Are you looking for a quick and easy tutorial for the WordPress block editor?
Whether you’re completely new to WordPress or you’re transitioning from the classic editor to the block editor, we’ve got you covered.
In this article, we’ll go over everything you need to start using the WordPress blog editor. You’ll learn how to use blocks, how to navigate the block editor interface, and how to customize pages to your exact specifications.
As an added bonus, we’ll also be covering the hands down easiest way to create full landing pages. If you need to build pages like sales pages, opt-in pages, and thank you pages, you won’t want to miss this.
Ready to dive in? Let’s go!
More...
What is the WordPress Block Editor?
Introduced in 2018 with WordPress 5.0, the WordPress block editor is a way to create customized layouts for WordPress pages and posts. The new block editor was designed to give users more flexibility and control over their site’s content than the previous WordPress editor, now referred to as the classic editor.
The Basics of Building a Page with the Block Editor
If you're new to WordPress and you go to build your first page, you're going to find it a bit bewildering. What you're likely to see is what we call the block editor, which is the built-in way of building pages, but it's not the most intuitive.
We've put together a guide on all the key elements you'll encounter when trying to create your first page with the block editor, but we will warn you if you're trying to build something complicated, then you might find it tricky.
Remember, if you're struggling with anything (and the block editor can definitely be frustrating), there are much more efficient ways of building your site.
So, explore the block editor and see if it's something you can work with, but if not, keeping reading to find a much more effective way to build your pages (and the rest of your website).
An Introduction to Blocks
At the heart of the WordPress Block Editor are the blocks themselves. You can think of each block as an individual element, with its own unique settings and customization options. For example, there are blocks for paragraphs, lists, images, buttons, columns, and more.

The beauty of using blocks is that customization is like a walk in the park. Each block has it's own appearance settings, easily accessible via the block editor interface.
This system makes creating layouts and customizing individual elements much easier and faster than with the classic editor.
Block Editor vs Classic Editor
The classic editor had been the standard content editor for WordPress for many years. Functioning much like a traditional word processor, the classic editor allows users to easily build pages with simple elements such as text, images, and tables. However, elements like buttons require custom HTML or a third party plugin.
With the introduction of the block editor, users now have access to an array of elements, and can more easily build intricate layouts.
Let's break down more key differences between the block editor and the classic editor:
1. Content Creation:
- Classic Editor: Operates more like traditional word processors. Content is added in a linear, top-down manner.
- Block Editor: Emphasizes a modular approach to content creation. Each piece of content, whether it's a paragraph, image, list, or quote, is added as an individual "block". Blocks can be rearranged by dragging and dropping, and are styled independently.
2. Layout Flexibility:
- Classic Editor: Standard formatting tools allow for simple layouts. Complex layouts require shortcodes, custom HTML, or additional plugins.
- Block Editor: Offers much more flexibility out of the box. Columns, spacers, and other layout tools are built in. Blocks can be moved around to achieve intricate layouts.
3. Media:
- Classic Editor: Integrates media via the "Add Media" button. Embeds like videos or tweets are accomplished by pasting in a URL or using embed code. No built-in customization options.
- Block Editor: Has dedicated blocks for various types of media and embeds, making it more intuitive to add and customize images, video, and other elements. The block editor also offers design styles and appearance customization.
4. Customization:
- Classic Editor: Must use plugins or custom code for added functionality or styling.
- Block Editor: Comes with built-in customization options for each block. Developers can create custom blocks to further extend the editor's capabilities.
While the classic editor served audiences well, the block editor has modernized the WordPress content creation experience. With the block editor, it’s now easier than ever for users to build complex, media-rich pages and posts, and without needing additional plugins.
The Block Editor Interface
Before using the block editor, it might be helpful to take a tour of the block editor interface and get the lay of the land.
To access it, simply begin a new page or post on your website. `
Overview of the Block Editor Window
The WordPress block editor interface consists of 4 main areas:
- The sidebar
- The toolbar
- The content area
- The block inserter
Let’s go over each of these in turn.
The Sidebar
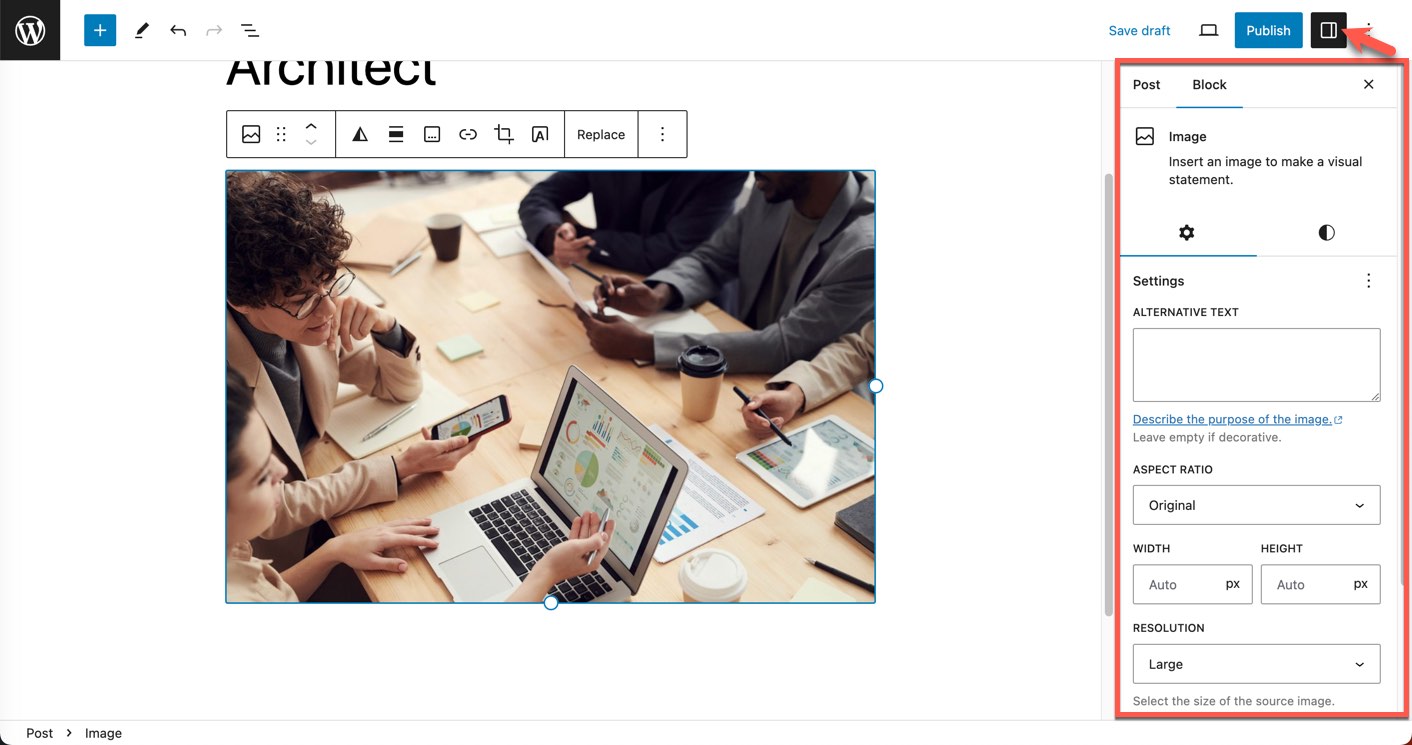
The sidebar, located on the right side of the screen, can be revealed and hidden by clicking the Settings icon. The sidebar contains page settings and settings relevant to a particular block when the block is selected. When you click on an individual block, this sidebar will dynamically change to display settings and controls specific to that block type.
The Toolbar

Located at the top of the block editor, the toolbar provides quick access to the block inserter, controls for undo and redo, and content structure.
Additionally, when you select a block, a contextual toolbar will appear either above or near it, offering additional options. For instance, text-based blocks will show formatting options like bold, italic, and alignment in the contextual toolbar.
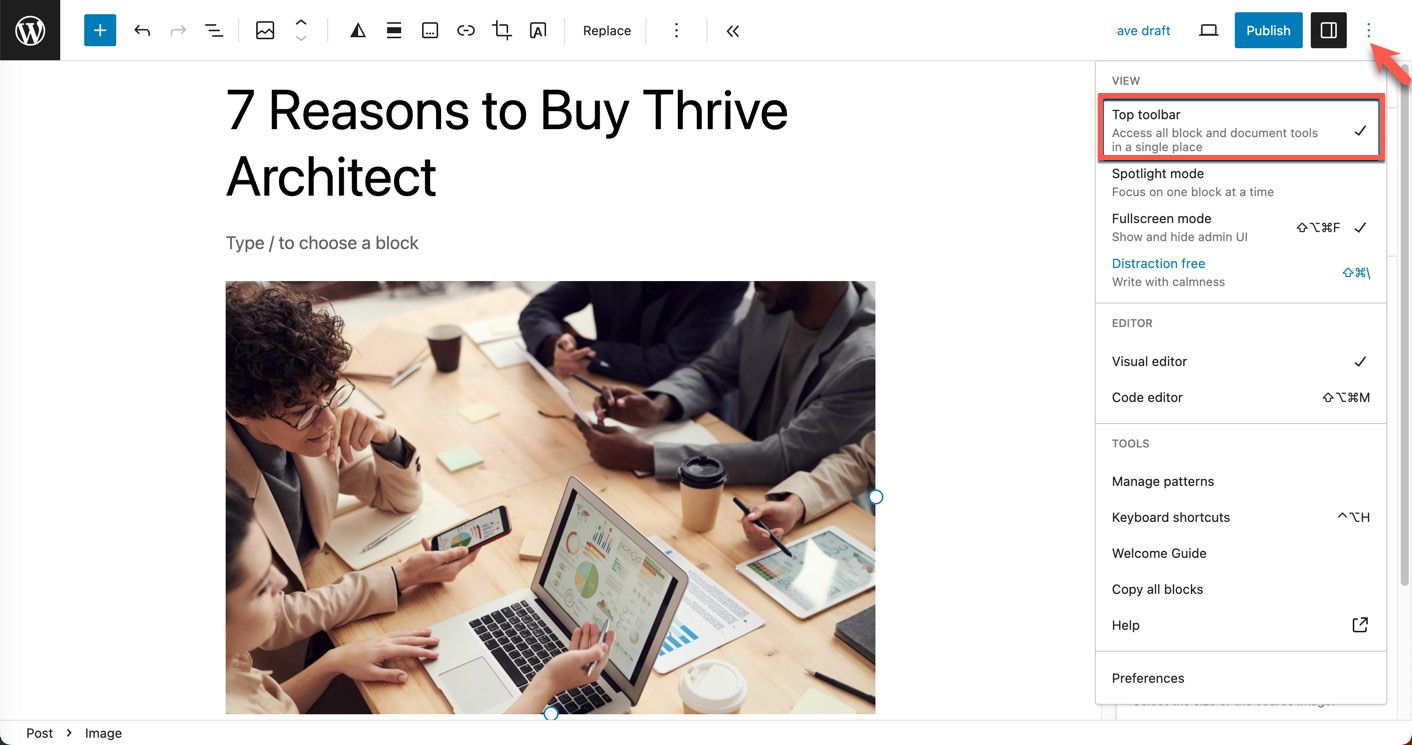
If the contextual toolbar gets in your way as you work, you can ‘stick’ the contextual toolbar to the top of the page by clicking the three dots in the upper right of the page, and enable the Top Toolbar option.
The Content Area

This is the primary workspace in the block editor. The content area is where you add, edit, and arrange blocks. It gives you a live preview of how your content will appear to your audience.
The Block Inserter
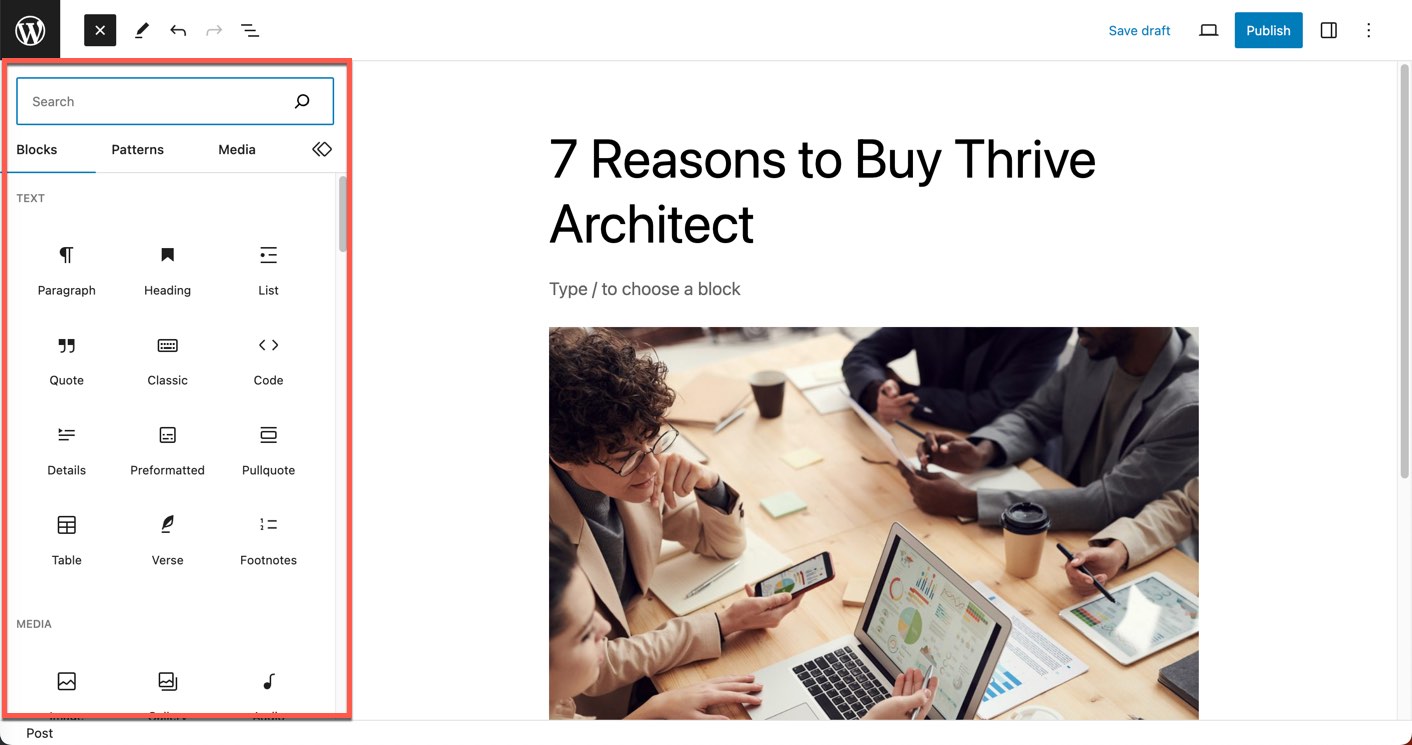
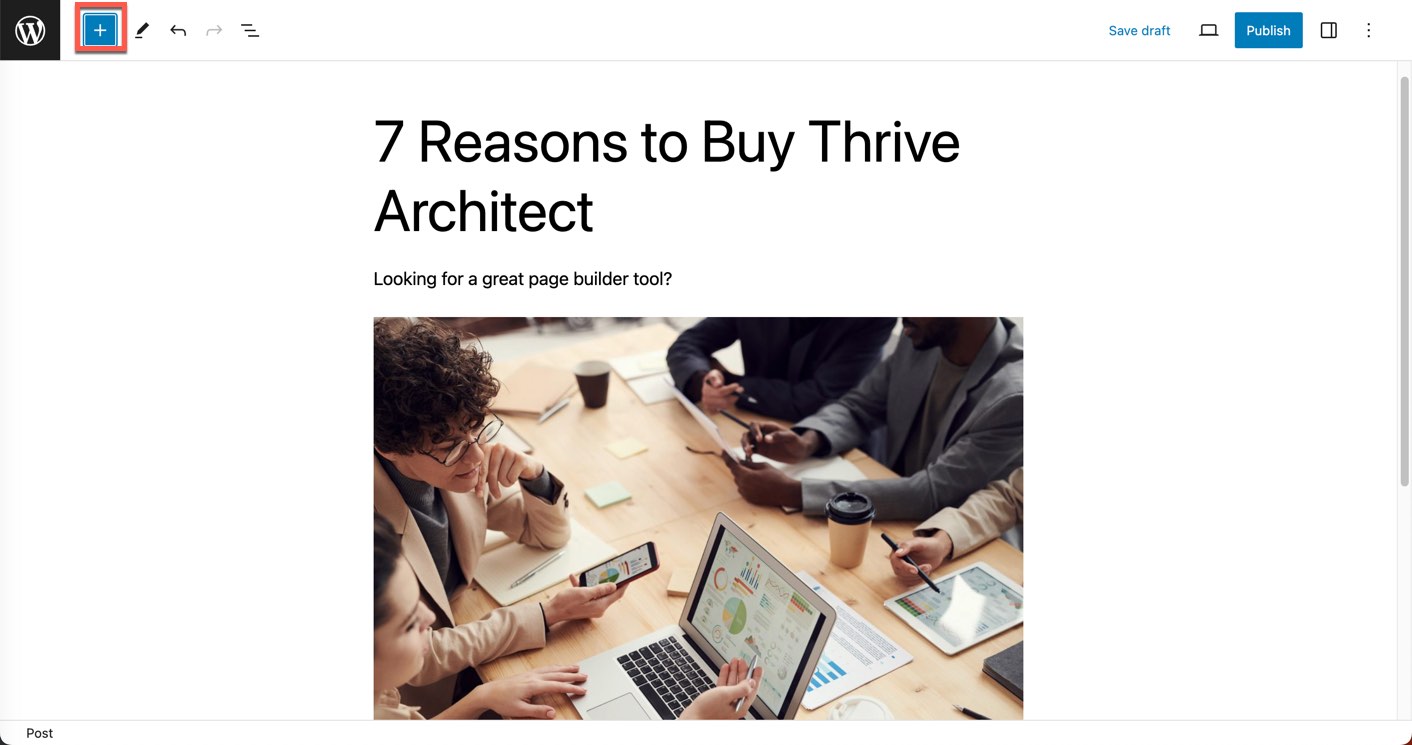
The block inserter is your toolbox of available blocks. Clicking the plus sign in the upper left corner will reveal and hide the block inserter window.
The block inserter contains blocks for text, media, design, widgets, and more. You can browse through these categories or use the search bar to find a specific block quickly. Once you've found the block you want to use, clicking on it will place the block in the content area.
Different Types of Blocks Available in the Editor
The block editor contains a large array of block types. To get acquainted with the blocks inside of the WordPress block editor, let's go over some of the most commonly used blocks:
1. Text Blocks:
- Paragraph: This block allows you to add plain text and format it.
- Heading: Essential for creating structured content, the heading block offers levels from H1 to H6.
- List: Used for unordered (bullets) or ordered (numbers) lists.
- Quote: Perfect for highlighting quotations or testimonials with emphasized styles.
2. Media Blocks:
- Image: Insert and format single images. Options include alignment, linking, and captions.
- Gallery: Display multiple images in a grid or column format.
- Video: Embed a video file or use an external URL.
- Audio: Share audio files like podcasts or music tracks.
- Cover: An image or video with overlaid text. This block is useful for headers or highlighted sections.
3. Design Blocks:
- Separator: Insert a line to divide sections or content visually.
- Spacer: Add adjustable space between blocks to manage vertical distance.
- Columns: Create multi-column layouts for more complex designs.
- Group: Combine multiple blocks into a single group, which can be styled as a single unit.
4. Widgets:
- Latest Posts: Display a list or grid of your most recent posts.
- Social Icons: Add clickable icons linked to your social media profiles.
- Shortcodes: Incorporate functionality from plugins or themes using their provided shortcodes.
5. Embeds:
- YouTube: Embed videos from YouTube by pasting the video URL.
- Twitter: Showcase tweets directly in your content.
- Instagram: Share photos and posts from Instagram accounts.
- Spotify: Embed playlists, songs, or podcasts from Spotify.
- ...and many more: The block editor supports a wide range of embeds from various platforms.
This list merely scratches the surface of functionality offered by the block editor. By grouping or nesting multiple blocks you can create a multitude of truly unique layouts.
How to Add, Delete, and Rearrange Blocks
Now that you're familiar with what kinds of blocks are offered inside of the WordPress block editor, let's go over how to use them. The WordPress block editor makes it super easy to add, delete, and rearrange blocks. Here’s how to do it:
Adding Blocks
To view the list of available blocks, simply click on the "+" button located at the top left of the editor. Scroll down the list to find your desired block, or use the search bar. Clicking on a block will add it to the content area, ready for customization.
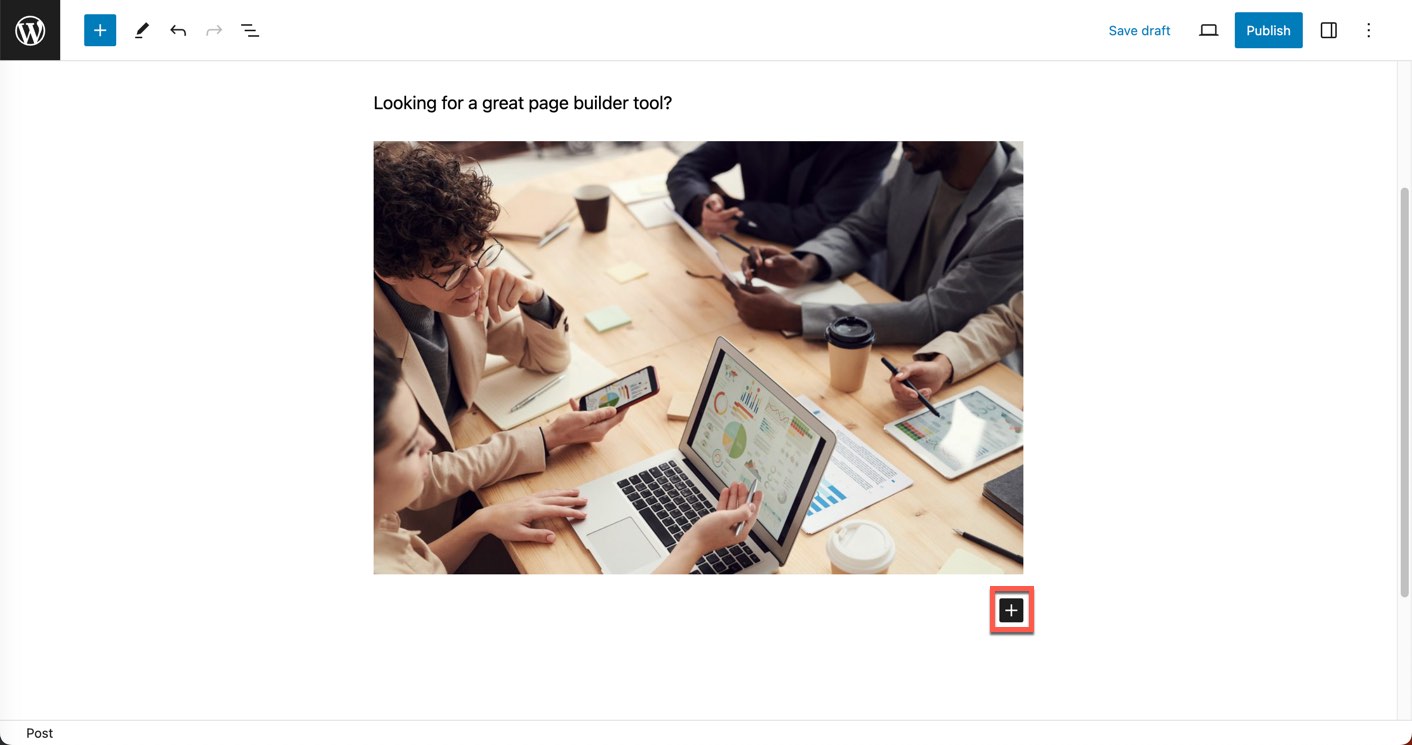
Alternatively, clicking the “+” button in the content area will call up a list of recently used blocks and a search bar.
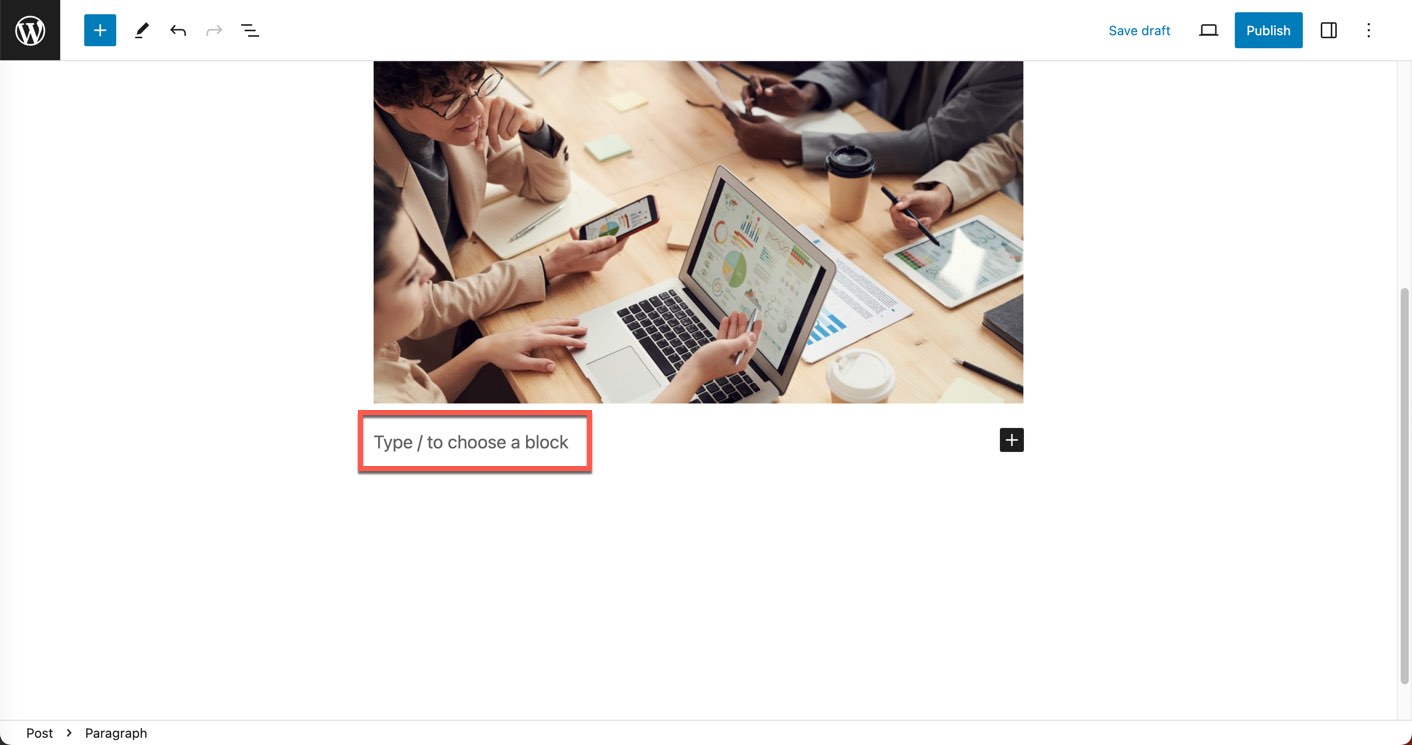
Once you’re familiar with block names, you can search for blocks by name using the prompt in the content area. Start by typing “/” followed by the name of the block.
Deleting Blocks
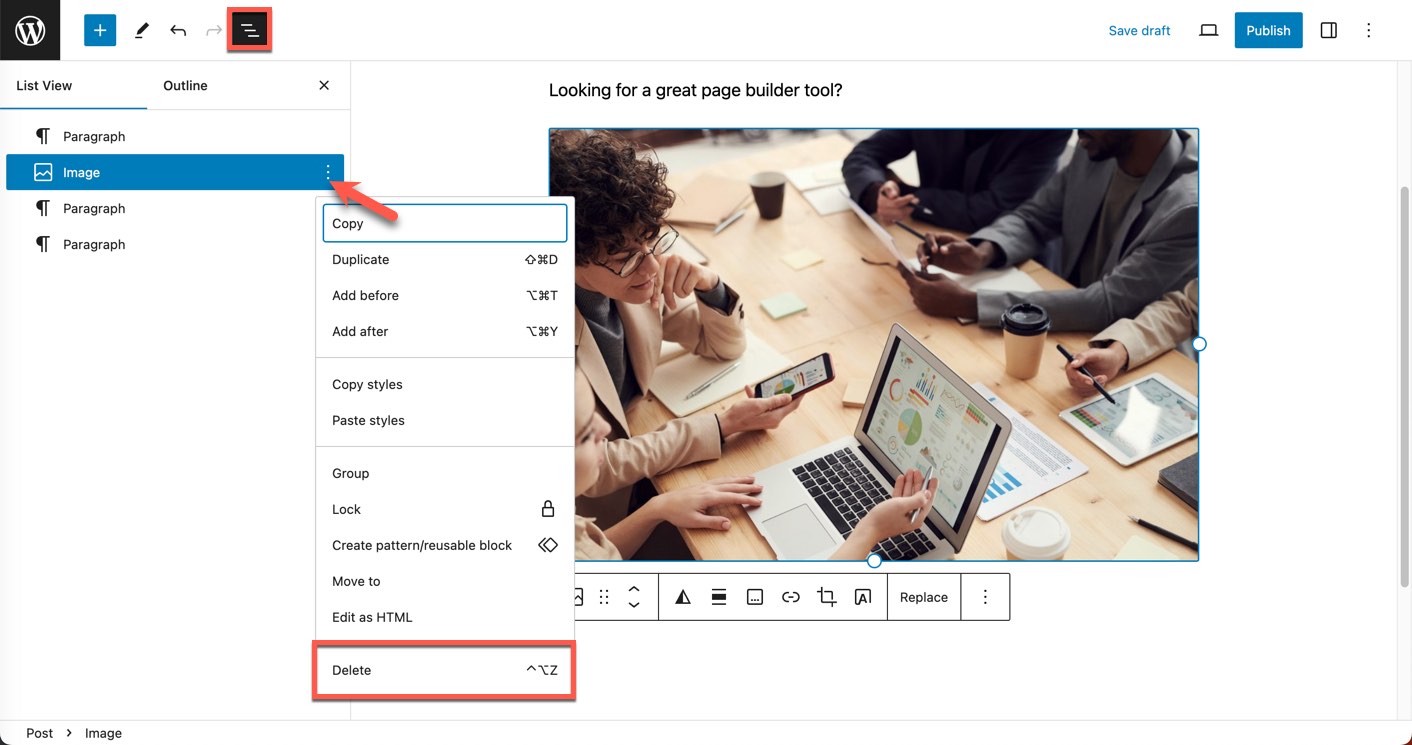
To remove a block, click on the block you wish to delete, click the three dot option in the toolbar, and click Delete.
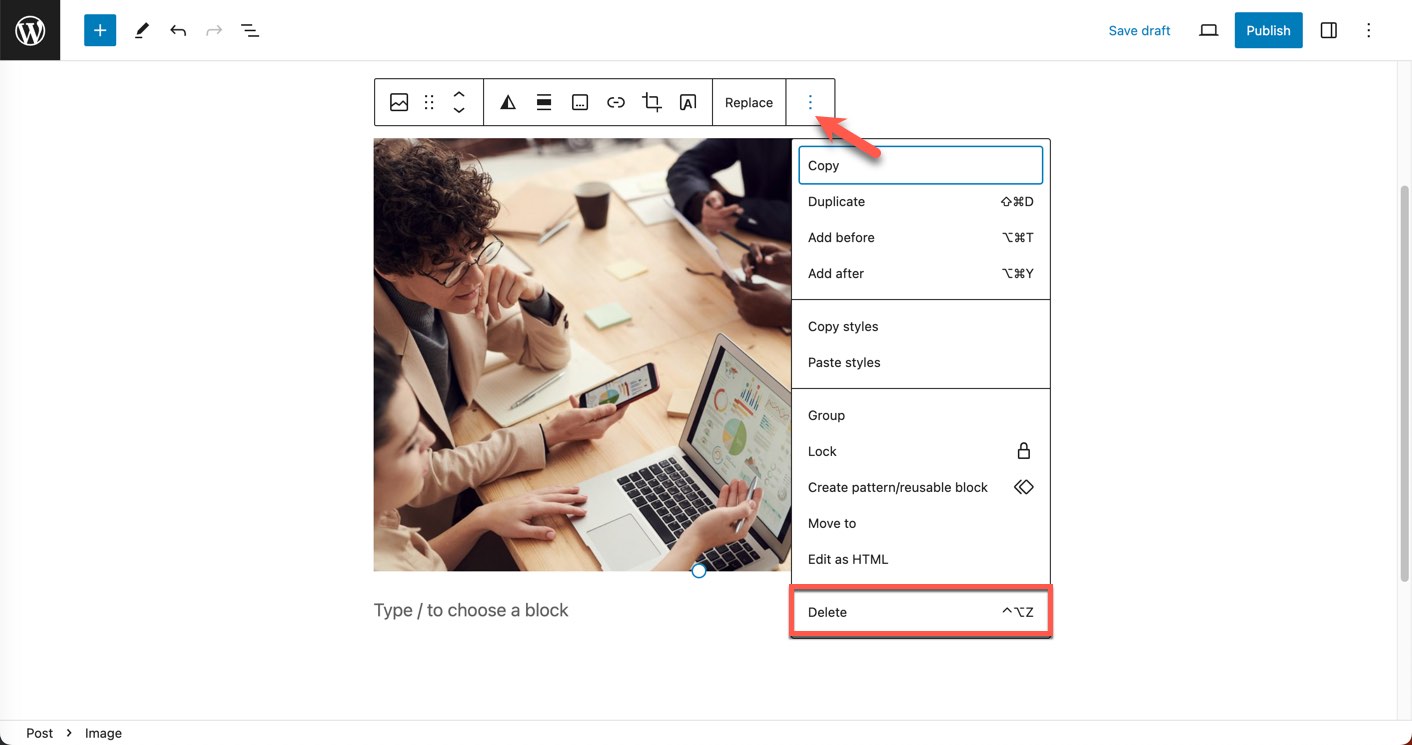
Alternatively, open the Document Overview, locate the particular block you wish to delete in the List View, click the three dots option, and click Delete.
Rearranging Blocks
Dragging and dropping is the easiest method to rearrange your blocks. In the contextual toolbar, click and hold the six-dot handle icon on the block you wish to move, drag it to its new location, and then release.
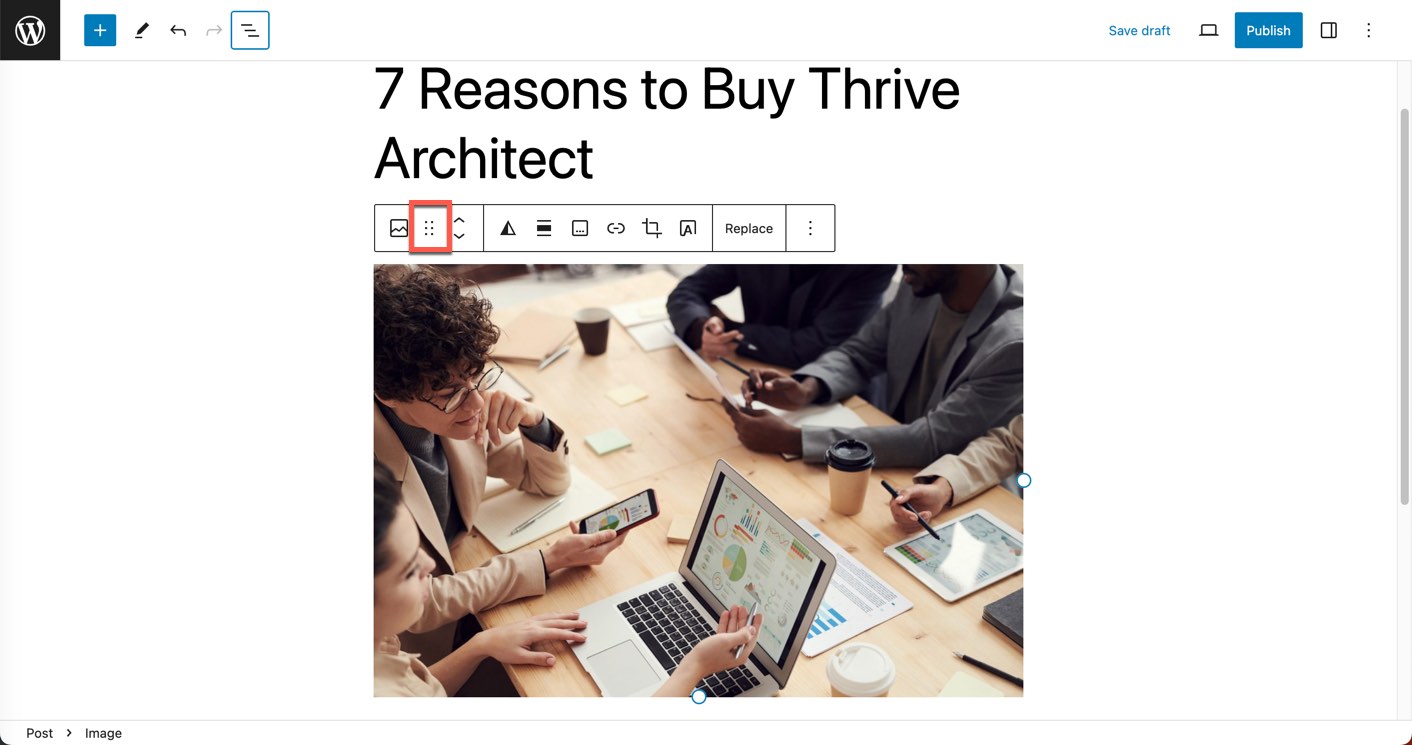
If the Top Toolbar option has been enabled, you can use the Up and Down arrows to move a block to its new location.

Easy, right? Now let's move on to customization.
Customizing Blocks
The Block Editor in WordPress allows creators to tailor each block to their own unique vision. Whether you’re a seasoned designer or a blogging novice, you can take advantage of the block editor’s customization options.
1. Elevating Typography:
Gone are the days of just bold and italics. Adjust font weights, introduce custom font sizes, or even change the text color to suit your design aesthetics.
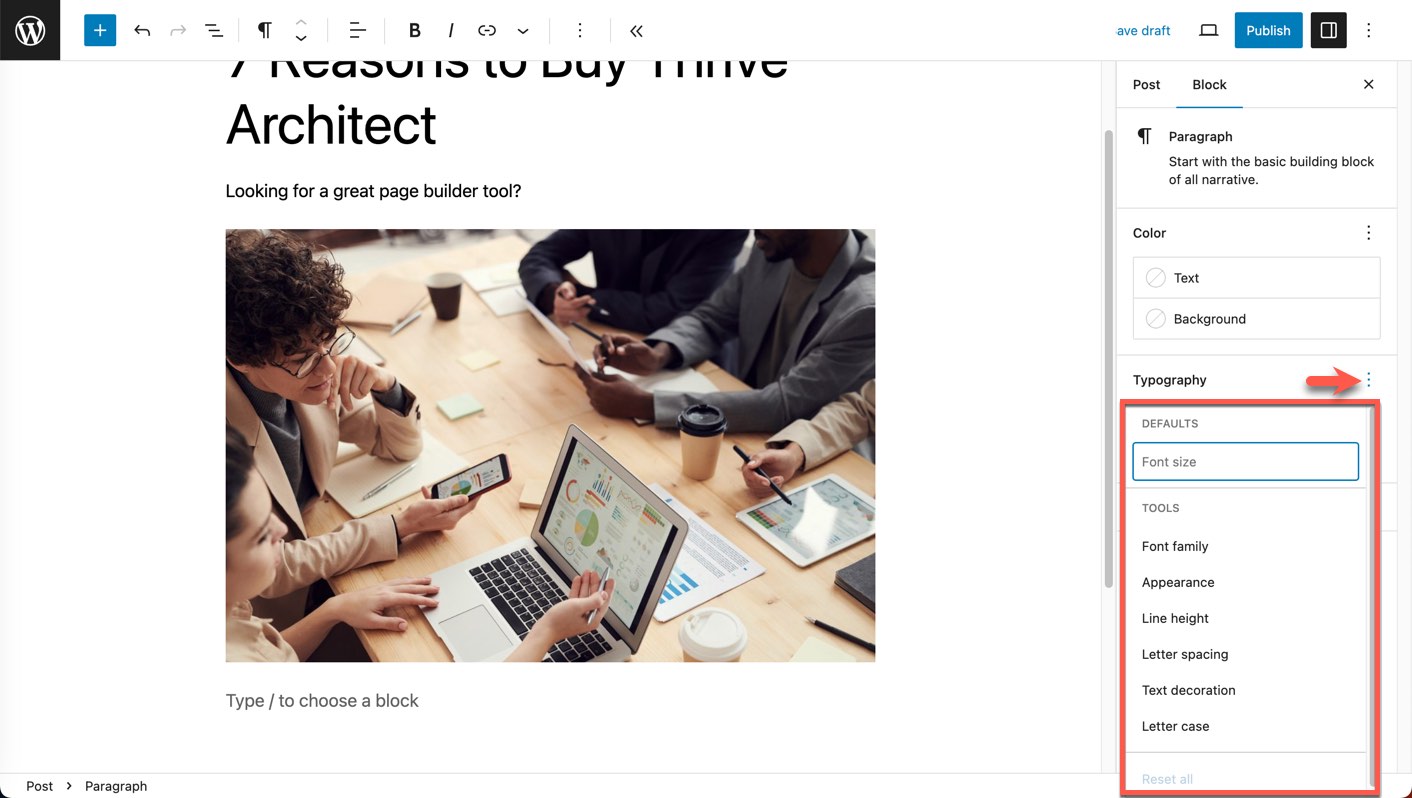
To access additional typography options, select a text block, then navigate to Block settings. Click the three dots next to Typography, and select the options you would like to add to the Block settings panel.
2. Visual Storytelling through Media:
A picture speaks a thousand words, and with the block editor, your visual content can narrate entire tales. Here's two ways to level up your visual storytelling:
Image Galleries: Create stunning image collages, try duotone filters, and set the aspect ratio for a cohesive look.
Video Backgrounds: Why limit videos to just embeds? Use them as captivating backgrounds for sections to give your content a dynamic edge.
To create a video background, add the Cover block to your page, and then upload a video to be used as a background. Add other blocks on top of the background image, such as text, buttons, or quotes.
3. Building Complex Layouts:
The block editor lets you do so much more than the old linear design of the classic editor. Here's a few of the highlights:
Columned Designs: Split your content area into multiple columns, each capable of holding various blocks, creating magazine-esque layouts.
Grouping: The grouping feature allows you treat multiple blocks as a single unit, and style them together.
Saving groups as patterns: This provides an easy way to use the same design across multiple posts.
Now that you have some ideas for customizing individual blocks, consider this: How long would it take you to build an entire page from scratch using the WordPress block editor?
The Most Efficient Way to Build a WordPress Page (and Website)
While the WordPress block editor offers several handy tools, they aren't ideal for creating full pages like sales pages, opt-in pages, and webinar sign-up pages.
For anybody without coding skills and limited design knowledge, the block editor is tough because it's hard to picture what the site will look like as you're building it. That's why many people try the block editor, but ultimately they end up using a drag-and-drop, visual page builder (here are some of the best page builder options).
Building a website is no longer reserved for people with tech skills, and it's largely down to page builders like Thrive Architect.
When you use a page builder like Thrive Architect, it's like you have a team of world class designers and developers behind you who have already done a lot of the hard work. Then it's just up to you to add the finishing touches.
This is going to save you a ton of time vs the block editor, but it's also going to give you much better results.
Let's look at some of the key Thrive Architect features you will benefit from.
Landing Page Templates
Thrive Architect was built from the ground up for entrepreneurs and business owners who don't want to waste time fiddling with software, and who do want to spend time increasing conversions.
That's why Thrive Architect comes with over 350 landing page templates, for everything from collecting email list signups to selling digital products, to delivering lead magnets.
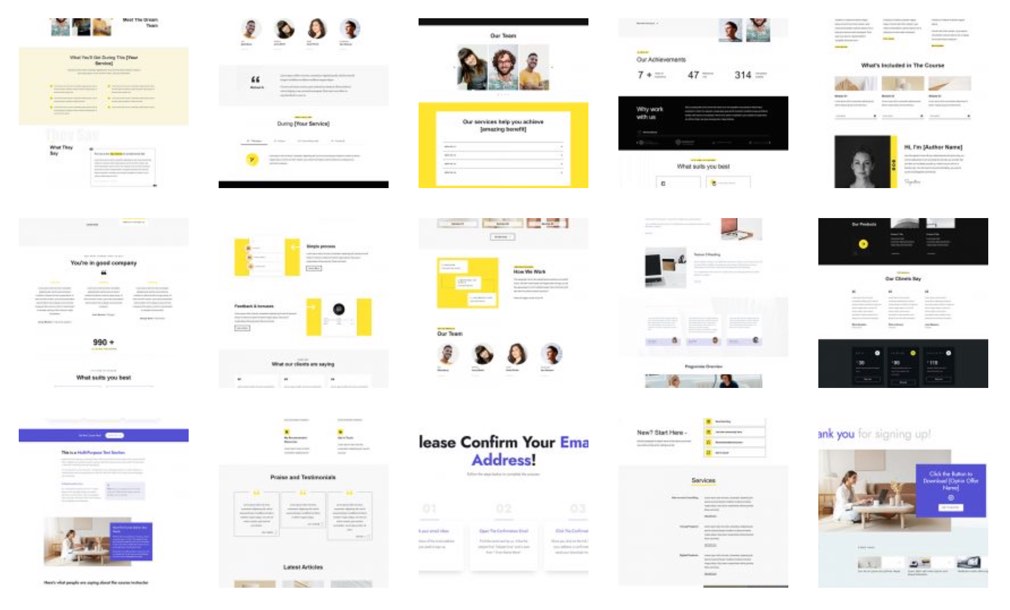
To use a landing page template, all you have to do is browse the template library, choose a template, customize it, and you're ready to go!
And, with features like smart color technology and a clever typography editor, customizing an entire page to match your branding takes only a few clicks.
Thrive Architect Blocks
Thrive Architect also comes with over 800 block templates. With a slightly different meaning than WordPress blocks, Thrive Architect blocks are pre-designed page sections.
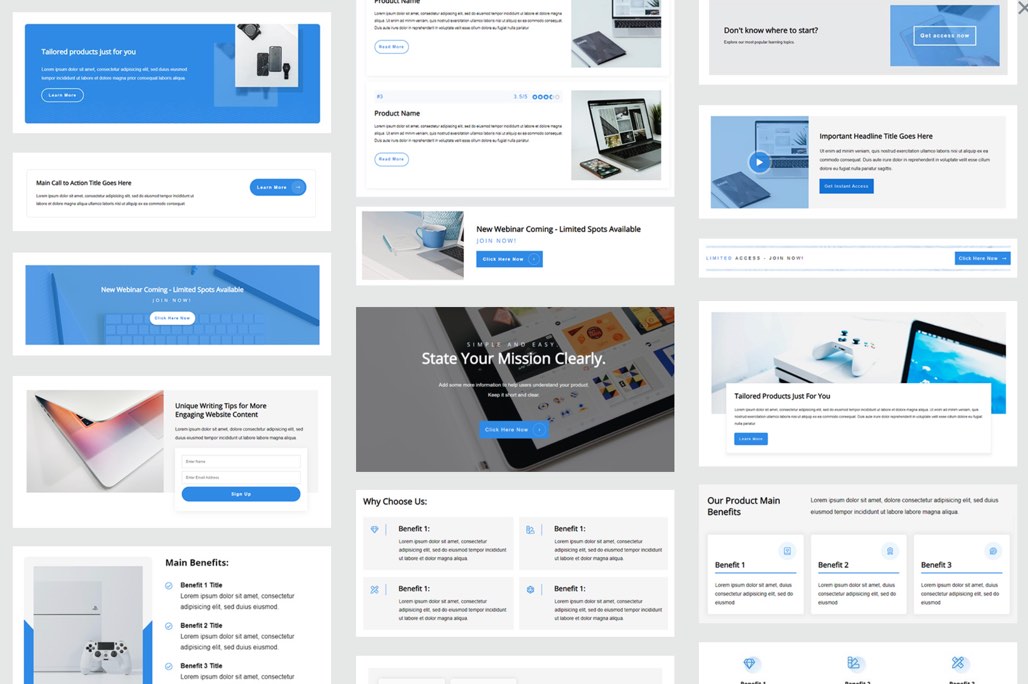
Need a hero section with an image and a call-to-action button? Or a testimonial section with perfectly formatted quotes? Or a team section featuring a photo gallery of all your team members?
Simply add a Thrive Architect block to your page, peruse the pre-made designs, and make your selection. After replacing the templated text and images with your own, you're good to go!
WordPress Block Editor vs Thrive Architect
Now that you’ve heard about the WordPress block editor and Thrive Architect, you might be wondering: Which one is right for you?
Let’s do a quick comparison to see how they stack up against each other:
WordPress Block Editor
- Simple: The block editor is a step above the classic editor. Easily add content blocks like images, paragraphs, and headings.
- Customization Options: The block editor comes with some customization options for individual blocks.
- Core Integration: Being a native part of WordPress, the Block Editor ensures compatibility and smooth performance without relying on external plugins.
Thrive Architect:
- Professionally-Designed Templates: One of the most useful features of Thrive Architect is its library of landing page templates and blocks. Catering to a variety of business objectives from product launches to lead generation, you can build an entire business website in mere minutes.
- Conversion-Focused Elements: Thrive Architect offers a plethora of conversion-optimized tools. Whether it's strategically placed call-to-action buttons, testimonial carousels, or countdown timers, each element was designed to help you boost user engagement and conversions.
- High Customizability: While the block editor offers some customization, Thrive Architect provides extensive control over every aspect of design, from margins and padding to impressive hover effects.
- More Functionality: Thrive Architect comes with built-in features like lead generation forms, countdown timers, testimonials, and guarantee boxes. To get this same functionality in the WordPress editor, you would need additional plugins and tools.
While the WordPress block editor might suffice for a very basic website, if you’re serious about building an online business then we recommend Thrive Architect. Perhaps the biggest edge Thrive Architect has is its conversion focus. Every element, block, and template is optimized for conversions, making Thrive Architect the perfect choice for marketers and business owners.
Check out pricing for Thrive Architect
FAQs about the WordPress Block Editor
1. Is the WordPress Block Editor the same as Gutenberg?
Yes, the WordPress Block Editor and Gutenberg refer to the same editor. "Gutenberg" was the code name for the project while it was in development. Although the official name is the WordPress Block Editor, many people still refer to it as Gutenberg.
2. Can I still use the classic editor with the latest WordPress versions?
Yes! If you prefer the classic editor over the block editor, WordPress provides a Classic Editor plugin that will let you use the previous (“classic”) editor in place of the block editor. To install the Classic Editor plugin, navigate to Plugins > Add New, and search for the Classic Editor plugin. Then, simply follow the prompts to install and activate the plugin.
3. How do I get more blocks for the block editor?
While the block editor comes with a good selection of default blocks, you can expand your block collection by installing specific plugins that provide the functionality you need. Here are some popular plugins:
- Thrive Leads: Add high-converting email opt-ins to your site. Thrive Leads comes with templates for pop-ups, top ribbons, welcome mats, slide-ins, and more.
- Thrive Architect: Harness the power of a full-fledged page builder within the block editor. Thrive Architect works with most WordPress themes.
- Thrive Quiz Builder: Add some personality to your site with a fun quiz. Want to generate leads using quizzes? No problem!
- Thrive Ultimatum: Use scarcity marketing campaigns to drive up conversions. Add customizable countdown timers to your site.
- Thrive Ovation: Gather testimonials and reviews from your loyal fans. Then, display them in key areas of your site.
You can get all of these plugins and more at a fantastic value by purchasing Thrive Suite.
4. Are there any performance issues with the block editor?
Generally speaking, the block editor is optimized for performance. However, as with any tool, if you overload your posts or pages with an excessive number of blocks or complex customizations, it could impact load times or the editing experience.
Ready to Start Building Gorgeous Pages and Posts?
While WordPress Block Editor is a definite improvement over the classic editor, if you’re ready to build a serious business then you need a serious page building tool like Thrive Architect.
And if you ready to make even bigger strides toward achieving your conversion goals, consider upgrading to Thrive Suite. This comprehensive toolkit brings together all of our plugins, from our customizable quiz builder to our powerful learning management system and more.
Thrive Suite isn't just a smattering of tools; it's an all-in-one solution for entrepreneurs and business owners looking to elevate their online presence, drive engagement, and boost conversions. Plus, we provide tons of free resources to help you get started. Here’s a few to check out:
- Thrive Themes Review: Is It Really Worth It?
- How to Create a Clean, Conversion Focused WordPress Website
- How to Create a WordPress Landing Page?
- 7 Cool Features Thrive Architect Has (That Other Tools Don’t)
Now there’s just one thing left to do, get Thrive Suite today!


