Looking to learn how to create an opt-in form on WordPress that actually generates leads for your business?
This guide can help you achieve just that.
Opt-in forms may seem like a "small" part of your landing pages, but they play a big role in pushing your audience to convert.
With the wrong design, you could lose leads -- and we don't want that for you.
Building high-converting opt-in forms can be simple with the right guide and you have that right here.
Keep reading to learn a simple, step-by-step process for creating eye-catching opt-in forms that will turn more of your target audience into eager leads.
What Makes the “Perfect Opt-In Form”?
Creating the “perfect opt-in form” involves balancing simplicity, value, and timing.
Your opt-in form should be straightforward, with simple fields that ask for only the information you need – to reduce friction and make the sign-up process as easy as possible.
A good opt-in form must also clearly communicate the value of what new subscribers will receive, whether it's a freebie (like a free ebook), coupon, exclusive content upgrade (e.g. a members-only webinar), or regular updates, so they understand exactly what's in it for them.

Last, but not least, your form’s design. This plays a major role in determining whether a site visitor will convert or not.
Your forms should catch the eye without being a distraction, seamlessly integrating into your site while still standing out enough to draw attention.
Now if you aren’t a design or marketing expert, the thought of putting all these requirements together to create a high-converting form might be overwhelming.
But it doesn’t have to be. With the right tool and guide, you can consistently create attractive forms that lead to more conversions. We’ll show you how.
How to Create a Great Email Opt-In Form for Your Landing Pages (Step-By-Step)
The best way to create a great opt-in form for your WordPress site is with a plugin that offers customizable templates and advanced targeting features to help you build with ease.
Yes, there are a number of powerful WordPress plugins to choose from, but our top recommendation is Thrive Leads — and you’ll learn why.
This WordPress tutorial shows you how to create an easy, eye-grabbing opt-in form with Thrive Leads, one of the best WordPress lead-gen form plugins available.
Step 1: Download and Install Thrive Leads
Thrive Leads is your number one choice if you're looking to create opt-in forms to convince your audience to convert.
First off, you're going to love how easy it is to use. With its drag-and-drop functionality, designing custom forms is a breeze, even for beginner WordPress website owners. No need to try figure out HTML or CSS.
This tool is all about making things simple and efficient for you. And with a variety of templates (450+ to be exact) that are not just eye-catching but conversion-optimized, you're set to capture your audience's attention.
What's really cool about Thrive Leads is the way it lets you get specific with who sees your forms and popups.
You can tailor your content based on what your visitors are into, where they came from (e.g. a social media post), and more. This means you can make your content super relevant to each visitor, increasing the chances they'll engage with it.
In terms of integrations, you can easily connect this plugin with your favorite email marketing services and marketing automation tools.
This means you can manage your new leads easily and effectively. Plus, the plugin’s detailed analytics engine helps you keep track of how your forms are performing, giving you the insights you need to keep improving.
We know how important it is for your content to look good on every device, which is why everything you create with Thrive Leads is mobile-responsive.
Giving you everything you need to create high-converting opt-in forms and land more email subscribers.
Step 2: Create a Segment for Your Form (Lead Group)
To build a new opt-in form for your pages or posts, you’ll need to create a new Lead Group.
What is a Lead Group?
A Lead Group in Thrive Leads is a way to manage and organize your email sign-up forms.
You can decide when and where each form should show up for your visitors, making it easier to get more people to sign up. It helps you organize your forms neatly and use them smartly to grow your email list.
First, access your WordPress dashboard, navigate to the "Thrive Dashboard," and click on "Thrive Leads".
In the Thrive Leads dashboard, find the “Lead Groups” section and select “Add New”.
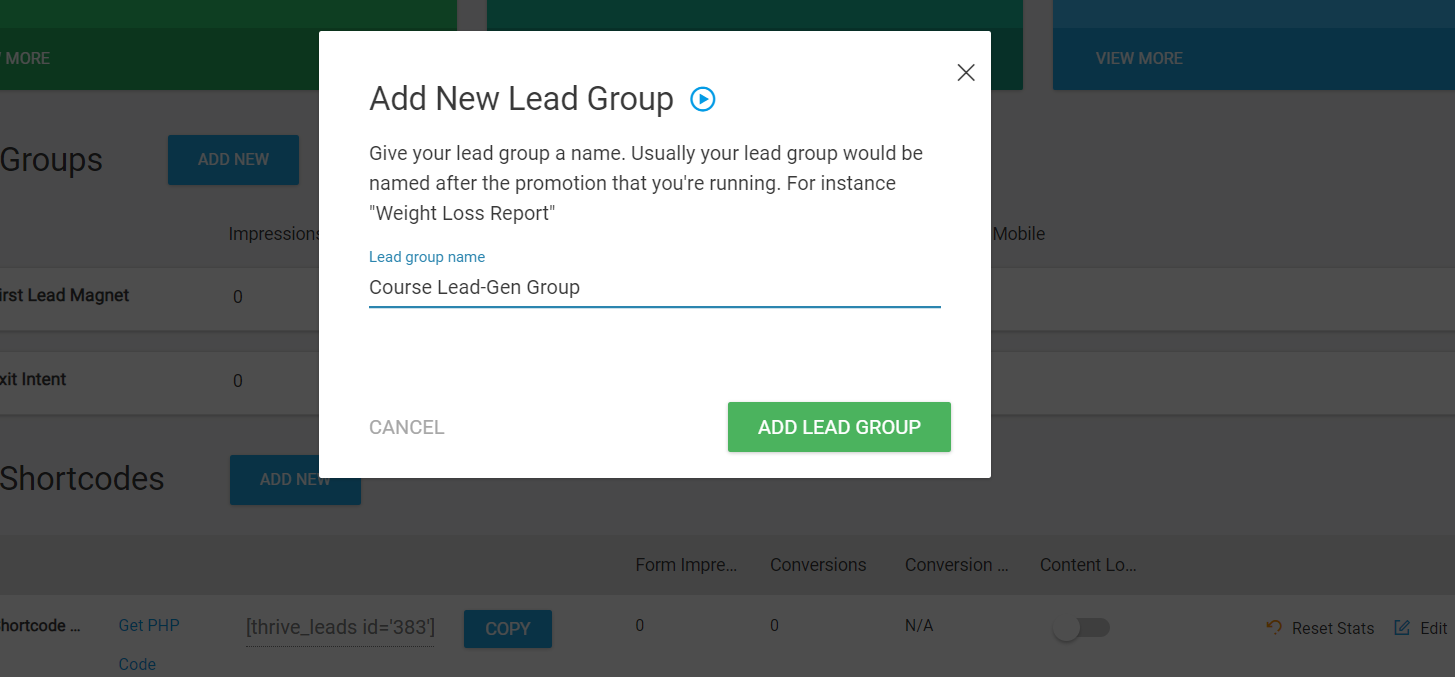
A popup will appear, asking you to name it. Give your shortcode a simple name and click the “Add Lead Group” button.
Next, click the “Edit” button in your Thrive Leads Dashboard. Now it’s time to design and customize your opt-in form.
Step 3: Create Your Opt-In Form
Next, you’ll need to choose the type of form to build. Click on your newly created Lead Group and click the “Add New Type of Opt-In Form”.

A new pop-up window will open where you will have to select the type of opt-in form you want to create. You have multiple form types to choose from — inline, widgets, sidebar, and more.
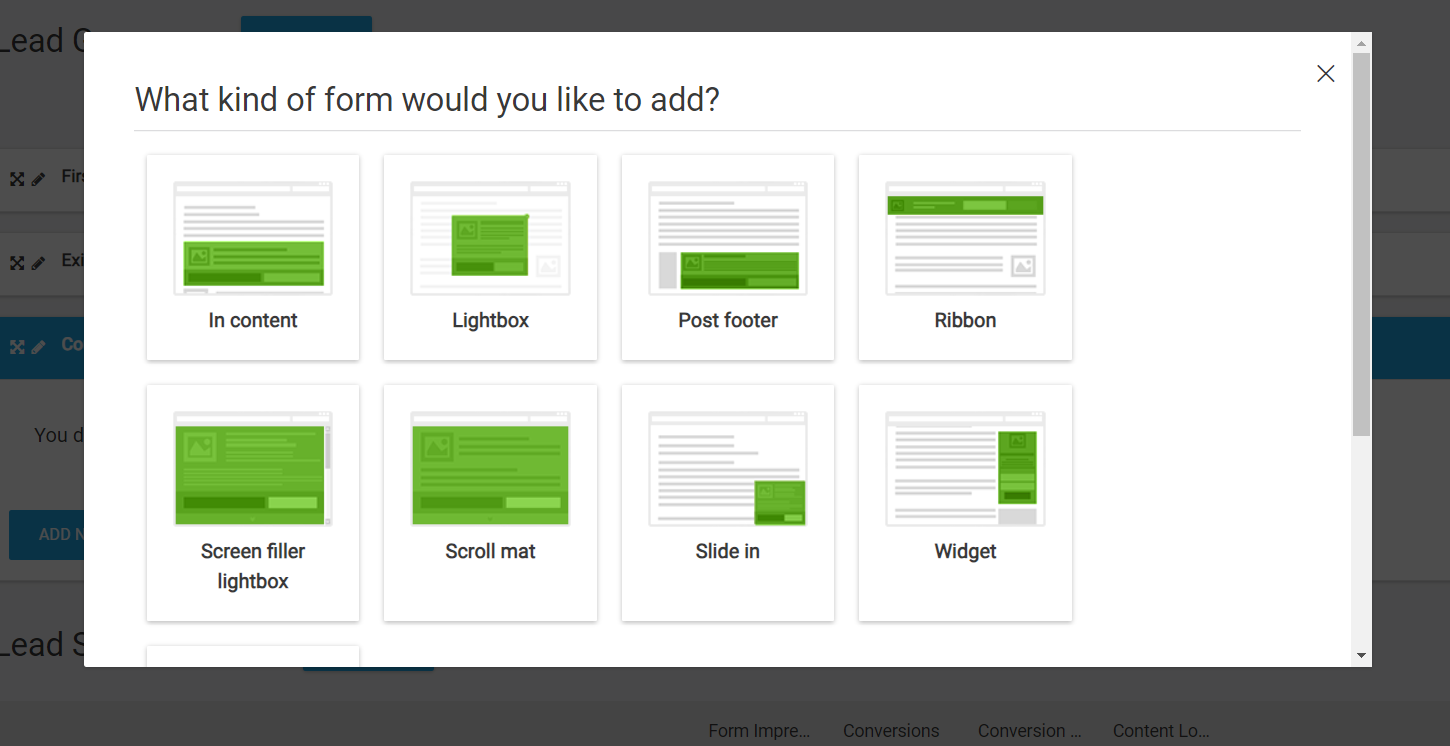
Select the form type of your choice.
After you’ve created your form type, you need to add an actual form to it.
Click the "Add" option – which can be found – on the right of the form type you have just created
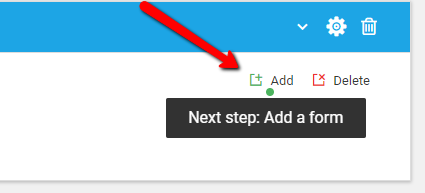
In the next screen, click the blue “Create Form” button, give it a name, and click the green “Create Form” button.

On the right side of your newly created form, you’ll see several icons. Click the blue icon – the edit button – to choose a design.

Scroll through our library of professionally designed templates until you find the perfect one for your offer.

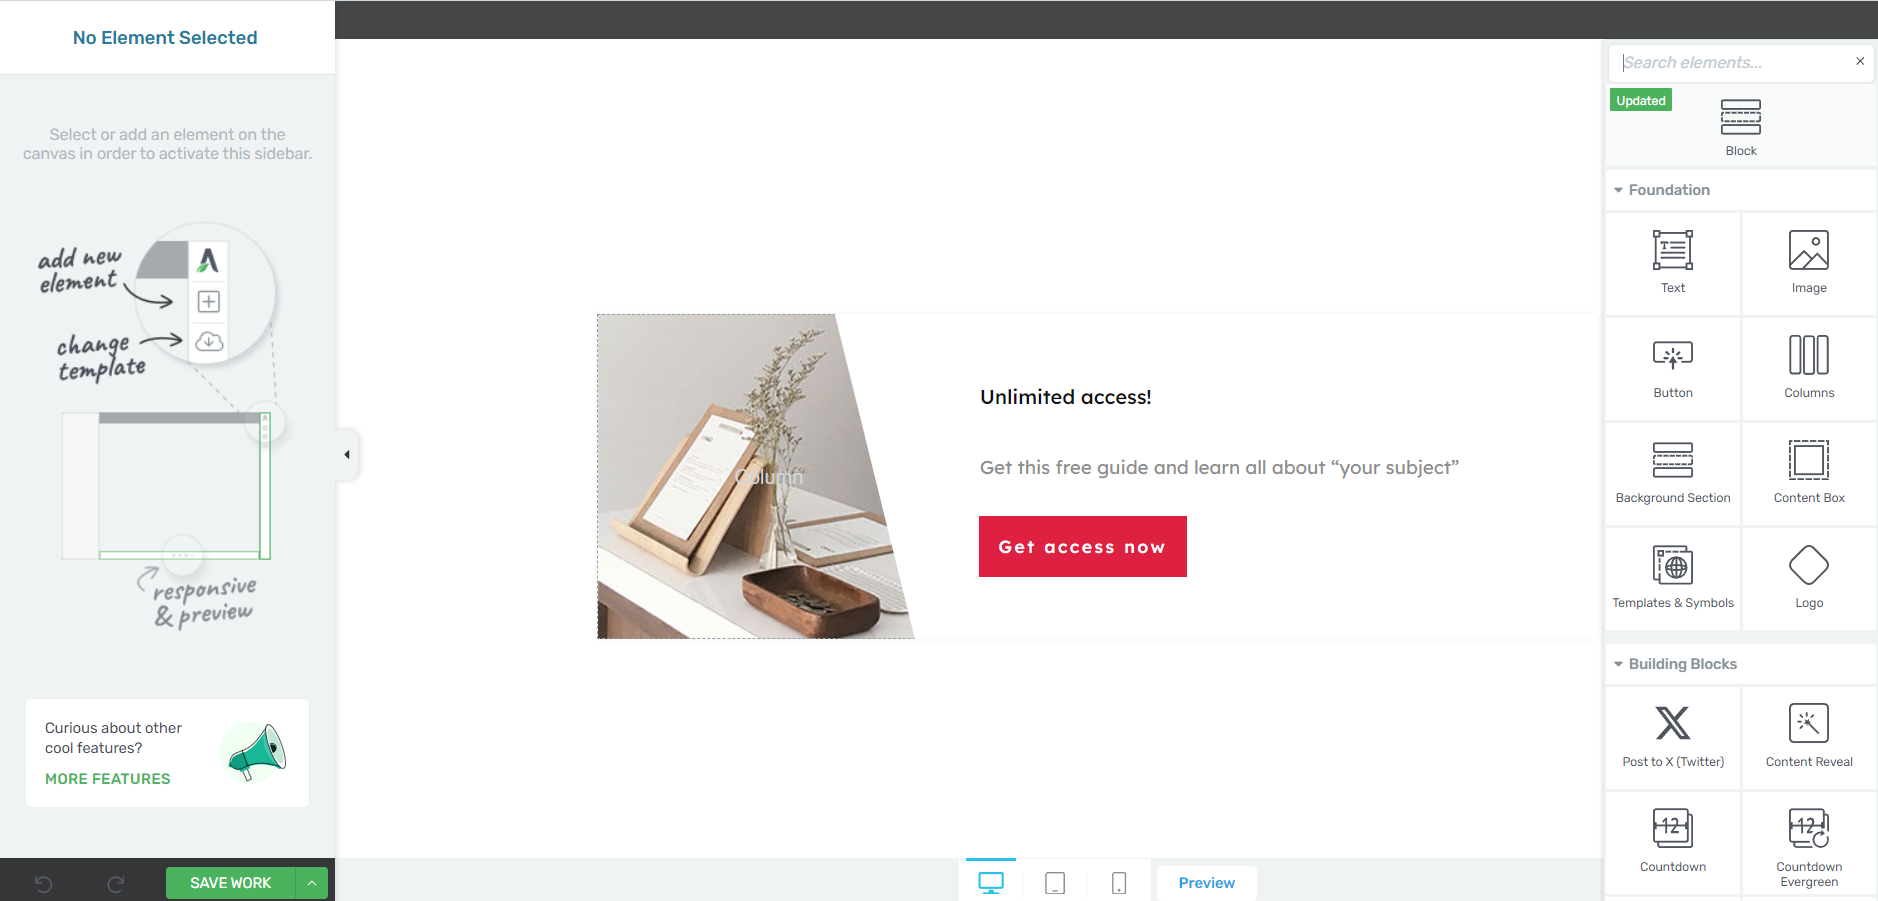
Once you've selected a template, the Thrive Visual Editor will open, allowing you to customize your form.
Step 4: Customize Your Opt-In Form Template
Once you've selected a template, the Thrive Visual Editor will open, allowing you to customize your form.

As you work on your form, make sure all of the following elements are included:
Bold, compelling headline to grab your audience’s attention and encourage them to keep reading.
A clear value proposition so potential leads know exactly what they’re signing up for
Minimal form fields that only request the important info you need (e.g. Name, email address, phone number)
Strong call-to-action with a CTA button that stands out and uses action-oriented language to encourage website visitors to click through and opt in.
A high-quality supporting visual (if it can fit) to support your form copy and help your audience visualize the benefits they will receive
Your forms also need to be responsive so that they can be easily viewed and filled in on mobile devices and desktops.
You don’t have to worry about manually configuring this when using Thrive Leads. Every form template is mobile-friendly right out of the box.
Step 5: Set Up Your Form Targeting
Thrive Leads lets you determine where and when your forms should be placed on your pages or posts. This is known as “Setting up form targeting rules”.
Once you have finished editing/customizing your opt-in form and you saved it, go back to its page in the Thrive Leads dashboard.

Here you will find other settings that you can apply to your forms, such as its trigger, its display frequency, and animation:
To set how you want the form to appear, i.e. what you would like to trigger its appearance, click on the text "Displays immediately on page load" from this option:
This will open up a pop-up window with the trigger settings. Click on the down arrow from the "Trigger" section to see every available setting:
In the drop-down that opens, you can select when the form should appear. Choose whichever trigger you prefer from the list:

Then, depending on which trigger you have chosen, there will be different settings you will have to complete. Once you have done that, click on the "Save" button from the pop-up window to apply the new trigger to your form.
Step 6: Configure Your Display Settings
Once you’ve created your form and saved it, head back to the main Thrive Leads dashboard and find your new form.
There will be a red cog, with an exclamation mark, on the right side of your form.

This is where you’ll set when and how you want your form to display on your site. No need to embed a shortcode or manually add the form to your pages or posts.
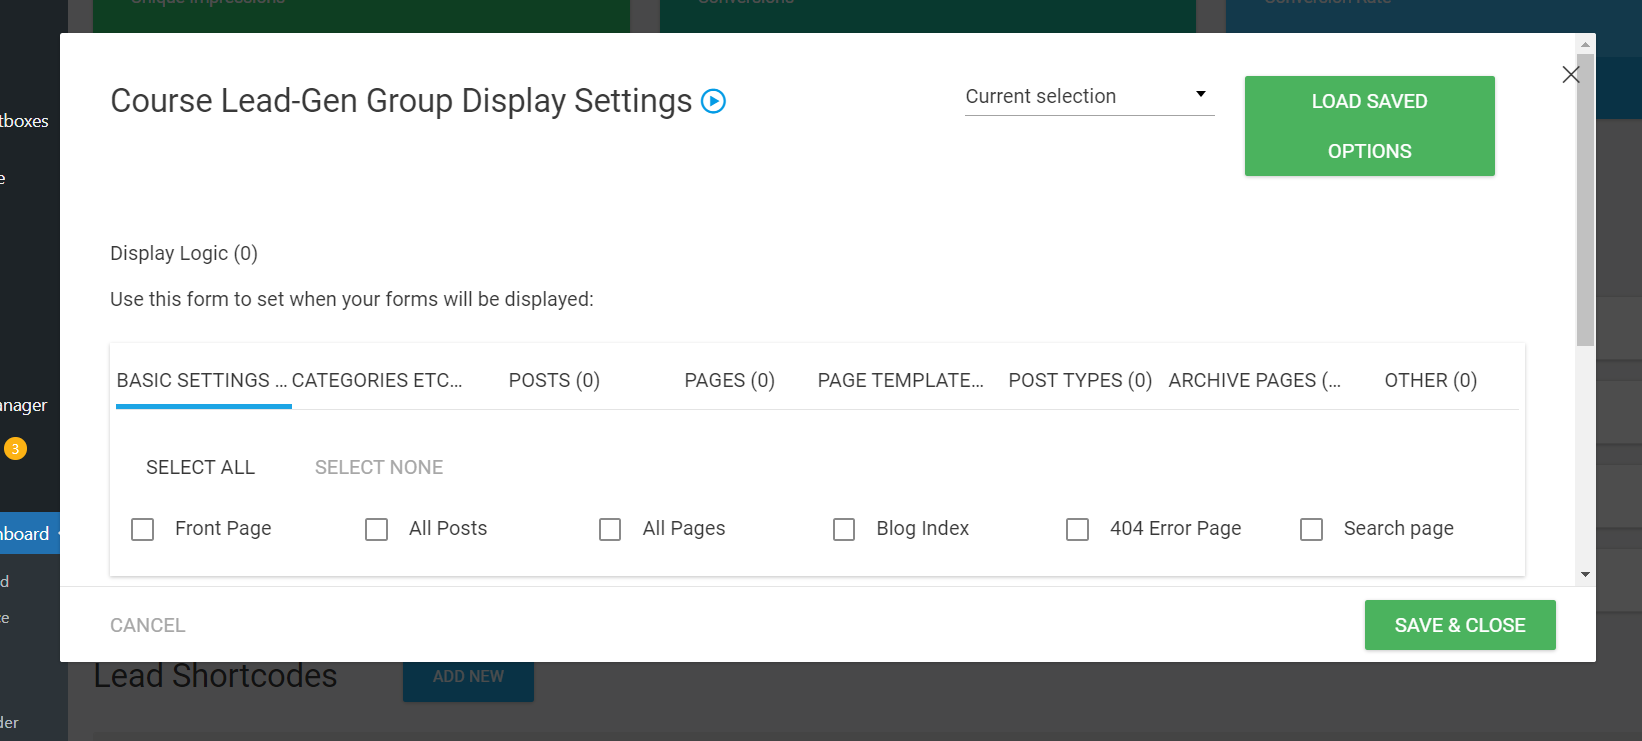
Simple tick the relevant checkboxes to indicate where you want your forms to appear.
It all gets taken care of right from your Thrive Leads dashboard.
Here, you can:
- Specify on which webpages, posts, categories, or custom post types the form should appear on your WordPress site. You can include or exclude specific pages (e.g. the homepage) or categories.
- Define rules based on visitor behavior, such as new vs. returning visitors, or based on referral source.
- Choose whether the form should be displayed on desktops, tablets, mobiles, or a combination of these.
- Set rules based on the amount of time a visitor has spent on your site before the form is shown.
- Enable the form to appear when it seems like the visitor is about to leave your site (this is mainly for popup forms).
Different options will appear, depending on the opt-in form type you’ve chosen.
This feature is useful for your business because it lets you have total control to show your sign-up forms to the right people at the right time, increasing the chances they'll sign up.
Step 7: Connect Your Form to an Email Service Provider
You'll need to configure your email provider so that a confirmation email lets them know their signup was successful.
This is different for every email provider, but a quick Google search should help you out.
Example: “How to create a confirmation email in MailChimp” — or ConvertKit, ActiveCampaign, etc.
Be sure to create a follow-up email sequence to engage your new leads and build a relationship with them.
Next Steps: Optimize Your Lead-Generation Strategy
Designing the right type of opt-in form is one step. There’s still more work to be done to convert more of your audience into leads.
The success of your opt-in forms also depends on ensuring you attract the right audience and guide them to see the value in your offer, convincing them to sign up.
Here are four more tutorials to help you optimize your forms for more conversions:
And if you’re looking for creative ways to drive your audience to convert, consider using online quizzes as lead magnets.
Quizzes are a fun and dynamic way to capture attention and increase engagement with potential customers.

You can use them to collect valuable insights about your audience's preferences and needs through their responses.
At the end of the quiz, you can guide these engaged leads further into your sales funnel, turning their interest into actionable conversions.
And with an easy-to-use plugin like Thrive Quiz Builder, you can create eye-catching, engaging quizzes with no hassle.
You can get Thrive Leads and Thrive Quiz Builder together, along with 8 other premium plugins when you purchase Thrive Suite, the ultimate WordPress plugin bundle for building a high-converting online business.
How to Create an Opt-In Form: Turn This Tutorial into Action
With this tutorial, you can rev up your lead-generation and gain more leads through your opt-in and contact forms.
And Thrive Leads helps you get this done fast and with ease. Our templates were built with conversion optimization in mind so you don’t have to spend hours trying to figure out the best design principles for your forms.
Whether you’re a blogger who wants to turn more readers into subscribers, or an eCommerce store owner who’s trying to get more leads in their funnels, Thrive Leads can help.
The best part? You can get this plugin for a really great price.
But don’t just take our word for it.
Get Thrive Leads and start turning more visitors into subscribers today.




Do your forms integrate with HighLevel?
Hey Jimmy!
We don’t have a direct integration with HighLevel (yet), but there is a way to do it with webhooks. This tutorial focuses on connecting Thrive Apprentice to HighLevel, but there should be a workaround to connect your forms in a similar way.