Welcome back, Thrivers, to another feature roundup where I'll share the 10 new features we've just added to Thrive Suite... today!
Every month, we announce a round of updates and new features we've added to our software based on your requests, our product development strategies, and where we think we can give you the most value.
And today is the day! This month, we have a hefty chunk of new features.
Don't worry— as a user of our software, you don't have to keep up with all of the new features that we're adding. Our growing knowledge base has articles for absolutely every piece of functionality in all of our software and is very easily searchable.
It's there whenever you need it.
But for the curious... read on to learn what we just released!
More...
We Have a New Website!
Notice something different?
We have a new website theme! Thrivethemes.com is now powered by Thrive Theme Builder, and our designers absolutely love it!
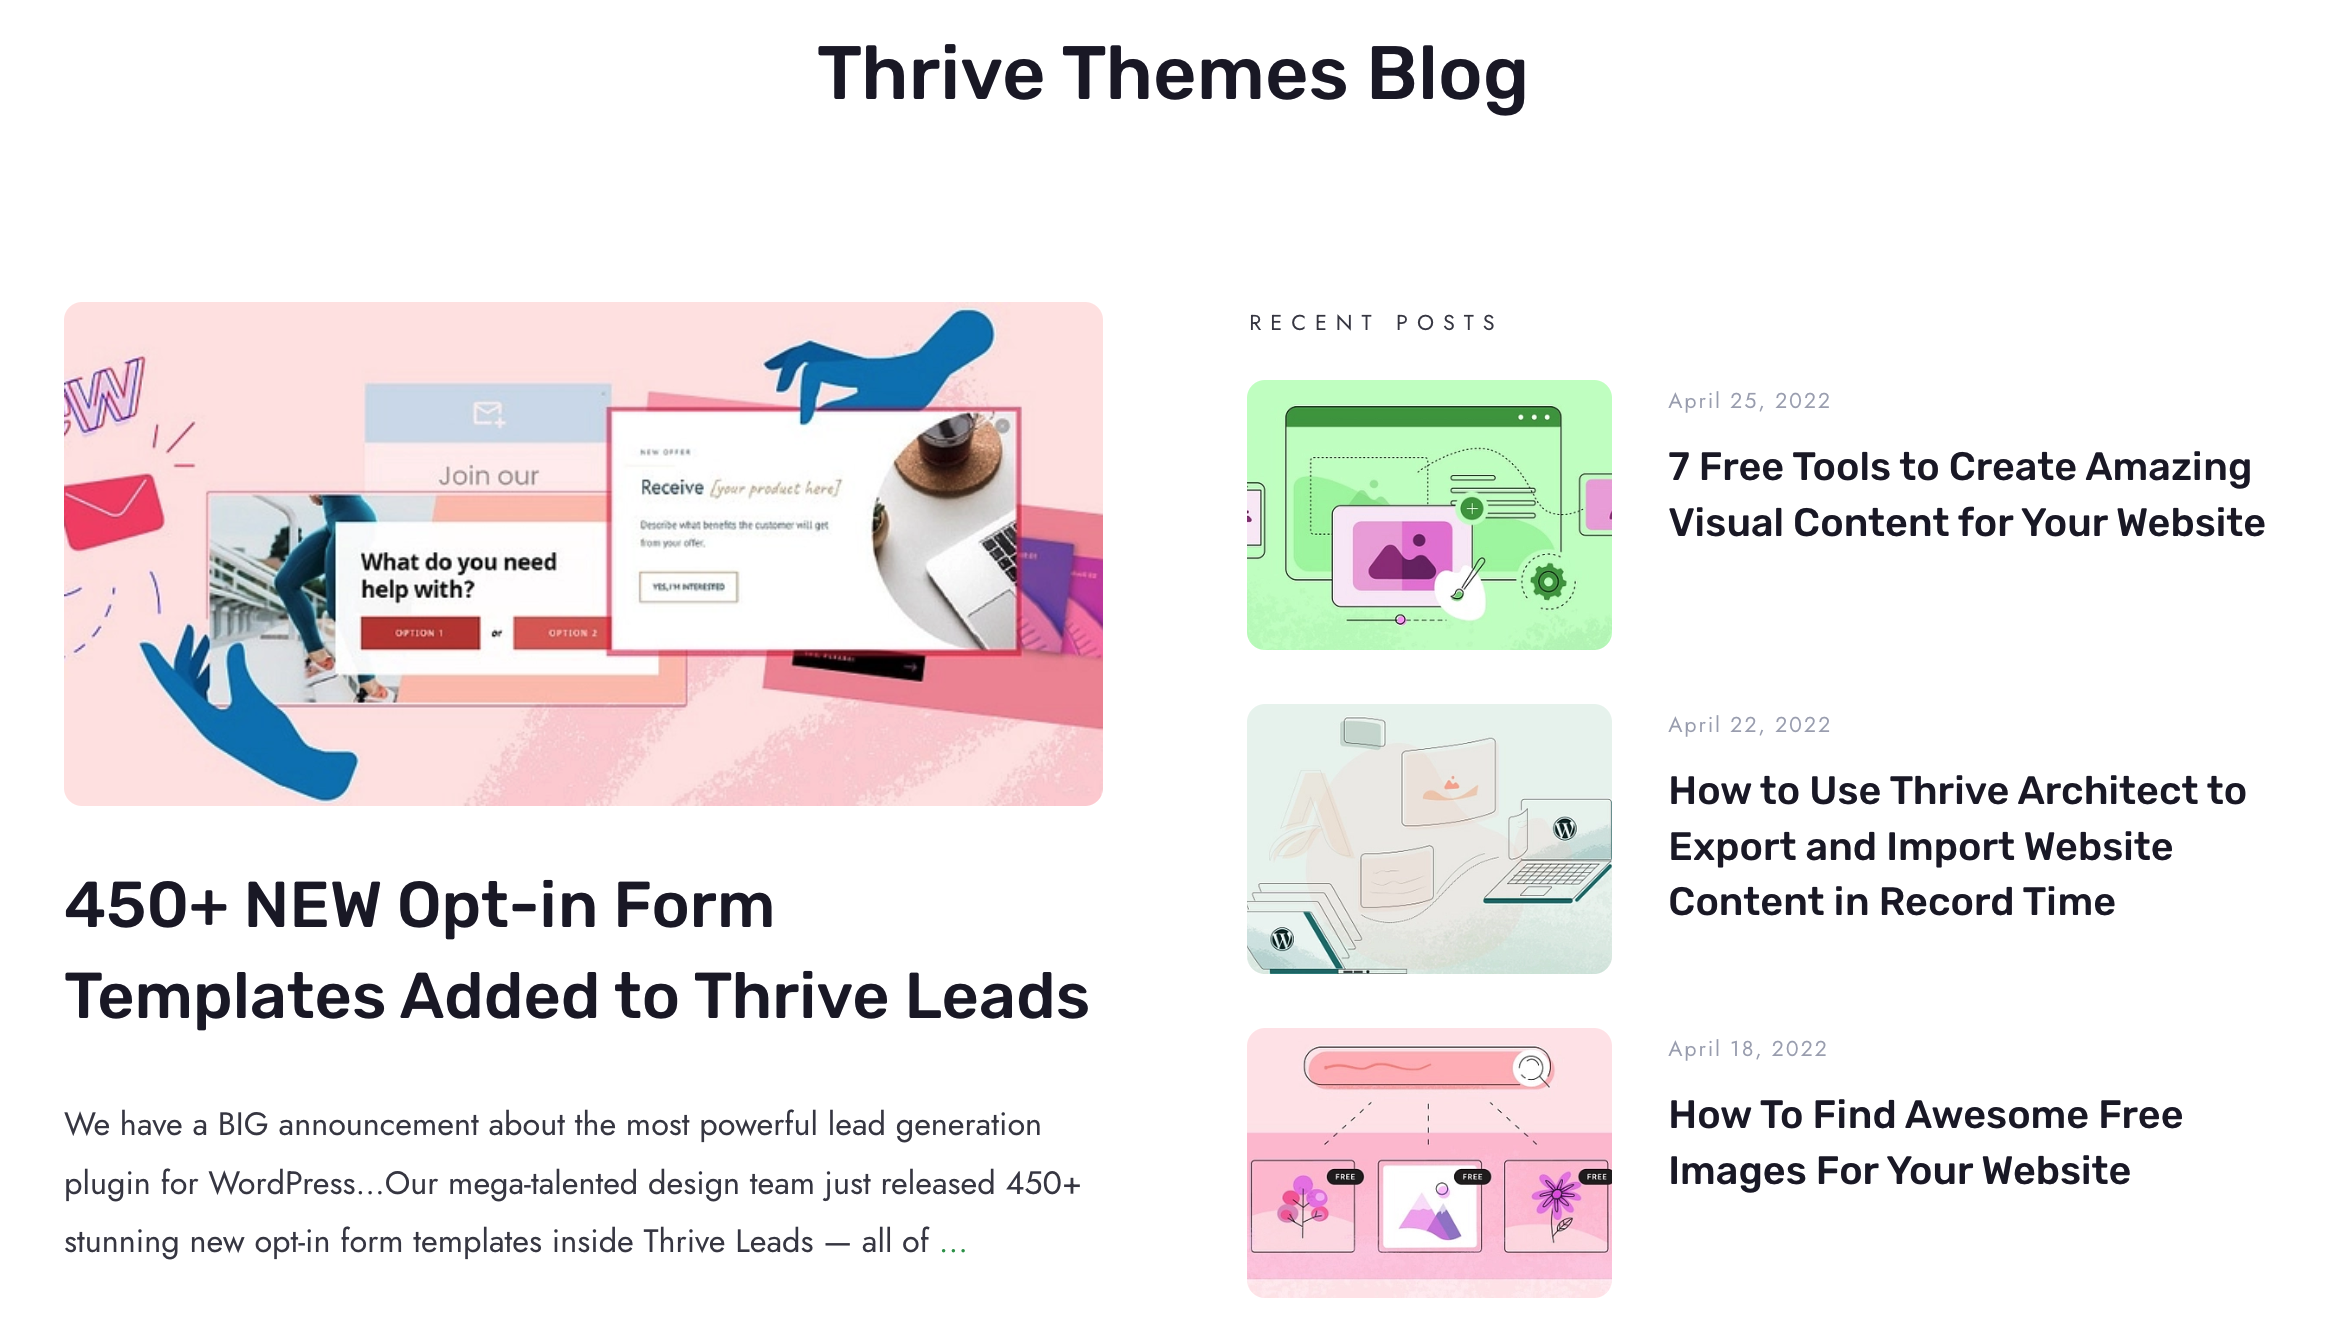
Perhaps you're wondering why we didn't switch over sooner— after all, we have created mind-blowing visually editable WordPress themes. Why wouldn't we use our own tech?
Well, originally our website was built with one of our legacy WordPress themes...
...but over the years we've added 20,000+ lines of additional custom code to it.
This is the beauty of WordPress. Because it's open source, you can hire a developer to write custom code to fit your needs. Our website is where we manage your accounts, licenses, purchases, and more. It's quite unique.
However, all of that custom development held us back from making the switch.
Until last week.
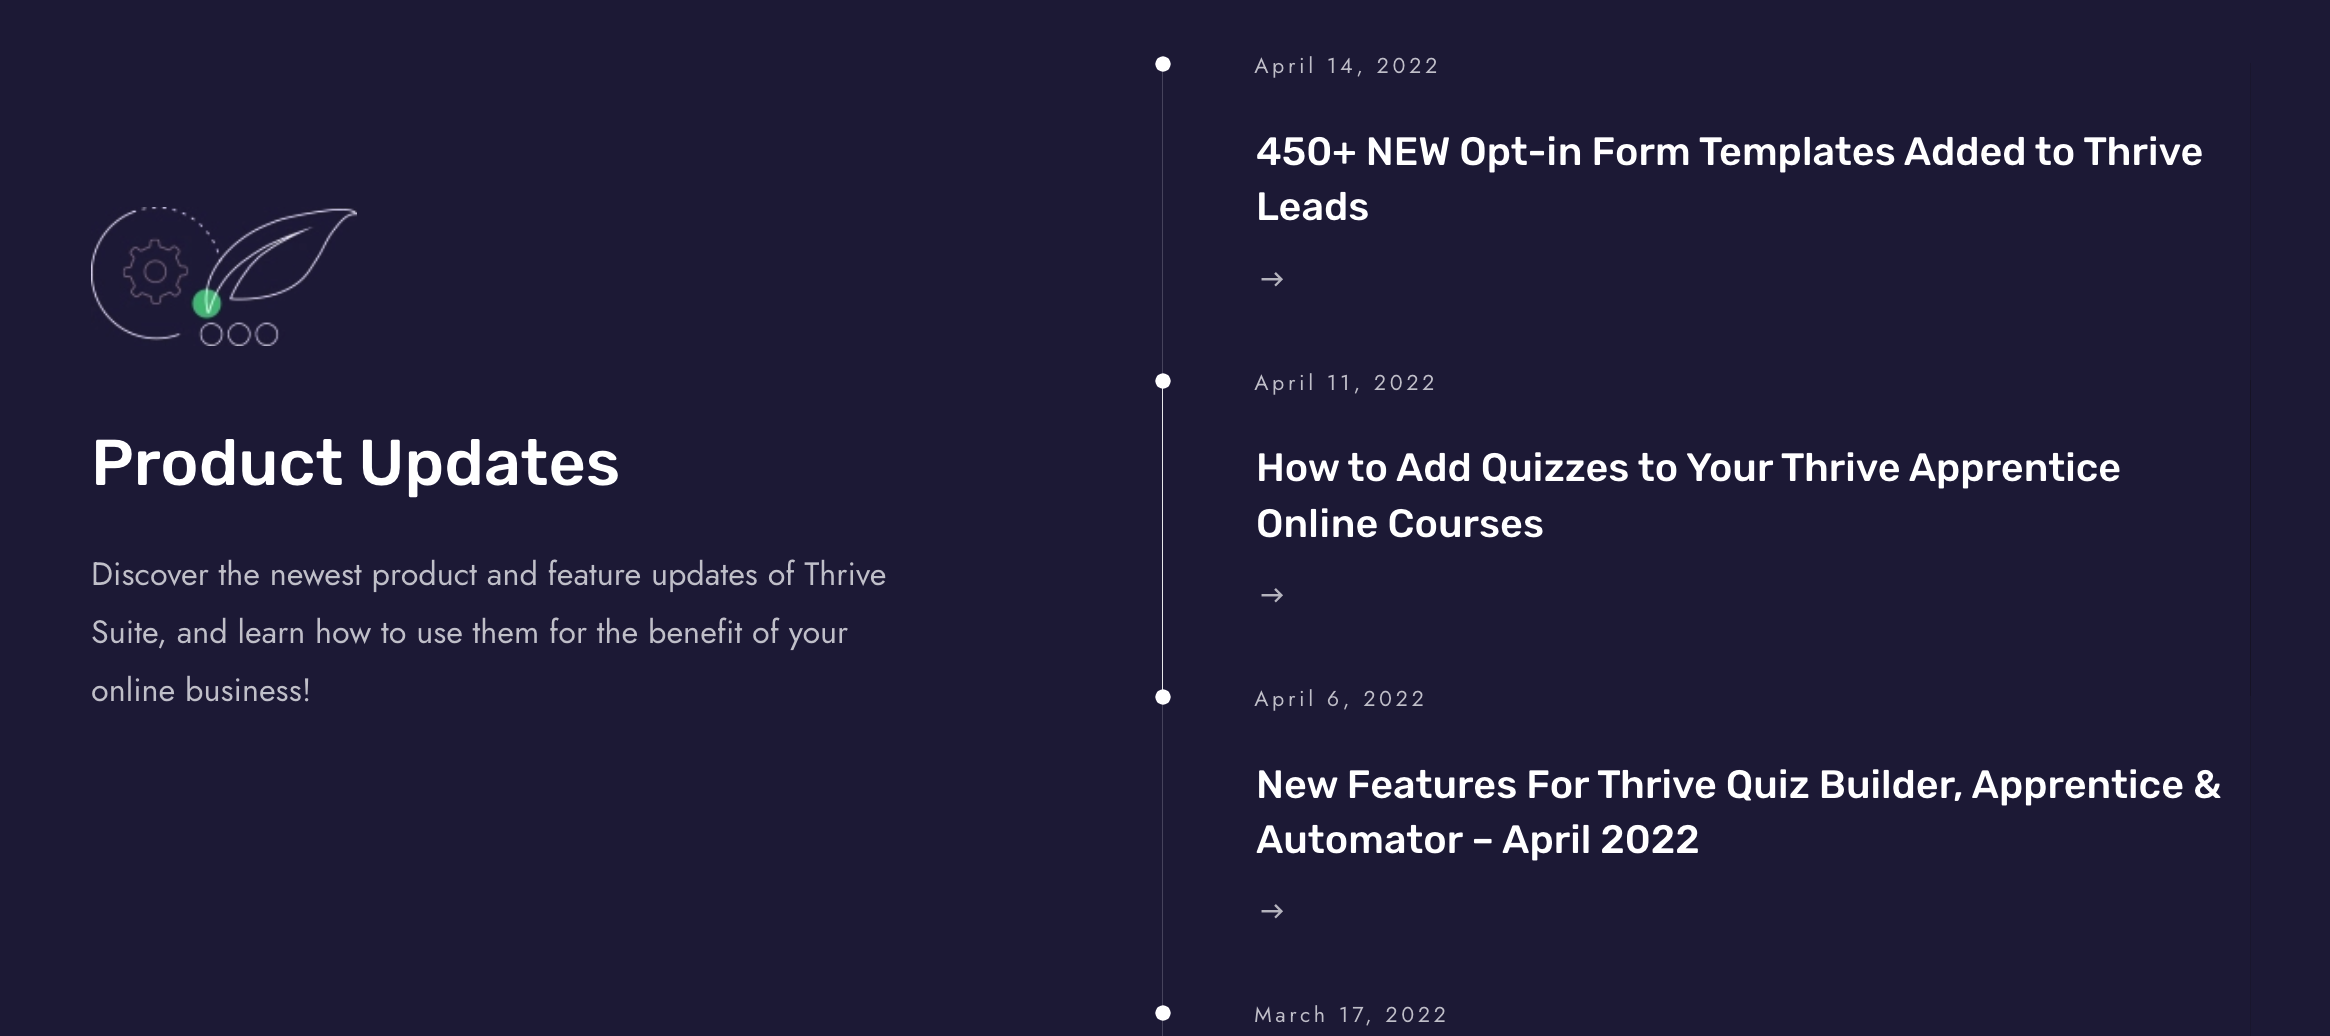
Now our website is powered by Thrive Theme Builder and the flexibility feels like we've broken free of our design-shackles. Whenever we find anything in our design that we want to tweak, our designers can do it on the fly without a developer even lifting a finger.
Check out our new header!
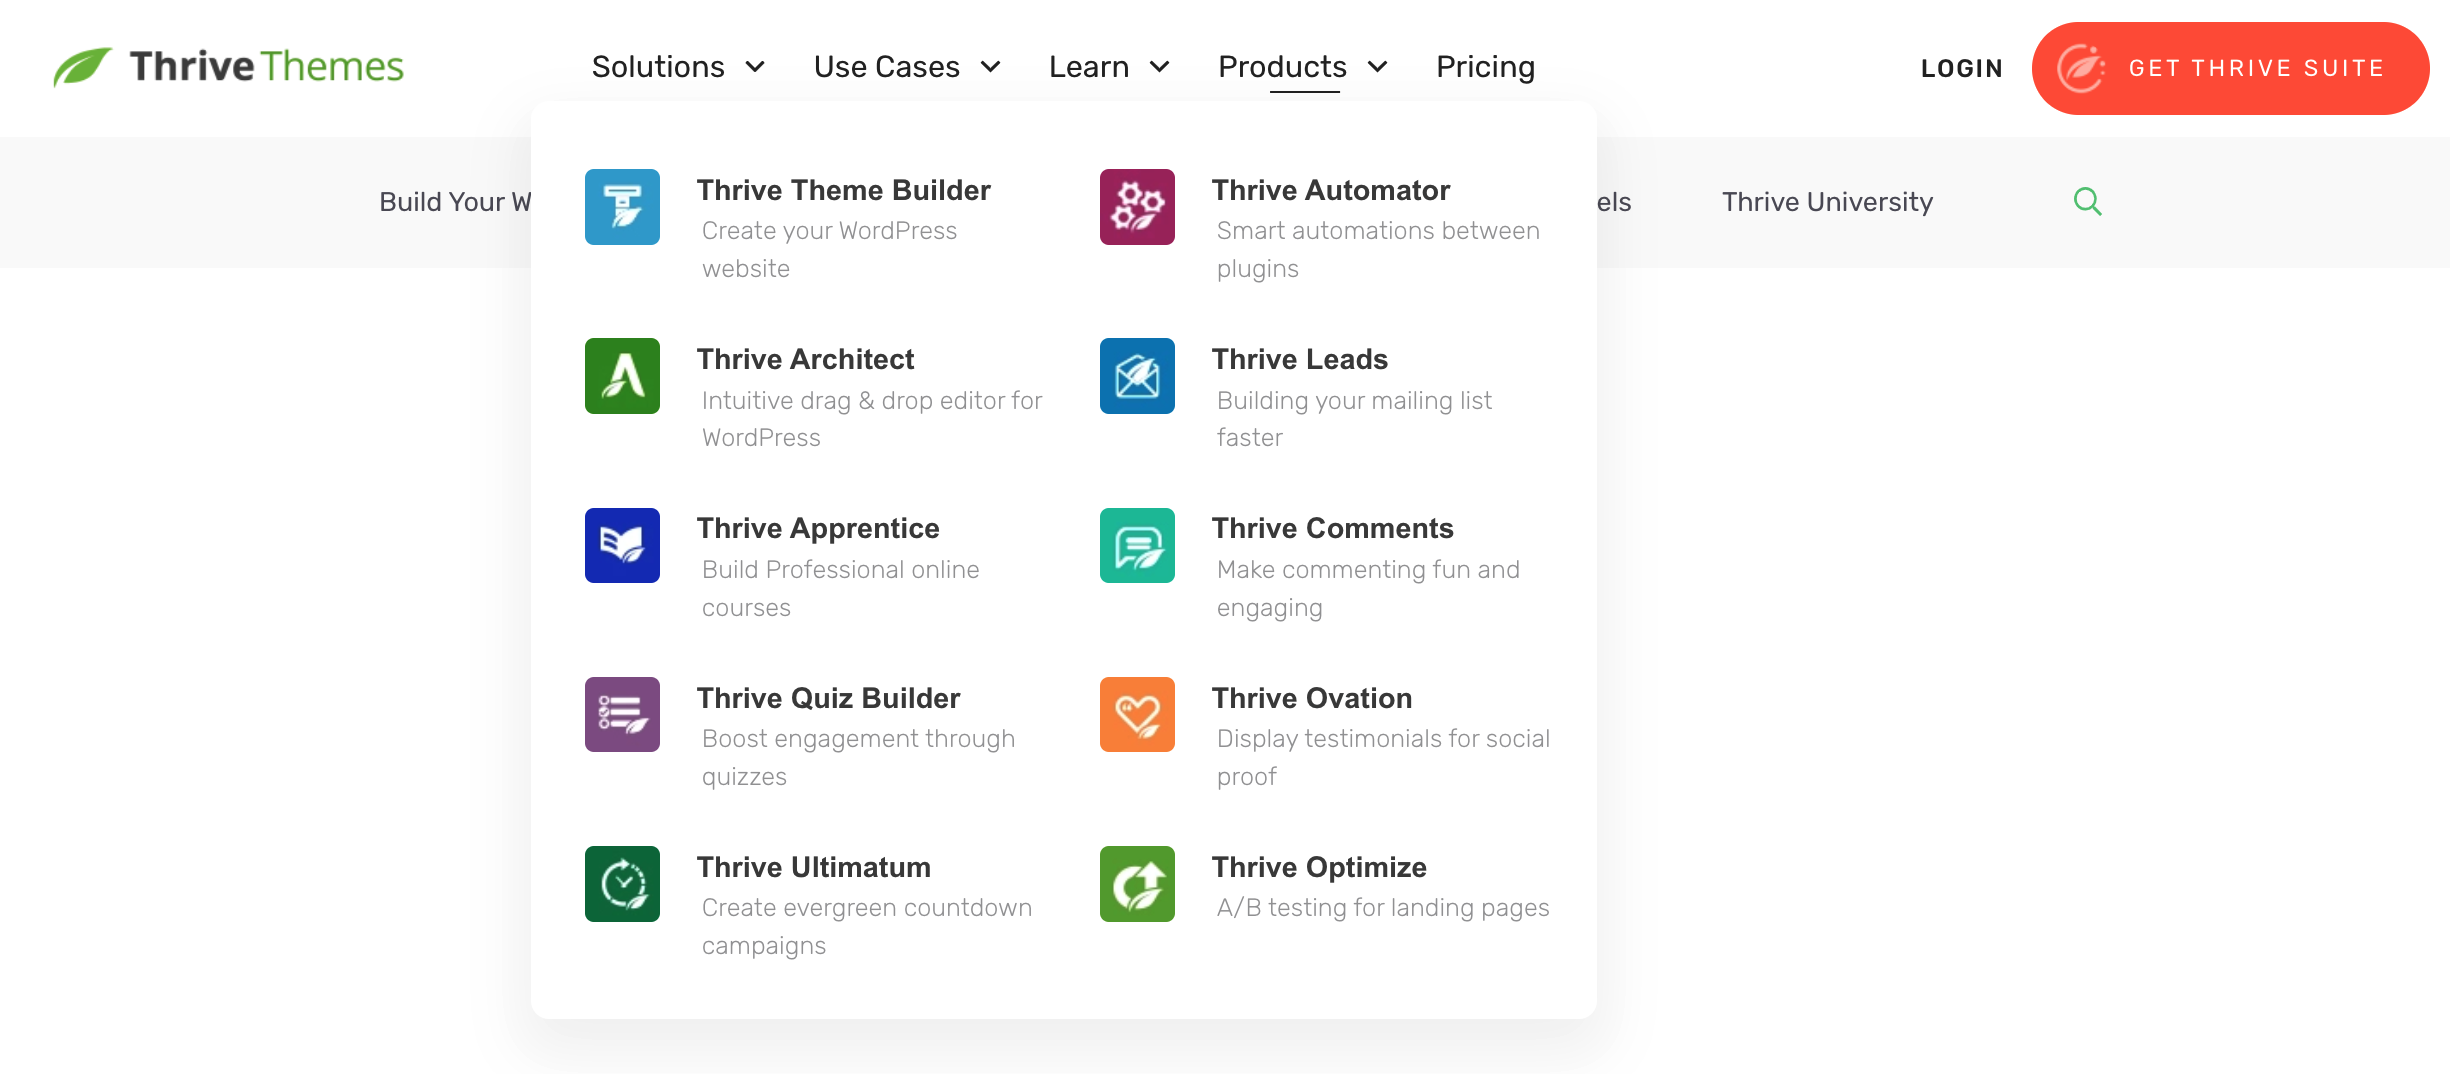
That kind of freedom is just incredible. We're going to continue to make tweaks over the coming months to polish our website, so it's not 100% complete yet.
To be clear, we only switched our theme. That means that all existing landing pages built with Thrive Architect over the years have remained untouched. Going forward, you'll notice that many of our landing pages will be improved to match the new brand aesthetic as we bring our entire website to a harmonious and consistent design.
Now, on to the features that YOU get in the latest release.
1. New Drip Condition: When Course Content is Marked As Complete
In Thrive Apprentice, we've added a new Drip condition.
Drip is the ability to release course content to your students at specific intervals and our course drip editor is honestly just ridiculously flexible. You won't find anything else like it.
You can release lessons and modules to your students on specific calendar dates, on an automatic weekly or daily schedule, on specific days of the week or month, when they complete quizzes in your course... and more.
But next time you open the drip editor for a specific lesson or module, you'll see a new option: "When course content is marked as complete"
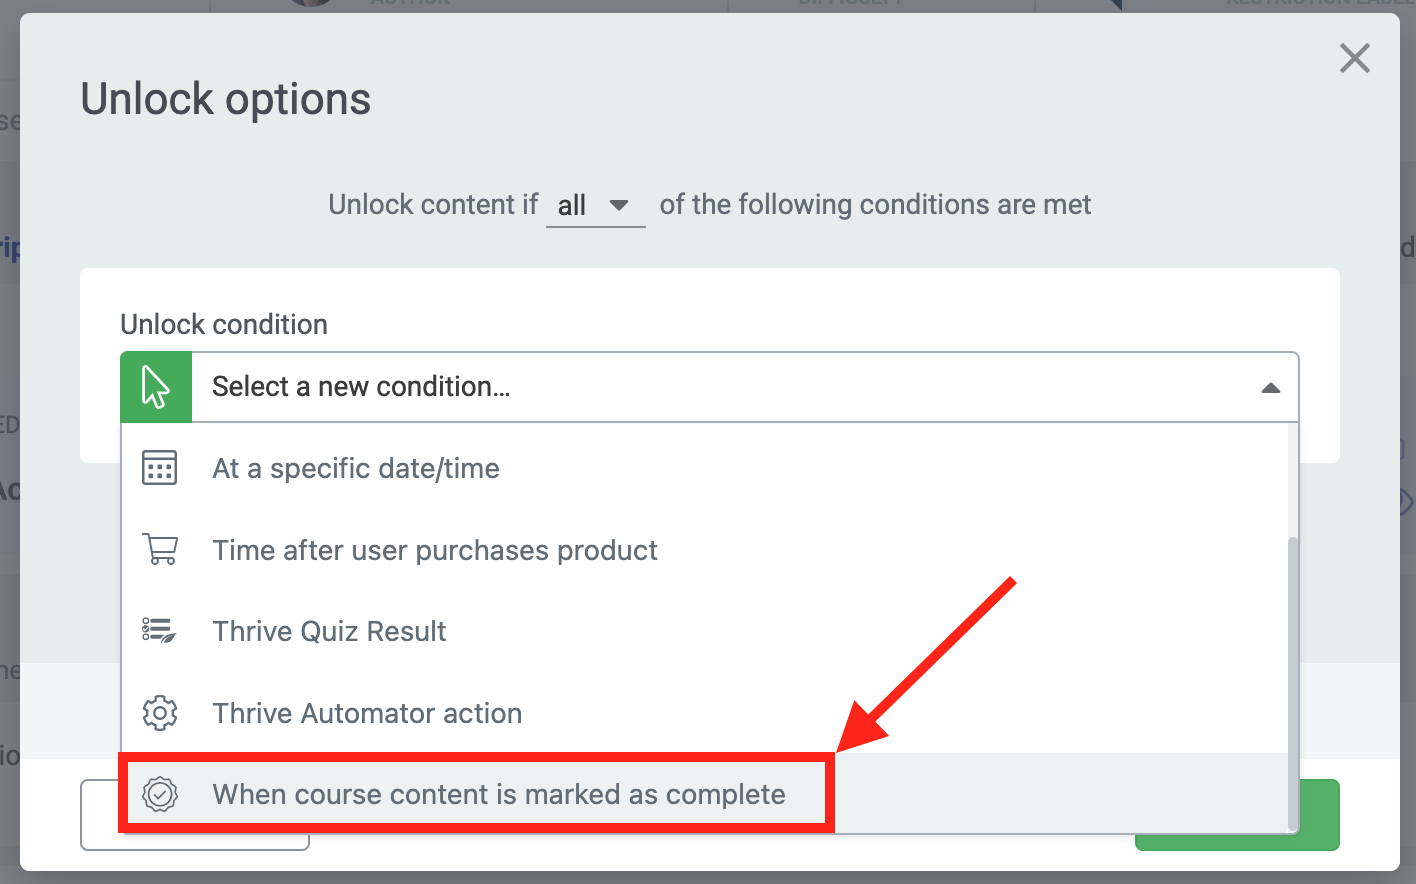
Look for the new option in your drip conditions view.
This should be fairly self explanatory.
You can choose any other piece of content that must be completed before your selected lesson or module is accessible.
But here is why it's so flexible: You can choose content in the same course OR from another course! You can even choose a whole other course that must be completed in order to unlock content elsewhere, perfect for releasing bonus lessons to your students only once they've met important milestones in their learning.
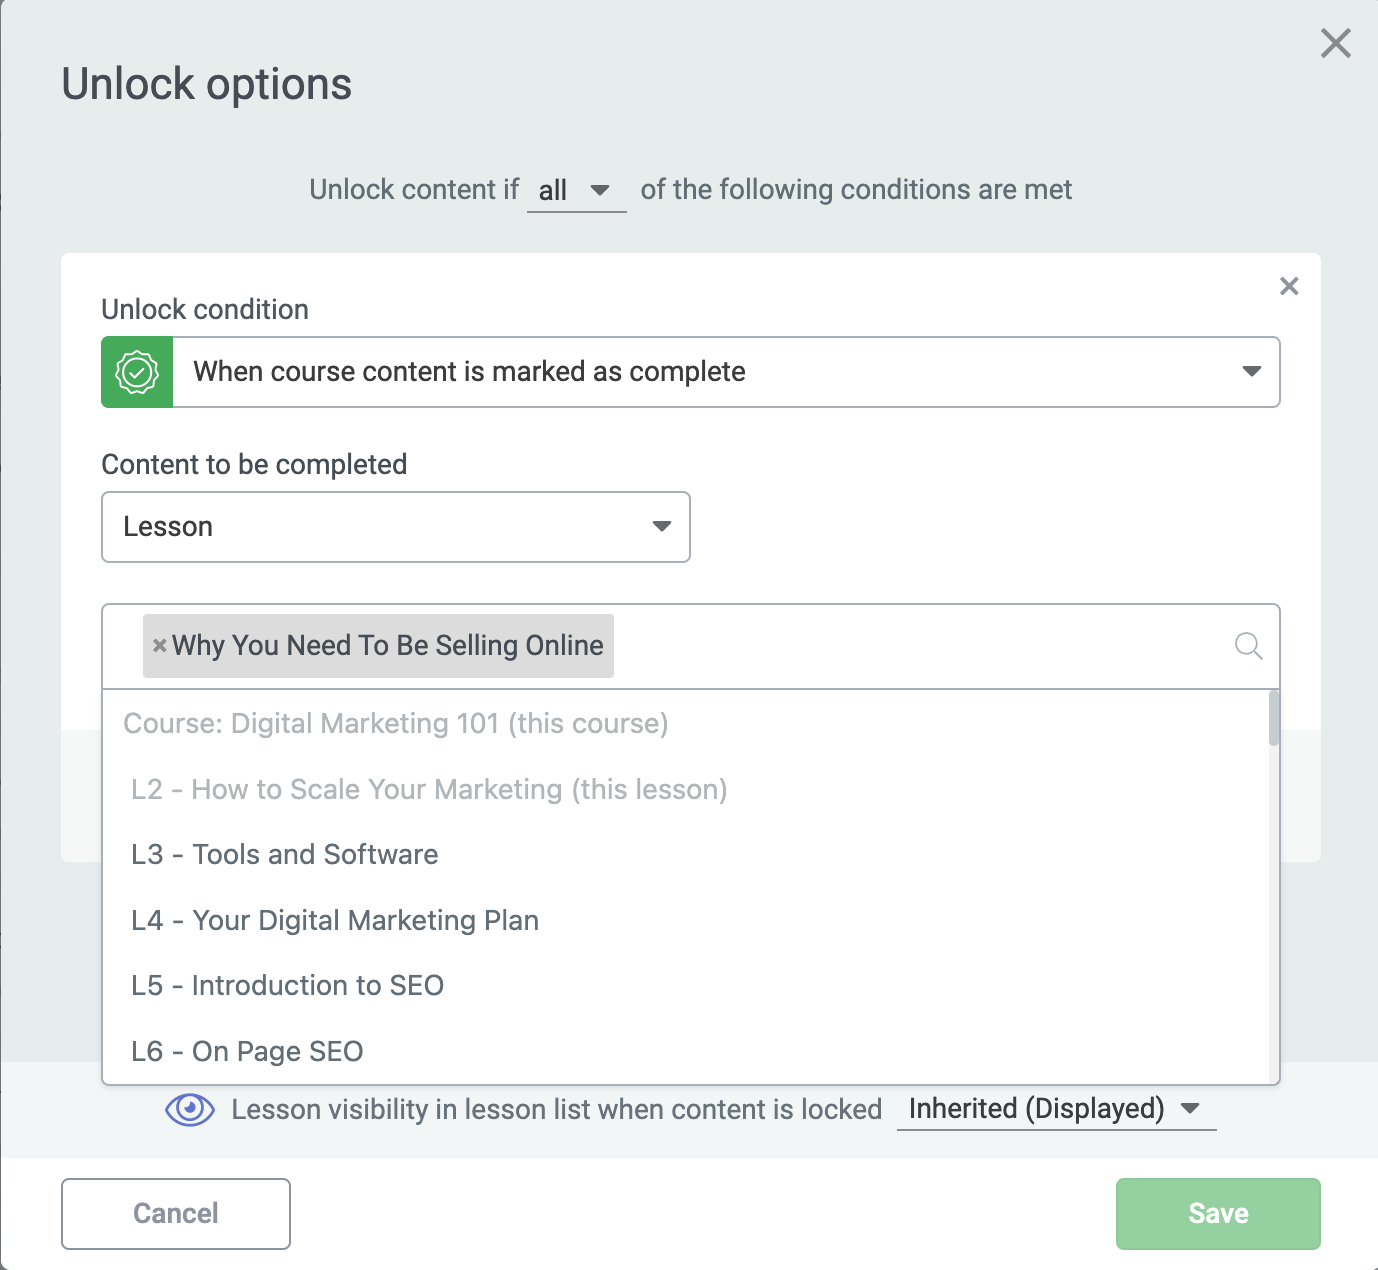
Easily select any lesson, module or course that must be completed before you want this lesson to be accessible.
When you open the drip editor for a piece of content and select 'When course content is marked complete', the previous lesson of your course will be selected by default.
That means it's only 3 clicks before you've locked access to a lesson until a user completes the one before it, which we figure is the most common use-case you'll need.
Couple this with our Quiz Completion feature released last month, where a user cannot mark a lesson complete until they complete a quiz or get a specific score, and you can force a student to access and complete content in whatever order you choose.
Once you apply a content completion condition, it'll appear in your drip timeline as 'Progress'.
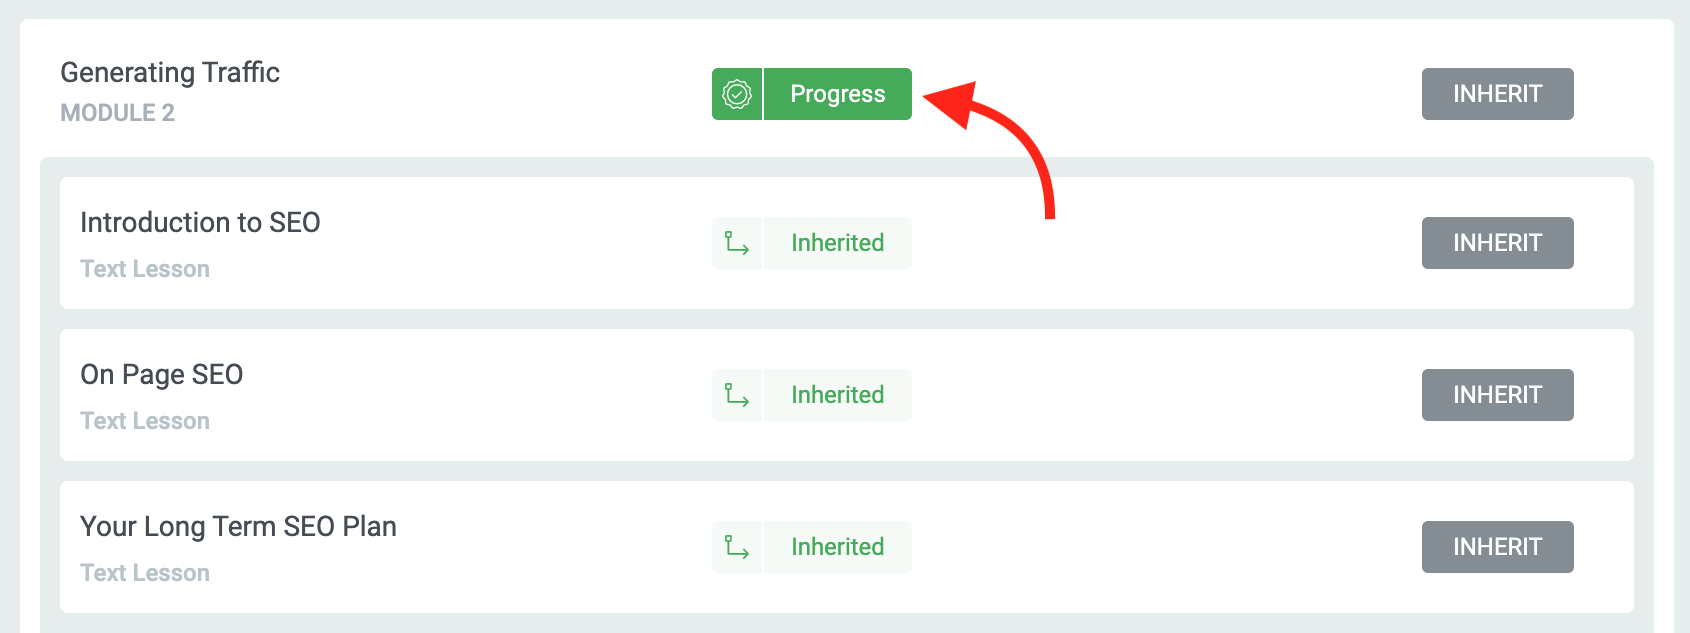
Content with your new drip trigger condition will have the label 'Progress'.
Nice, right? This feature give you more control over ensuring your students complete course content in the order that you believe best serves their learning.
2. Logout Redirect
As Thrive Apprentice 4.0 grows to be more powerful, managing your students' experience as they log in and access their courses has become increasingly important.
Earlier this year, we released an update that lets you control default login redirects inside of the User Access Manager, ensuring your customers always end up where you want them to be after they log in, even amidst a password reset.
But what about logging out?
In the latest update, we've added support for a simple logout redirect.
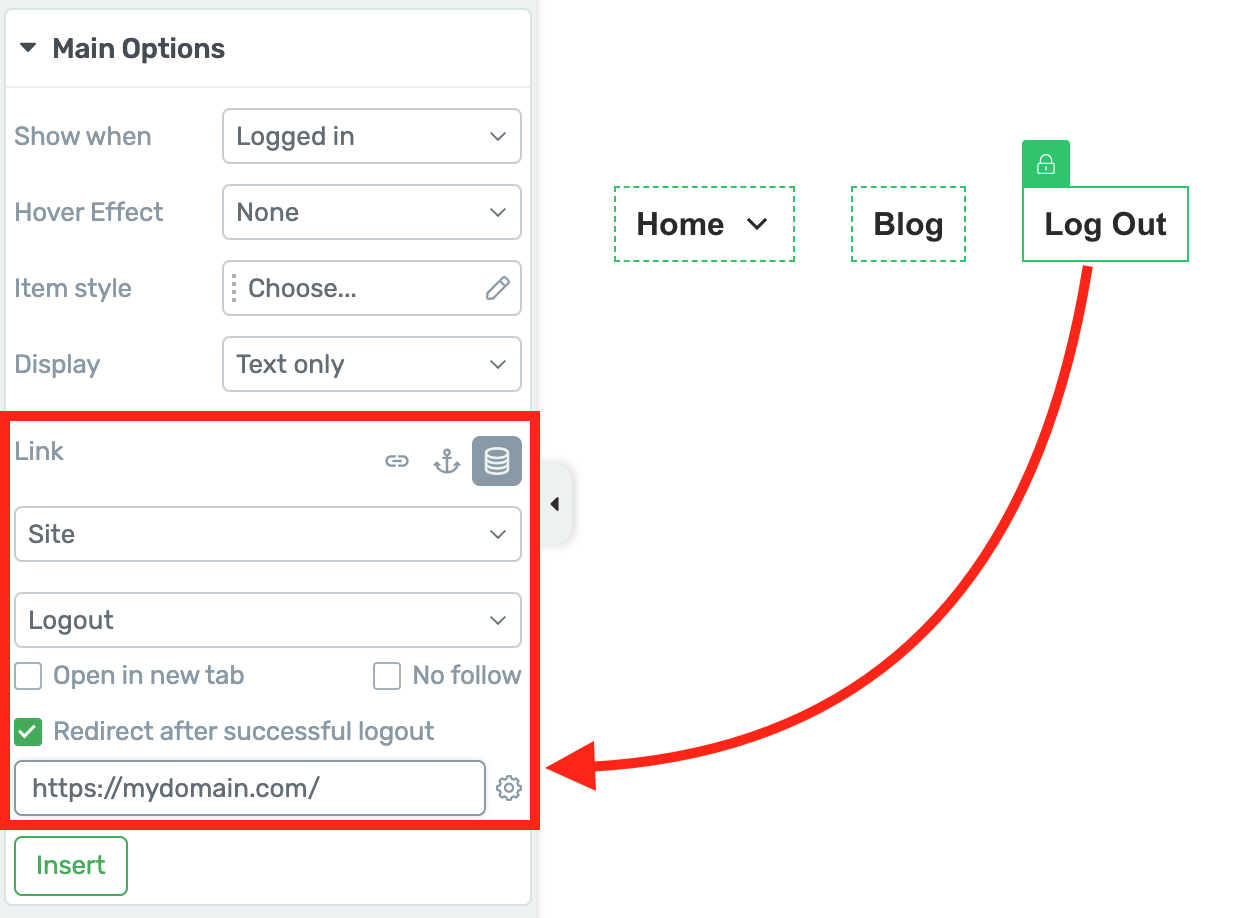
Easily add a logout redirect by checking the box on the left.
Any time you apply a dynamic logout site link to a Menu item, Button, Hyperlink, or linkable object (icon, content box, etc.), you will see a new checkbox for 'Redirect after successful logout'.
By selecting that checkbox, you'll have the option to search for any page on your website or to type in a URL directly. That page is where your visitor will be sent right after the logout action is performed.
Keep in mind that this only supports redirects inside your website. WordPress has some spam prevention that means it will not allow external redirects after a logout action is performed.
3. All Theme Landing Page Sets Now Available for Everyone!
Who doesn't love a landing page template?
Especially our Smart Landing pages, that come with hundreds of mix-and-match Page Blocks, and are Smart Color enabled meaning you can change the look of a whole page in 2 clicks.
In our latest update, we are giving every Thrive Architect user access to 70 new Smart Landing Pages! Between those landing page sets, that includes over 480+ Page Blocks!
How?!
We have unlocked access to all Theme Landing Page Sets, making them cross-theme compatible too!
Whether you're using Thrive Theme Builder or not, next time you open the landing page library in Thrive Architect, you'll see the Theme Landing Page Sets for ShapeShift, Ommi and Kwik... whether you're using any of those themes or not!
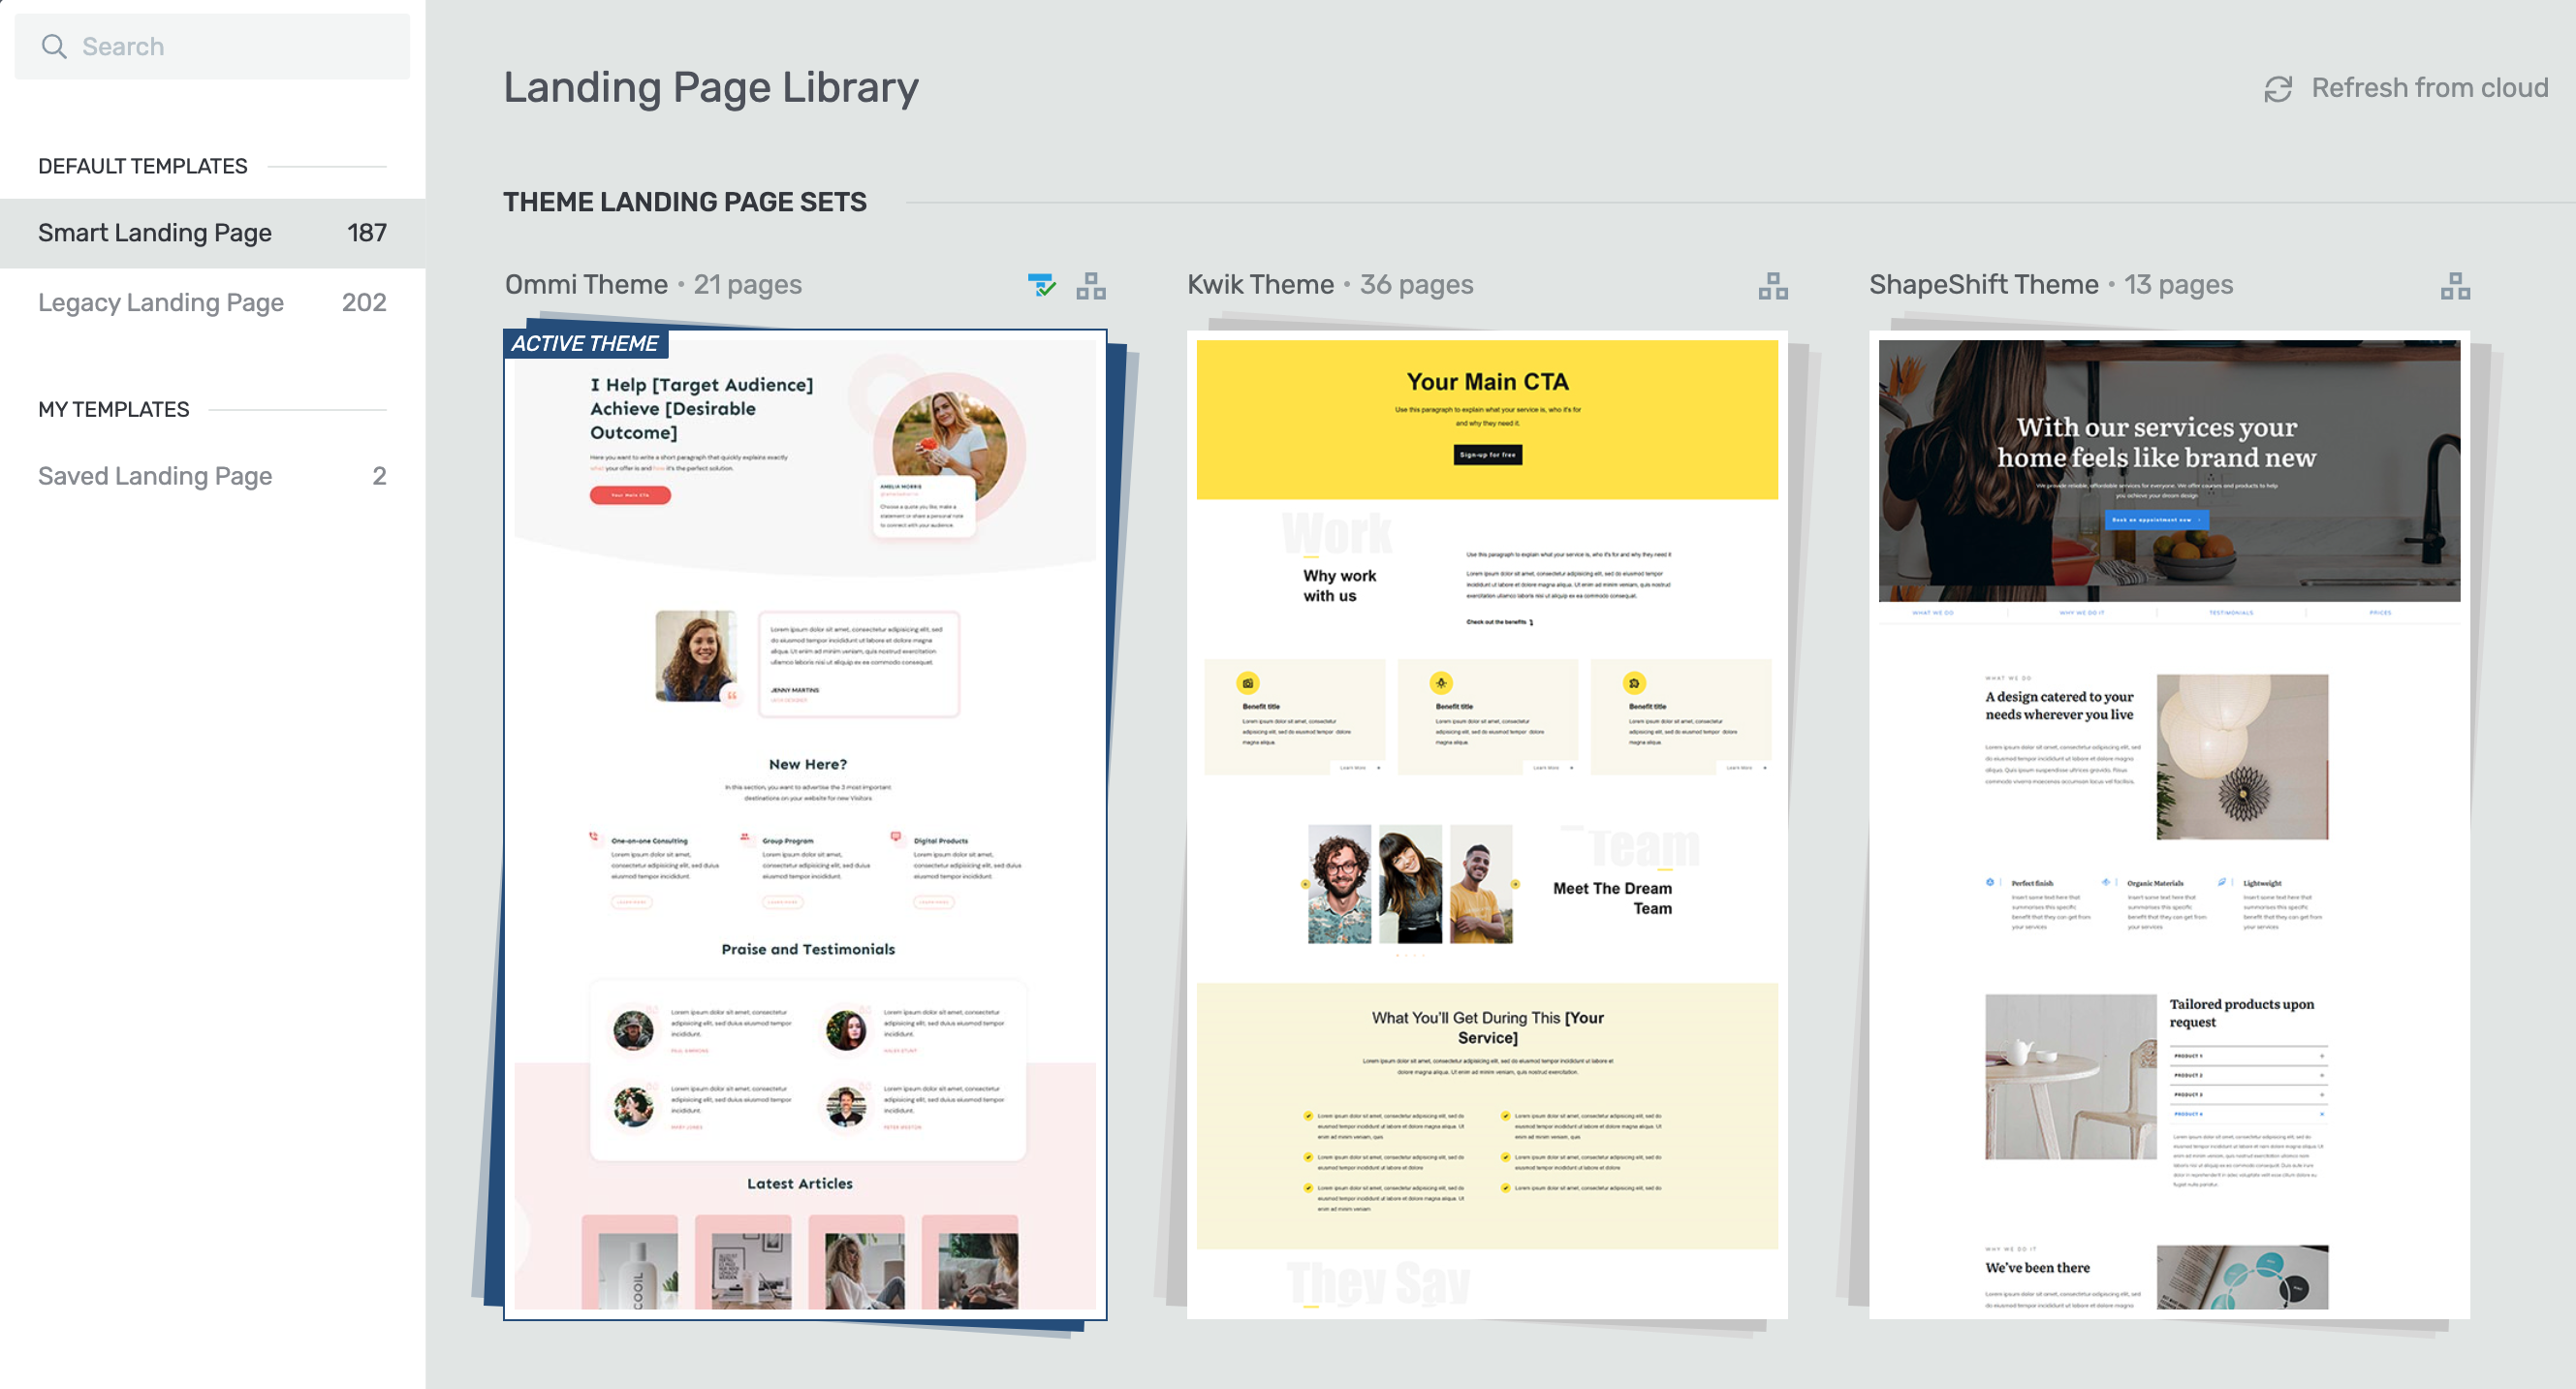
All Theme Landing Pages sets will now be visible in the Thrive Architect landing page library!
Remember, if you're not using Thrive Theme Builder and you like the look and feel of any of these landing page sets, there are Thrive Theme Builder theme template sets that match them. That means you can make your headers, footers, blog posts, blog archive, WordPress pages, etc., match the look and feel of these landing pages.
If you do have Thrive Theme Builder installed, selecting any of the Theme Landing Page Sets will apply your chosen brand color and typography. That means the landing pages from a different theme will look different to their thumbnail, based on your global settings.
4. Filter Quiz Reports by Location and Collect More Student Data
In last month's release, we added an integration between Thrive Quiz Builder and Thrive Apprentice, making it easy for you to add quizzes to your courses and restrict student access to content based on the quizzes they've completed and the scores they've achieved.
But what good is a quiz without stats and reporting?
As a course creator, you want to know what answers your students have provided, to better understand what issues they are facing and how you can improve your courses.
To support you in this goal, we've improved the Thrive Quiz Builder reports in a few ways.
New 'Location' Quiz Filter
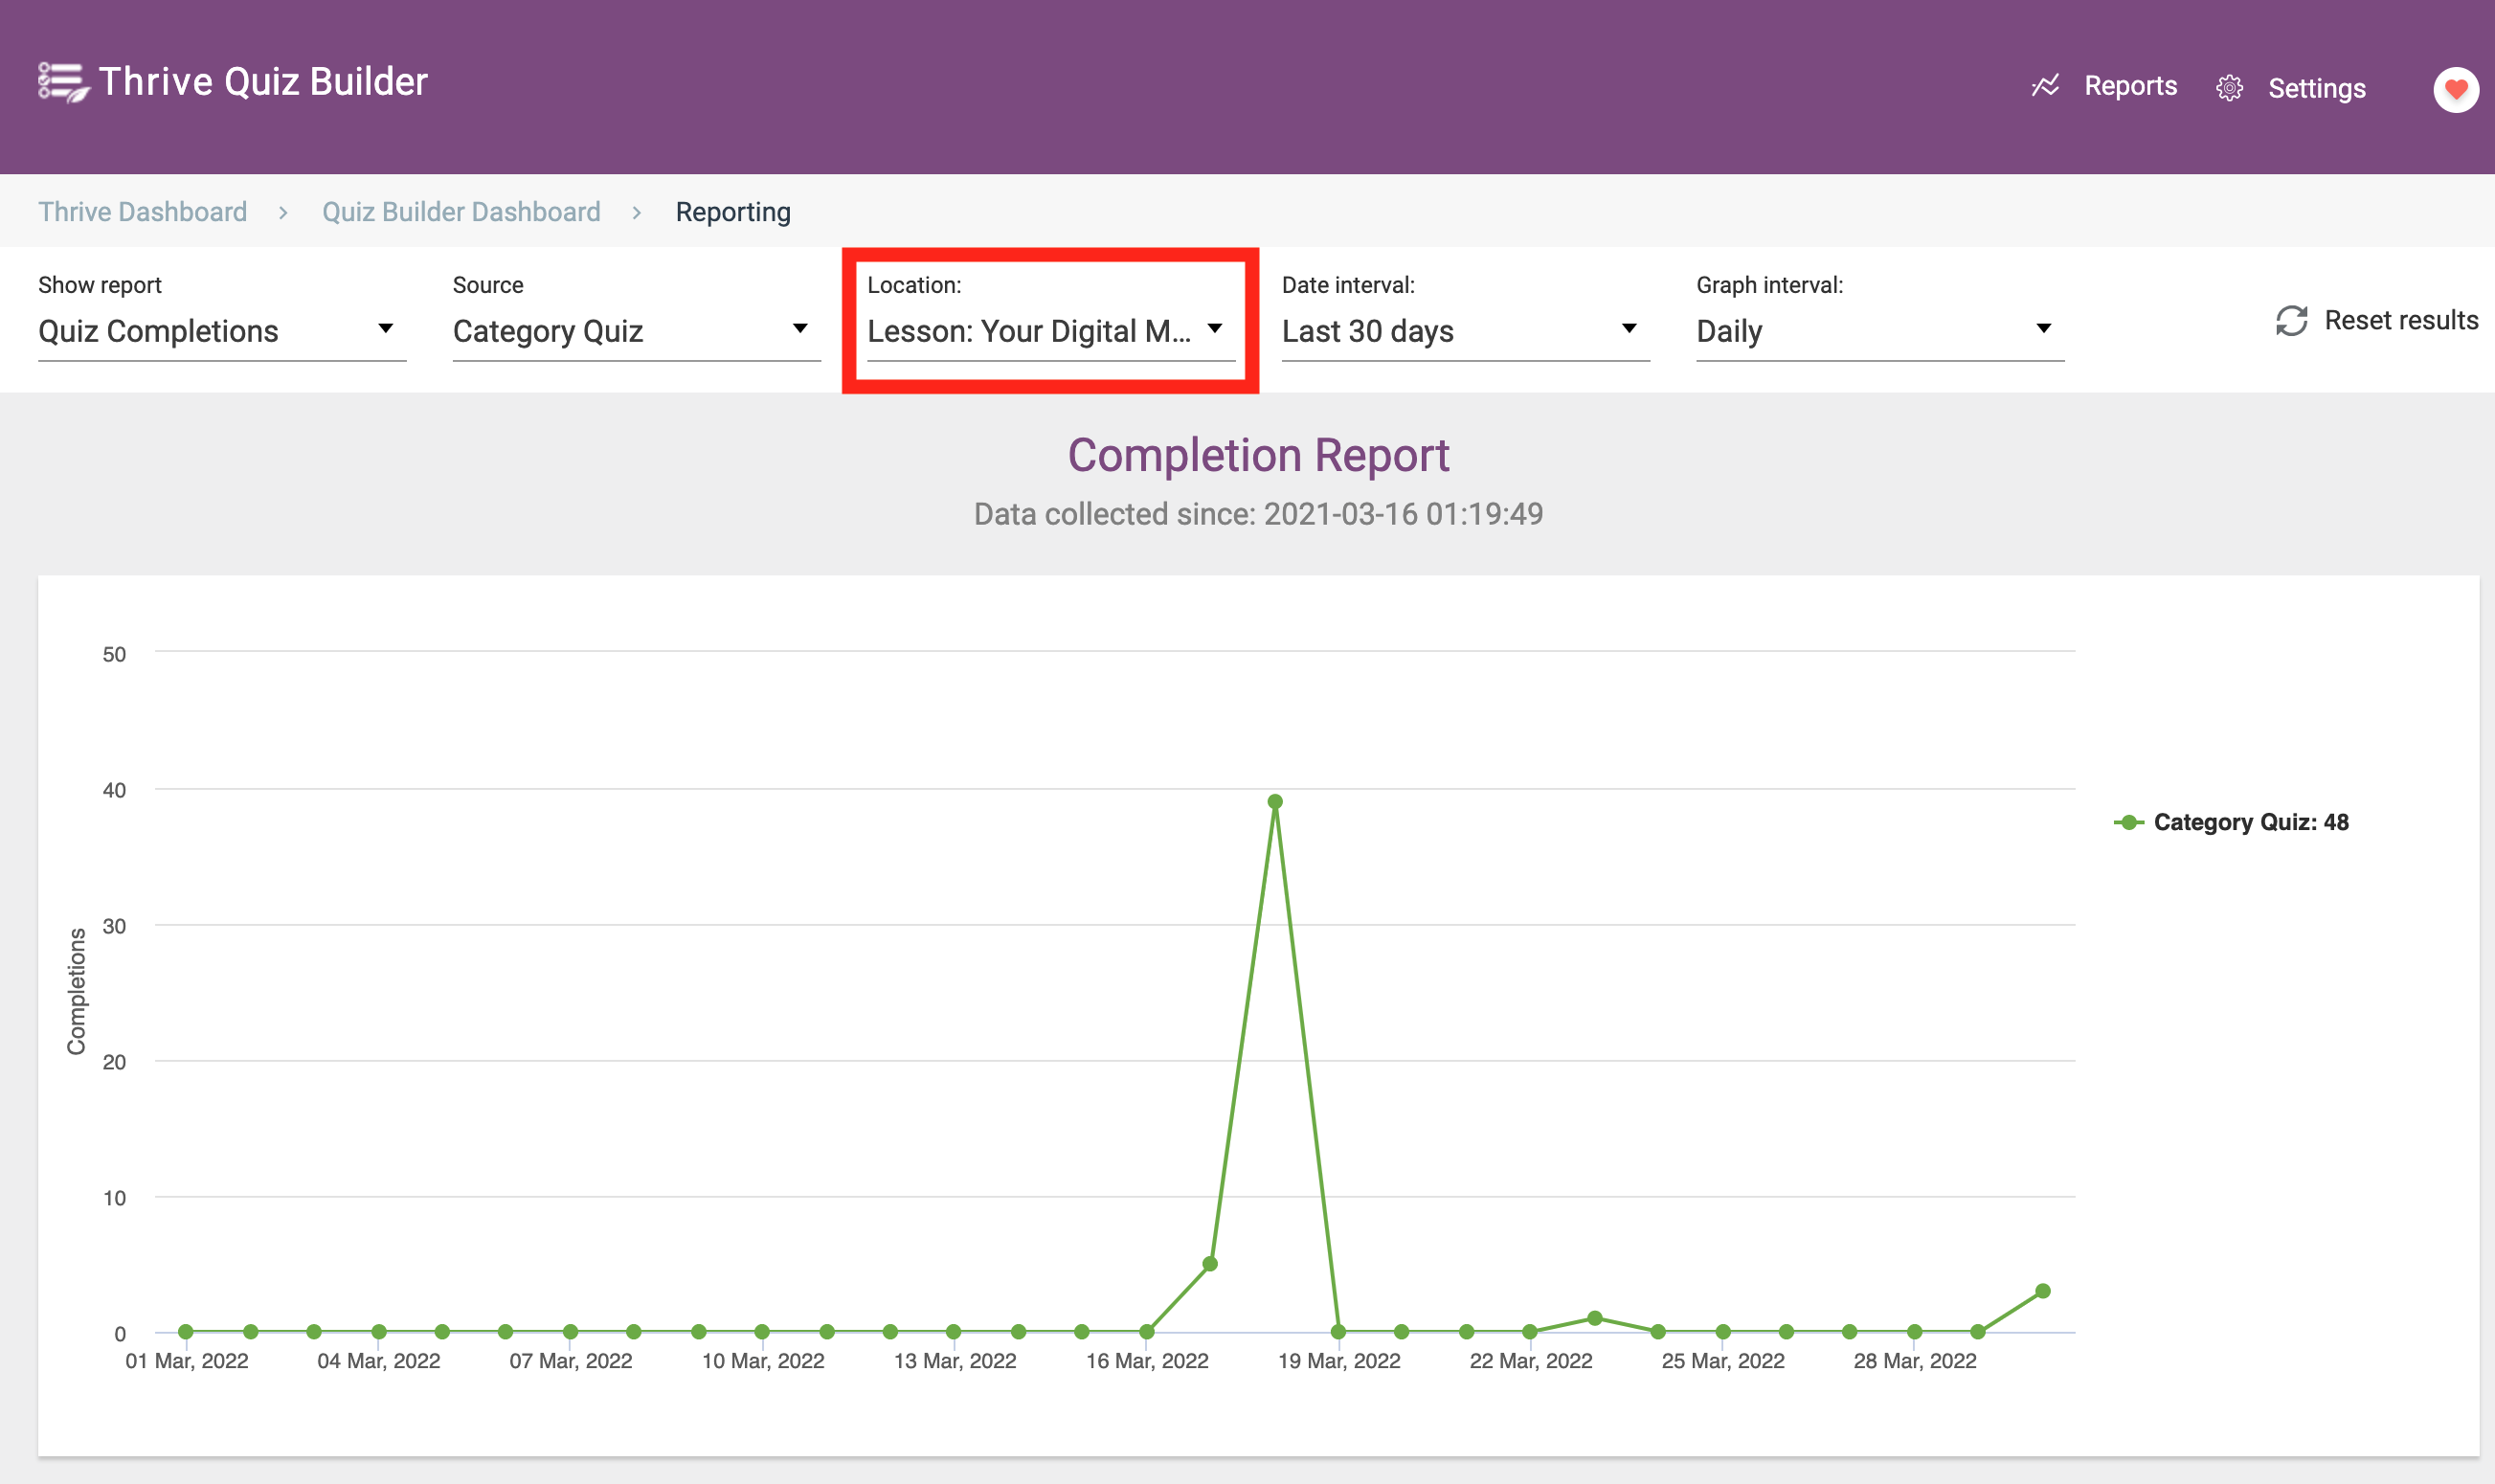
Filter your quizzes by the pages or lessons they are embedded on.
The location filter is a sub-filter for a specific quiz and lets you see how the given results vary depending on where your quiz is.
We also made it easy to identify which ones are part of your courses with the location prefix 'Lesson'.
Here's an example. Let's say you have a quiz at the start of your course, to test your student's lack of knowledge. Then you include that exact same quiz at the very end of the course, to see how much their knowledge has improved.
You can broadly see all of that quiz data together or you can separate the data based on where it was submitted, easily dividing and comparing the answers provided on your first and last lessons.
More User Quiz Data
We've increased the amount of quiz data that gets saved inside of Thrive Quiz Builder in the Users report, focusing on what is helpful for course creators.
Marked in red below are the new types of data.
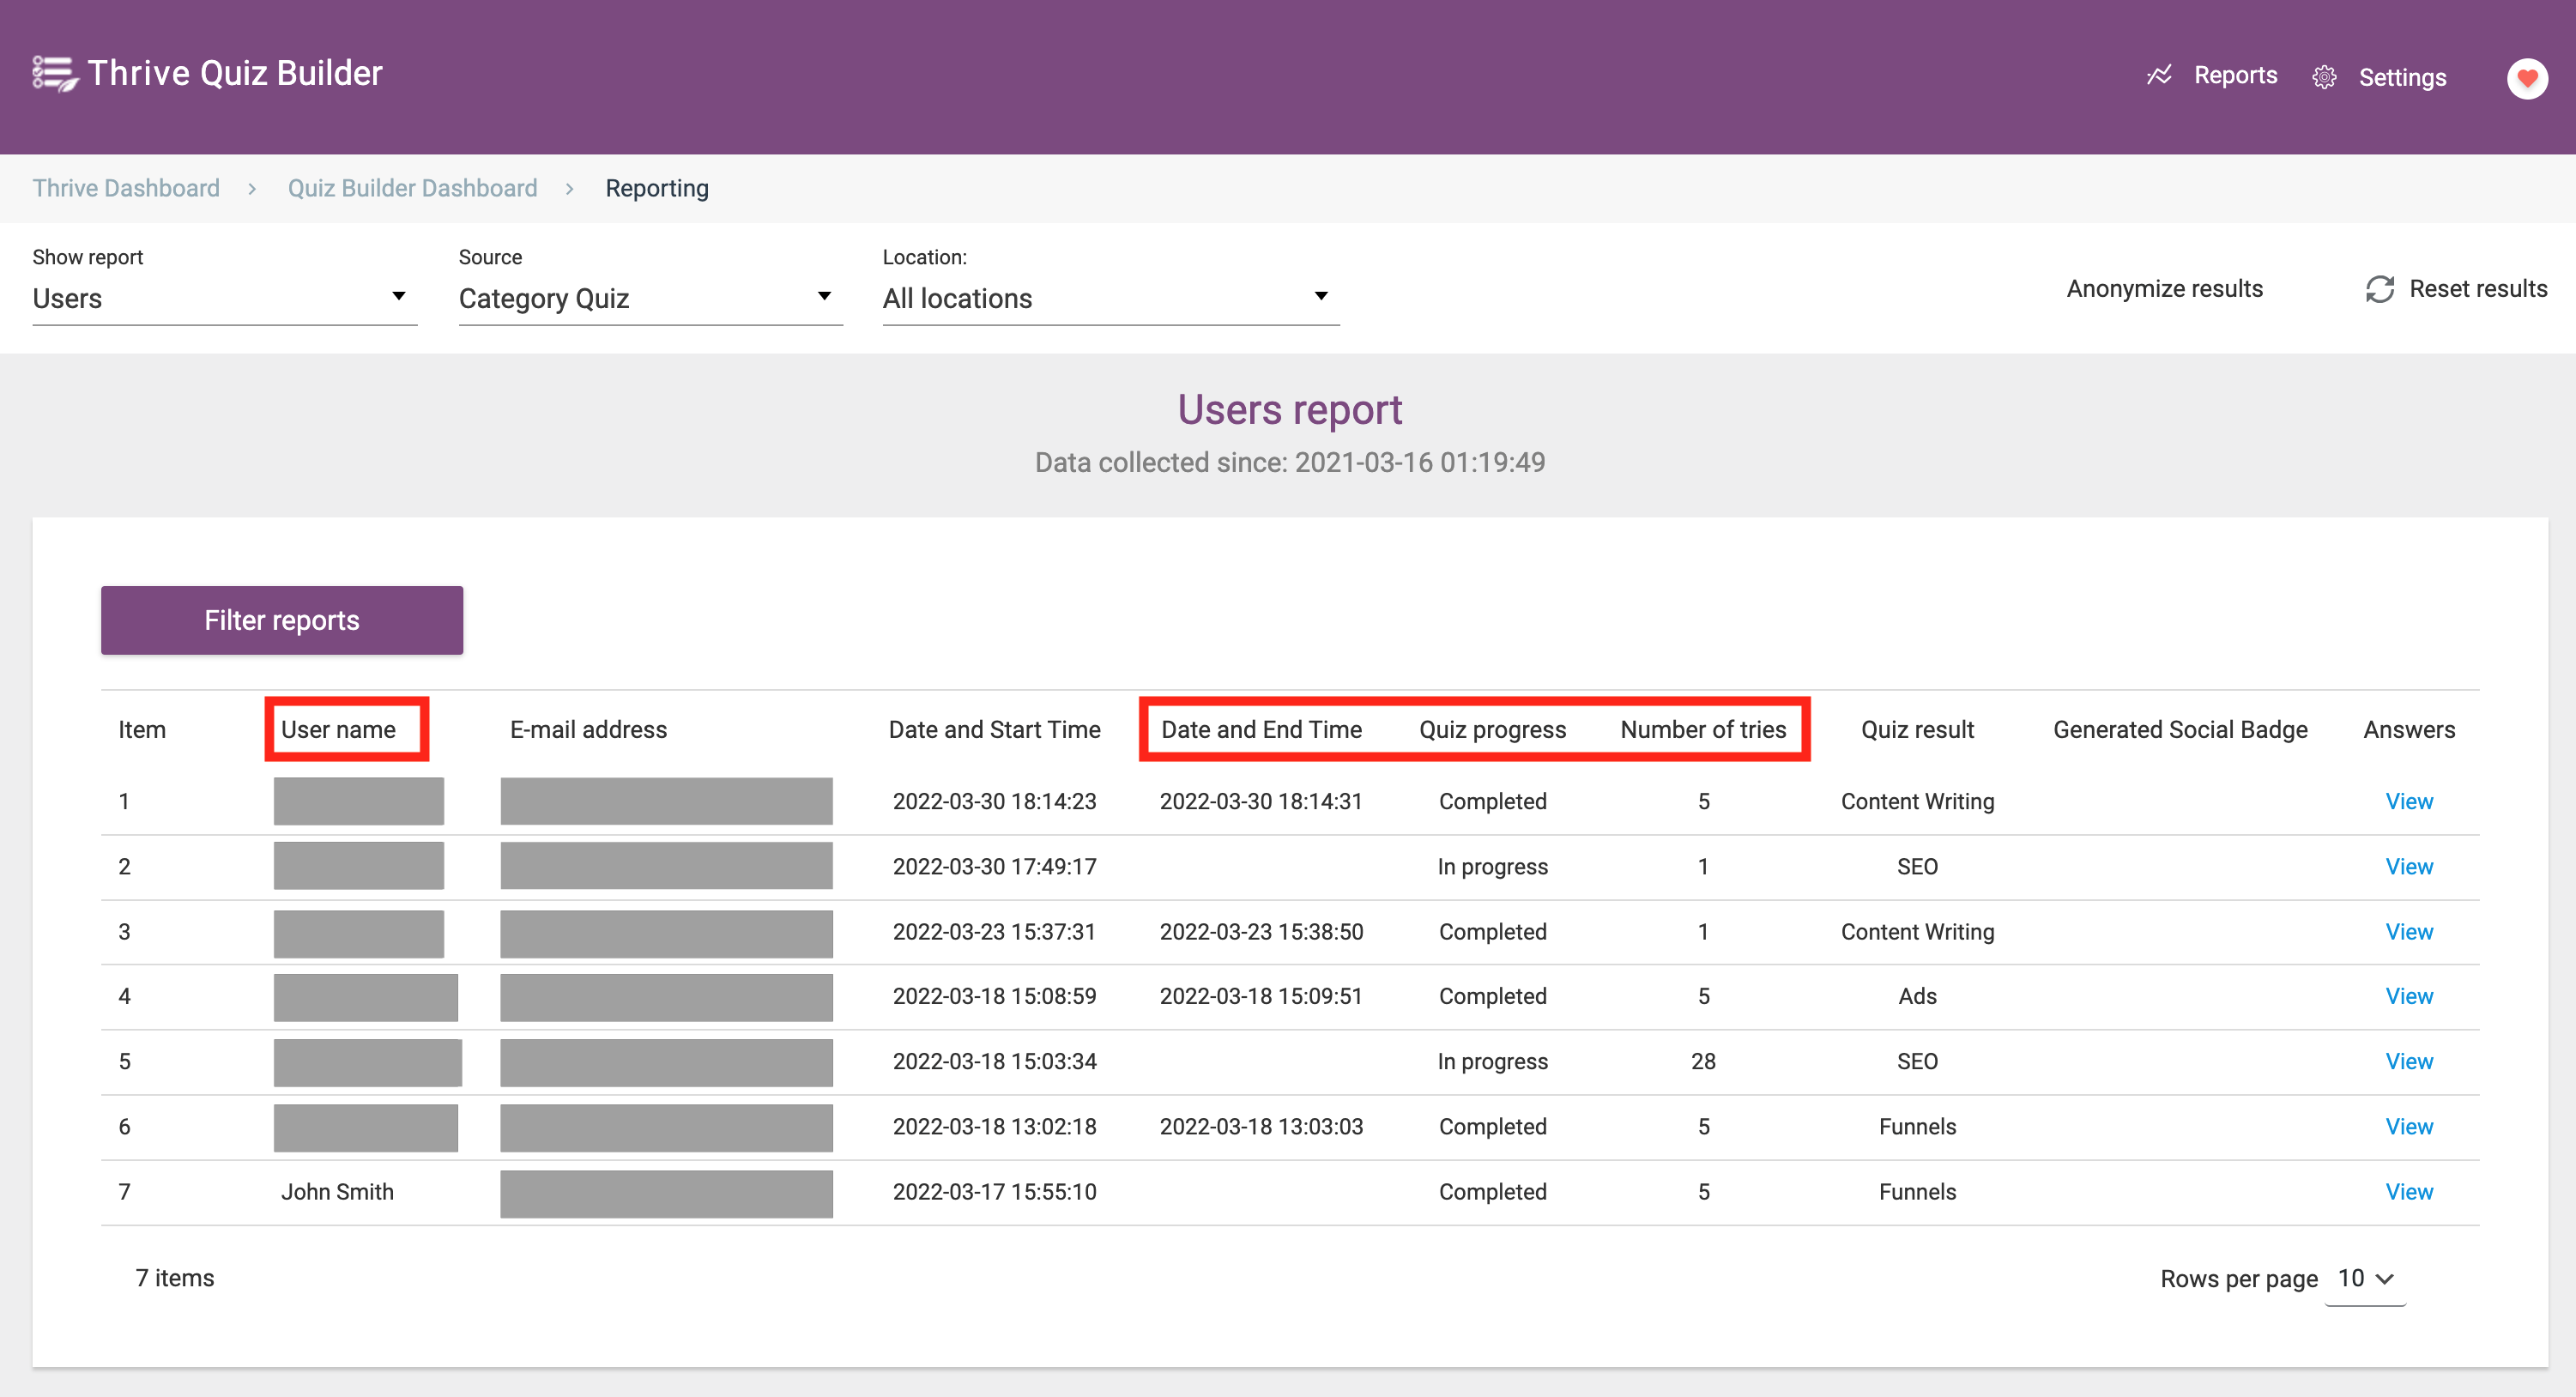
More data is now being collected when quizzes are submitted.
Logged-in users that take your course will have their usernames listed, and since you can now save quiz progress, we're recording both the start date and time as well as the end date and time, their quiz progress, and their number of attempts.
Once again, you can filter by specific locations or lessons where you've added your quiz.
With all of this extra data, we've also added a filter option where you can narrow down the results to get a better picture of how your students have been engaging with your quizzes.
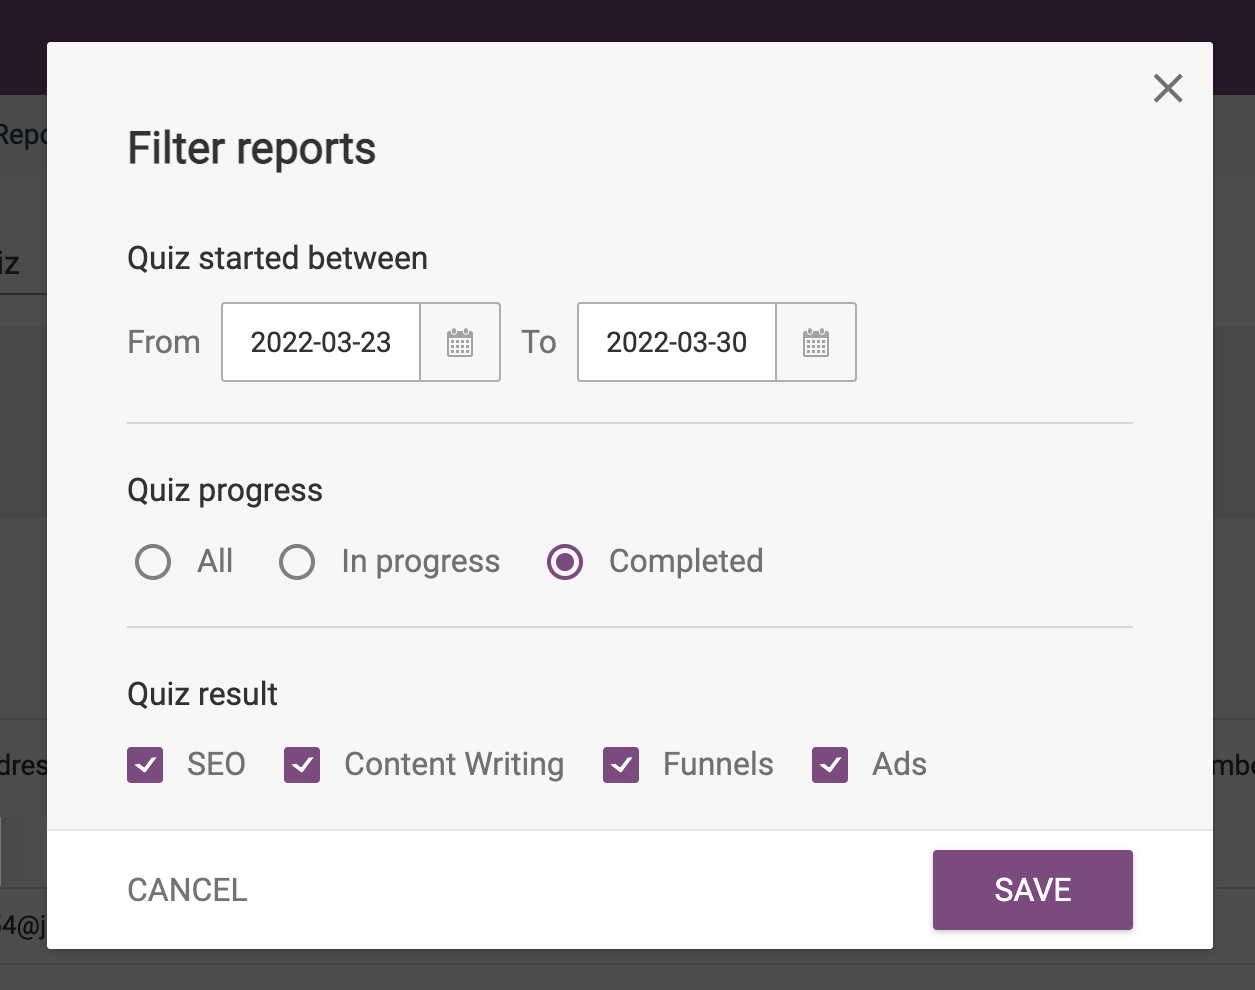
Filter based on completion, result, and when your students started your quiz.
By filtering to specific results, quiz dates or quiz progress, the Users report will only show the students that have met your filter criteria, making it easier for you to see which students need your help.
5. Exporting Your Landing Pages Now Includes Headers, Footers and More
Lately, we've been doing a lot of work on improving the importing and exporting of content from your website with Thrive Architect.
In our March release, we made it super easy to export non-landing page content (WordPress page content and blog post content) with just a few clicks.
This month, we've added support for headers, footers, top sections and bottom sections, which will now all be included when you export a Landing Page.
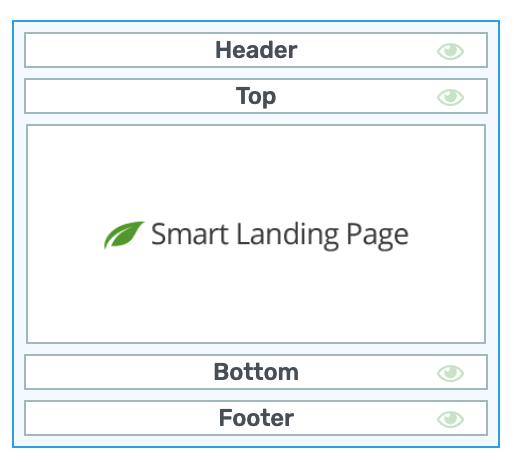
Headers, footers and other sections will be included in exports.
Headers, footers, top sections and bottom sections are all template sections... meaning they can easily be reused across multiple pages on your website. Update them once and they update globally.
They're an efficient way to keep your website fresh. But because those template sections are globally managed, we previously were unable to include them in single-page exports.
We've now solved this.
When you export from one site and on another, those template sections will also be imported. For there you can begin using them as a new global template sections or leave them to only show on that single page.
There's only one catch: unlike headers and footers, top and bottom sections are driven by Thrive Theme Builder technology and are unavailable on websites with a different theme engine. If you export a page from a site with Thrive Theme Builder but import that same page on a site with only Thrive Architect, headers and footers will successfully display (as well as the main page content of course), but top and bottom sections will not.
6. Set Email Delivery Service in Thrive Apprentice
Thrive Apprentice allows you to customize the registration email sent to newly registered users on your website.
These could be users that complete a registration form, users created automatically by making a purchase on a 3rd party checkout (like ThriveCart), or users created in an automation in Thrive Automator.
This email provides users with their login information, so it's important that it doesn't get lost.
Therein lies the problem... WordPress emails are notoriously bad at delivery, and often end up in spam.
Not anymore. You can now select an email delivery service that will send that new account creation email from a much more reliable source, ensuring it delivers immediately to inboxes.
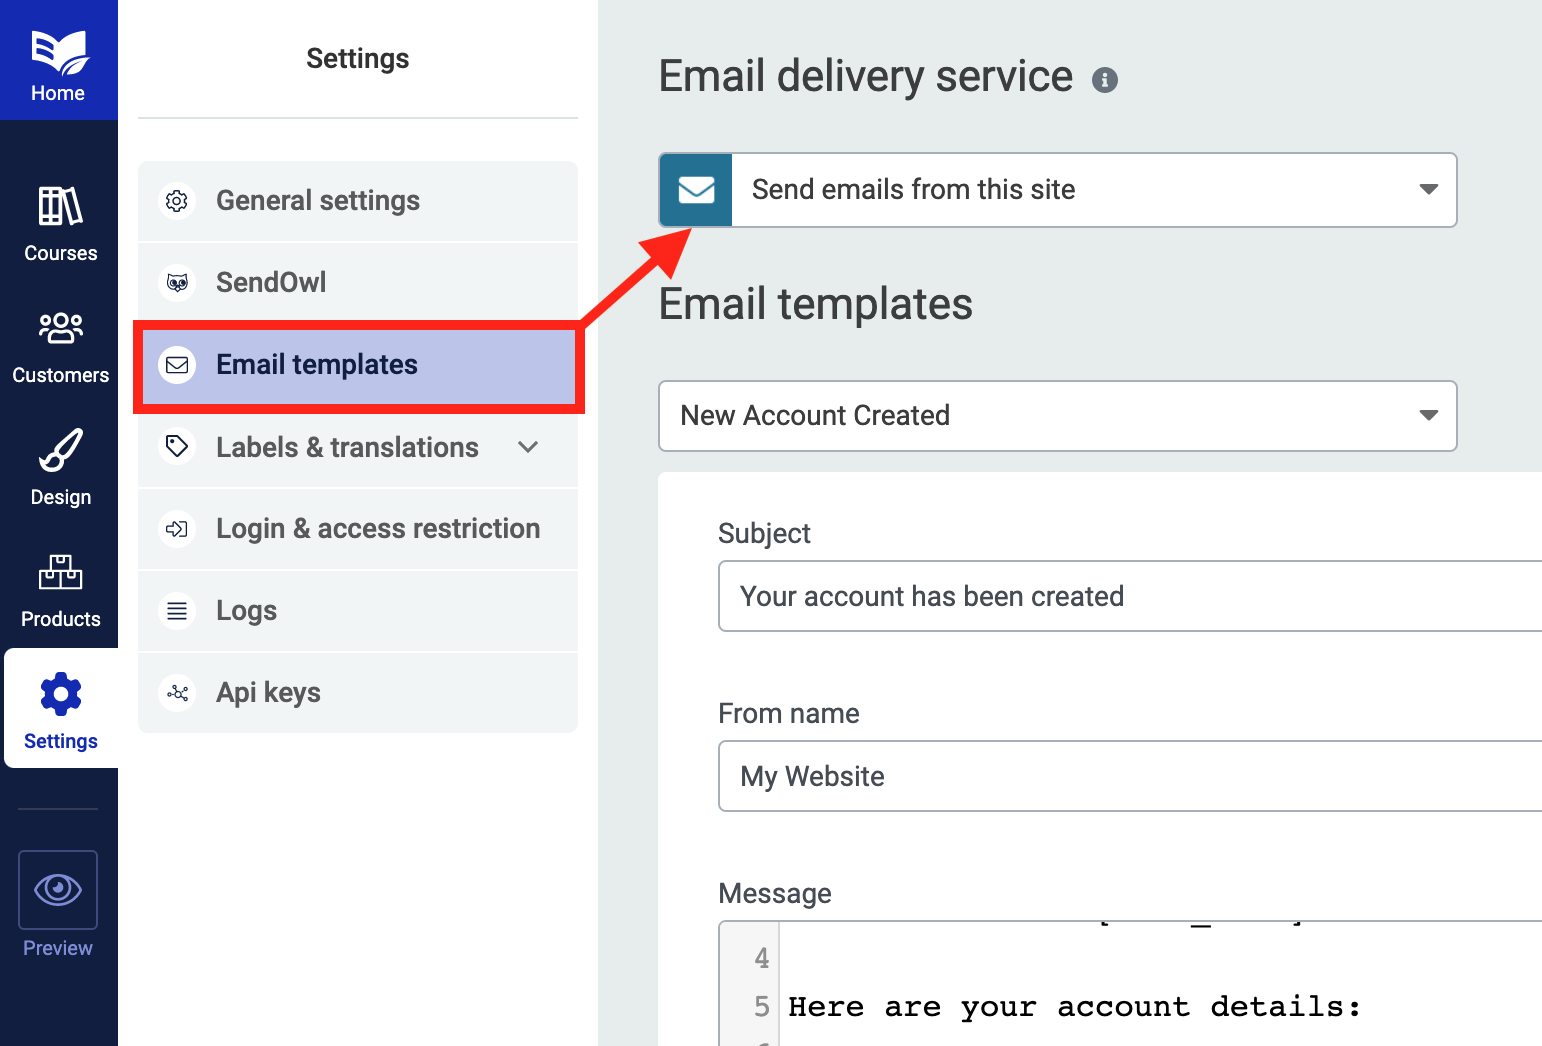
You can now choose which service you'd like to use to send emails from your website,
If you've been kicking around WordPress for a while, you might be using an SMTP plugin— a type of plugin that takes over all emails sent from your website to ensure they are delivered correctly. (You can learn more about how to do this here.)
If you are, then just leave this new setting to 'Send emails from this site'. Nothing needs to change.
But if you aren't, head into Thrive Dashboard > API Connections and connect a type of email account called a transactional email service.
Transactional email services can be configured here.
Transactional emails (sometimes referred to as an Email Delivery Service) are different to marketing emails, in that they contain unique information per customer and must be delivered immediately. Transactional email is used for account information, receipts, passwords resets, and more.
We currently integrate with the following transactional email services:
- Postmark
- Amazon SES
- Campaign Monitor
- Mailgun
- MailRelay
- Mandrill
- SendinBlue
- SendGrid
- SparkPost
Once you're connected, you can choose any one of those services in Thrive Apprentice.
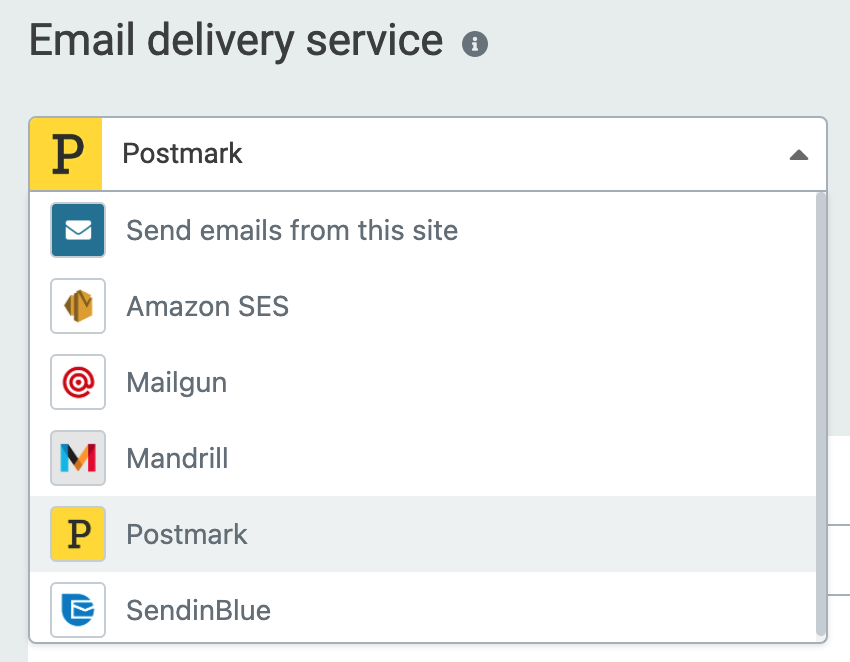
Any connected transactional email services will appear here.
Then, whenever someone registers a new account, your website will package up the email data, pass it to your delivery service of choice, and it will be sent from a respected email server, massively increasing the deliverability into your customer's inbox.
Thrive Automator
The following 4 features across Thrive Automator and Thrive Apprentice work together to let you grant access to your courses easier than ever before with the incoming webhook trigger.
Previously, you had to create two automations per course that you wanted to give access to: one for granting the course, and another for refunds or revoking access.
For a website with 20 courses, that would require 40 different automations.
Now you can do it... with just 2 automations!
One automation for providing access, and one for removing it. Those two automations can now dynamically grant access to different courses depending on incoming webhook values. It'll work for 1 course, 10 courses, 100 courses... or even more.
We've been focusing on this use-case to ensure Thrive Automator is flexible and can handle dynamic and complex data types.
Let's get into it!
7. Dynamic Field Mapping at the Incoming Webhook
Next time you open Thrive Automator and configure an incoming webhook trigger, you'll notice different field mappings are available.
You can choose to map an incoming webhook to a generic field such as a text field or a number value, at which point it has no meaning but can be used down-stream.
Or you can choose a Dynamic Mapping.
One of the dynamic mapping options we've added is 'Apprentice Product ID'. By selecting this, you are telling Thrive Automator that the incoming webhook field should be matched to a Thrive Apprentice product.
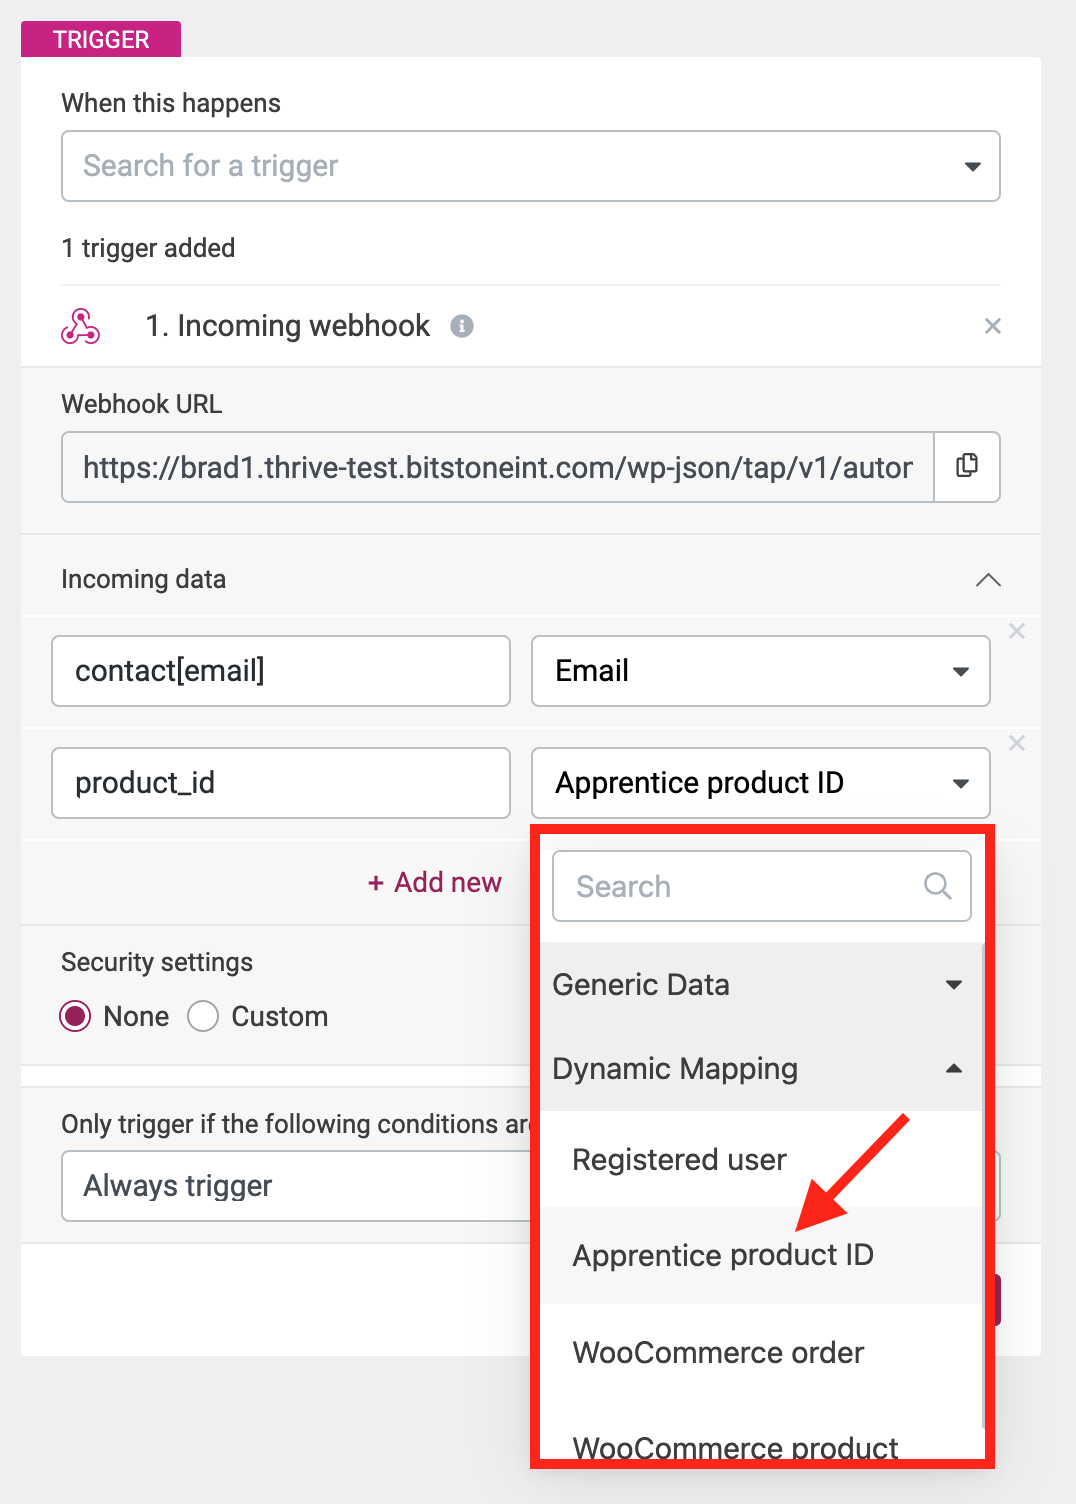
Dynamic mappings will be available in the incoming webhook.
If the match is successful, then as the automation runs, Thrive Automator will know which Thrive Apprentice product you are referring to based on the ID sent through on the incoming webhook.
But, how do you know that the ID should be? Well, for that we have...
8. Find or Set Thrive Apprentice Product ID for Dynamic Mapping
If your incoming webhook needs to provide the correct Thrive Apprentice Product ID, then you'll need to know what that ID is.
Now you can.
In Thrive Apprentice, open your products list and click on any product. Under the Access Requirements tab, you'll see the Product ID listed in the top right.
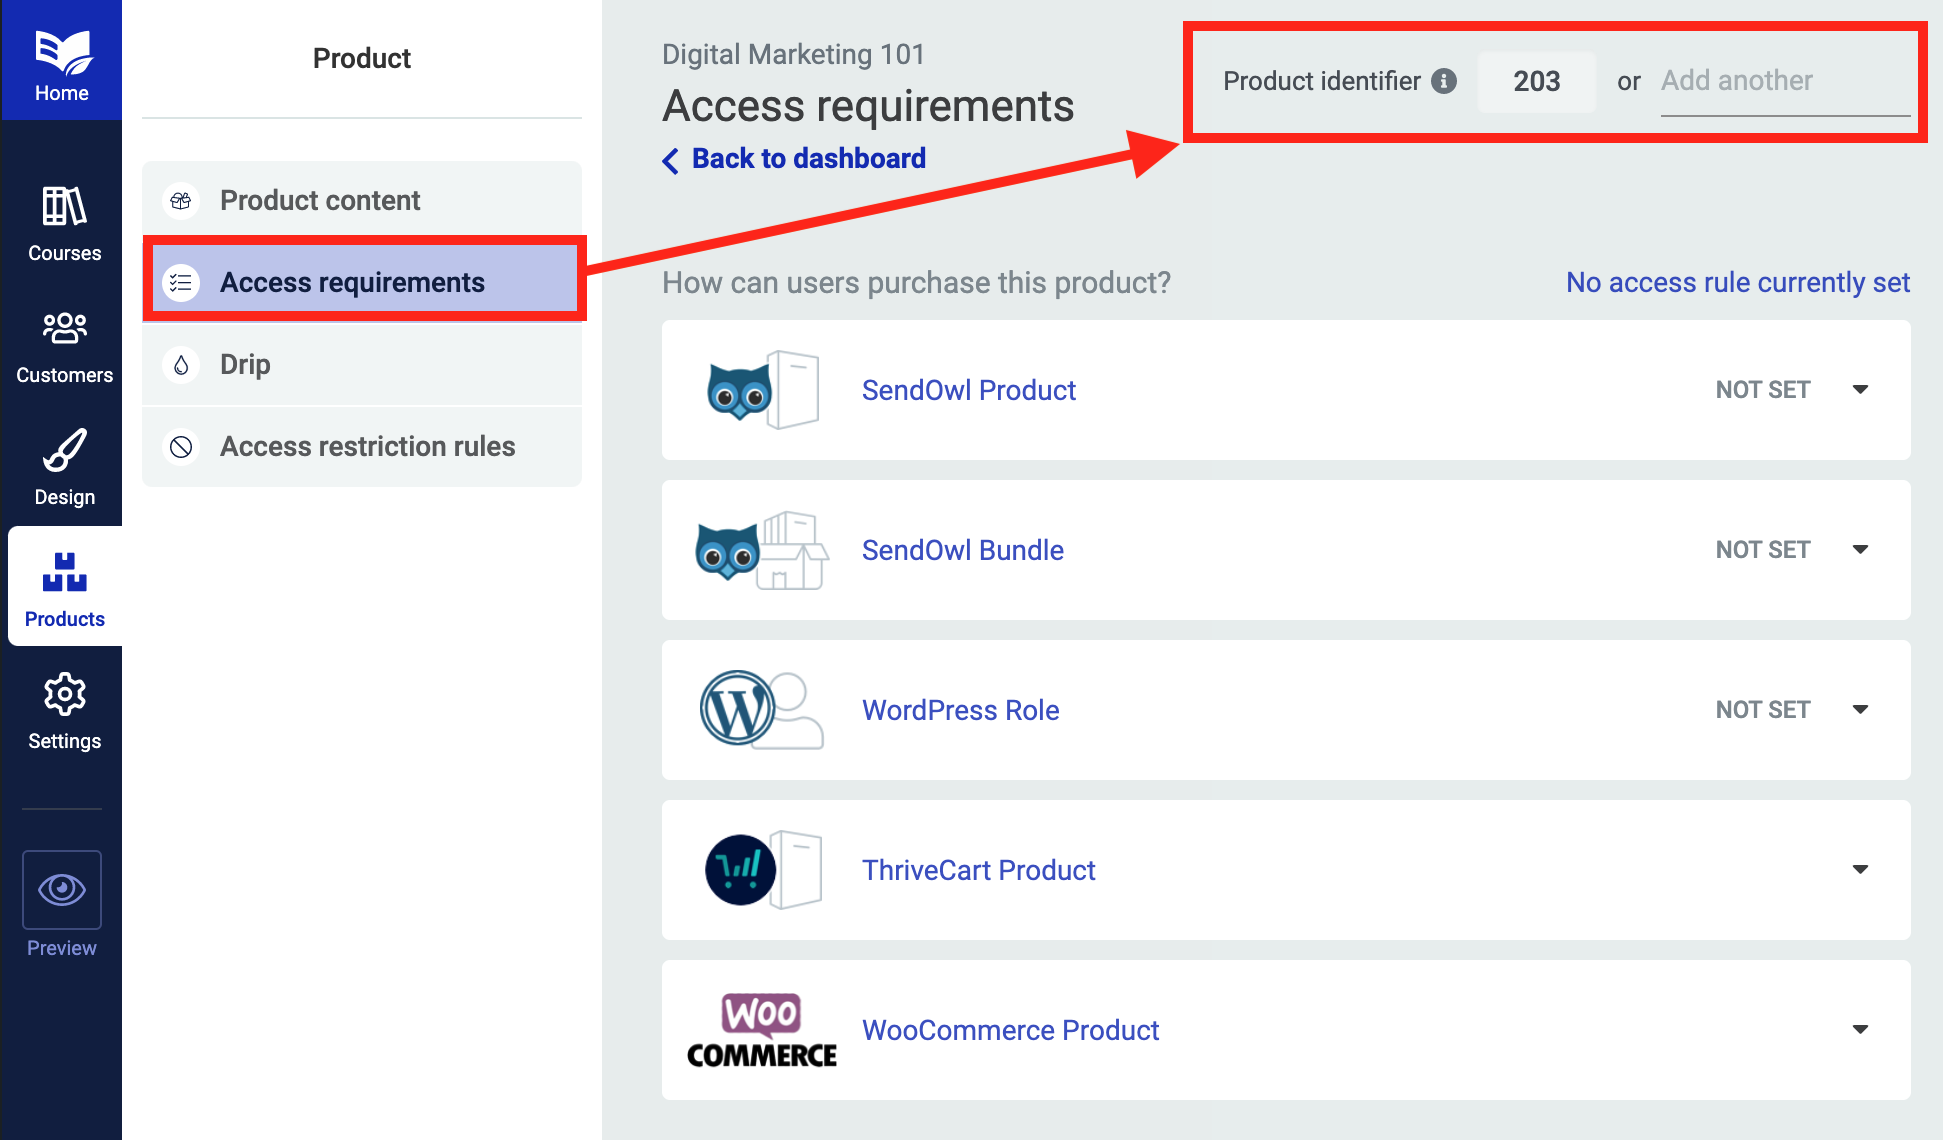
Find your Product Identifier inside of the Thrive Apprentice Product.
In the image above, I know that the Thrive Apprentice Product 'Digital Marketing 101' has the ID of 203.
That means that if I dynamically map my incoming webhook to a Thrive Apprentice Product, and that webhook sends through the value of '203', then I know the correct product will be selected.
However, not all 3rd party checkout services or webhook senders support custom fields. If they don't, then you won't be able to tell it to send the value of '203'. You'll be stuck with some kinda of hardcoded, generic ID provided at the sender side.
In which case... we also allow you to provide a custom ID.

Or add your own custom ID instead!
Providing a custom ID means that you are telling Thrive Automator that if it receives the value of 203... or the value 'custom_id_123'... that it should be granting access to this specific product.
For any webhook services that have their own IDs hardcoded into the sending service, you can simply copy and paste the unique ID into Thrive Automator and it'll point to the correct product.
9. Thrive Automator Actions to Support Dynamic Data
Ok, so your incoming webhook has been dynamically mapped to a Thrive Apprentice Product. And the value it sends is the ID that matches the Product ID.
What now?
Actions in Thrive Automator can now intelligently see the dynamic data source.
The first two actions we've applied dynamic logic to are 'Grant access to product' and 'Remove access from product'.
If you select either of these, you'll find a new dynamic value in the selection dropdown, called Dynamic Apprentice product.
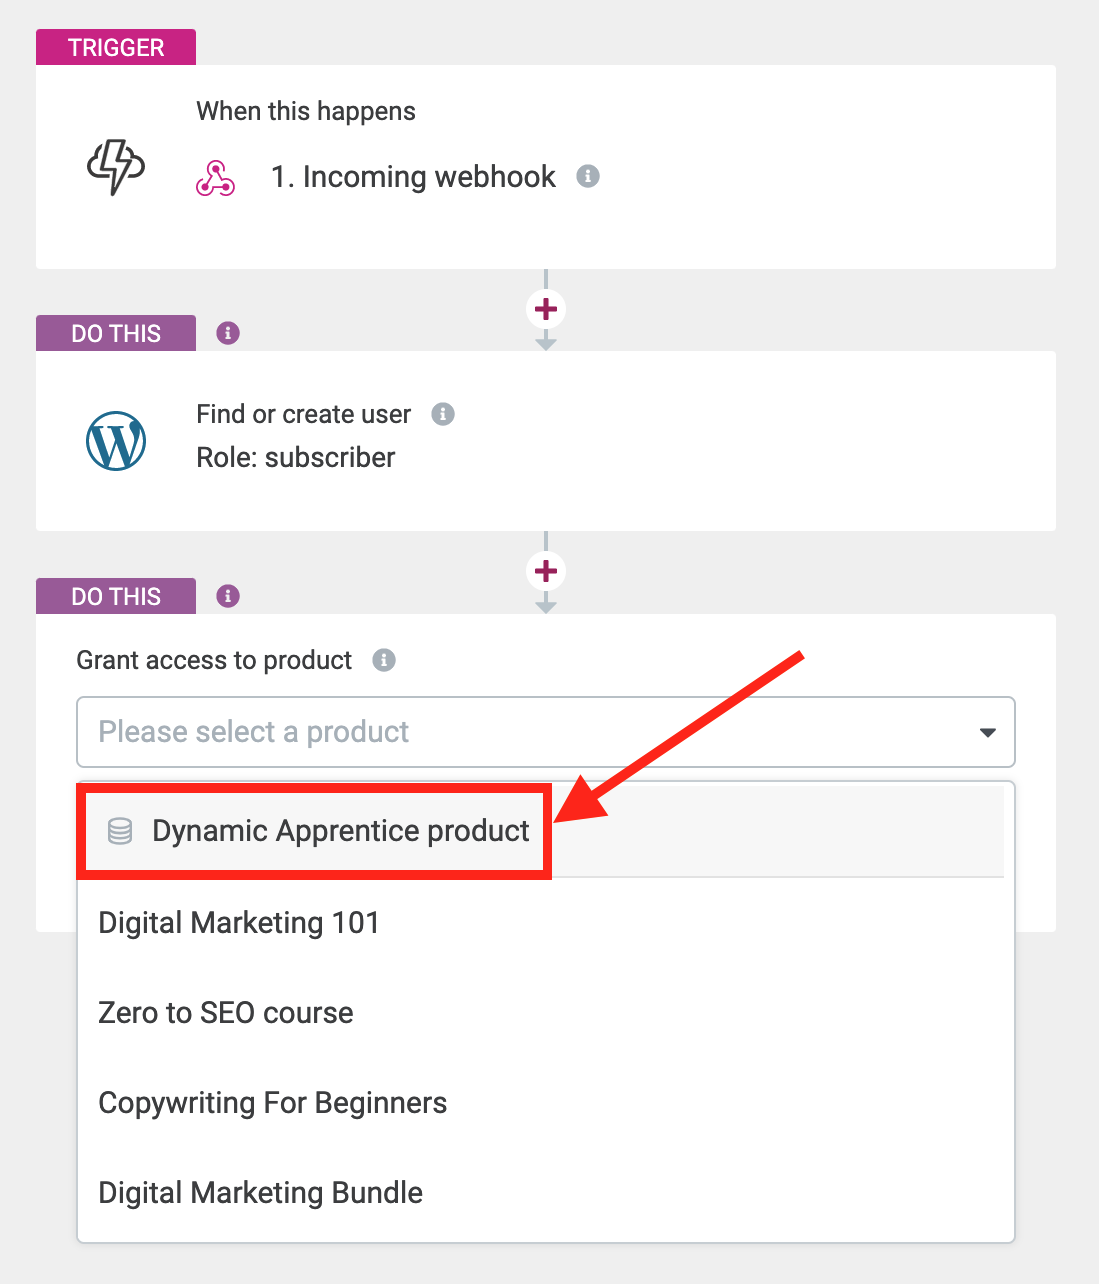
Dynamic actions will be available if the upstream mapping is correct.
This means that while you're building your automation, Thrive Apprentice will not know exactly what product to give access to. But once you've built the automation and it is triggered by an incoming webhook, it will grant access to the product that matched the Product ID in the incoming webhook.
That means you get a completely different product depending on what the incoming webhook sends! Amazing!
10. Advanced Data Mapping
The above 3 features are super powerful, and they lay the groundwork for how we're going to support dynamic data across all data types, triggers and actions going forward.
But every once in a while, you might find yourself in a unique position where what you require is just... well... a little bit more complex.
We've got your back.
We call those unique examples 'edge-cases'— use cases that are uncommon and difficult to cater to with a general solution.
To support those edge cases, we have a new action type called Advanced Data Mapping.
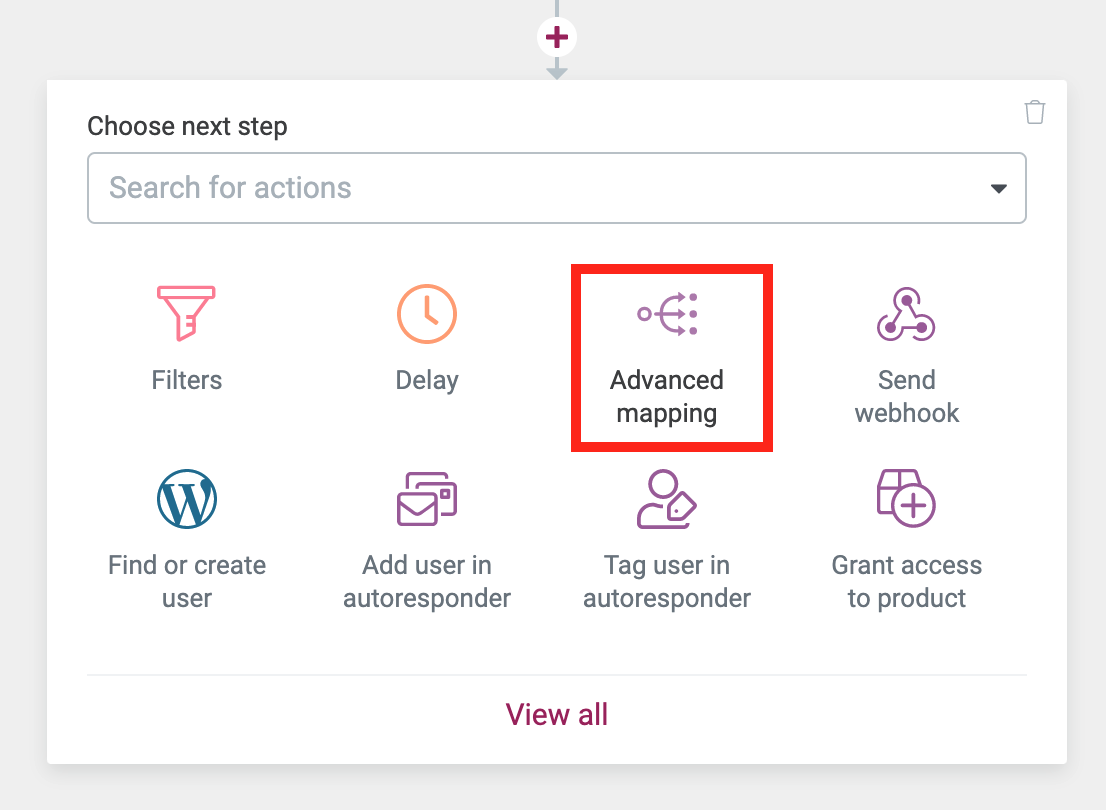
Look for the new Advanced Mapping action.
Advanced Data Mapping is clever.
It allows you to take any data coming into Thrive Automator, and to manually tell it what the data is meant to do.
You do this by selecting a data source— anything that Automator knows about based on the triggers you've set up.
Then, you choose what it maps to. In this case we're mapping it to Apprentice Product ID again. This unlocks the dynamic products in later actions.
But after that, you can build a table of matches, telling Thrive Automator what specific IDs you want to map to which product in Thrive Apprentice.
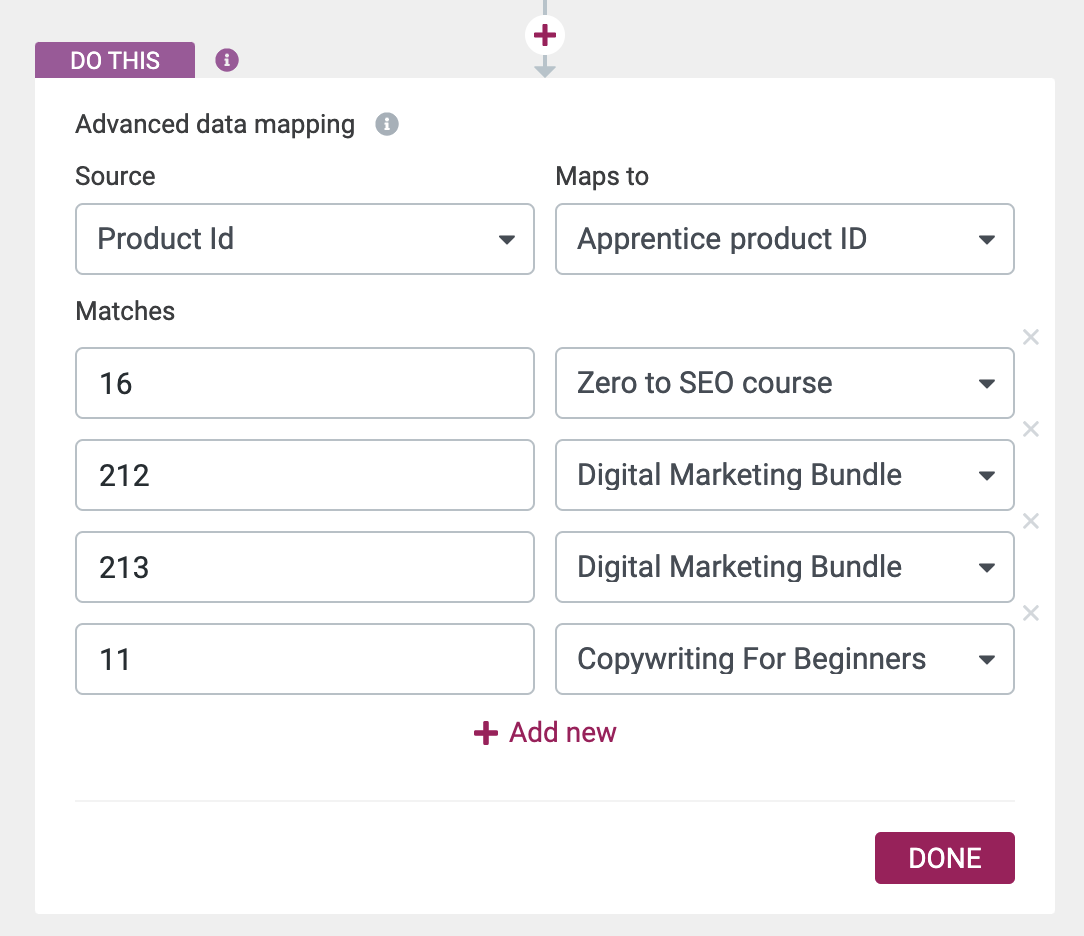
Manually map your data into pairs.
This completely bypasses the internal IDs in Thrive Apprentice. By manually setting it up here, you are telling Thrive Automator exactly what product you would like to point to, based on what values arrives.
Pretty neat, huh?
If you want to take it a step further, think about using Advanced Dynamic Mapping with the Form Submit trigger. Your customers can complete a form on your website, and depending on the custom field they pick, such as a dropdown, radio or checkbox on your form, you'll be able to grant them access to a different Thrive Apprentice product.
If all of this sounds a little technical, don't worry.
You don't need to understand or use this at all if you don't need to (that's why we call it advanced data mapping)
But for our team, this is quite a milestone in preparing the foundations of data manipulation for Thrive Automator, something we really wanted to get right before we exit the public beta.
Let us know what you think in the comments!
You know the drill— we love hearing which features you will use straight away, your unusual and interesting use cases, and what you think of the latest features.
Drop a comment below!


I love how the new website looks!
Just one question – I have been having trouble accessing items from the drop-down menu. Every time I move the mouse to click on “Knowledge Base”, the drop-down menu disappears. I tried clicking on it etc but no dice.
Ah, this is something our design team are figuring out. It doesn’t replicate for me, it works just fine (Chrome on Mac OS), but some of our designers seem to have observed the same thing.
We’ll figure it out soon enough.
Wow. I bought a theme – and got a Universe …
An expanding universe too. Hope you find what you’re looking for in our little universe, Stefan
Bradley, I cannot thank you and the whole team enough for the whole thrive suit surprising us every day, week and month AND the best support team ever!
Man, this is an amazing update!!!! You all have been crushing consistently for the past 5 years!!!
It’s all about consistency. Here’s to the next 5 years of continuing to crush it
This is amaaaaazing… Y’all continually blow me away with your creativity inventiveness, always pushing the possibilities forward, and also the reliability of the products you build. It’s a wonderful thing, keeps me inspired and grateful to be (fully) on board with you. Rock on!!
Thanks Daniel!
Awesome!
Sheesh! Thank you, and rock on!
Rock on, we shall!
Hi Brad,
I noticed a question on the FB group about ActiveCampaign has acquired PostMark…
This was news to me but welcome info since I use AC…
I’ve been confused for a couple of weeks about the free Membership I’ve set up with Apprentice: I have over 100 website subscribers, but only a handful of email list subscribers…
I’ve been trying to sort this out (but no luck :/) so I’m wondering if I also need this transactional email service set up… Is that why I’m not getting more signups…but why did I get *some*???
And do I need that now that AC has acquired PostMark???
Thanks for any advice/direction! <3
Oh, I missed that AC acquired PostMark. That’s interesting, and I’d imagine it’ll be good news. There’s only one or two mailing list providers I’ve seen that have transactional email built in.
Usually when a company acquires another, they continue to run them separately until they figure out a merger. Until then, I’d imagine you would still sign up for PostMark and use their API for transactional email.
As for your website having more sign ups than your list, no that won’t be related to transactional email. My best guess is that you have a Registration Form somewhere on your website that hasn’t been connected to your mailing list. So when someone signs up to your free courses, they get access without being subscribed to your mailing list as well. Either that or if you’re using Thrive Automator to register users, you’re not adding them to your mailing list there either.
Hope you find the source of it soon!
Thanks, Brad! <3
I suspected it my Registration form wasn’t connected to both WP & AC, but I confirmed that it IS connected to both… so I’m lost as to why… 🙁
I do have double-optin set up at AC, so I’m wondering if that’s why
Ah, yes. Quite likely that it’s to do with the double opt-in. There is no way (yet) to use double-opt-in for website registrations, except for using a webhook from ActiveCampaign to Thrive Automator that only sends when they’ve confirmed.
Gotcha! Thanks!
I’ll look into that 🙂
Hi Brad,
Michael’s comment below got me to thinking… (dangerous proposition, I know 😉 LoL!)
I followed Christine’s comprehensive video on setting up a membership but it never occurred to me about configuring transactional emails…or that I’d need a separate plugin to handle these…
Perhaps you could let someone on the team know that should be added to the notes for that video (on your YouTube channel). Or better yet, give us a tutorial post for just what we need to include…
I never considered having “subscriber” users, but with Apprentice 4.0 I’m now using the free membership as a Lead Magnet; site Members get all my LMs & other premium content, but I’m really “flying blind” on all the details of making it a great subscriber experience…
Thanks! <3
Hi Karen, are you sending your ‘password reset’ and other WP specific emails via AC? I’ve been trying to figure out how to do this rather than using bland emails send via sendinblue or sendgrid. Also, we are limited to one email template in Thrive when, in fact, we might have courses and products so the template does not fit all. Any tips? Thanks.
Hi Michael,
TBH, it never occurred to me I needed to set up transactional emails! (rolls eyes!)
So… no! I haven’t sorted this out… I do recall customizing the Thrive email (weeks ago) then forgot all about it! ;-/
I’ll dig into the Thrive Knowledgebase & read up on this…
Wish I could be more help! If you figure this out, please drop it in here…or in the FB group (you’ll find me in there).
Good luck… <3
Hi, what about Aweber, can I use it?
You sure can! We’ve had an Aweber integration for years now. You can read more about setting it up here: https://help.thrivethemes.com/en/articles/4425547-how-to-set-up-use-an-api-connection-with-aweber
Thank you.
Wow… this is great. I really have to look at the Automator and check, if this fits my special use case, too.
But please add a course sorting option to the course overview Item in Architect. My Products all include more than one apprentice course and I want them to be done in a specific order. Usually the standard order of courses is not even alphabetical, but the latest developed course shows up front. This is not, what I want and need.
There is a workaround to achieve my goal, (adding a course overview item with exactly one element and copy this, choose manually the next course and order them manually in columns) but this is not very comfortable and may occur errors. What I need, is something like the Blog-Post-sorting-option in the Post-Item (where i have multiple ways to filter and sort posts), just for courses in the course-item.
Hi Jasmin,
The courses will be shown in the order you order them in the Thrive Apprentice back-end.
You can simply drag and drop them in the order you want to show them on the front-end. When you hover over the card of the course in the course tab in Apprentice, you’ll see a drag and drop to reorder handle.
Wooow!
This is such an amazing update! Love You guys! And thank You!!
Question – does advanced data mapping includes custom fields created by Advanced Custom Fields plugin?
I’m asking, coz I’m sending from Active Campaign, by webhook some data and in Thrive Automator I can’t assign it to Advanced Custom Fields created for users 🙁 Could this be done?
Thanks again <3
Hey Lukasz, it’s awesome to hear that you’ll use these features. The ‘create user’ action only supports first and last names right now. However…
We are working on an improvement to this feature right now (as well as an ‘update user’ action) that will support other user data, yes— including ACF user fields. So stay tuned!
OMG!!
This is so gonna be so helpfull!
I’m planning to use Architect, Automator and ACF to make an awsome users page with a summary of their quizes results 🙂
But it can also have so many other uses…
Any time frame info when this update could be released?? 🙂
Hi, that’s so good news with the new Data Mapping. Could you make a tutorial or update the help article. Trying to make it work with Digistore24 but not successfully, unfortunately…
Sure, we’ve just published a KB article that walks through the dynamic data mapping example.
Here: https://help.thrivethemes.com/en/articles/6174997-using-a-single-automation-to-grant-users-purchasing-different-stripe-products-access-to-different-thrive-apprentice-products
Depending on how far you got with setting up Digistore24, you may also benefit from this article that walks through the initial setup: https://help.thrivethemes.com/en/articles/5966990-automation-walkthrough-connecting-your-thrive-themes-website-to-digistore24-using-thrive-automator
I still haven’t got the feature that I want. I wish to be able to edit the source code of the Header/Footer right now it is only giving me the option to edit the body. Plus in the mega menu using Thrive Theme Builder, the only hover effect I can apply is background or the font, I wish you could add an icon when you hover a menu item like a “right” icon. Please implement it the next update
Why do you want to edit the source code of the header/footer? I’m asking because if we know what you’re trying to achieve, we can better figure out how to achieve it.
You also lost me with your explanation about the “right” icon for a hover effect in the mega menu. Can you explain it better?
Hi Brad, thanks for the reply. Here is a video https://www.loom.com/share/9fac50dd3c63441a90a403c907ee7cd2 I want to implement the same hover effect however the header doesn’t give me an option to do it, I can add the icon manually but unable to do so since source code is uneditable
Right, I understand now. Thank you! We’ll discuss this with our team.
Thanks for the new updates! Can you tell me please if you plan multi-step-form for the lead generation element in TA?
We’d like to! But we have a lot of other higher priorities. I’m assuming you mean splitting form fields across multiple states. I’m sure you already know that we have multi-step Thrive Leads forms, but those still keep all form fields in a single state.
If you’re splitting your fields across multiple states, how and why are you dividing them? Like, first name and email on the first state, then custom fields on the second? Basically, we’d like to better understand what you’re trying to achieve and why it’s important to your business.
Awesome!!!
I am *TOTALLY* blown out by all this continuous avalanche of cool new features!
However, I believe you could support just one more Architect use case to finally surpass Genesis as the best “dev friendly” theme framework.
I need quite often to call a custom made PHP function when a button / link is pressed. So far, I create shortcodes and assign them to the button / link action.
However this is very tedious and an unnecessary.
What I’d love to see is adding another destination with an edit box (like when specifying a shortcode) where I can:
1) As a minimum, type a PHP function name, i.e. blah();
2) Better, type a PHP function name and I can pass static parameters, i.e. blah(“John”, “Smith”, 33);
3) Dreamworld better: type a function name where I can also pass Architect Dynamic link values, i.e. blah(“John”, “Smith”, 33, {Address});
where {Address} could be any of Thrive Global fields names, dynamic fields names and so on.
Hey Dario, I discussed your request with our dev team, and we’re a little bit puzzled by it and have some follow up questions.
The main question is: what are you trying to achieve? What’s your end goal that you want or that you want your website visitors to experience? If we can better understand what you’re trying to achieve, we can pull apart your suggestion and think about it properly.
On top of that, we’re wondering if this is better served with Thrive Automator, and creating a link click action. That would allow you to build your dynamic datasets.
Hello Bradley,
thank you for your caring about us, your customers!
What I want to achieve is to create simple functions that “do stuff” on the same server, when website users press certain buttons or links.
Now, Automator sounds good and is improving by the day, but if you want to go the “Automator way”, it should add a “OnClick” trigger, where I can pass a button id / class (and its page).
For various reasons, forms are not always a possible choice, plus they are quite inflexible if one needs to fine tune every form field, add “non form” stuff inside the form (possibly linking to the form elements too) and so on.
A simple “OnClick” would suffice to me, especially if using the parameters functionality offered by Automator.
Use case: a customer of mine wants to implement a Restaurant menu where customers can click buttons to order stuff. I know there are specific plugins to do that, but they are FAR from the awesomeness that Architect makes possible.
Also I am so “obsessed” at using your product that I am both an affiliate of yours AND I want to keep proposing YOUR suite not other plugins.
Thanks for your answer, Dario. Appreciate you taking the time. We’ve discussed this a bit with our team, and there were originally a few security concerns and raised eyebrows from our developers. On one hand, we want to give you the freedom to do anything. On the other, we need to exercise a degree of responsibility to make sure we aren’t opening up lots of vulnerabilities. We haven’t made a decision, but if an “OnClick” trigger would suffice, this is something we’ve been wanting and intending to do for some time.
Hi! I’m loving the flexibility of Thrive Suite, but the only piece I feel is missing – and one I’m *super* interested in – is a Community piece! This feature would be SO helpful. ???? Any chance you geniuses are working on that in the background!! ????
Hi Emma,
We’re working on A LOT in the background but community is not one of them.
This exact topic keeps coming up in the “Official Thrive themes FB Group” (https://www.facebook.com/groups/383136866154053)…
TL;DR: Not many options out there and the “good ones” are not inexpensive… FWIW, Shane recently switched over to “Circle” platform (on his ikario project)… It still looks like the traditional “forum” but people seem to like it better.
What I read into the comments on those various “Community” threads is that they want something “like Facebook” in appearance and searchability, but NOT on FB…
I suggest you take a look in that group and see these comments for yourself…