Today, we're going to set the bar high.
It's 2021, and Thrive Themes isn't here to mess around. We're here to take our website building software to a whole new level, and help you get even more out of your online business.
This means some epic updates are on our development roadmap.
But we've already begun.
Last week we rolled out 8 new features to our suite of software tools, and if you read on... you're going to learn how these epic new features improve your already awesome Thrive Themes toolkit.
More...
1. New Thrive Apprentice Lesson List Element
A good book publisher knows that a contents page is not just there to help a reader find what they're looking for...
It's there to sell the book.
Interested readers will read the cover, the blurb and then turn to the contents page to see what else the book explores.
In much the same way, a list of lessons for your online course is a vital part of any online course sales page, showing potential buyers what values lie within.
And if your online course is built with Thrive Apprentice, then the next time you open Thrive Architect to build a page, you'll find a brand new element: The Apprentice Lesson List:
The Apprentice Lesson List element inside the Thrive visual editor.
This new Lesson List element borrows the ground-breaking technology behind our Post List element, and combines it with Thrive Apprentice to give you visually editable, interactive course outlines.
Take a look at this example below. Would you believe me if I told you it's a pro-designed template that automatically loaded my courses's module, chapter and lesson titles?
Well, it's true. This is how it looks out-of-the-box:
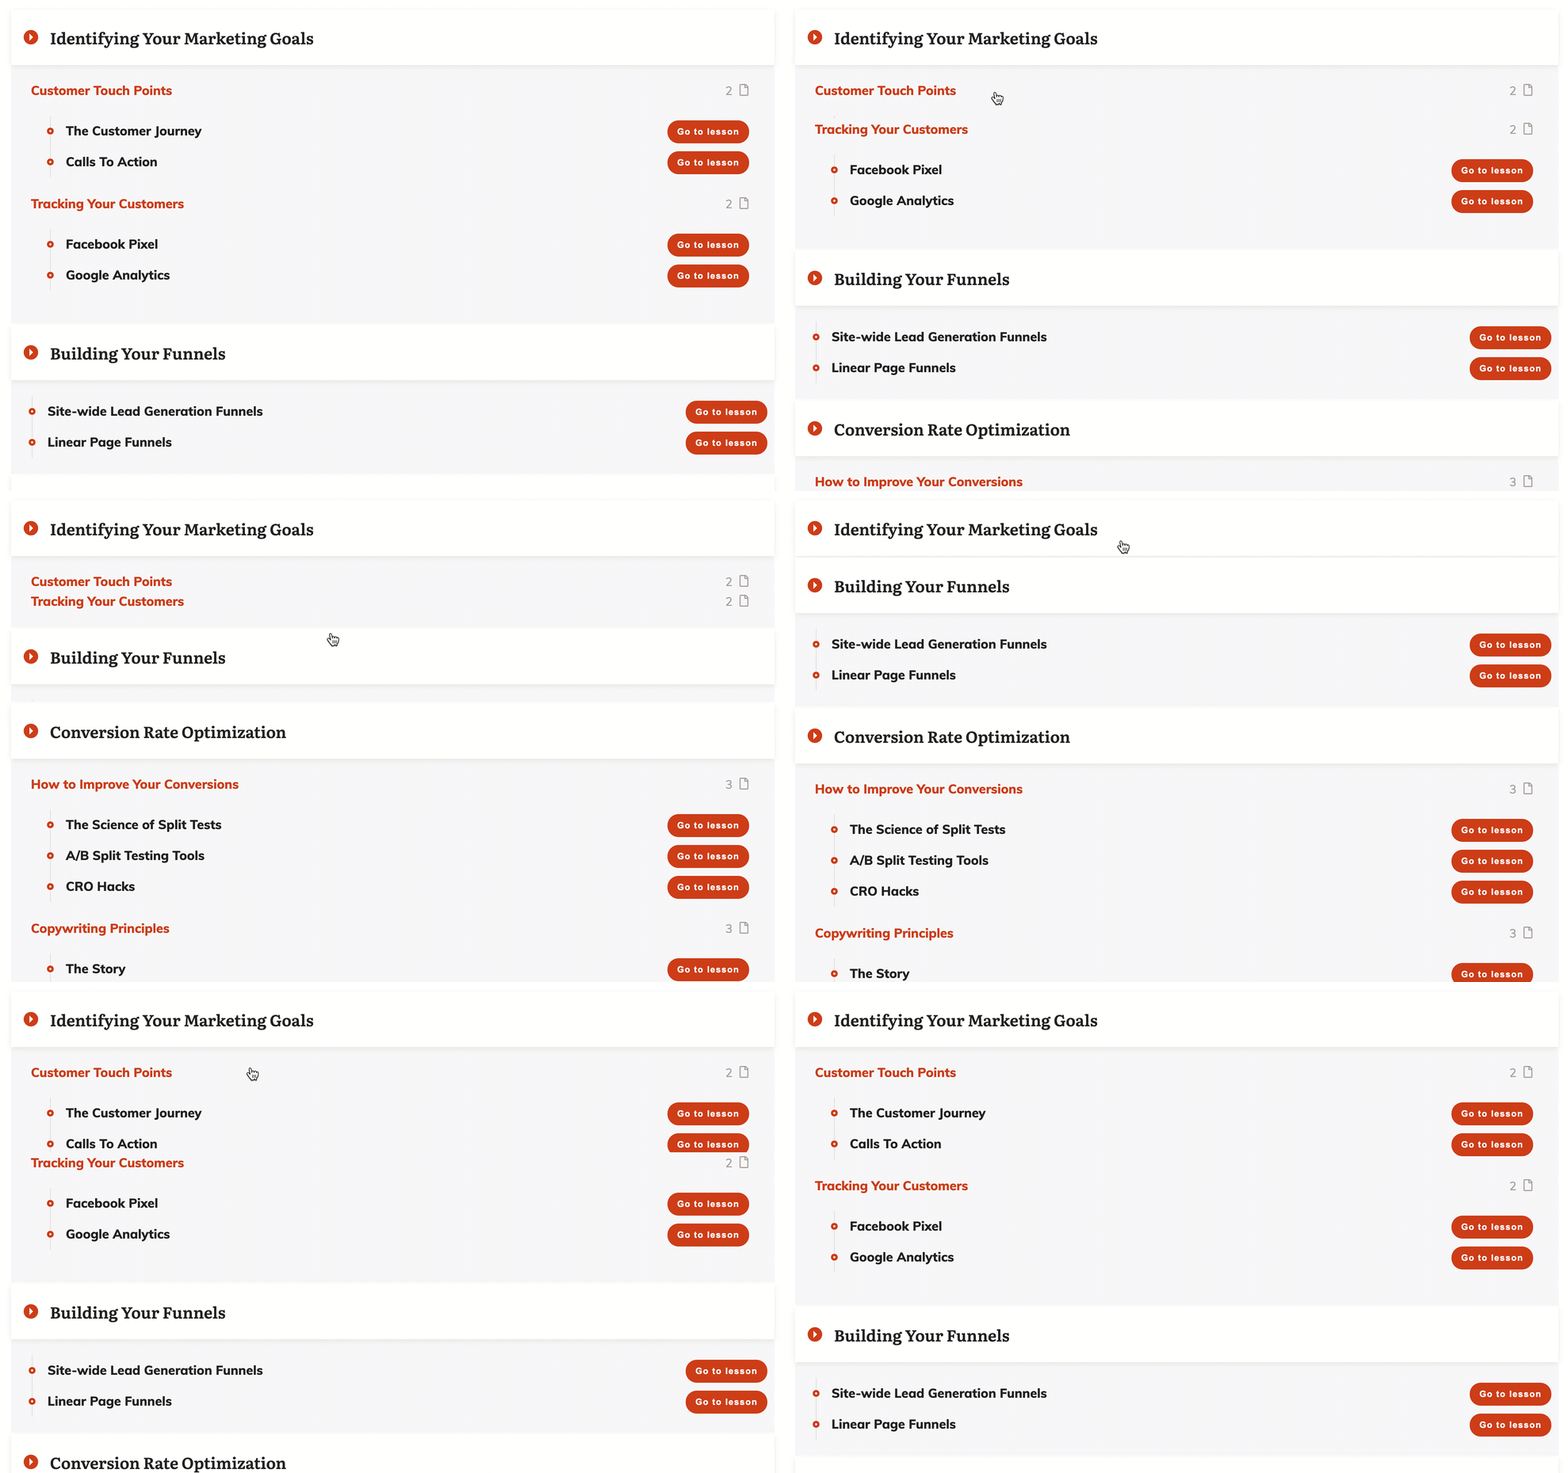
The Apprentice Lesson List element comes with multiple pro-designed templates to choose from and automatically loads your course's module, chapter and lesson titles.
When you drop the Apprentice Lesson List element on any sales page, content area or dashboard page inside Thrive Architect, it will ask you to select from any of your existing Thrive Apprentice courses.
Once you've chosen the course you want to load, you can pick from any of our pre-designed templates:
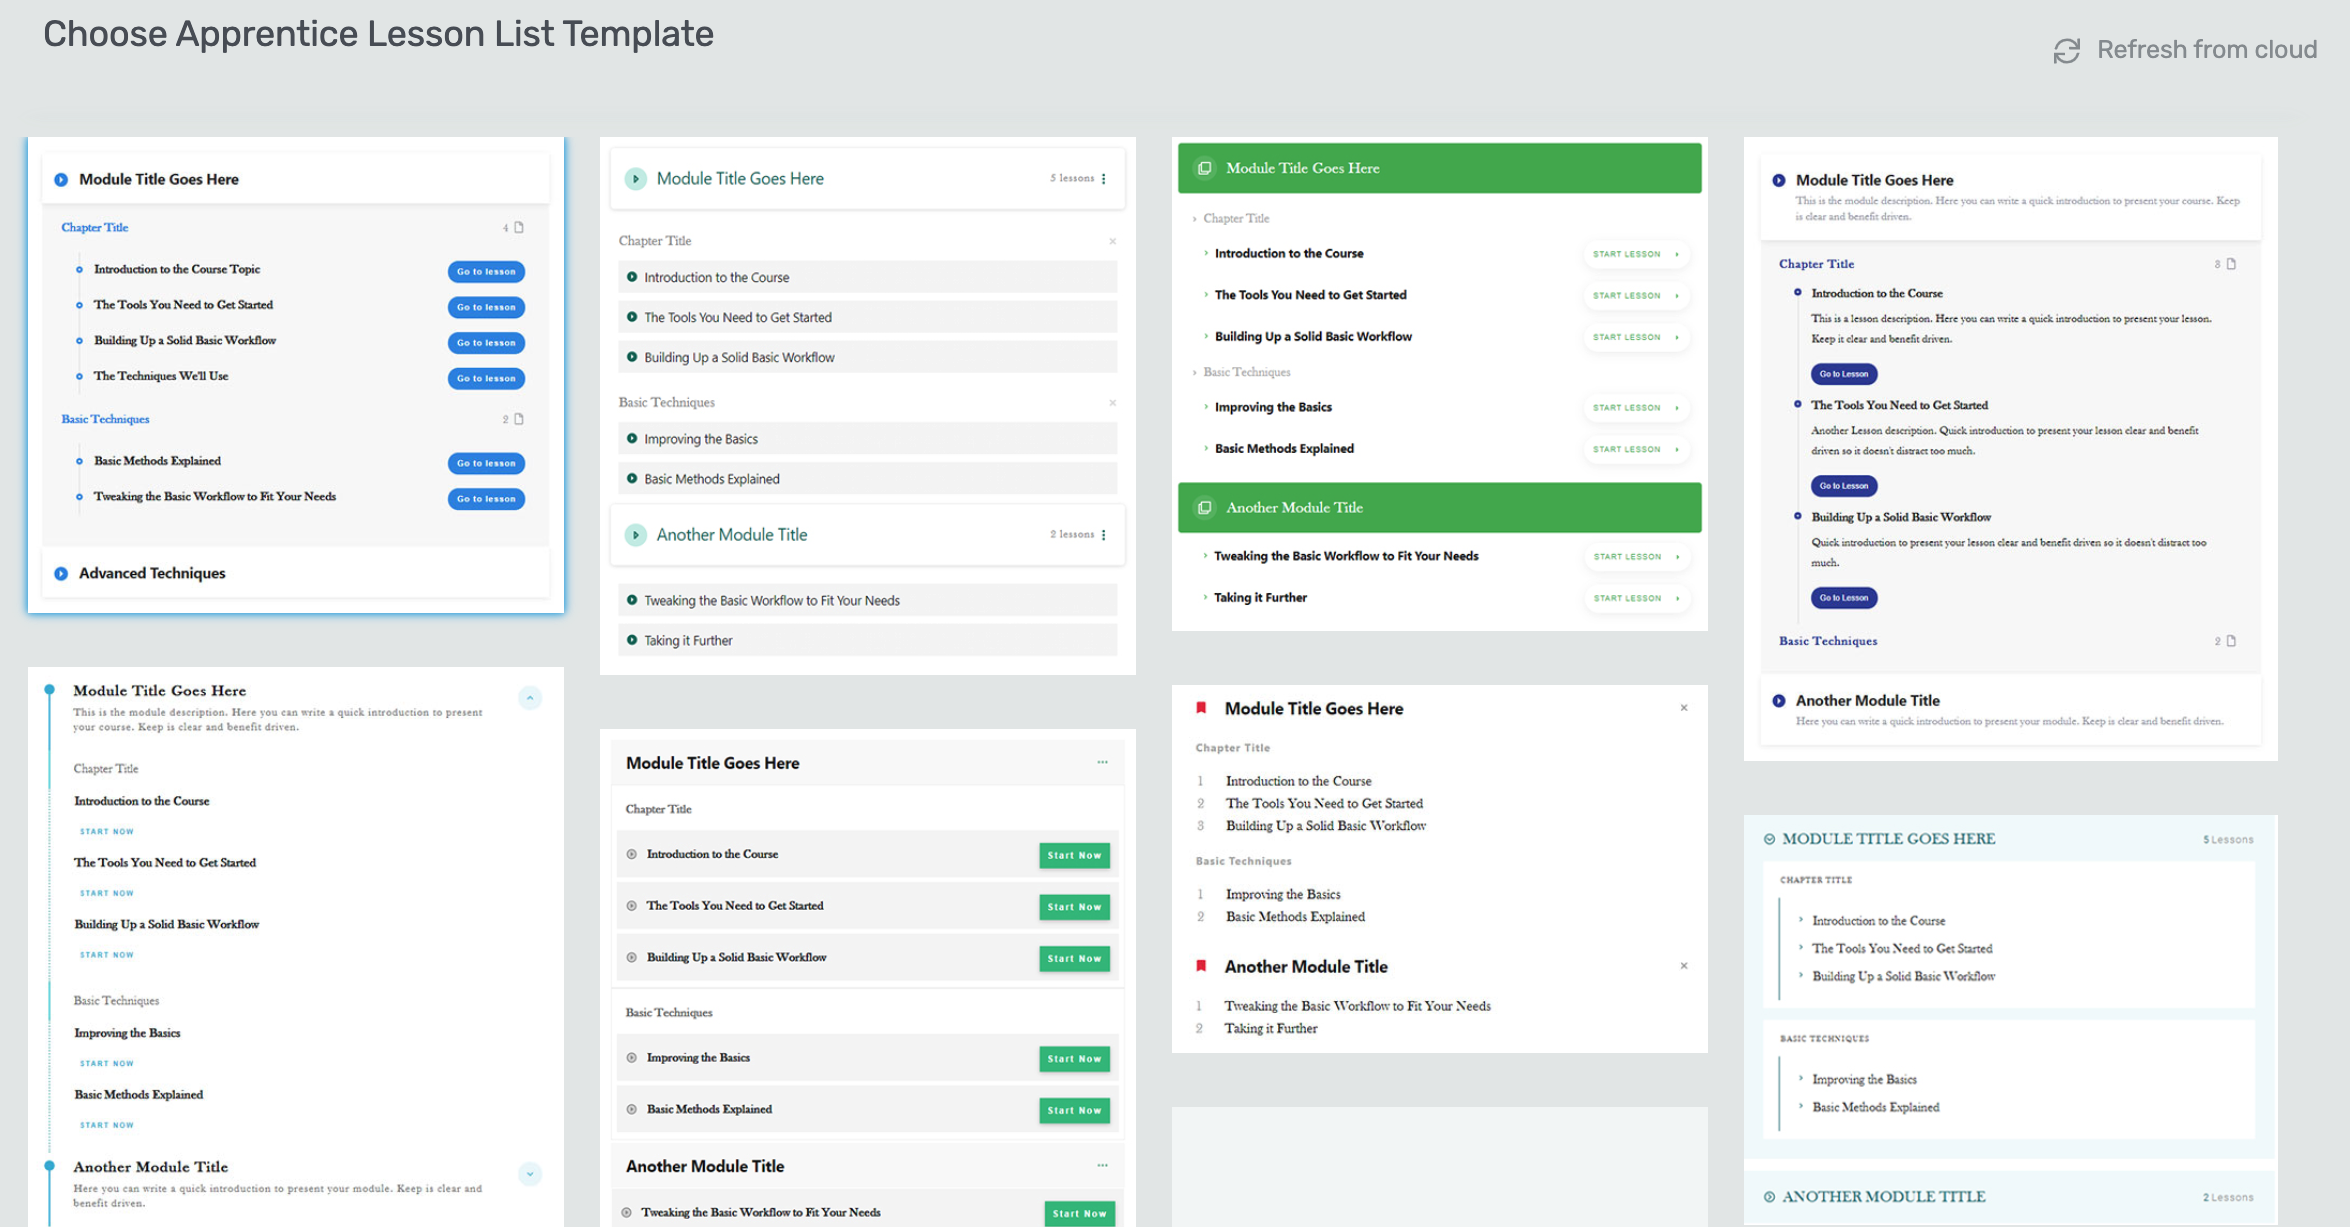
The Apprentice Lesson List element template library gives you several different professional designs to choose from.
The Main Options panel for the Apprentice Lesson List will let you choose a few simple options, including changing the course, setting a Smart Color, choosing collapse & expand behaviours, and setting a course display level.
The course display level allows you to show the entire course outline, choose a specific module, or just a single chapter.
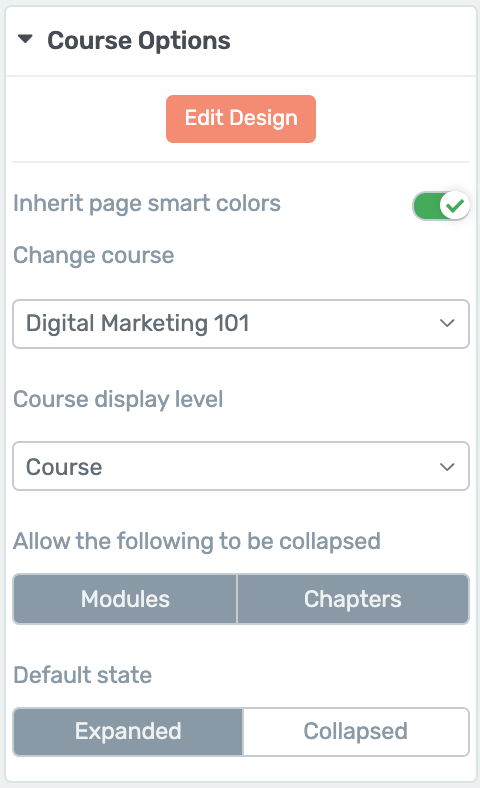
The course display options inside the Course Options tab of the Thrive visual editor's left sidebar.
In a matter of clicks, you can drop a beautiful outline of your online course onto any page.
But there's more....
The Apprentice Lesson List element is interactive.
If a user is logged in to your website and has access to the course, then your lesson list transforms from a static display of lesson titles... into a navigation tool that lets them go straight to their desired lesson!
Let's take a quick look at how that feature works...
How to use the 3 Lesson states:

The Apprentice Lesson List edit mode floating bar found inside the Thrive visual editor window.
Once you enter the edit mode on the Lesson List, you'll see a floating edit bar with a dropdown offering 3 states...
1. No Access
The 'No Access' state is what a user sees when they obviously do not have access to the course.
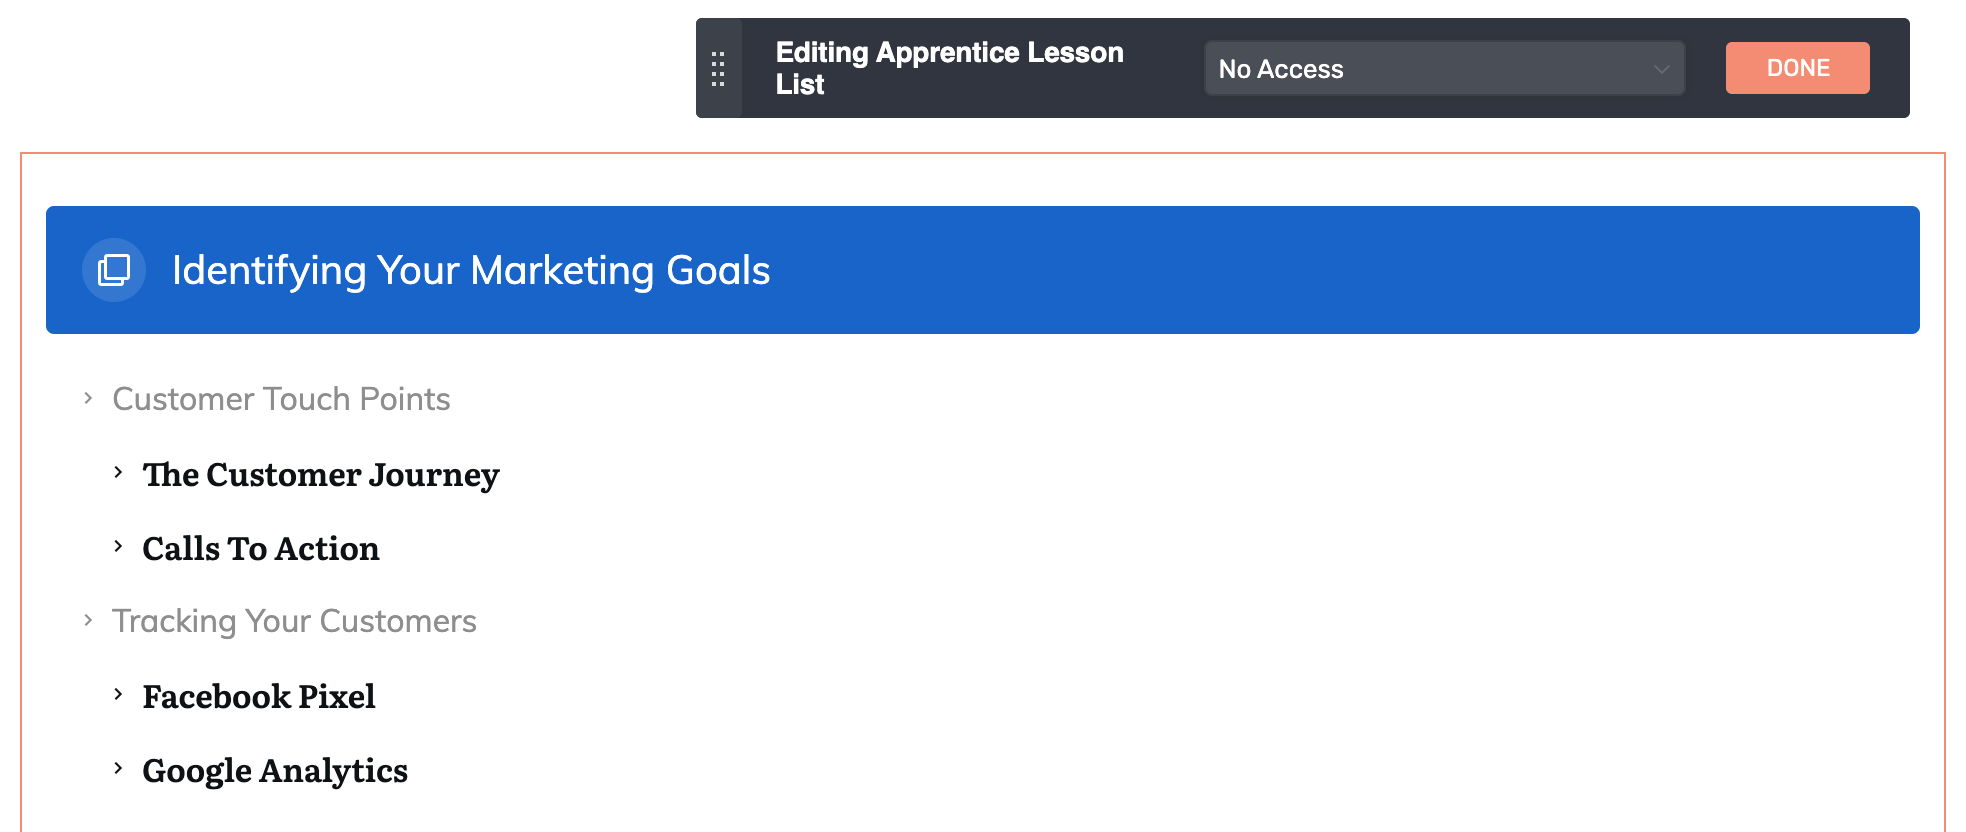
To customize what users who DON'T have access to your online course will see, modify the 'No Access' state of your Apprentice Lesson List element.
By default, the lesson titles are unlinked so a potential buyer on a sales page is not distracted and cannot navigate away from your page.
It reads like a simple contents page for an online course.
2. Not Completed
The 'Not Completed' state is what will be seen when a user is logged in and has access to the course, either by enrolling in a free course or purchasing a premium course through your chosen checkout system.
Should that student come across your sales page or any course outline, it would be frustrating to see lessons titles that aren't linked to the lessons. So in this case, our Apprentice Lesson List element templates are designed with hyperlinked titles and buttons prompting the visitor to get back to the course content:
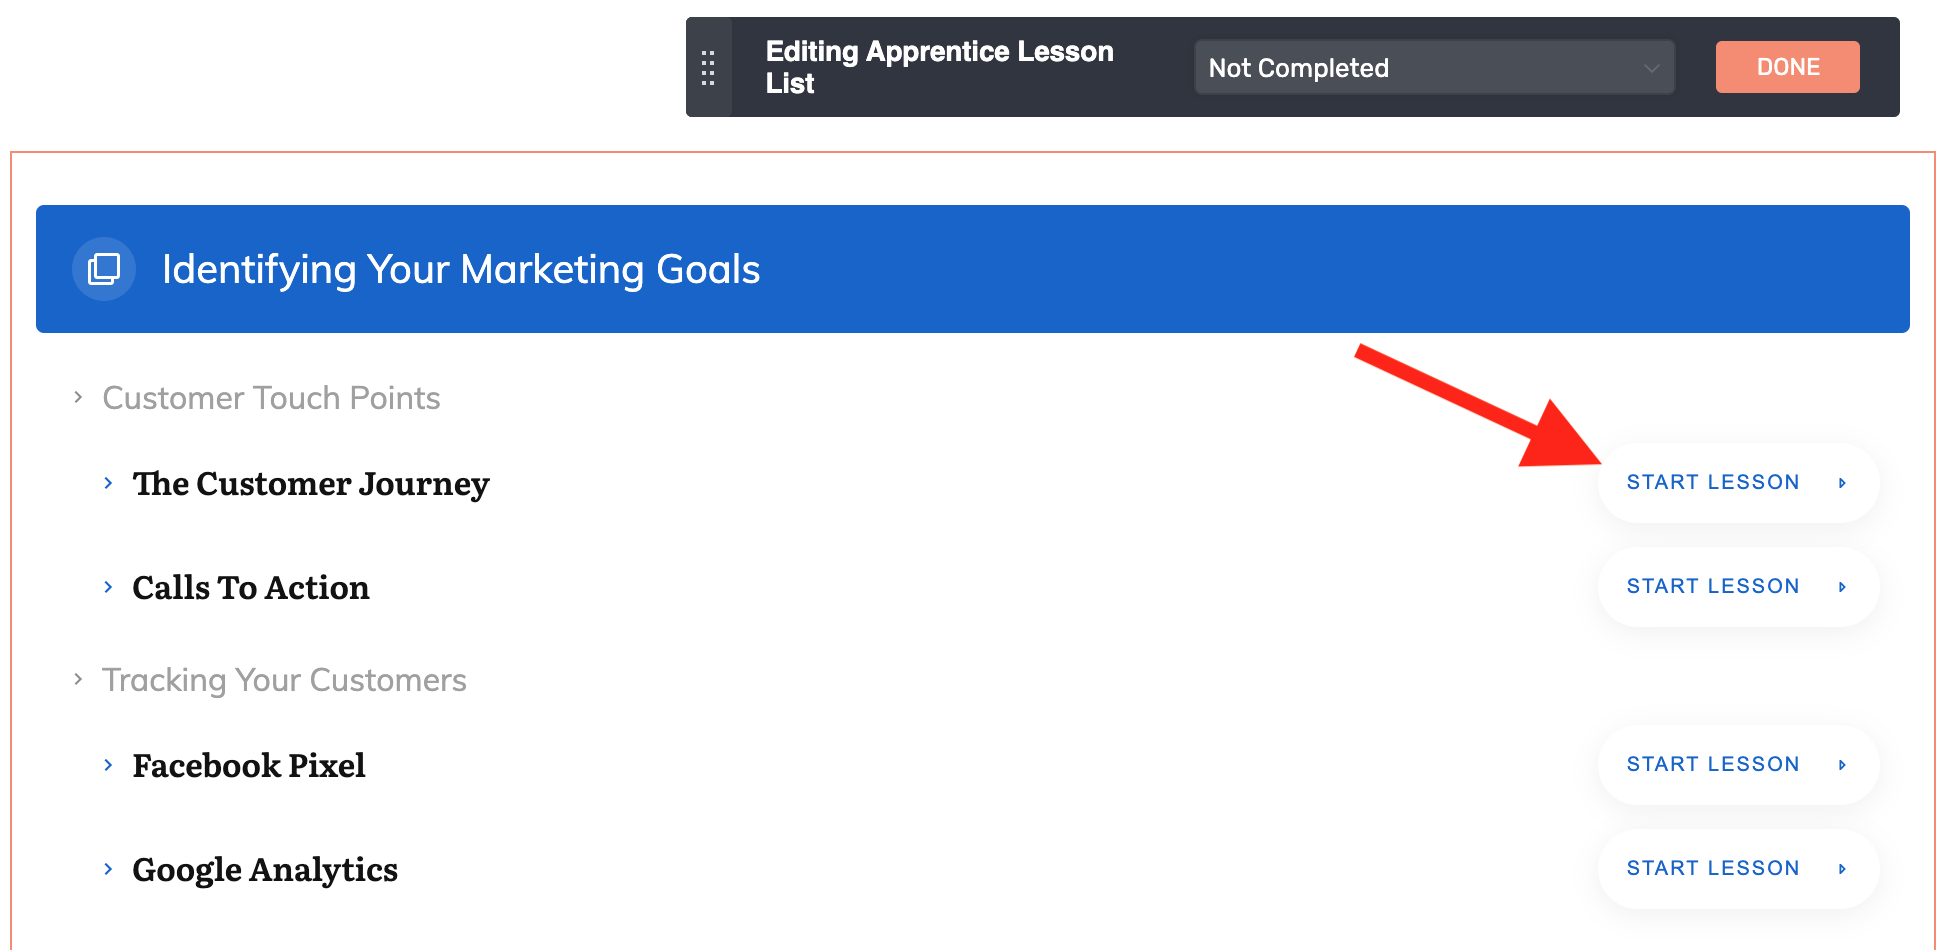
To customize what users who DO have access to your online course will see, modify the 'Not Completed' state of your Apprentice Lesson List element.
3. Completed state
I'm sure you see where this is going, but the 'Completed' state is a variation on the 'Not Completed' state, providing visual feedback to the student so they can identify which lessons they have already taken.
Our templates come with a subtle change to the lesson icons and a different call to action, since we know the user would be revisiting lessons they've already seen.
To customize what users who have completed your online course will see, modify the 'Completed' state of your Apprentice Lesson List element.
What displays on the front end?
To exaggerate the differences between the 'Not Completed' and 'Completed' states, I've modified the above Apprentice Lesson List example with some new icon colors and strikethroughs, and have logged in as a test student with 3 of the 4 lessons completed.
Check out what an online course student in this situation would see:
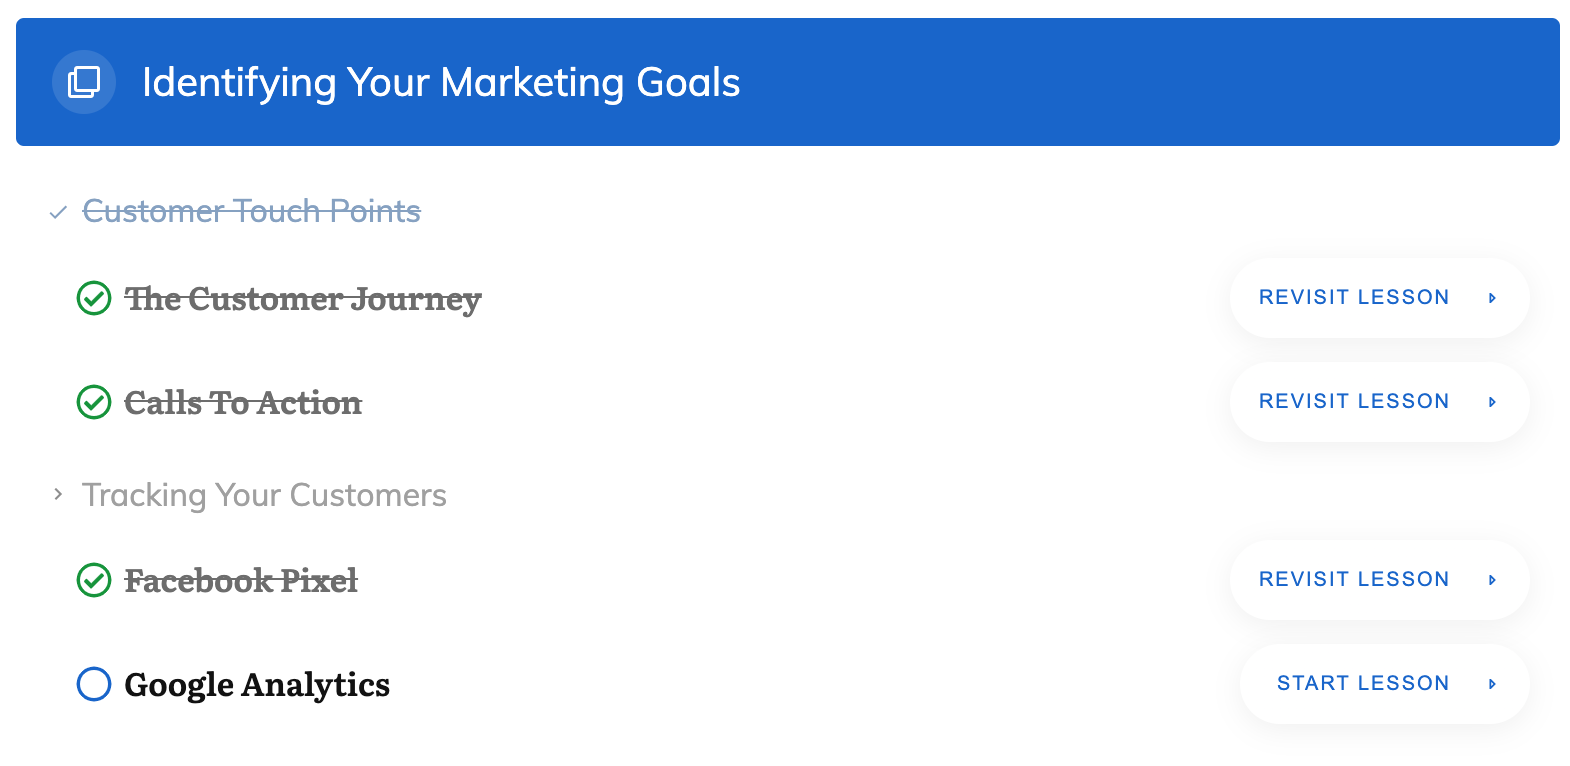
An example of how you can customize your 'Completed' state design of the Apprentice Lesson List element so it's clear for students what lessons they've already taken and what lessons they've yet to complete.
All the titles are hyperlinked automatically, completed lessons are crossed out, and the fourth incomplete lesson is easily identified as the next one the student should complete.
Styling the Lesson List
All of our designer-made templates come with each of the 3 states pre-styled out of the box.
In other words, you don't have to configure anything if you don't want to.
But, if you decide to... then you'll start to see how powerful this element really is.
Adding Titles and Descriptions
Inside the Apprentice Lesson List element 'Edit Mode', you'll find 2 new Apprentice Elements available in the element tray: a Description and a Title element:
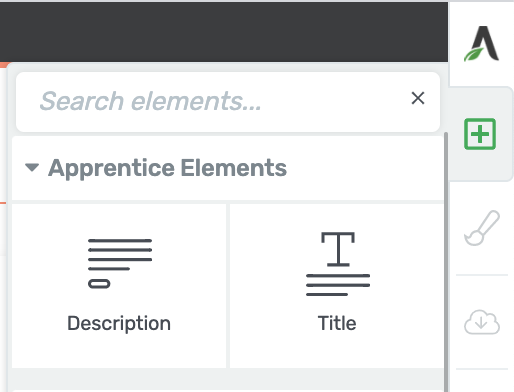
The Description and Title elements become available in the Thrive visual editor elements tray when you enter the Apprentice Lesson List element 'Edit Mode'.
There are 3 drop-zones inside the lesson list: Modules, Chapters and Lessons. As you drop the description or title elements into these drop-zones, the Lesson List will intelligently load the correct information for that part of your course.
What you add to one drop-zone will automatically populate in the matching drop-zones.
Look at the image below, where I've dropped a 'Description' into the lesson drop-zone:
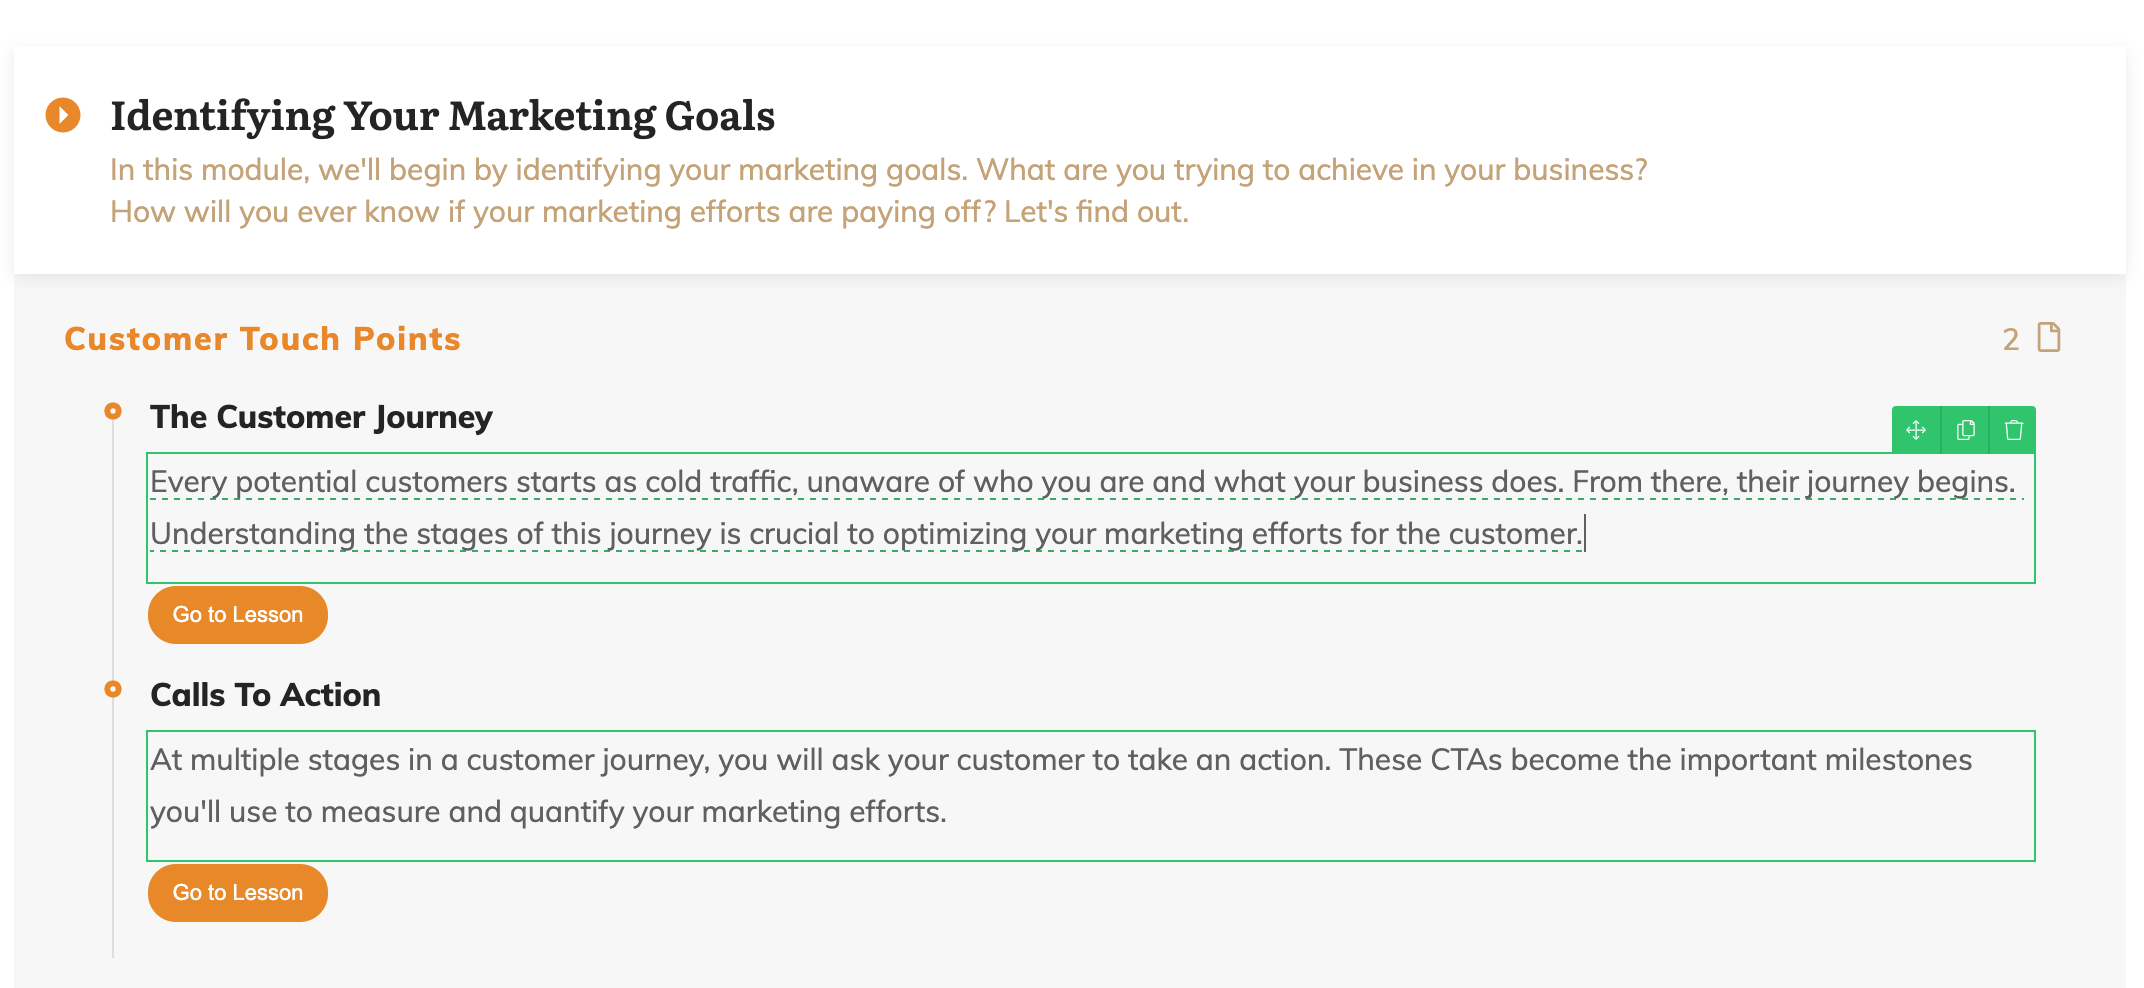
Just add a Description element into a drop-zone of your Apprentice Lesson List element and watch it automatically populate with the appropriate lesson descriptions.
Notice how it has added to the second lesson as well, and both are displaying the correct descriptions for the two lessons? That's the power of dynamic text feeding through to a visual page builder.
Adding Dynamic Numbering
When we use the word 'Dynamic', it means some information is being loaded from somewhere else and will automatically update to reflect when changes are made to that information.
If you want to add a chapter number or list the number of lessons in a module, you can easily add this as dynamic text:
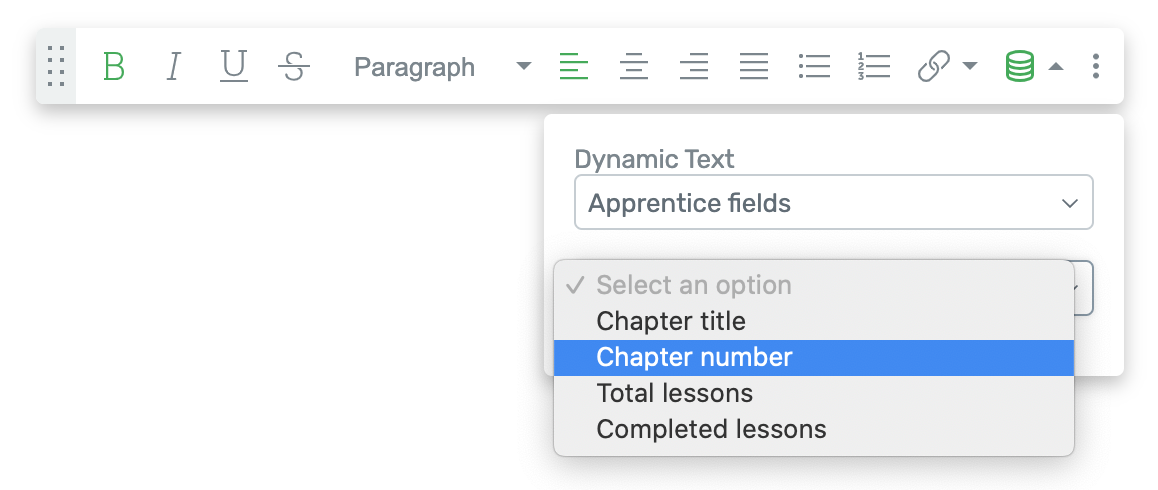
To dynamically add a chapter number or list the number of lessons in a module, you can use the Dynamic Text options found in the floating text editor bar of the Thrive visual editor to do so.
Once again, the dynamic text options match the drop-zone that you are editing.
This means you can easily add numbering to your lesson list just like I have in the example below.
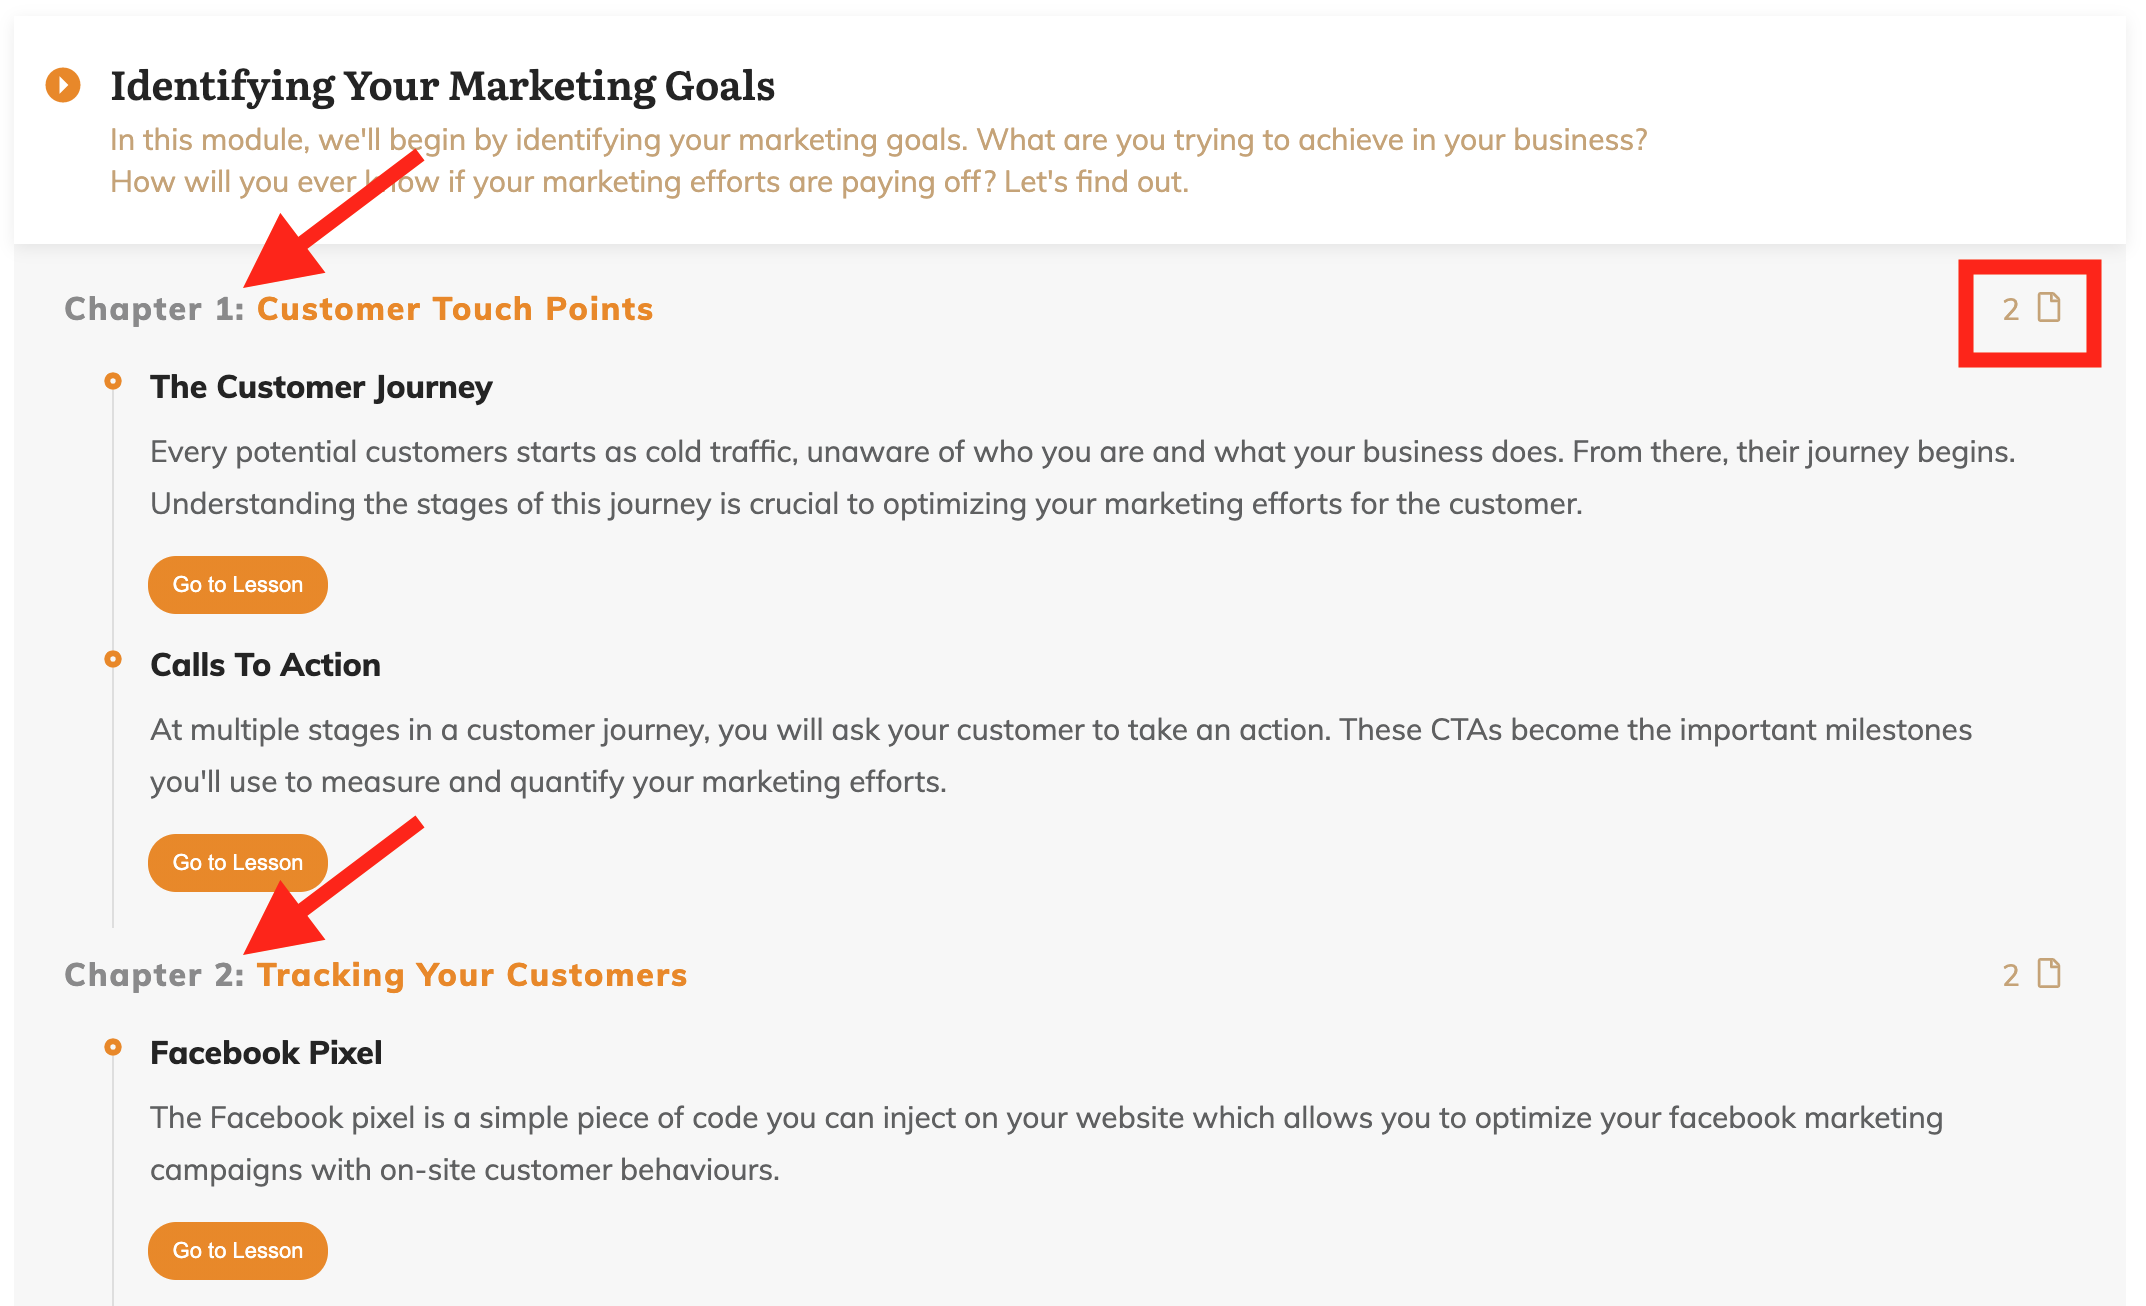
An example of dynamic numbering in action inside the Apprentice Lesson List element.
Pretty incredible, right?
Finally, what makes this even more impressive is that the Apprentice Lesson List will auto-update to match the correct course.
That means if you change course names, lesson titles, or re-order your course content in the backend of Thrive Apprentice, the changes will automatically be reflected in any Apprentice Lesson List element on your website!
If you'd like to learn more about the specifics of this element — so you can push its limits as far as you can — then check out our new knowledge base article: How to use the Apprentice Lesson List Element.
2. New Vertical Menu
This has been one of our most requested features for some time now, and proved to be quite the technical challenge to deliver.
But we think you're going to love the new Vertical Menu variation of our Custom Menu element!
When you drop a Custom Menu onto your page in Thrive Architect or Thrive Theme Builder, you'll be greeted with a new template library that includes 13 Vertical Menu templates:
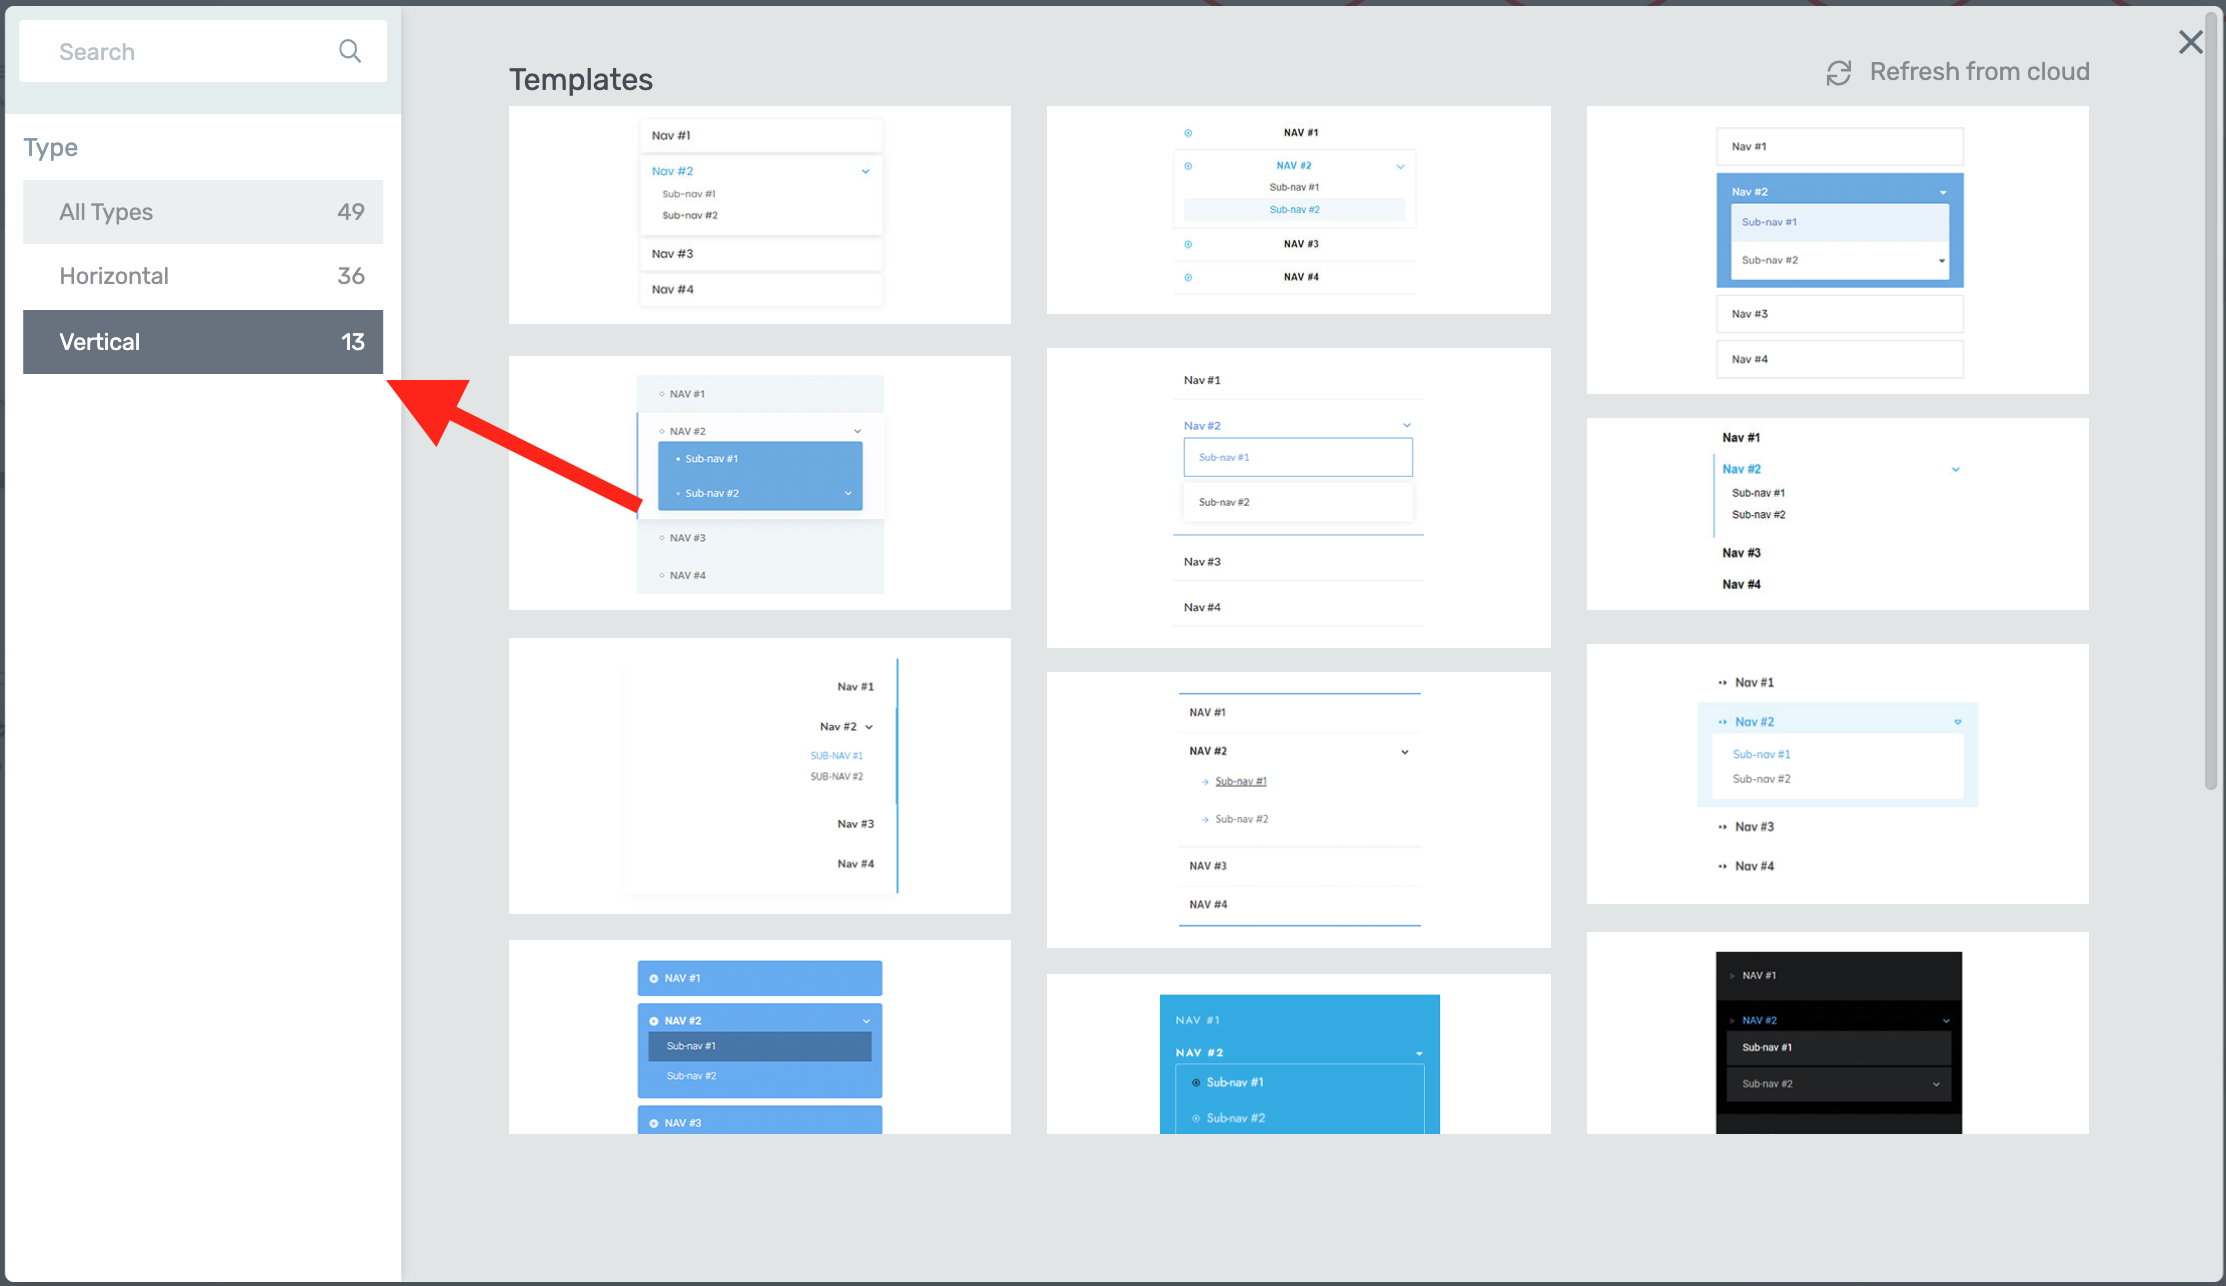
When you drag & drop a Custom Menu element into your Thrive visual editor, a menu template library will appear where you can filter for both Horizontal AND Vertical menu designs.
Every Custom Menu template has a Vertical variation, and vice versa. This means if you change your mind and want the other type of menu, it only takes a single click to swap its orientation:
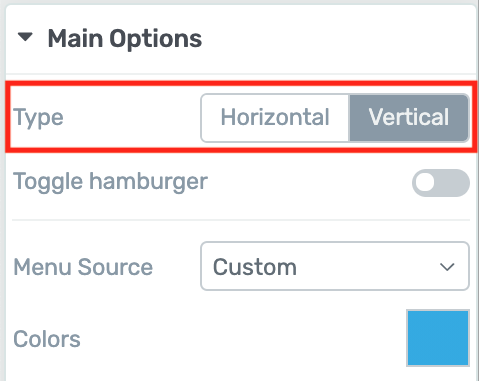
Changing between Horizontal and Vertical menu variations only takes a single click!
Vertical Menus look just like the image below and are perfect for layouts with columns, sidebars or narrow areas:
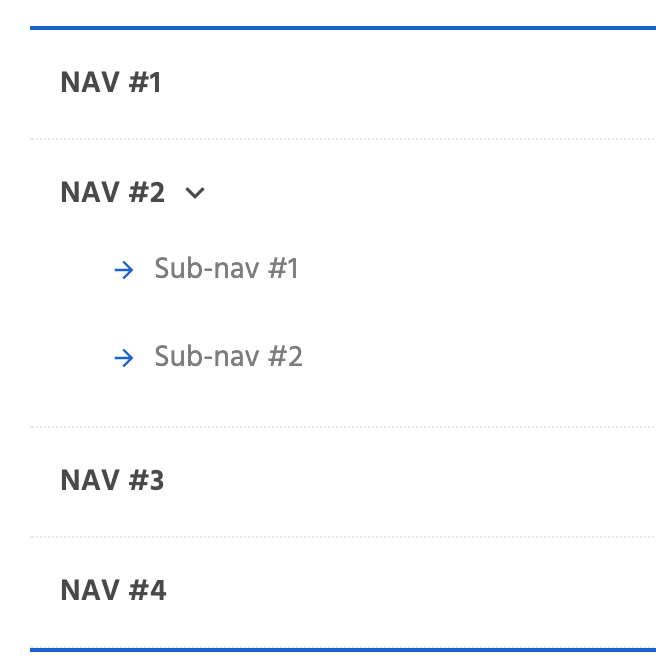
One of the many Vertical Menu template designs now available in the Custom Menu template library.
When you set your menu to vertical, a few new options will become available in the main options panel.
First, there are some new alignment options:
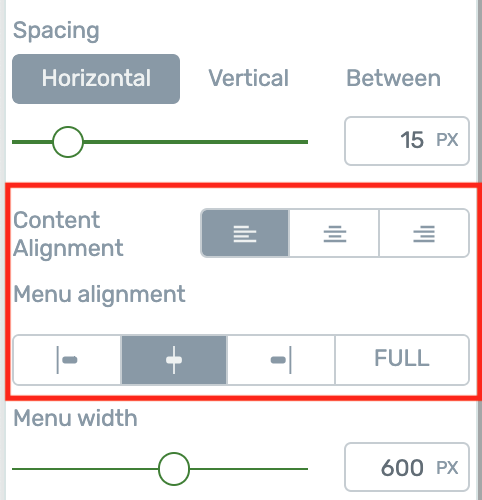
The new alignment options available for the Custom Menu element inside the left sidebar of the Thrive visual editor.
Content Alignment sets all of your menu options to the left, center or right of the menu element.
Menu Alignment changes the whole menu's position on your page, with the 'Full' option automatically setting maximum width to 100%, meaning it will take up any available space in its parent container.
Then there are some options for the display of submenu items.
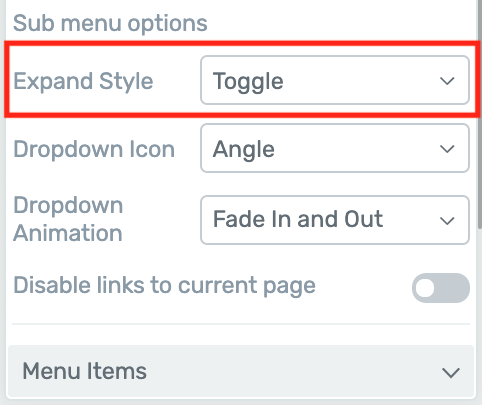
The Custom Menu element also gives you the ability to set some display options for submenu items.
The default 'Expand Style' for a vertical menu is a toggle, meaning that submenu items will drop down underneath the parent menu item when clicked, like so:
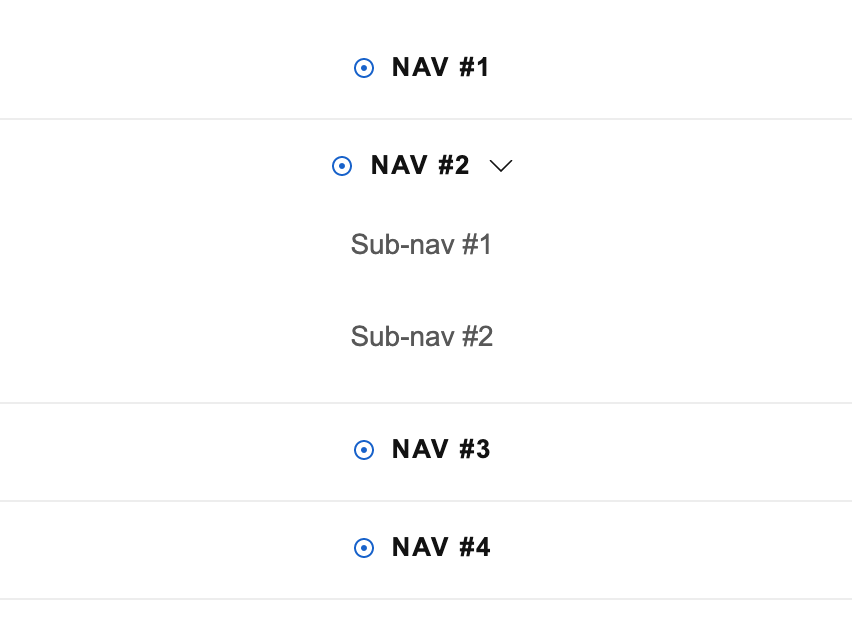
The default 'Expand Style' setting for vertical menus 'Toggle', meaning your submenu items will toggle open beneath their respective primary menu items.
Other options include 'Drop Right' and 'Drop Left', where your submenu items will fly out to the side and down from the parent.
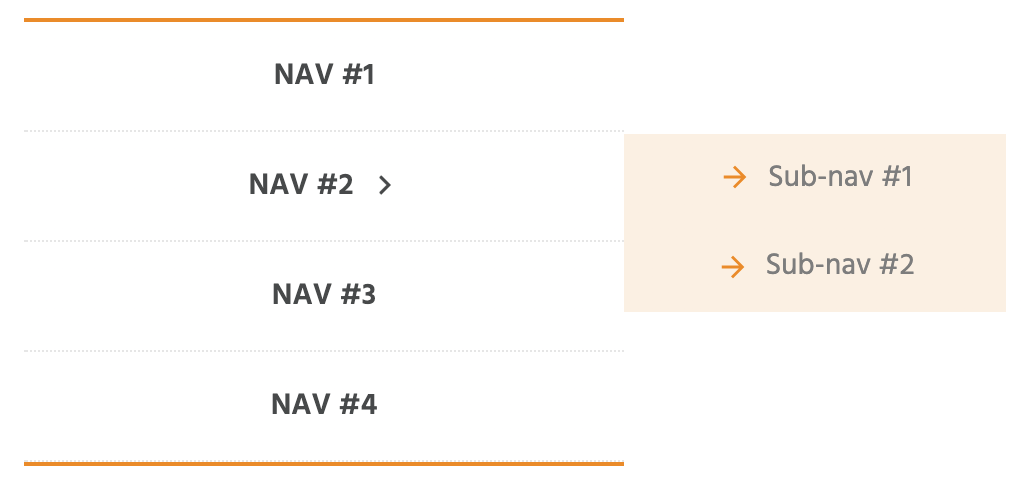
You can also set your Vertical Menu 'Expand Style' setting to 'Drop Right' or 'Drop Left', meaning your submenu items will fly out horizontally from the main Vertical Menu.
Be mindful that these fly-outs can go off your page if you pick the wrong direction.
Both Vertical and Horizontal menu types also respect the hamburger menu options per screen size, meaning you can choose to display a hamburger view on mobile or tablet and the full menu on desktop.
3. New Off-Screen Sidebar
This latest feature is for you Thrive Theme Builder's out there, and it will blow your template styling options wide open.
With just a few clicks, you can now turn your simple sidebar layout into this!
The new Off-Screen Sidebar option can be found under a new Sidebar Display settings area on your Theme Builder templates.
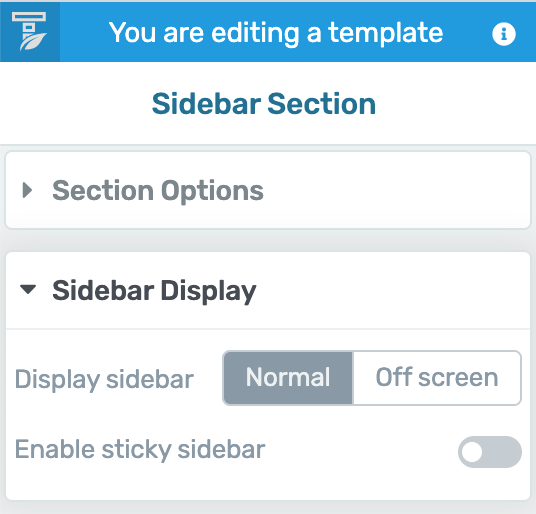
Toggle from 'Normal' to 'Off screen' sidebars inside the Sidebar Display tab of the Thrive Theme Builder visual editor window.
Enabling 'Off screen' will automatically enable the sticky sidebar, open a bunch of new options and configurations, and change your template layout previewer to reflect the new look:
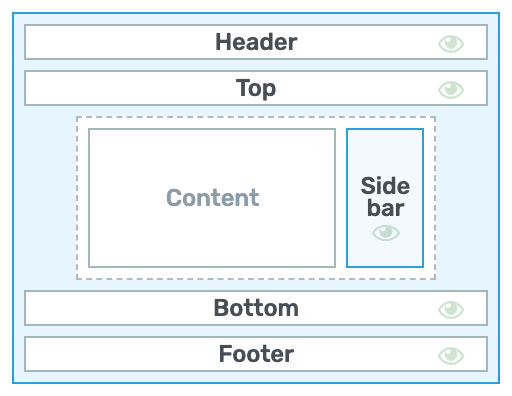
Standard sidebar layouts
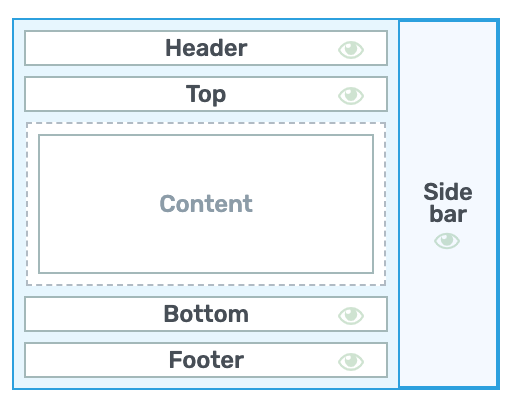
When Off screen sidebar is enabled
How to configure your off screen sidebar
Of the new options available, there are 3 worth noting...
1. Show Sidebar: Over Content vs Push Content
Again, as the name implies, you have two options for how to show your sidebar:
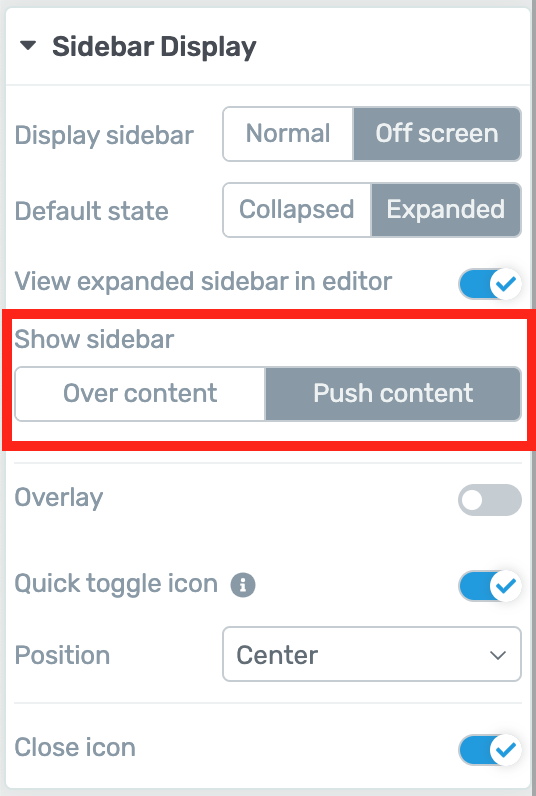
When your sidebar is set to 'Off screen", you can then choose to have the sidebar display over your content (Over content) or push your content to the side (Push content).
If you choose 'Push content', your expanded sidebar will push your page content away so that no menu items or content are covered, like this:

If your 'Off screen' sidebar is set to 'Push content' and display on the right side...
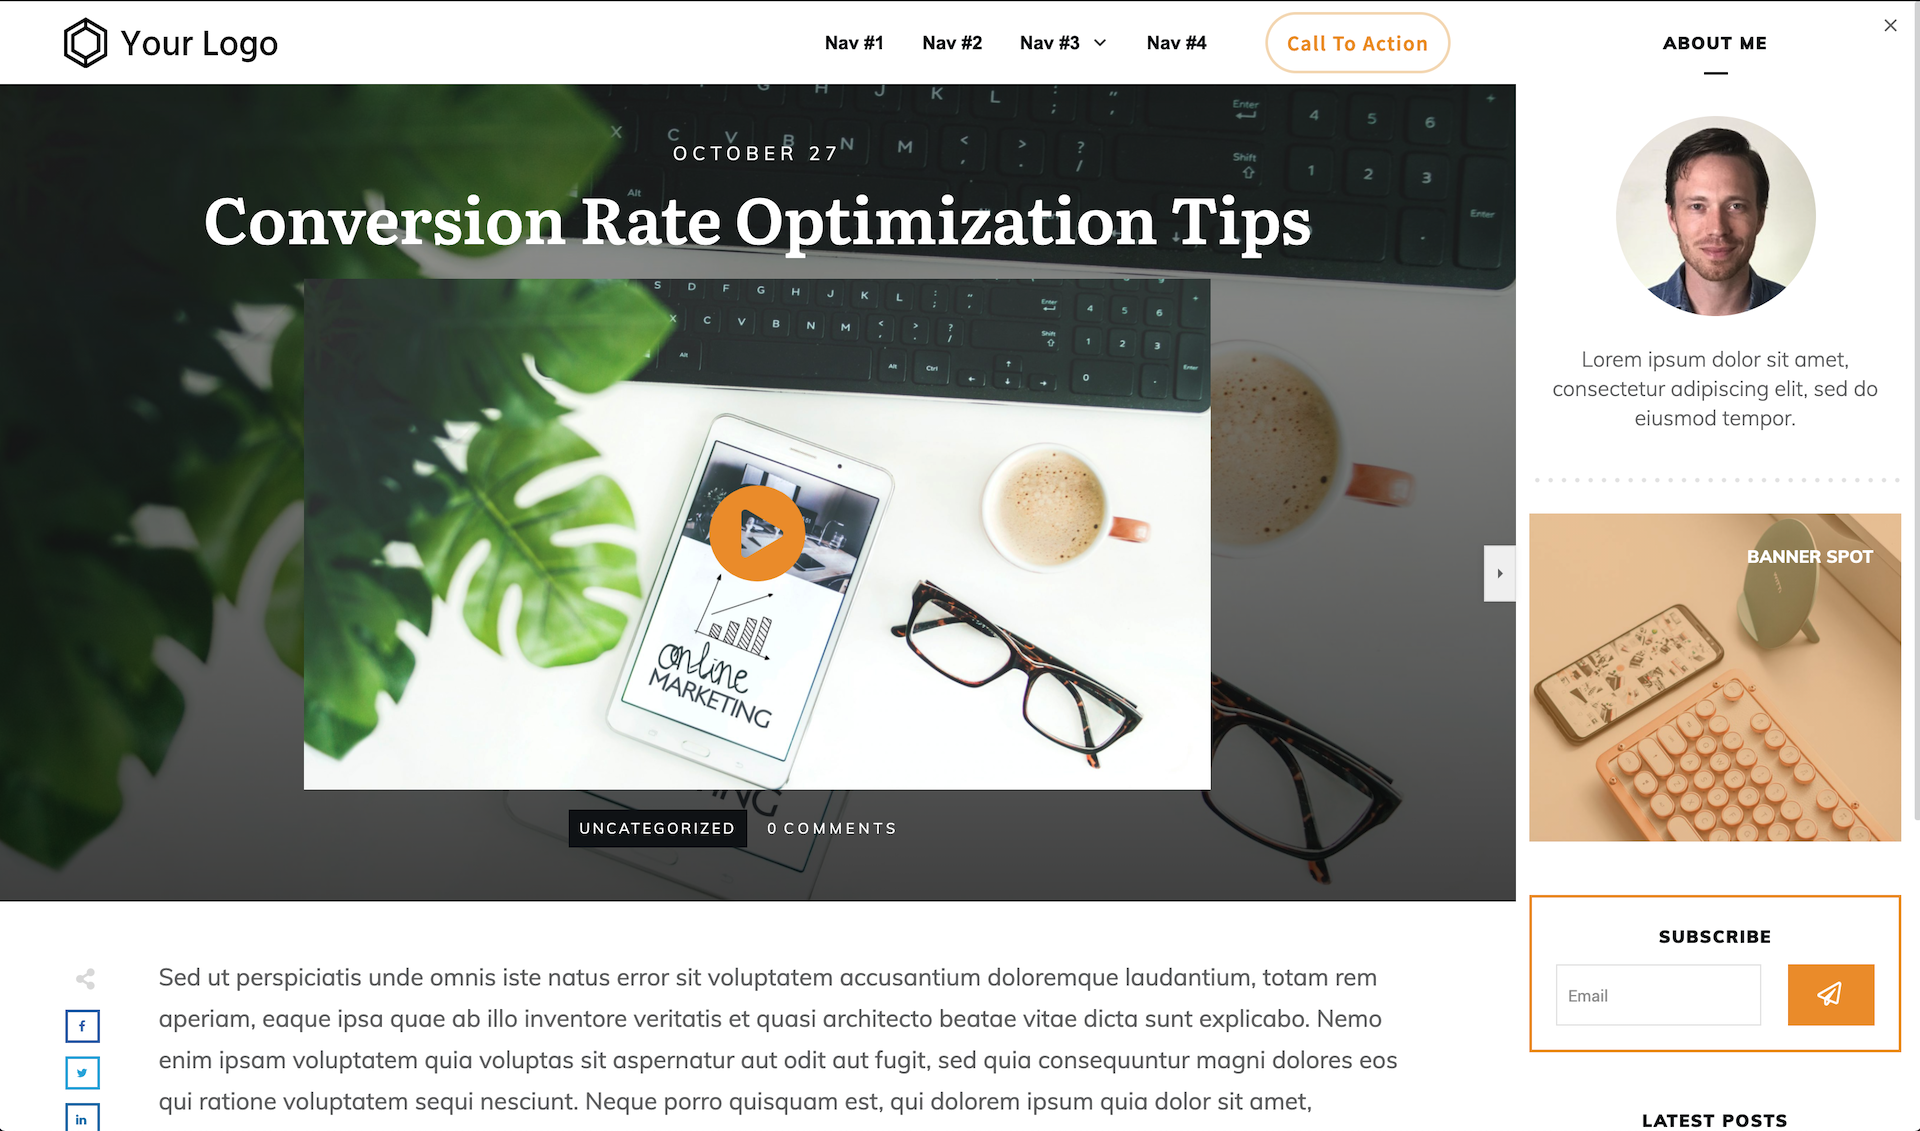
... it will push your page content away to the left when triggered so as not to obstruct any of your page content.
Whereas, if you choose 'Over Content', the sidebar will slide out over the top of your content, leaving you page unchanged but potentially hiding some content.
Notice in the image below how the Call To Action in the header has been covered.
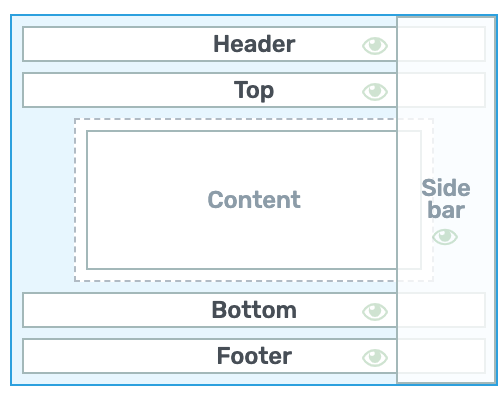
If your 'Off screen' sidebar is set to 'Over content' and display on the right side...
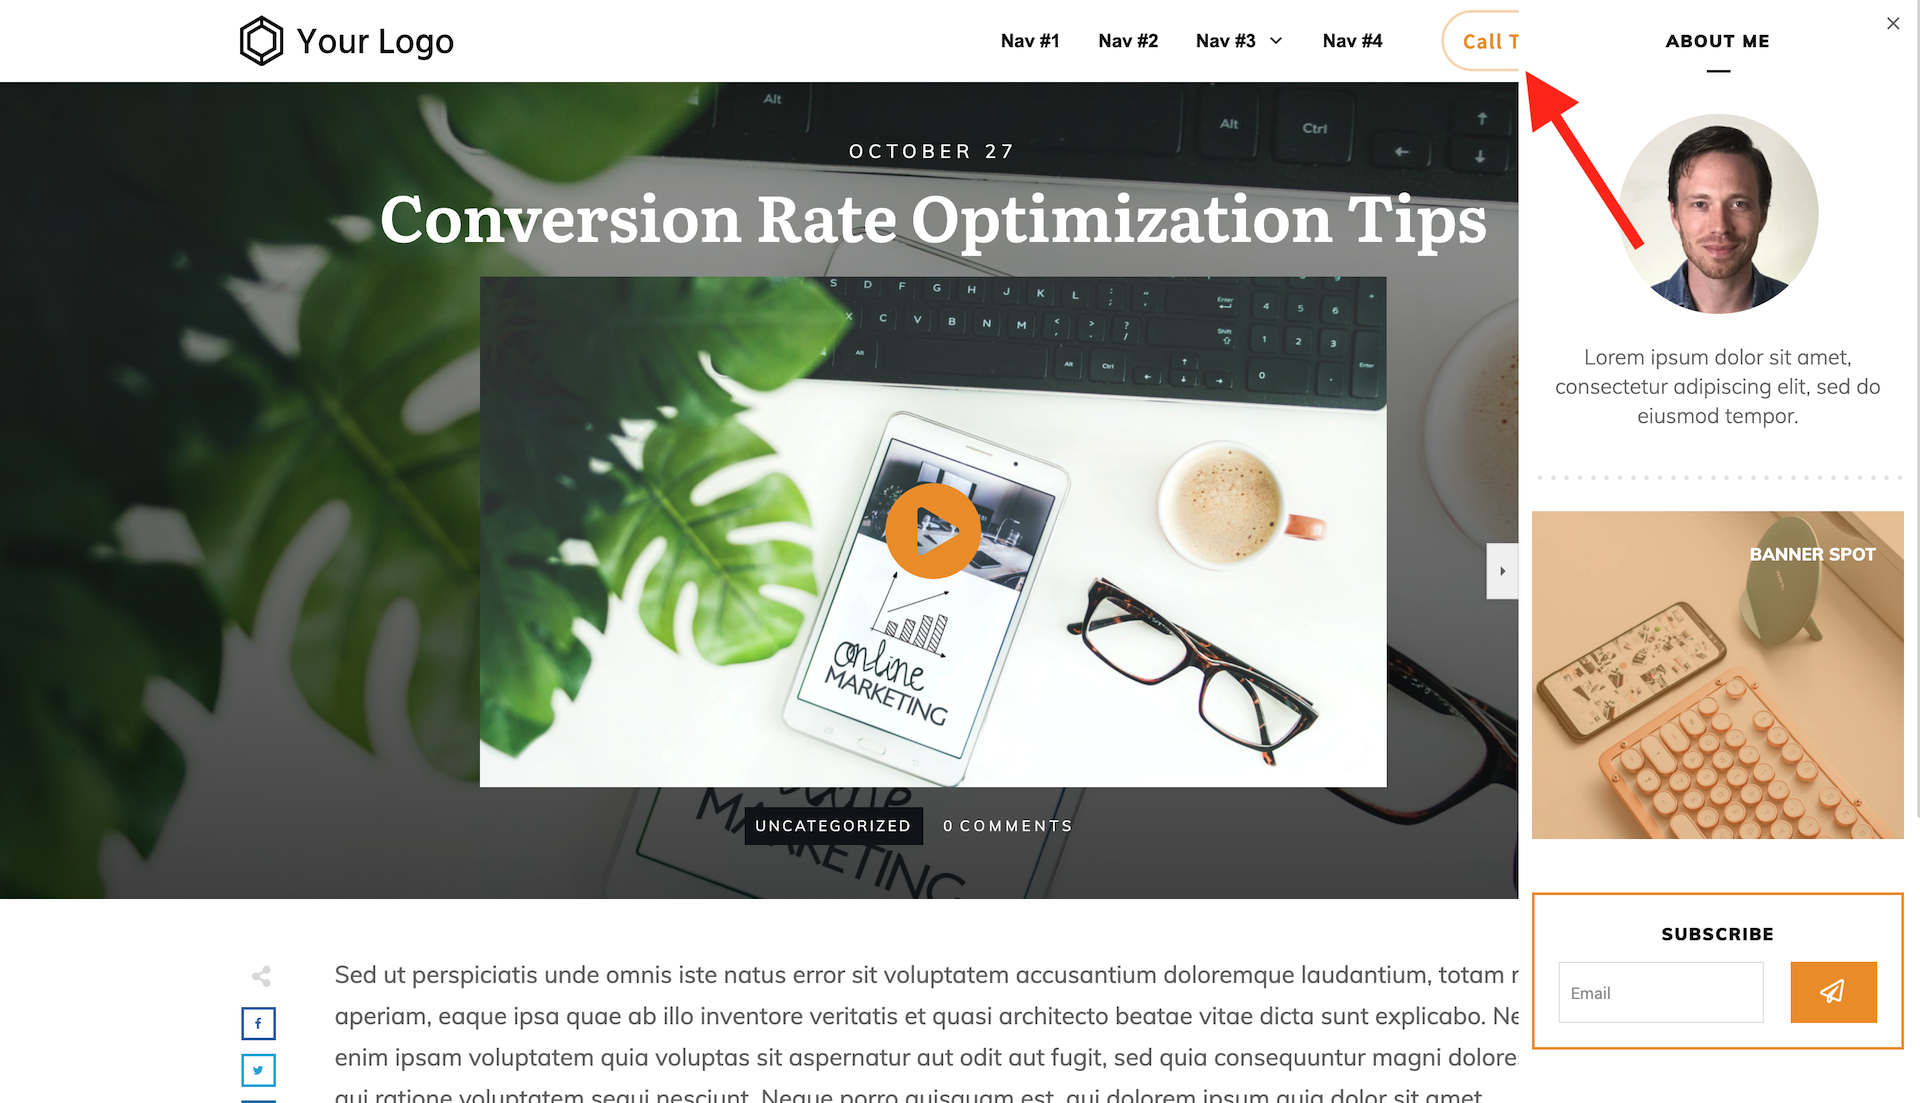
... it will overlay your page content when triggered, obscuring some of your page content.
2. Overlay
If you do choose 'Over Content', you might want to combine it with a dark overlay on the rest of your page.
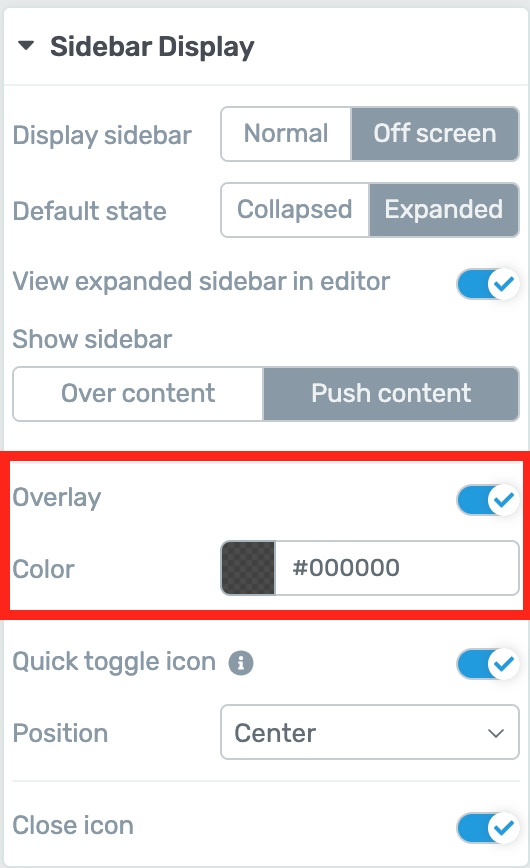
If your 'Off screen' sidebar is set to 'Over content', you can set up a translucent overlay that appears over your page content to make your sidebar stand out.
An overlay will make your sidebar unmissable while it's open, as you can see in this image below.
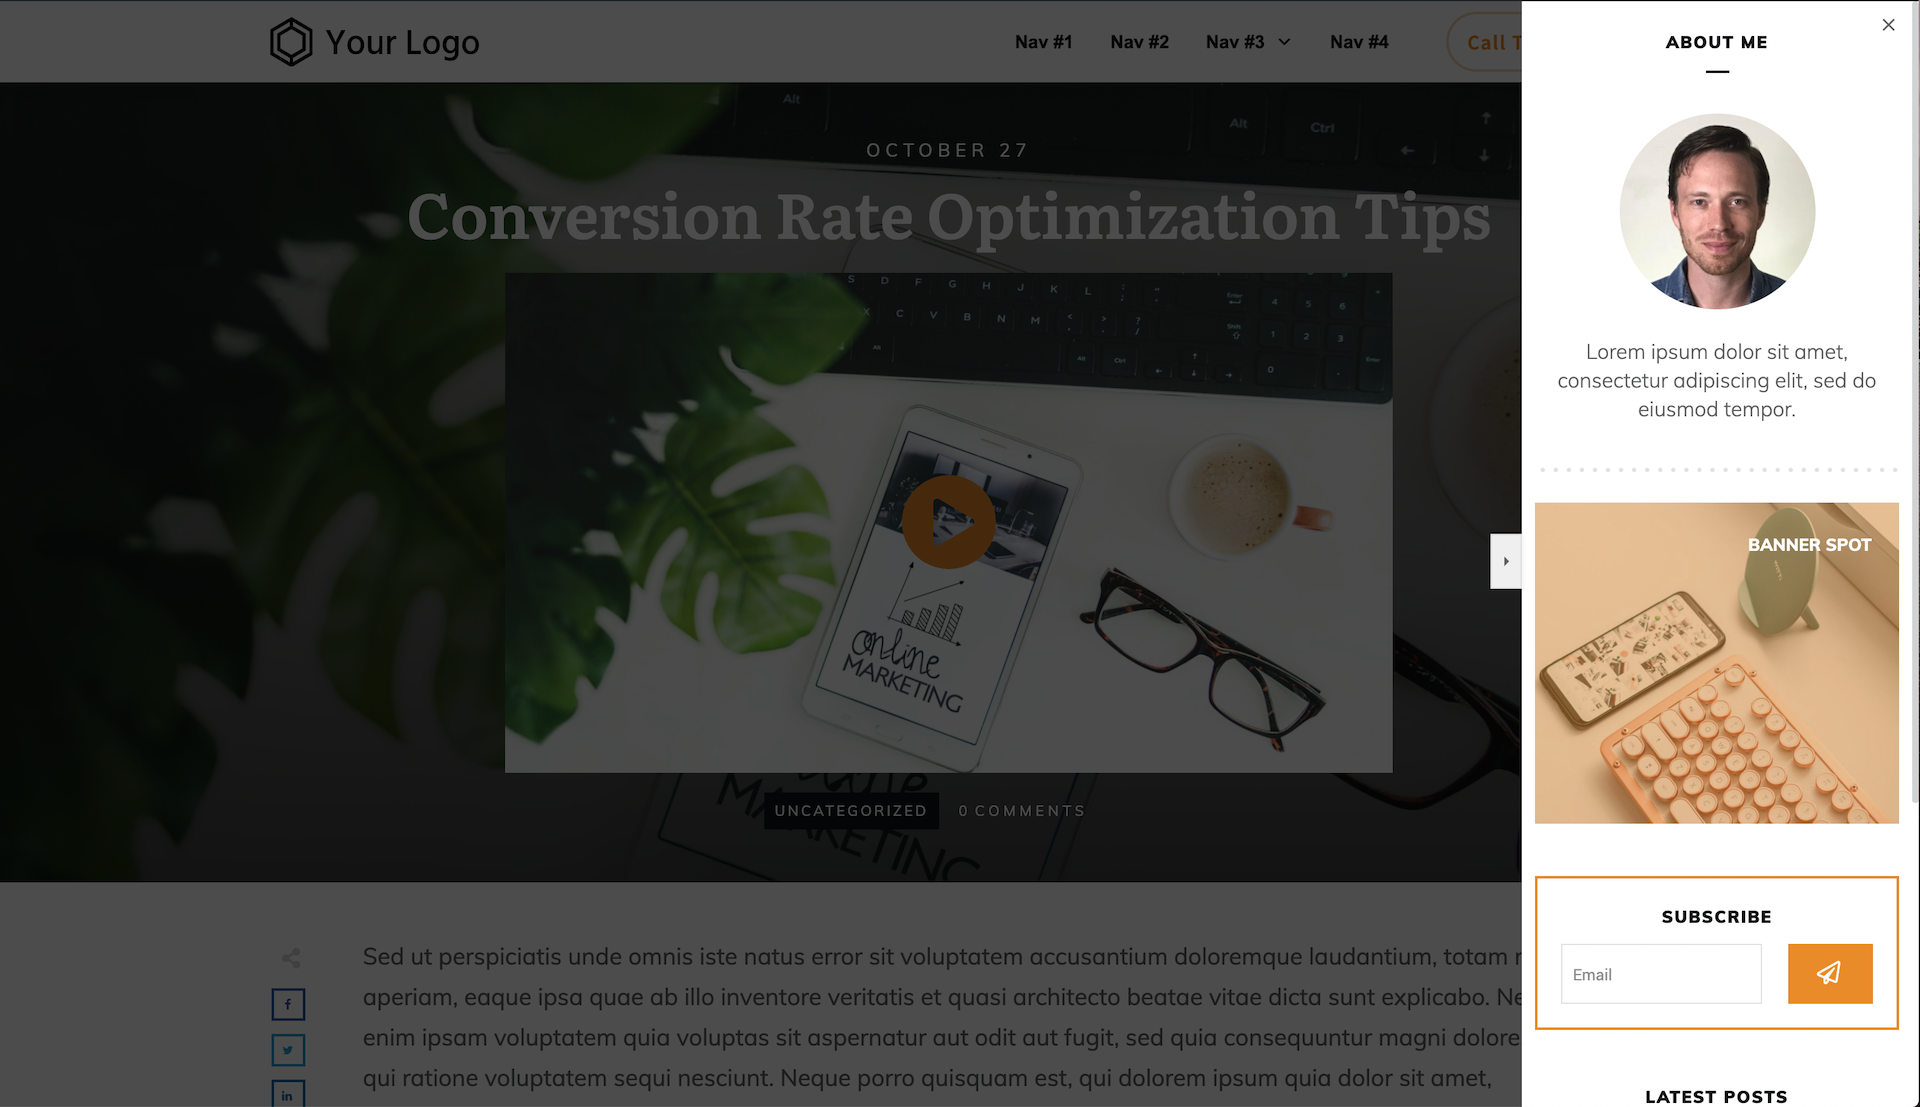
See how much more eye-catching your 'Off screen' sidebar is when you use the overlay feature with an 'Over content' design?
3. Quick Toggle Icon
If the Quick toggle icon feature is enabled, your sidebar will have a small tab with an icon on it. This toggle icon tab will open and close the sidebar when clicked by a visitor:
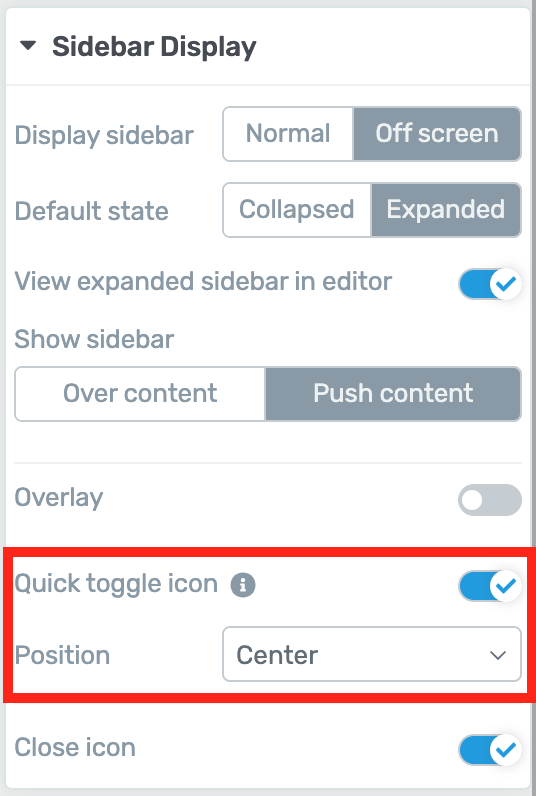
Toggle on the Quick toggle icon feature to give an Open/Close sidebar tab to your visitors.
You can choose to set your Quick toggle icon towards the top, bottom or center of your sidebar, and in true Thrive Theme Builder style, you can change both the open and closed icons, their color and the shape of the tab:
Yup, you can visually customize the Quick toggle icon tab to your exact specifications inside Thrive Theme Builder's visual editor.
But there's more to this feature too!
If you choose to disable the Quick toggle icon feature, how are you visitors going to get your sidebar open?
Well, on any template that has an 'Off screen' sidebar enabled, you'll have a new option available under the Animation & Action tab: 'Open/close sidebar'.
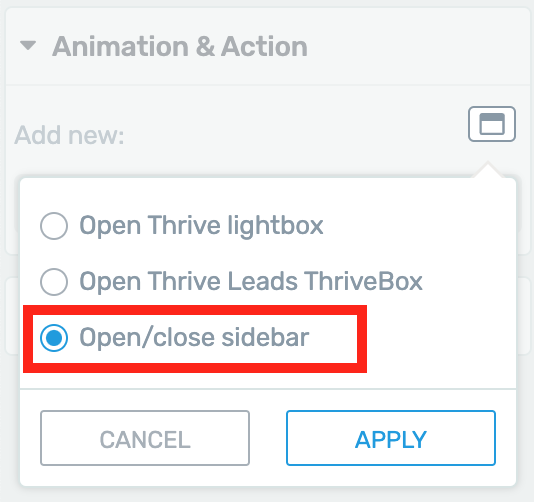
On any template with a collapsible sidebar, you'll see an 'Open/close sidebar' option in the Animation & Action tab of Thrive Theme Builder.
You can apply that action to anything on your page, from a Button element, to a link, to a menu item or even a Content Box element.
This is perfect when combined with our WooCommerce shop page.
Simply add a Button element on your WooCommerce shop page (above your products), set the action to 'Open/close sidebar', and then your WooCommerce filters will spring out from the side of the page when clicked!
Design Different Sidebars for Different Devices
And here's one last zinger when it comes to 'Off screen' sidebars in Thrive Theme Builder...
Unlike other WordPress themes that offer an offscreen sidebar option, Thrive Theme Builder DOES NOT force you to use the same style of sidebar across Desktop, Tablet and Mobile versions of a given theme template!
What this means is that Thrive Theme Builder allows you to assign 'Normal' sidebars for desktop versions of a theme template, but then assign 'Off screen' sidebars for Tablet & Mobile versions of that same theme template.
Just think about the sidebar design possibilities this exclusive Thrive Theme Builder feature could unlock for your website!
4. Improved Progress Bar Element
For many, many years, we've had a humble Progress Bar element.
The Progress Bar element icon found inside the element tray.
You've seen it in your elements tray, on our landing page templates, and in multi-step opt in forms.
Progress Bars are an excellent visual tool for encouraging visitors to complete a conversion goal.
A good marketer knows that you want to focus on getting a visitor to take one simple action, but once they have, you may want to chain it to the next step.
Multi-step opt-in forms and upsell funnel pages can benefit from the inclusion of progress bars, simply because visitors are more inclined to complete all the steps in any process that they've already started.
Knowing this, it was time to give our humble Progress Bar design element a massive update...
Check out the new templates it comes with now!
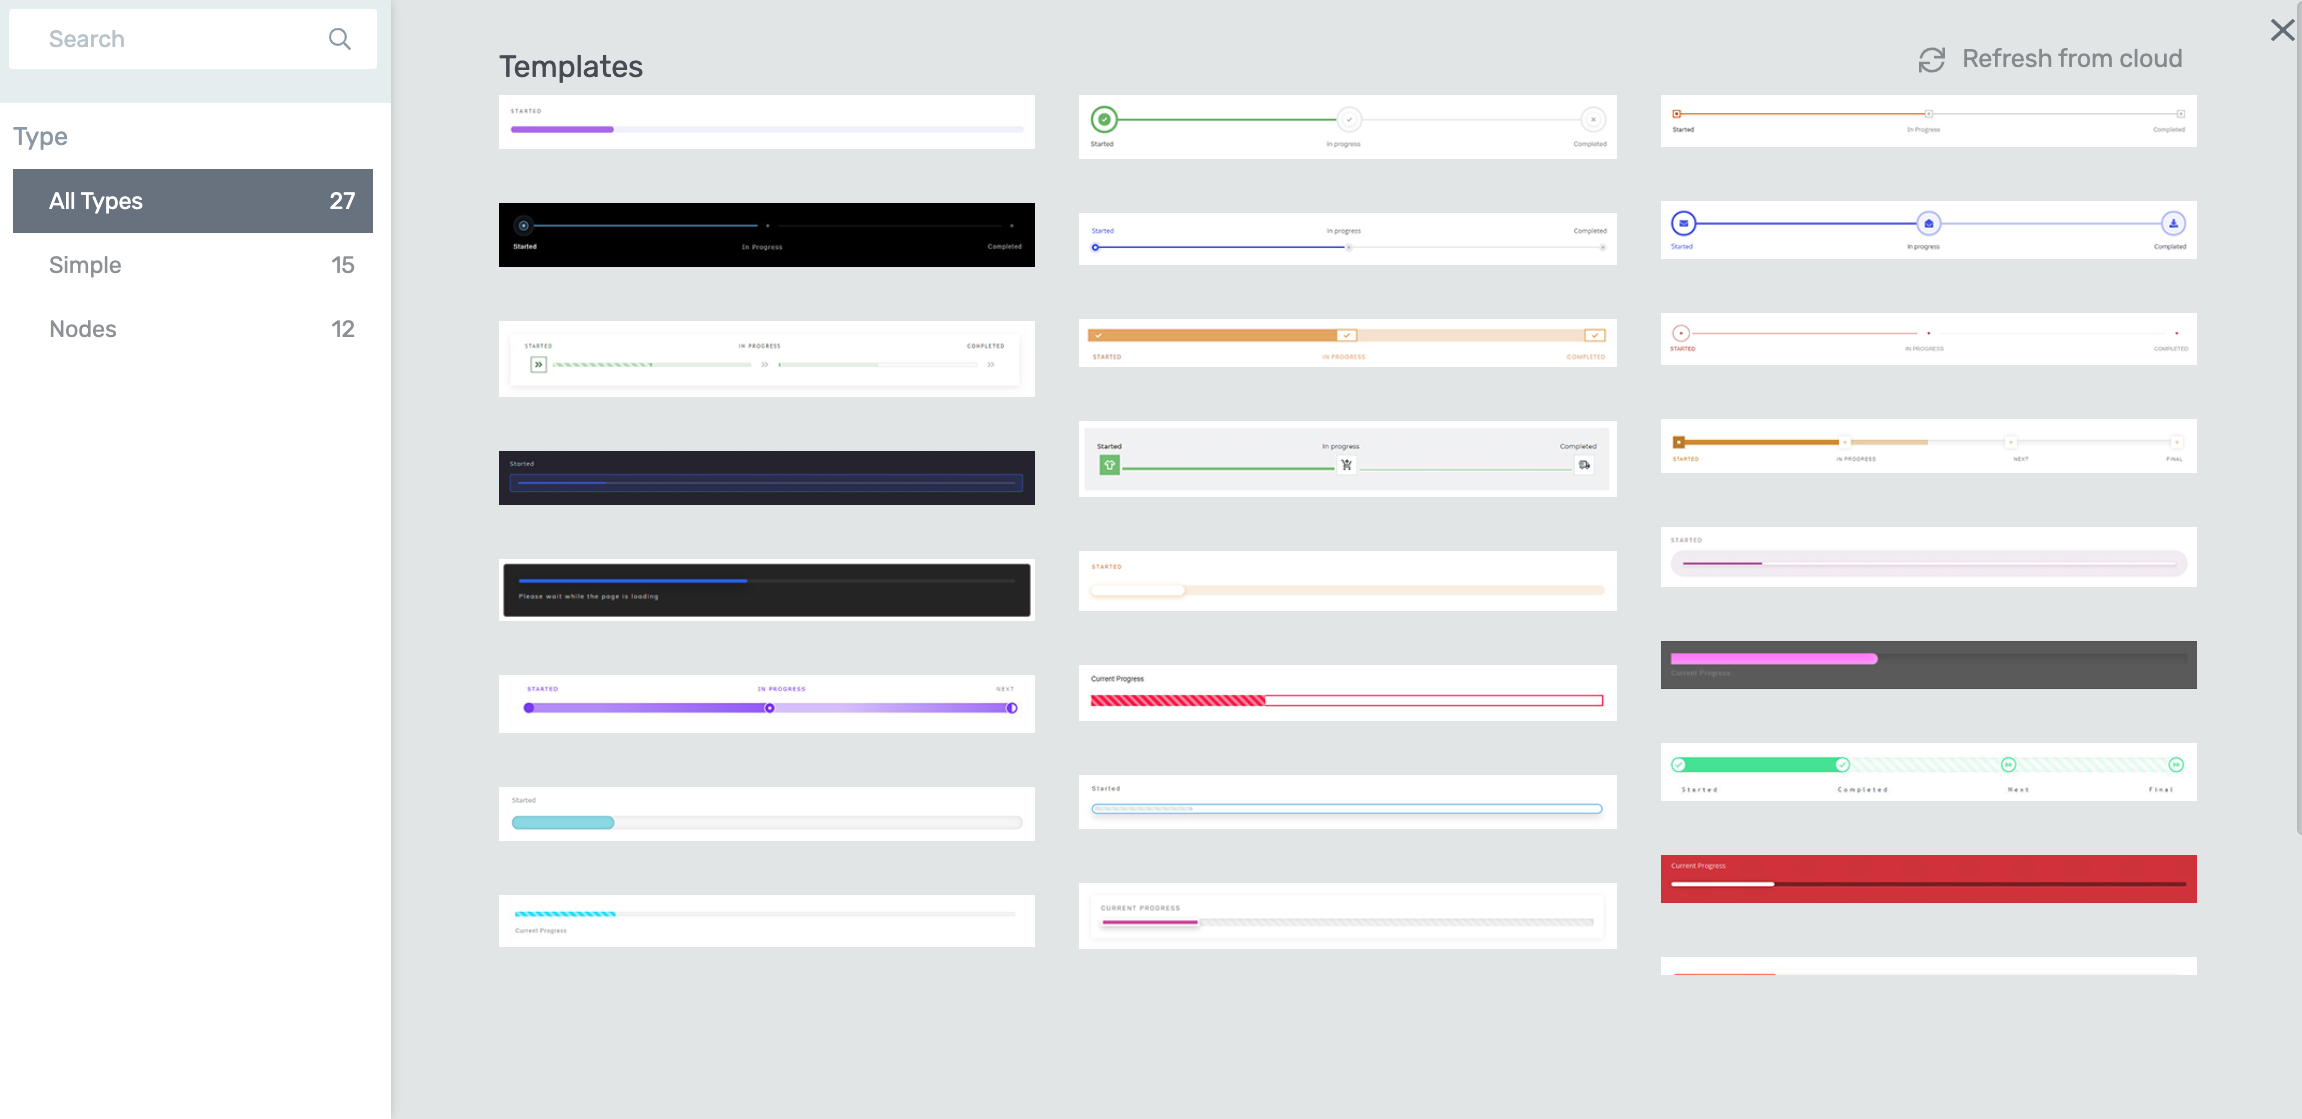
When you drag & drop a Progress Bar element into your Thrive visual editor window now, you'll see a template library appear overflowing with new designs!
Out of the box, the new Progress Bar element is massively flexible.
It comes in two different Progress Bar designs: Simple and Nodes. Let's start with the Simple Progress Bar designs...
Simple Progress Bars

An example of a simple Progress Bar design.
With the new Progress Bar element, you can change its height, length, colors, corners, label text, position and so much more!
All the flexible options you could want are right there in the Main Options tab:
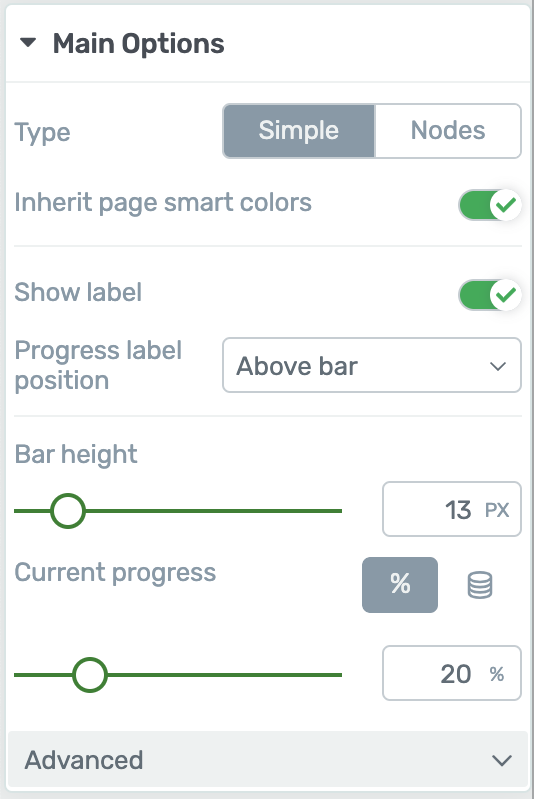
Customize the different properties of your Progress Bar element from the Main Options tab inside the Thrive visual editor window.
But when you go digging into the 'Advanced' tab, that's where you'll find two awesome new options.
1. Fill animation on view
With the 'Fill animation on view' toggle enabled, your Progress Bar design will animate its shift in progress as your visitor scrolls their viewport past it:
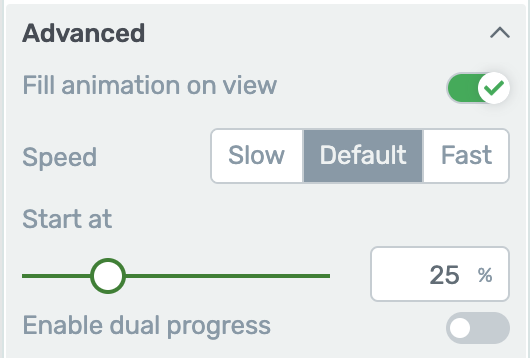
Toggle on the 'Fill animation on view' option by opening the Advanced sub-tab inside the Main Options tab.
You can choose both the speed and the starting value. Let's say you have a progress bar at 50% but choose a 'Start at' value of 25%.
That means as it enters your visitor's viewport, they will see the progress bar grow from 25% to 50% at the speed you've selected, and then pause.
2. Enable Dual Progress
If your visitor is moving through a long sequence of steps, you may want to encourage them to continue by suggesting how far their progress will increase once they complete the current step.
We show this with the 'Dual Progress' feature:
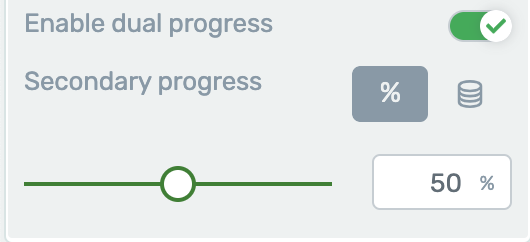
You can also toggle on the 'Enable dual progress' option inside the Advanced sub-tab of the Main Options tab.
Dual Progress allows you to set a second percentage value on your progress bar and set a different color for it, the result looking like this:

An example of the Dual Progress feature in action.
3. Candy Stripe Animation
Rather than finding this option under the Advanced sub-tab, you'll find it when you hover over the actual Progress Bar element in the Thrive visual editor window and click the 'Progress Bar COMPLETED' breadcrumb that appears.
With the 'Progress Bar COMPLETED' breadcrumb highlighted, you can then enter the Main Options tab to set its 'COMPLETED' color as well as toggle on a 'Candy stripe animation' for it.
That means you can show a beautiful striped animation like this with the new Progress Bar element:
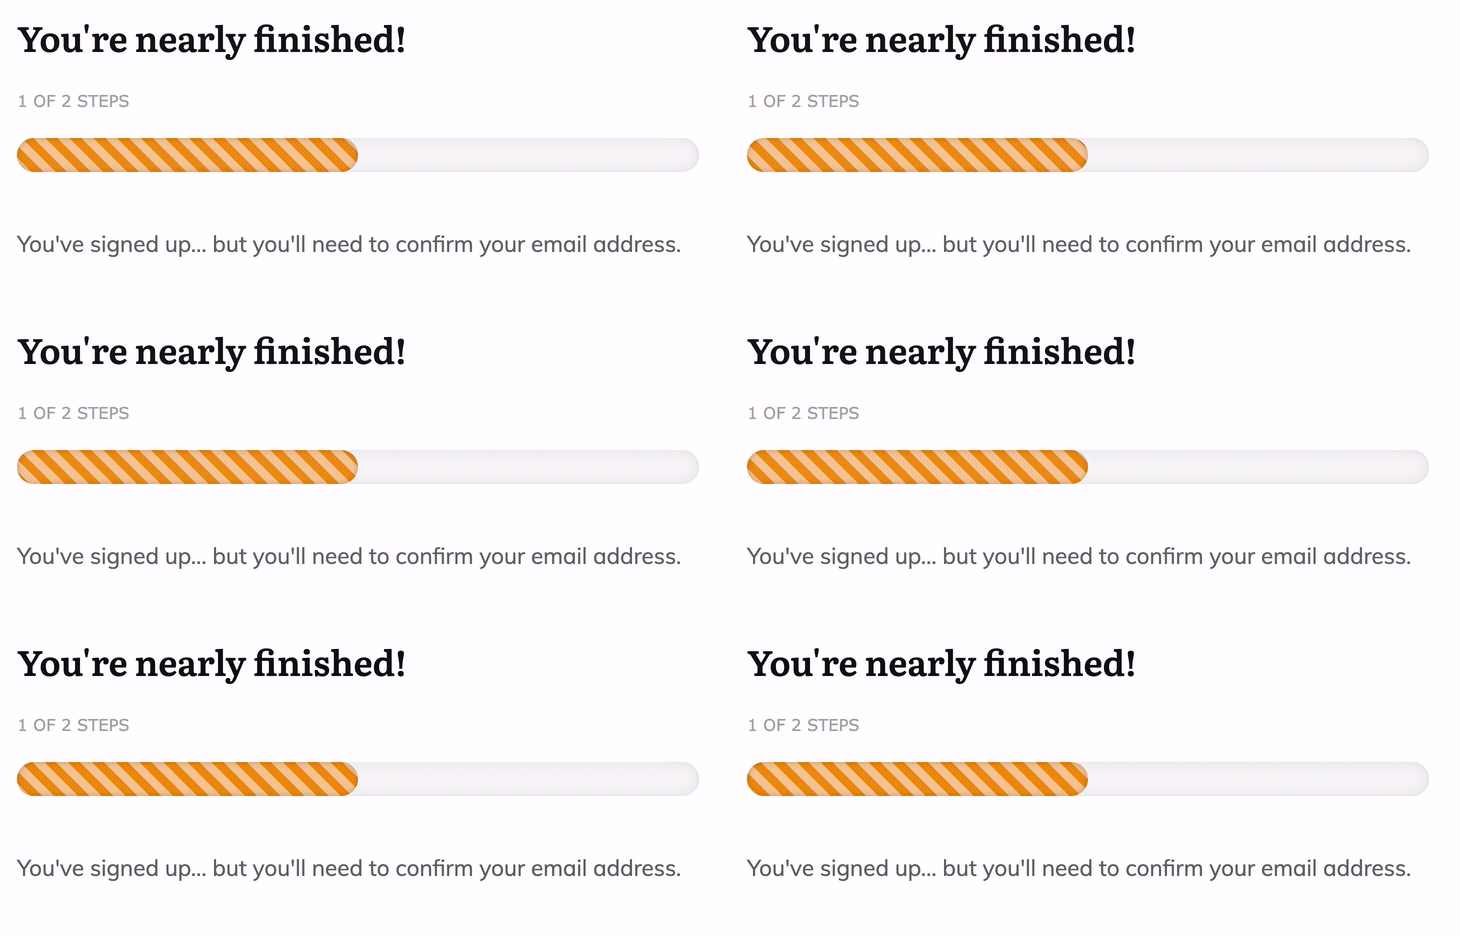
An example of the 'Candy stripe animation' you can set for the 'Progress Bar COMPLETED' section of your Progress Bar elements.
Node Progress Bars
With a click, you can also swap your Progress Bar element to display 'Nodes'. Immediately, your Progress Bar will transform into this:

An example of a 'Nodes' Progress Bar element design.
A Node Progress Bar is one that has icons or markers along its length, and is ideal for showing a user which steps they have completed, which have yet to come, and what they have to do right now.
You'll notice some new options jump out when you enable Nodes:
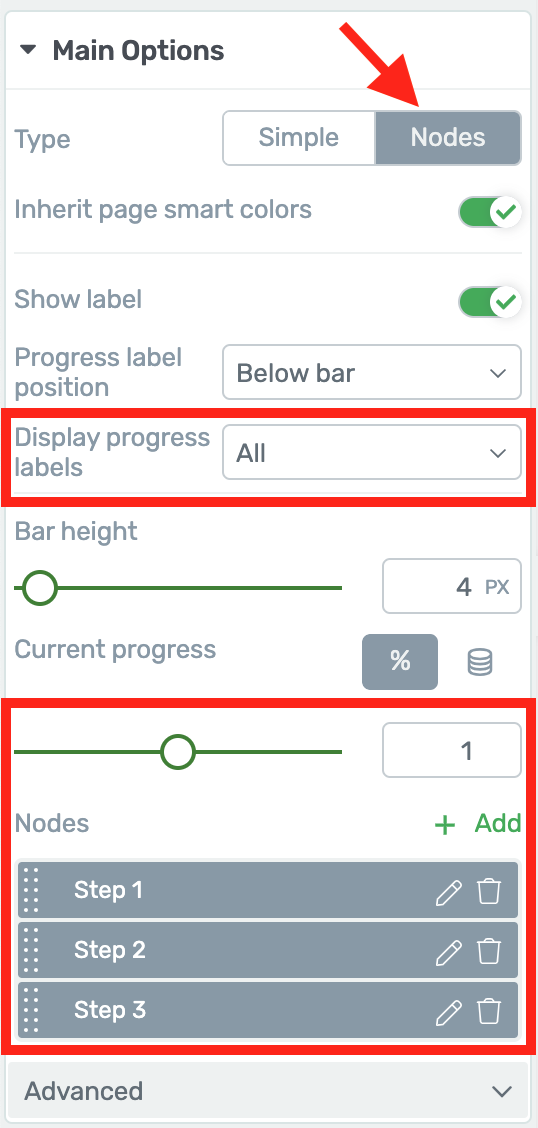
When you enable the 'Nodes' design style on your Progress Bar element, you'll notice several more design options appear.
The 'Display progress labels' option will be set to 'All' by default, which means the labels next to every icon will be shown. However, on smaller screens such as a mobile, this might make your Progress Bar design look a bit cramped.
In those situations, you can set it to 'First and Last' which will hide all Node labels except the first and last, or 'Current', which will hide all labels except the one for the current step to be completed.
Adding nodes is as easy as clicking '+ Add', which will drop a new icon on your timeline.

Just click the '+ Add' option above the Nodes list, inside the Main Options tab to add new Nodes to your Progress Bar design.
Dig through the templates and you'll find some beautiful designs, including some that use the candy stripe animation too:

An example of a Node style Progress Bar template using the 'Candy stripe animation' option.
In order to support Dynamic Progress inputs, Node progress bars use the CSS state switcher (found in in the top left of the Thrive visual editor sidebar - reference the screenshot below). Be sure to set the State option to 'Normal' when styling your Progress Bar element defaults, including the label fonts, icons and icon styles:
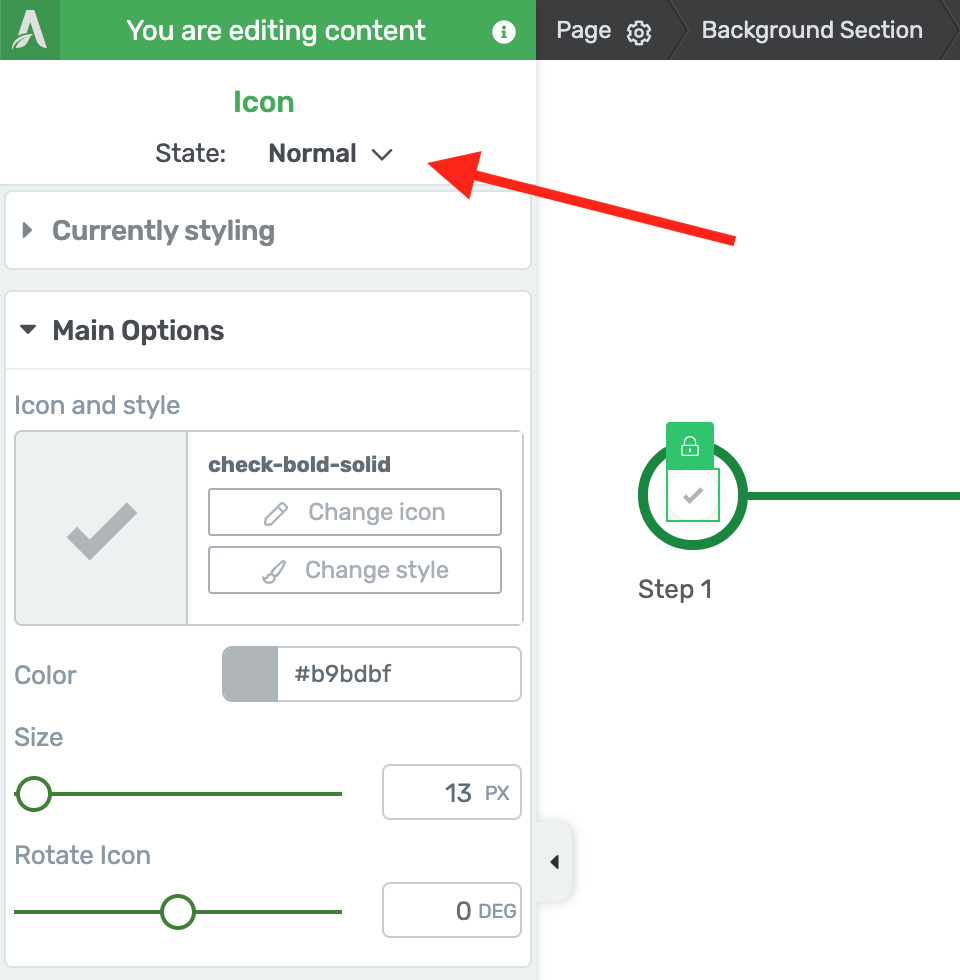
Be sure to set the State option to 'Normal' when styling your Progress Bar element defaults, including the label fonts, icons and icon styles.
The other two states, 'Hover' and 'Completed', will show which values of the default you are able to change depending on the progress position.
5. New Webhook Triggers in Thrive Ultimatum
Last year, we made an impressive leap forward with our scarcity plugin for WordPress, Thrive Ultimatum.
We added Active Campaign Webhook triggers for evergreen campaigns.
This meant you could trigger a countdown on your website that was unique to one specific subscriber just by sending their data from Active campaign in a webhook.
Although it's more of an advanced marketing feature, it's unbelievably powerful. Unbeatable countdown timers can boost conversions more than any other marketing strategy ever, and we know that one new feature had Thrive Ultimatum users cheering.
Now, we've rolled out support for webhook triggers with Drip, Infusionsoft, Zapier... and we've even added a Generic Webhook that can work with other 3rd party API services we've yet to integrate with.
How it works:
To use the new webhooks, start by creating an Evergreen Campaign in Thrive Ultimatum:
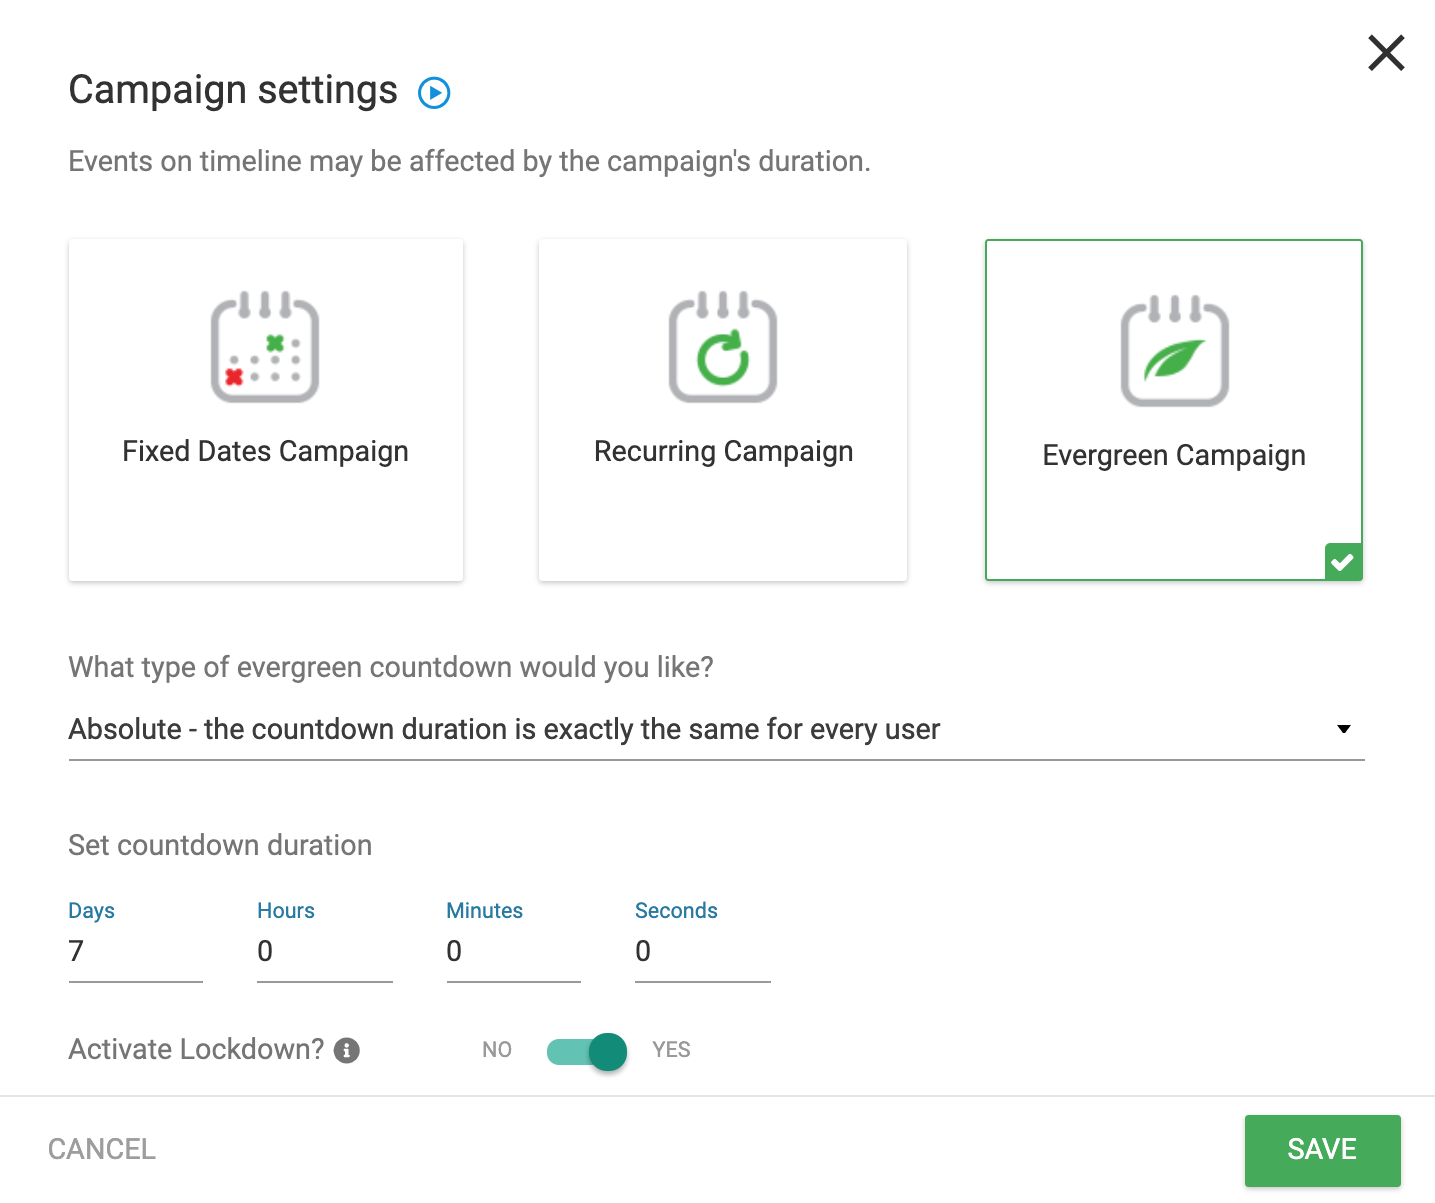
Open up the Thrive Ultimatum dashboard (inside your WordPress dashboard) to start a new 'Evergreen Campaign'. Set the countdown timer type to 'Absolute', choose your countdown duration, and then toggle the 'Activate Lockdown?' option to YES.
This is a scarcity marketing campaign that is not the same for all visitors. It is uniquely and privately triggered and uses email verification along with cookies to ensure your visitors only see their own, unique countdown.
Now enable 'Activate Lockdown' and choose 'Incoming webhook' as the trigger type. A new list of options will become available.
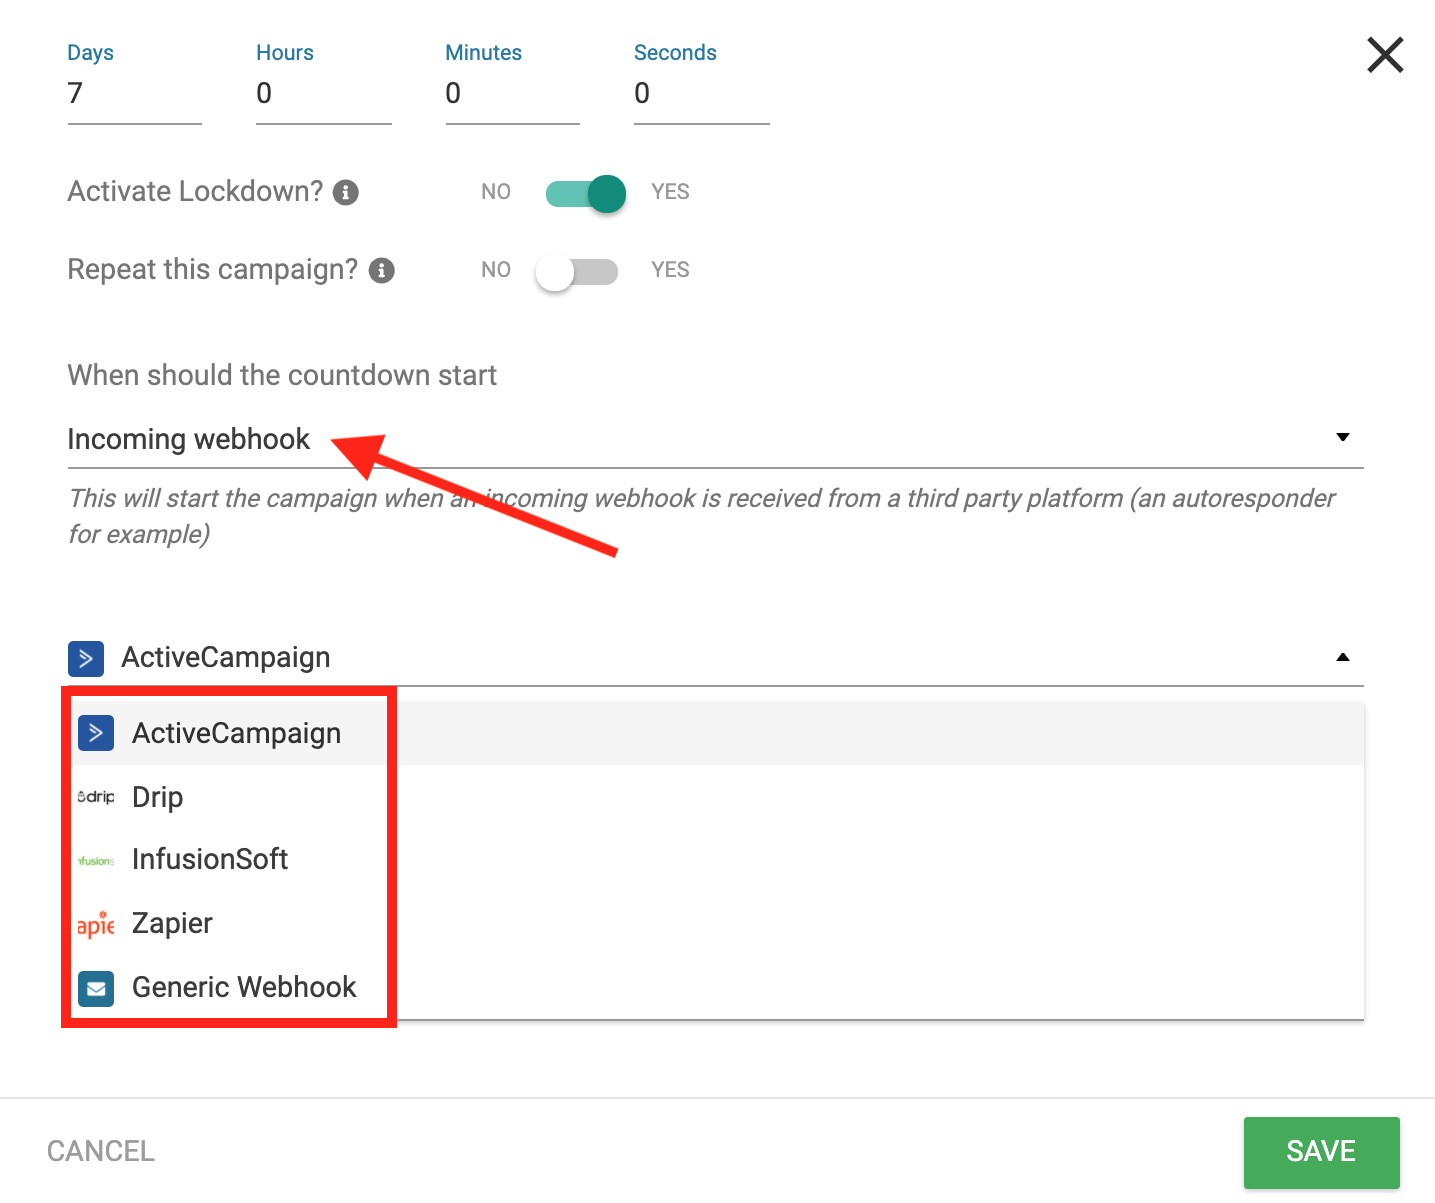
Now set the 'When should the countdown start' option to Incoming webhook and select your email marketing service from the dropdown box.
If you aren't an ActiveCampaign, Drip or InfusionSoft user, you might find Zapier will serve you well.
Or, if you're comfortable with configuring your own webhook, you can choose 'Generic Webhook'.

Comfortable with configuring your own webhooks? Choose the Generic Webhook option and have at it!
Our documentation team have put together a highly detailed knowledge base article on how to use Generic Webhooks with Thrive Ultimatum. If that sounds right for you, I recommend you check it out.
6. New One-Click Site Speed Integration: WP Rocket
Setting up the correct caching plugin for your website and hosting provider will make a huge difference to your website loading time.
But it often leads to confusing options and buttons that frankly... you don't care about.
For this reason, last year we added a Site Speed panel to Thrive Theme Builder, with one-click setups for WP Fastest Cache and W3 Total Cache.
In the latest release, we've expanded to support our first premium 3rd party caching plugin, WP Rocket.
Disclosure: This is an affiliate link, which means Thrive Themes get a small commission if you end up purchasing one of their plans. But more importantly, using our affiliate link helps us track how many people we refer. This information helps us to know which integrations are popular so we can continue integrating beneficial partnerships into our tools.
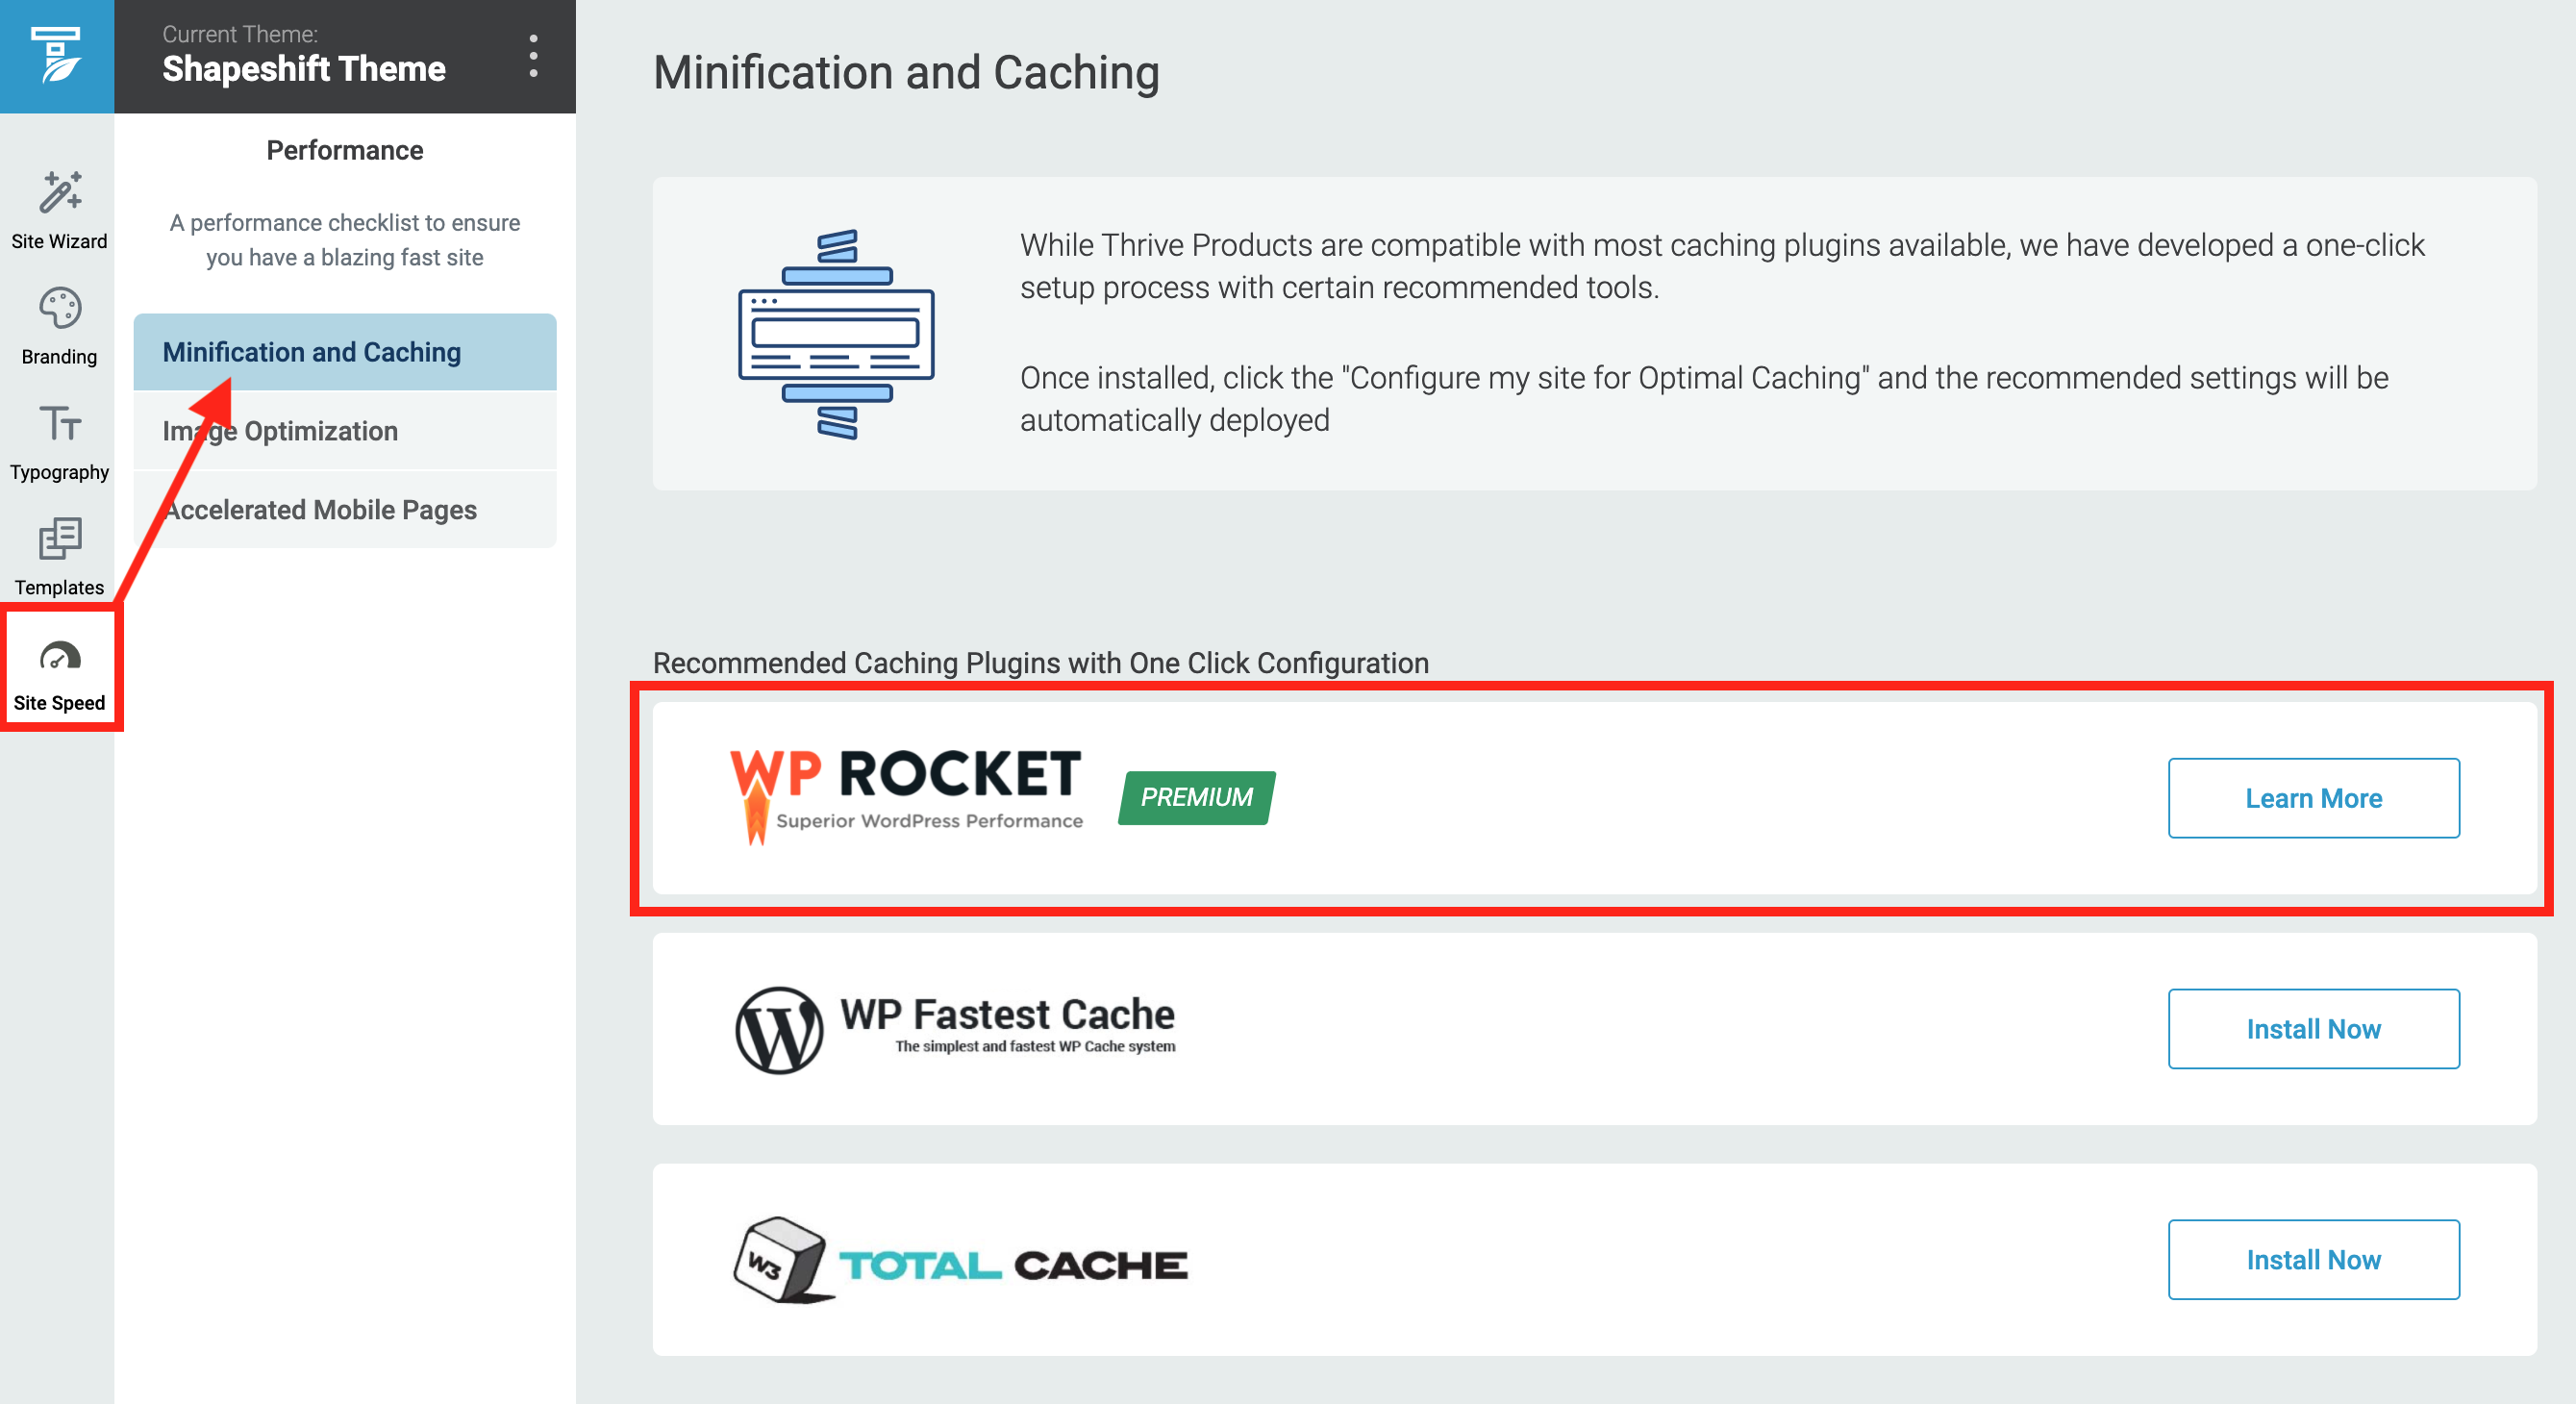
Inside the Site Speed tab of your Thrive Theme Builder dashboard, you'll find a Premium caching plugin integration with WP Rocket.
WP Rocket is one of the most highly rated caching tools available for WordPress. Yes, it costs... but many users swear by it.
We don't recommend any one specific caching plugin over another. From our own tests, we've found that the fastest is dependent on your specific configuration and tools.
However, we've been impressed with the results we've seen with WP Rocket.
If you'd like to use WP Rocket to increase your website speed, please use our affiliate link here.
7. Thrive Apprentice Access Rights Update
In this release, we've made an improvement to how you can manually edit your online course student access rights in Thrive Apprentice.
When you access the Customers tab inside the Thrive Apprentice dashboard, you'll have some new options when you click 'Edit access rights' on any user:
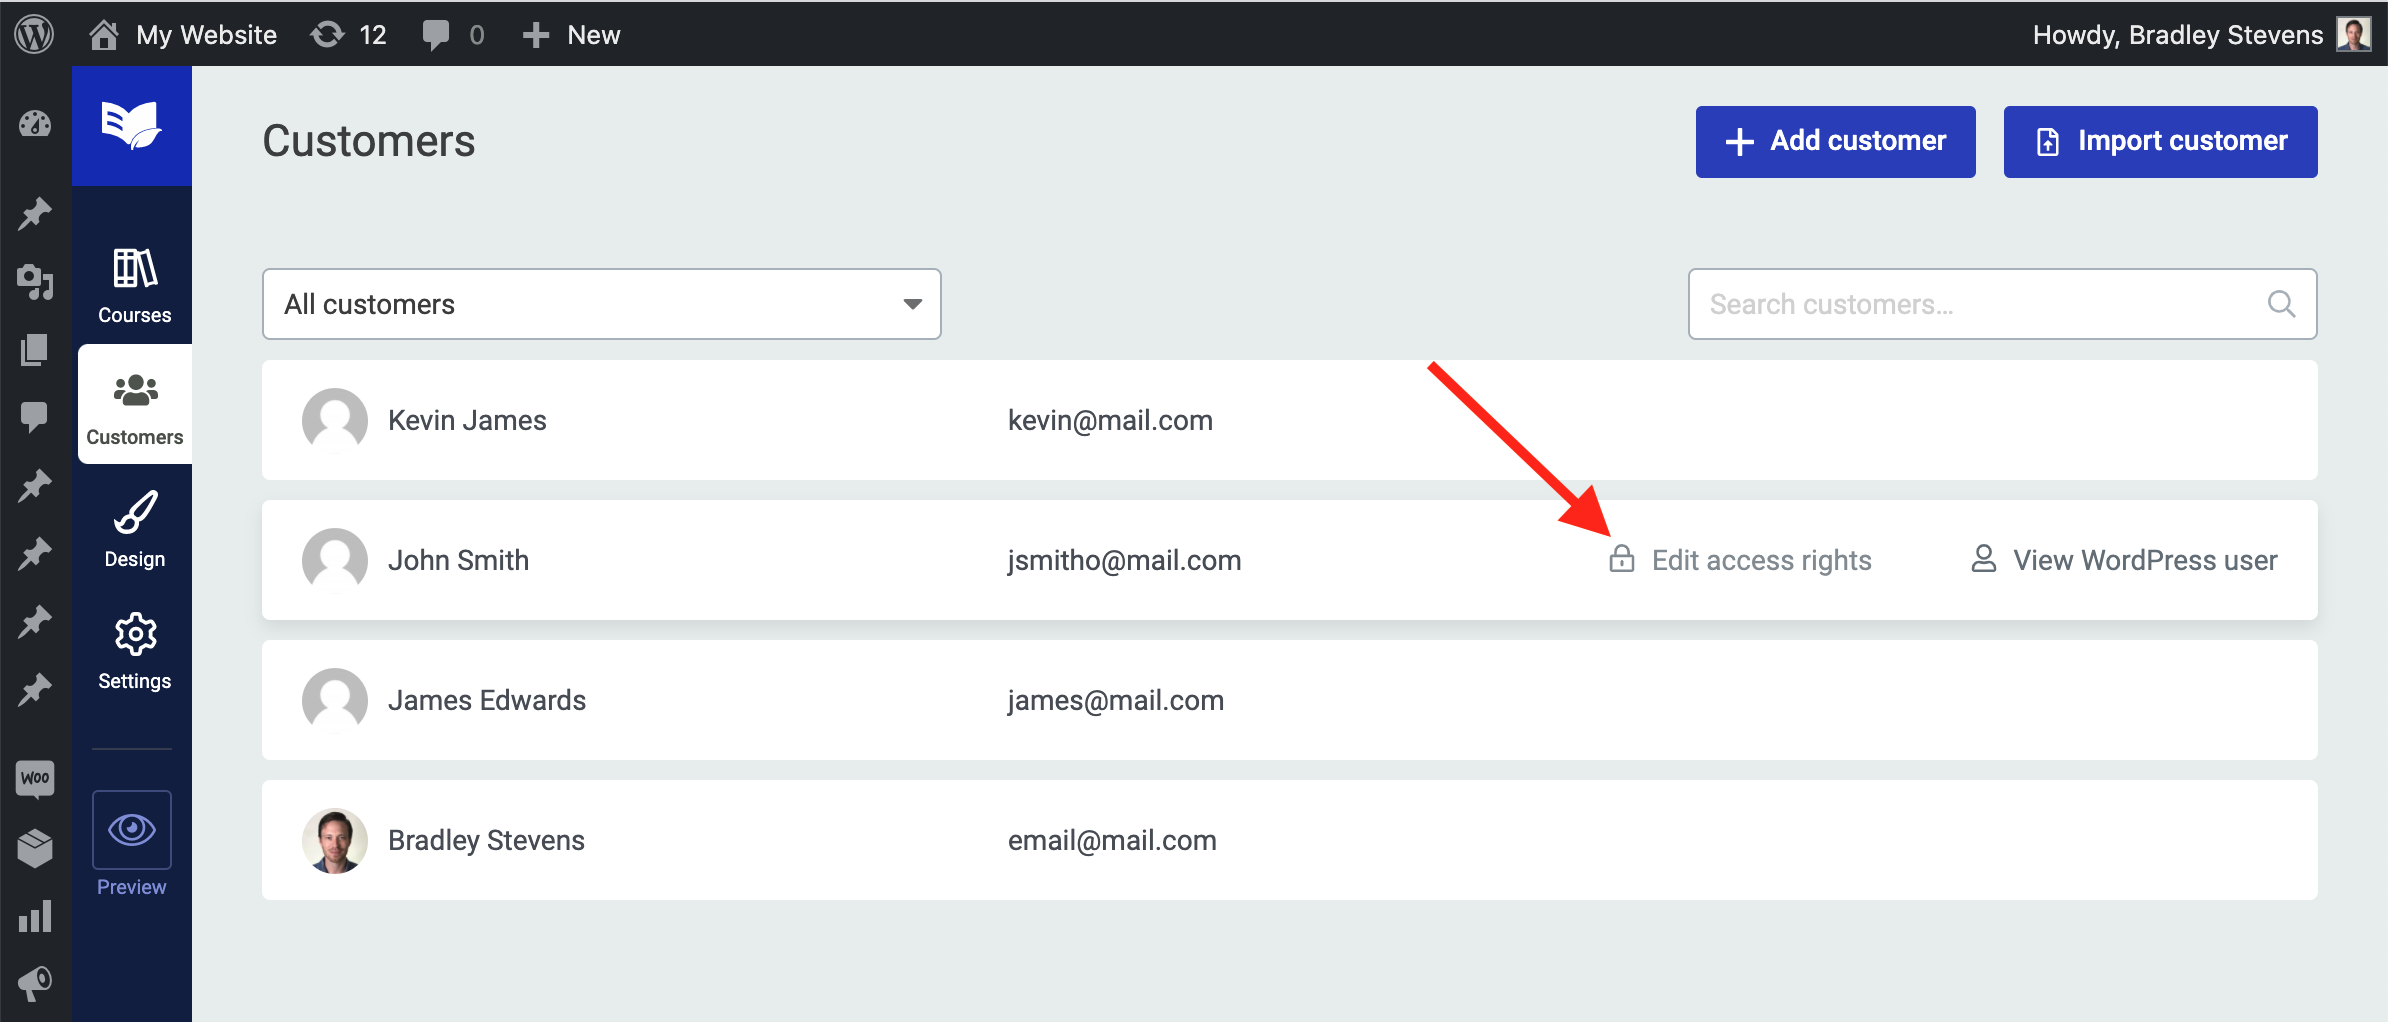
Inside the Customers tab of the Thrive Apprentice dashboard, you can now edit individual student access rights for each of your online courses.
Once you are editing an individual customer, you'll see a list of courses they have access to with information about how they received their access.
When you want to manually remove access, it's just 2 clicks on the trash icon:

You can delete a student's access rights to any of your courses by clicking the red trash can icon when the 'Edit Customer' lightbox is open.
You can also easily add access to an existing customer or to a new customer you are adding to your website.
When you click to add access, you'll see checkboxes for all the courses that exist inside of Thrive Apprentice. Greyed out checkboxes refer to access that a student already has (and can only be deleted from the previous screen).
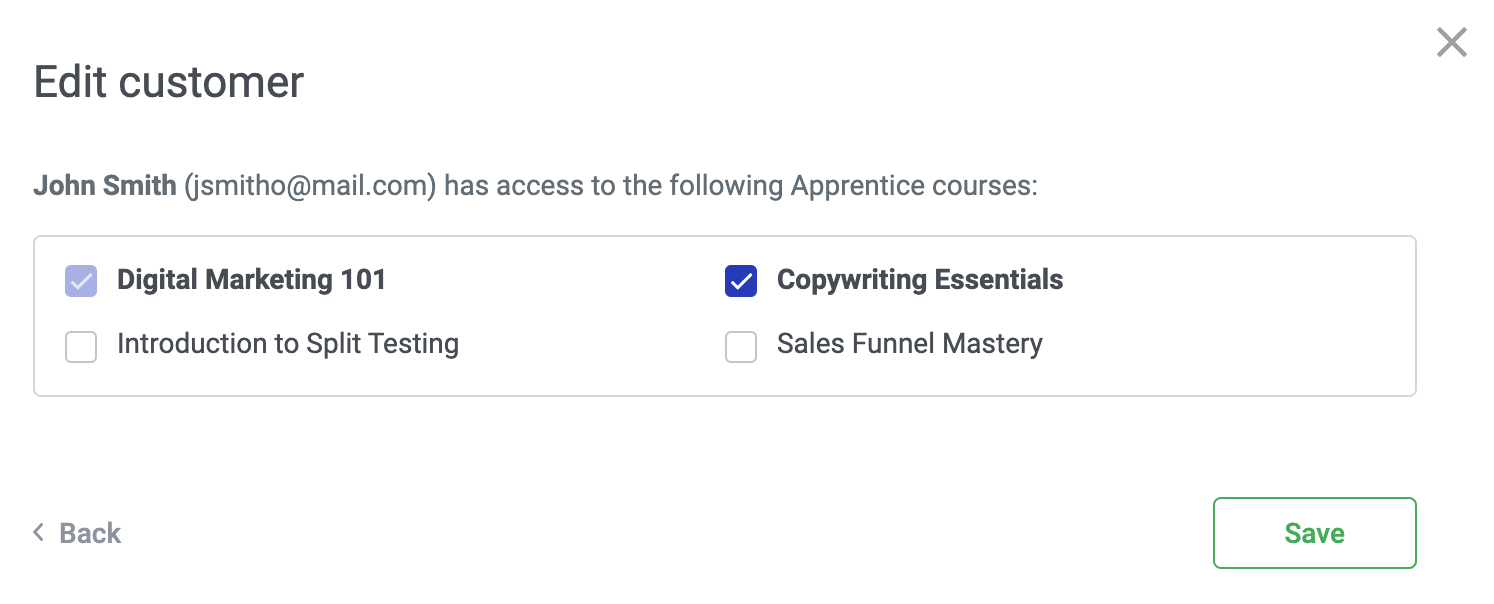
When trying to '+ Add Access' to one of your online courses for a given student, you'll see the courses they already have access to (greyed out) and the courses they don't have access to yet with a blank checkbox next to the course name.
Click, save and that student now has access to the course. Easy!
In the 'Edit Customer' view, you'll also see different 'Access Type' data. It's now much easier to identify what courses a customer has access to as well as how they purchased. You can also remove their access to a given course in a matter of seconds.
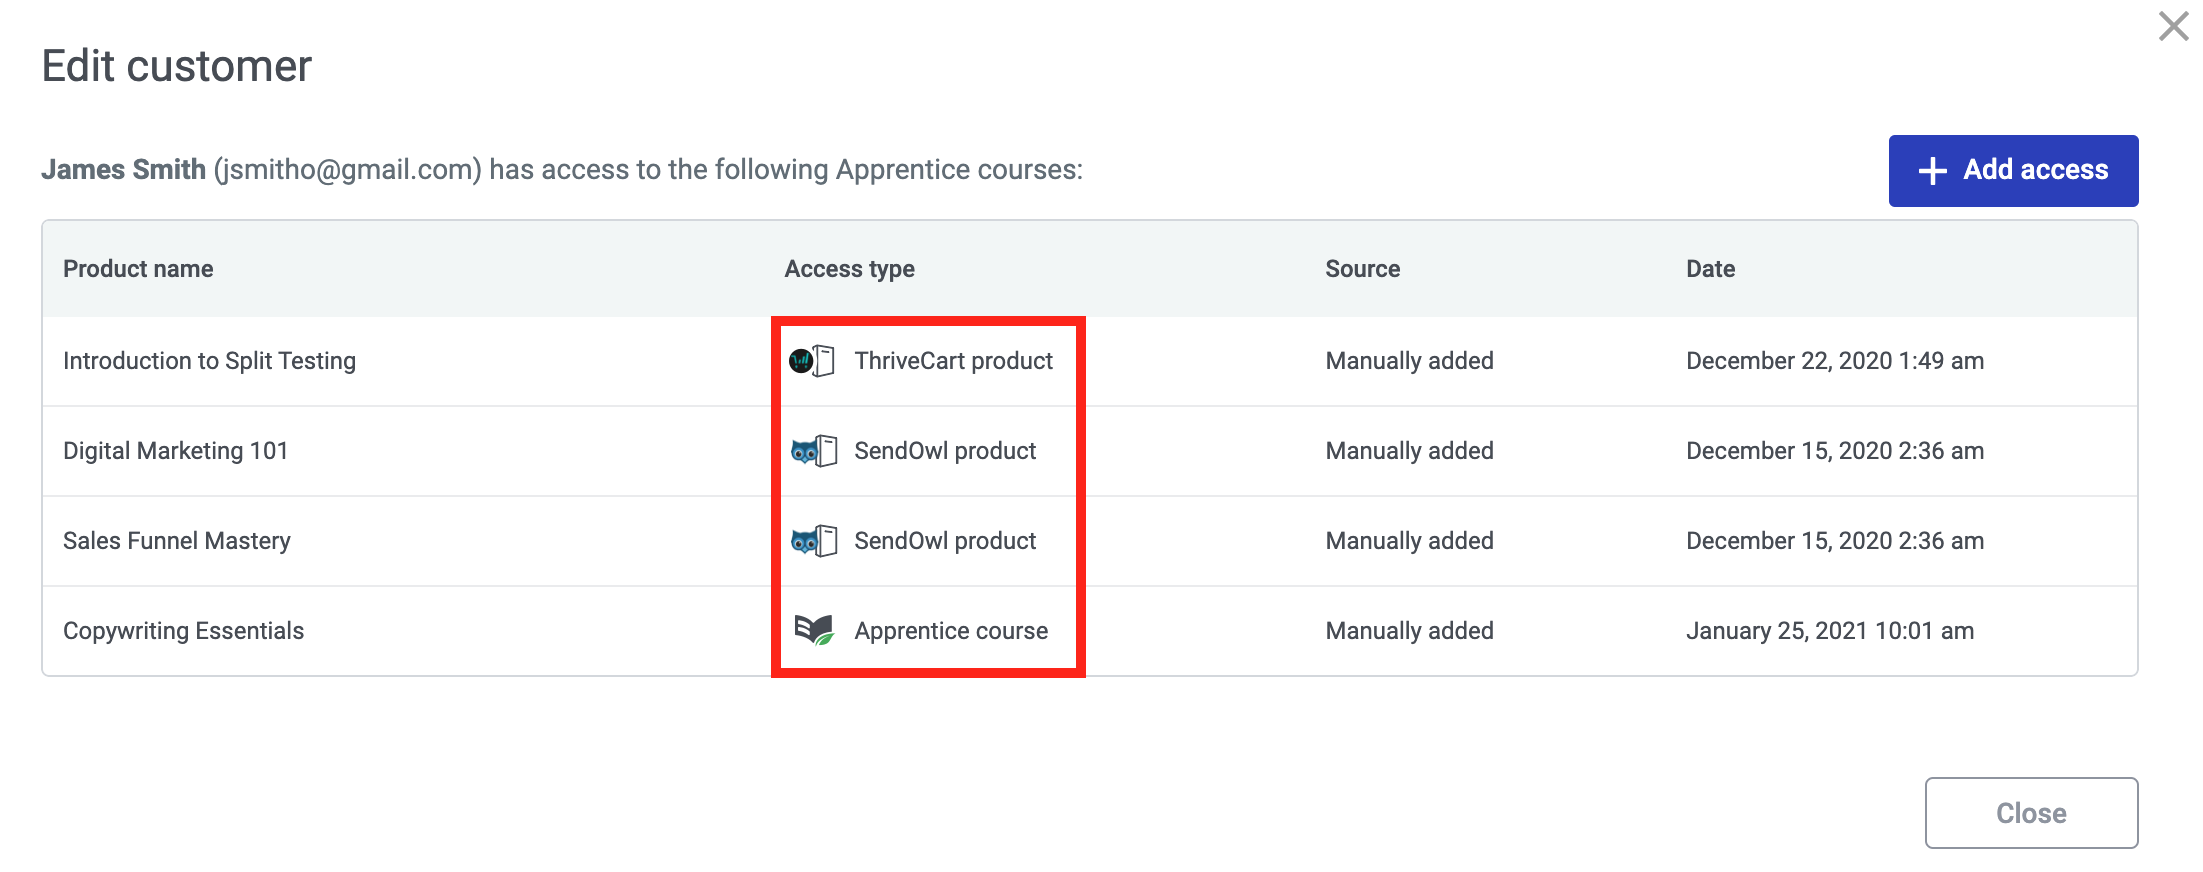
The 'Edit Customer' view makes it super easy to see allows you to see what courses a customer has access to as well as how they purchased. You can also remove their access to a given course in a matter of seconds.
8. Direct Access To The Knowledge Base
Last year, we moved our entire knowledge base to a new system and published hundreds of detailed, step-by-step articles on how to use our tools.
In an effort to help you get the most of our our tools, we've brought those knowledge base articles even closer to your editing experience.
Over the coming months, you'll start seeing tiny question mark and play button icons discretely added to the Thrive visual editor interface:
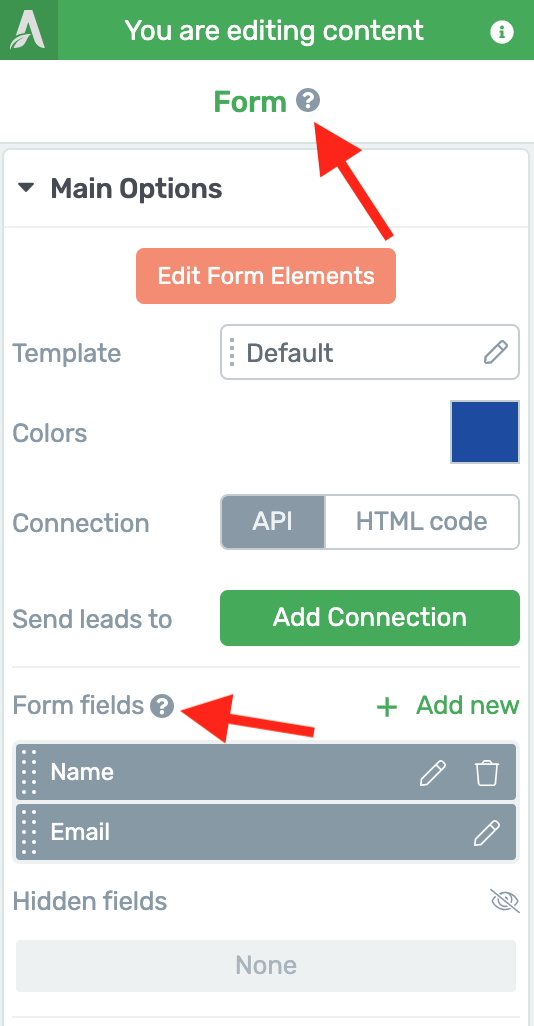
Be on the lookout for question mark and play button icons being added to the Thrive visual editor user interface to help explain & teach what the different features in our tools do.
If you see one of those icons alongside a feature or option you want to understand better, give it a click and the perfect knowledge base article will load right in front of you!
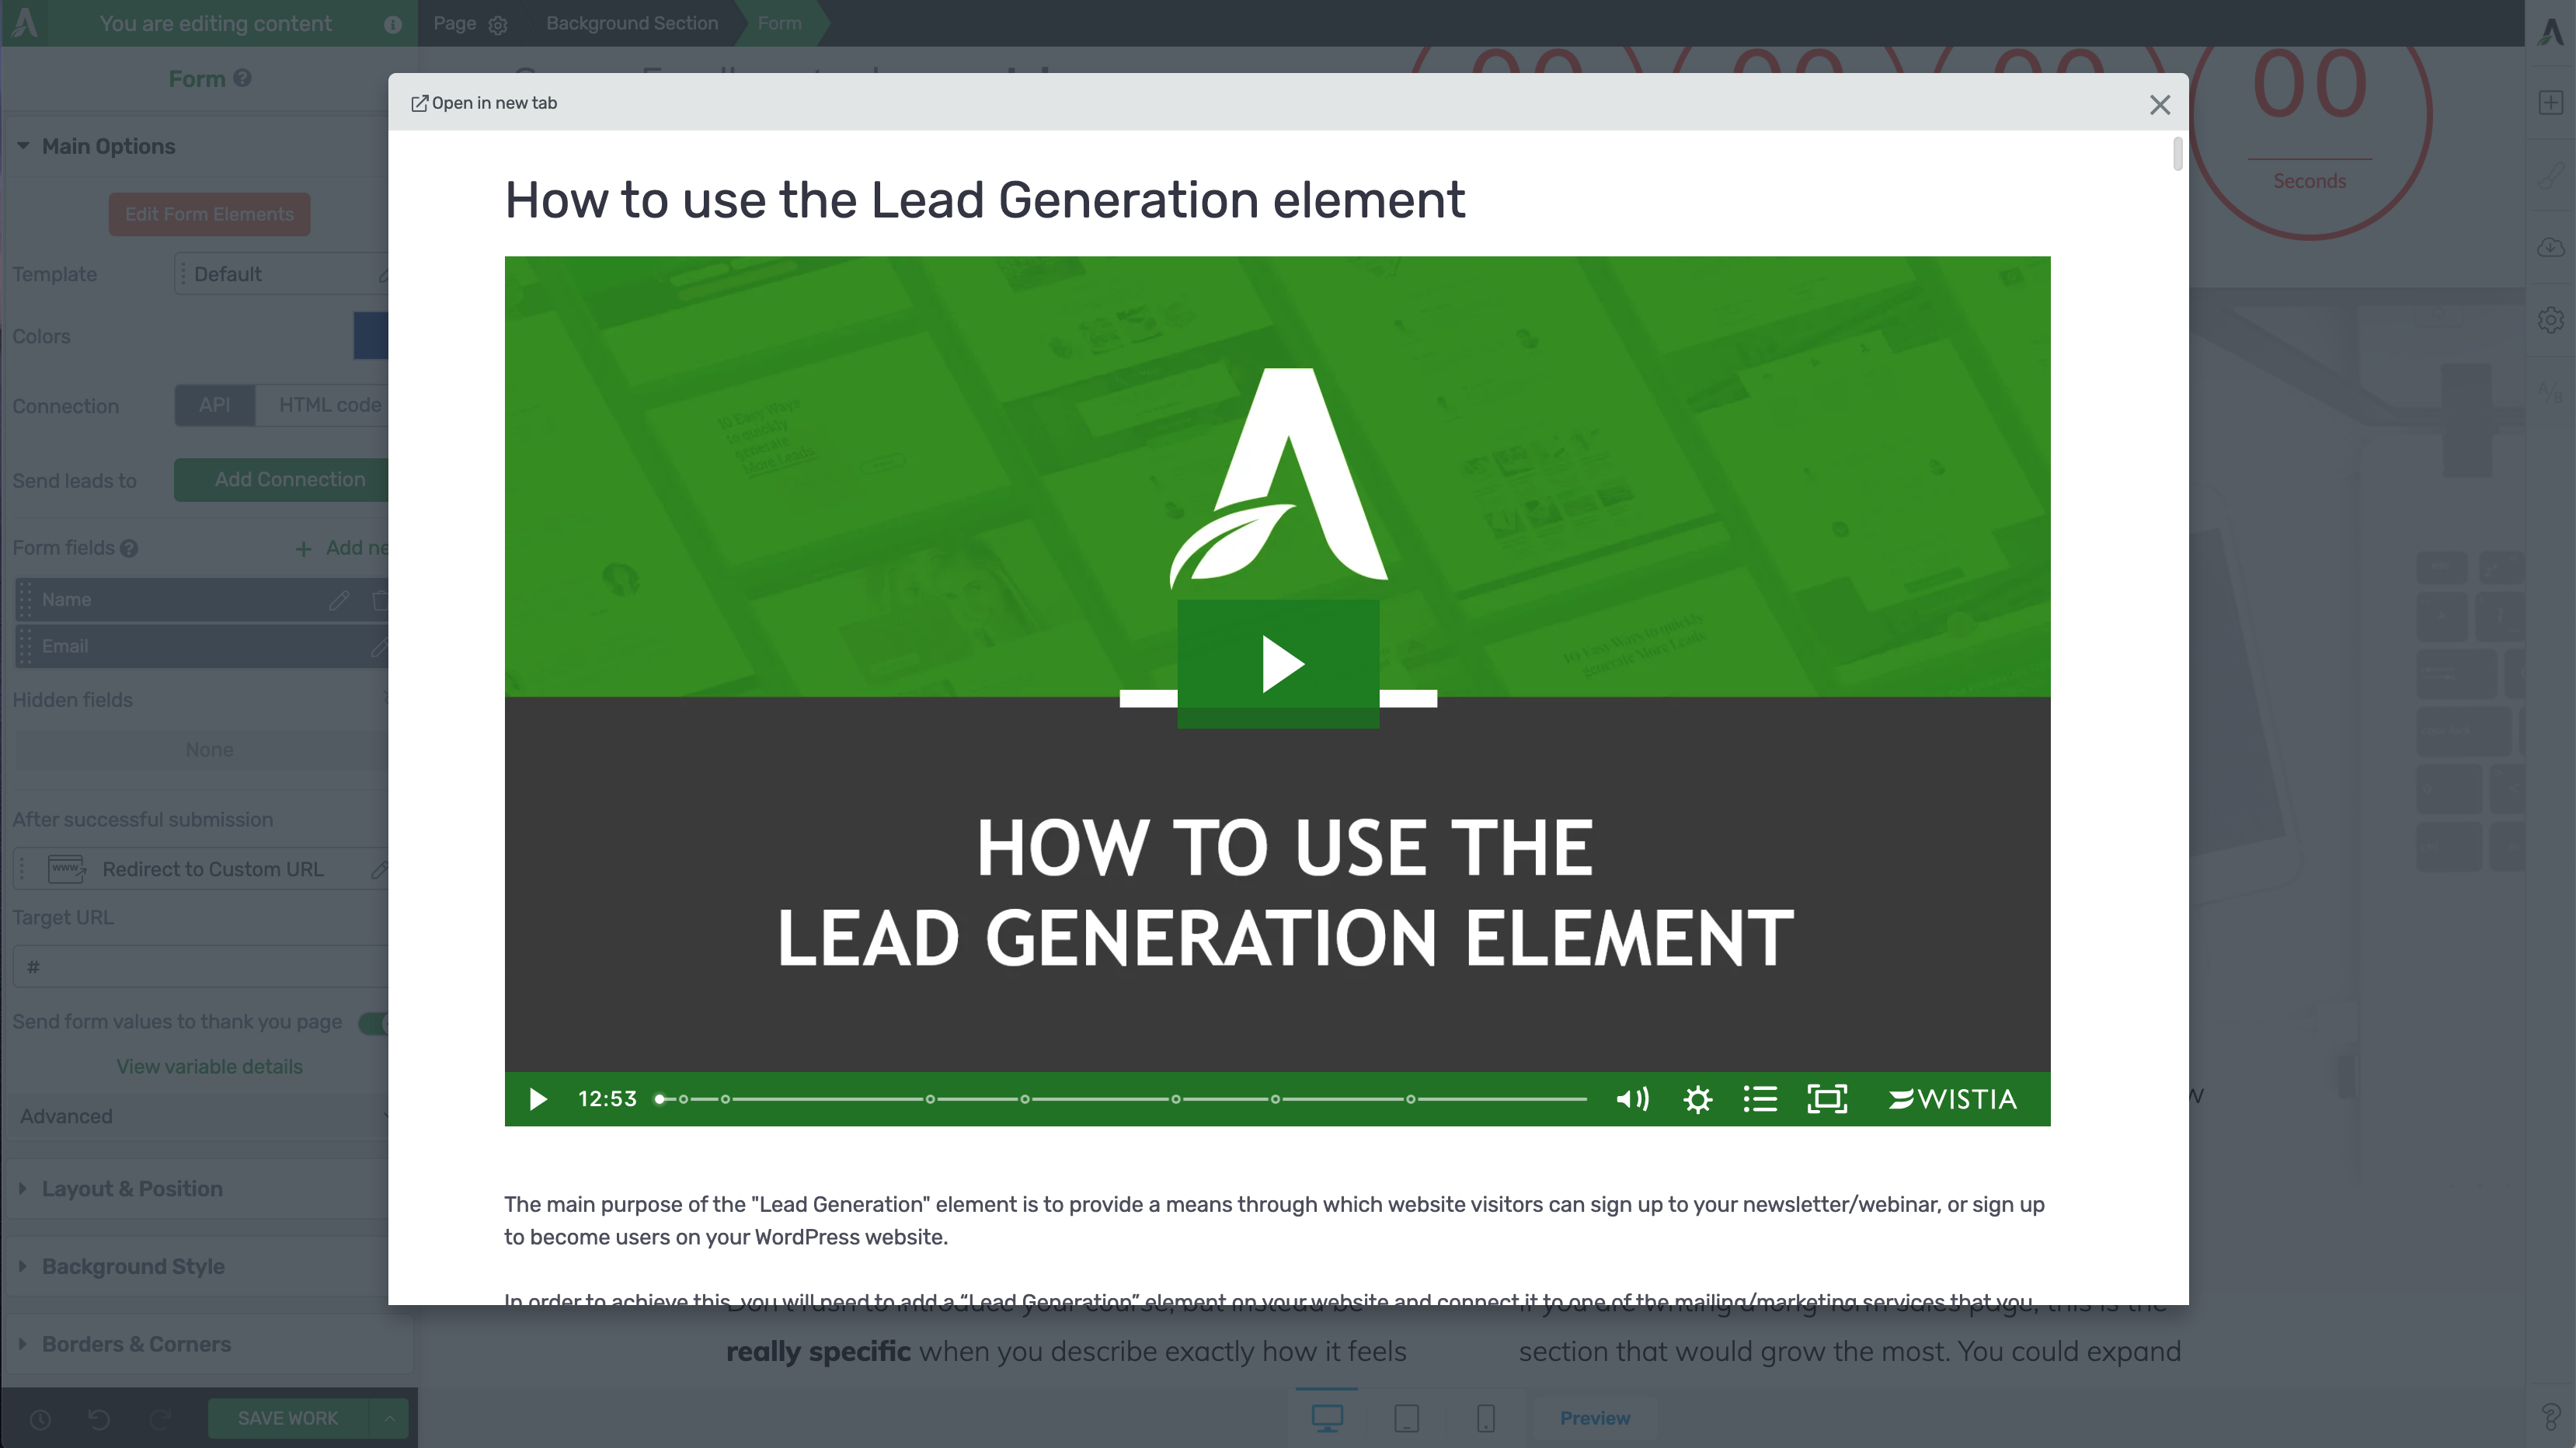
If you click on one of those question mark or play button icons, a knowledge base article or video will appear to help you understand the feature in question better!
If you'd like to keep it open while working on your page, just click the 'open in new tab' button and get back to work.
What do you think? Like these updates?
2021 is off to a good start here at Thrive Themes. Our team is feeling refreshed, inspired and ready to push forward with some more exciting features in upcoming releases.
But all of this begins with you.
We're reading your feature requests, your feedback, your comments and we regularly discuss how we can help your online business grow.
So please, drop us a comment below. Let us know what you think of this latest release and what you hope we'll work on next.


amazing updates, thanks a lot, congratulations for all the hard work!!
Thank you Alejandro
love it!
These are awesome updates, Bradley (as always).
How long it might take when we will be able to enroll people into Thrive Apprentice directly through zapier. I know we can do it with a custom role but unfortunately, zapier doesn’t show other roles than subscribers 🙁
And any plan to marry woo-commerce with Apprentice?
Hey Himanshu, our WooComm integration with Apprentice had to wait for some other priorities first, but we’re hoping to build it soon. It’ll work without any need for Zapier or custom roles.
Do you think we can see it rolling in this quarter? Or maybe next.
I’d estimate early Q2, provided no technical issues arise.
Good to know. Thanks Brad
Awesome work with the Apprentice lesson list!
Thanks Daniel!
A lot of good stuff!! I like especially the off-screen sidebar.
It’s very nice. Opens up lots of template design options, especially when combined with the vertical menu.
amazing stuff! so cool to see how you keep on improving and improving and improving. just a few weeks ago i was throwing together a progress bar with nodes with different images and screenshots etc. for my upsell page, because there were no options in thrivearchitect. and now they are here 😉 really cool stuff. keep up the good work!
Awesome! I’m glad to hear that we can make that easier for you
Great update. Especially love the progress bar. I may have missed it.. Is there a way to use it dynamically in, say a check out with multiple separate pages?
Great news about the Ultimatum webhook! Now, is there any way to embed the countdown in an email like with DeadlineFunnel or TimerCampaign? Then it could replace yet another tool!
Not yet, but we definitely want to bring that feature to Ultimatum. How much styling control do you require for an embedded email countdown timer?
I’m waiting for a few months on The Big improvements of Thrive Apprentice… One of them is the connection to Woocommerce and other ones has to do with user experience issues. I hoped this update did have those big changes into the LMS system you guys talked about.
Hey Piet, Thrive Apprentice is improving over a series of updates. An improvement to the student experience is coming soon, and Woocommerce not too far away either. Trust me when I say that we’ve got our best team members working on the Apprentice project. Software improvements just take a lot of time, so your patience is appreciated!
Ha, well, then I’ll have to wait a bit more 😉
Where are we with the ability to create courses in coordination with Thrive Theme Builder?
Sweet to have quicker access to the knowledge base when presented with that specific task / window.
My fav from the list of updates as well!
Here you go again. Xmas comes early this year! 🙂
Love it.
Haha, in January?! 11 months early!
Yepp, that’s how generous you are with the new updates … Your team is simply the best.
I enjoy being your customer. 🙂
Wondering if those progress bars work in a Thrive Theme Quiz yet. I know that this was a feature request, but I image that they don’t.
Hi Mark,
The progress bar is available in Thrive Quiz Builder since quite some time now. https://share.getcloudapp.com/xQun4qmQ
It’s design is not as flexible as the one in Thrive Architect though because of the fact that it’s completely dynamic depending on how many questions the quiz taker still has (which can depend on the path they’re taking in the quiz)
You can learn how to use it here.
Love the knowledge base links and offscreen sidebar! Great work!
Thanks Craig!
Never have I been happier to have invested in a WordPress plug-in. (Though the word doesn’t do Thrive Themes justice…)
The new sidebar is just the thing I’ve needed!
Awesome, glad to hear you’re going to put it to good use!
Does Thrive Themes have any integrations with referral tracking softwares?
I’m not sure an integration is needed, is it? You can place external referral links anywhere on your website. What are you hoping to achieve?
Excellent updates Brad. Thanks to the Thrive team for continuing to create an amazing list of products.
Thanks Mike!
Hi Brad
Brilliant updates as usual. Wow and it’s only mid January. Will we see ‘page breaks’ csv import and a star system in ovation this year?
Hey Ian, you’ll have to explain what exactly you mean for Page Breaks CSV import. As for Ovation, we’re hoping to give it some love, but still have other priorities first.
awesome updates >>>> wondering if any integration with a search and filter plugin is on the way:)
Is there any specific plugin or feature you want? What are you trying to achieve?
All these updates are great!
a) But talking about speed – are you also cleaning up and speeding up the Thrive plugins itself? I am just afraid that after this many updates and new features Thrive could be bloated? (I don’t know, I don’t find Thrive being slower than other content builders, I just am afraid – I dont want for my page to become slowed down by features I don’t intend to ever use :D)
b) Some of other content builter plugins (like that one with the name starting with E) has loads of extra plugins from independant authors, that improve the E. While Thrive ecosystem seems really closed off. Is it by Thrive philosophy or is there a plan to make Thrive more open-source and pluggable from outside?
Hey Danielius, good to see a comment from you again,
a) We’re always mindful of speed with our updates, and we have our best speed gurus exploring optimizations inside of our editor. Speed is a complex topic and there’s a lot of misinformation around it. As a general rule of thumb: optimize your images, pay for a good host, use a CDN, use the right caching services and your site will be fast. Leave the rest to us- our team are working on plugin optimizations that’ll make it even faster so all you have to do is keep your plugins updated.
b) We’ve recently added developer-friendly hooks to our software and will be publishing the documentation on how to use them soon. This opens up our ecosystem significantly, allowing 3rd party plugins to talk with our tools. However, we draw the line at allowing 3rd party elements inside of our editor, for 3 reasons: quality, price and compatibility. Our philosophy is to open up a lot more in 2021 than we have before, but to never sacrifice quality.
Oh, that’s so great to hear! That’s why I love Thrive 😀
Nice additions and good to see you can think of updates we did not even know we needed :).
I do wonder though: would a hidden sidebare not have a negative influence on conversion, as one might have conversion elements in the sidebar. If visitors can hide this, there might be less conversion.
Any ideas?
It really depends on what you’re using it for. If your sidebar is for navigation, then collapsing it may help remove distractions from the content of your page. But if it has an opt in form that is converting well, you might prefer to keep it discoverable. You can set the default value of the new sidebar to expanded if you want visitors to discover it on arrival, and if you’d prefer to make it always visible, then the regular sidebar cannot be collapsed.
Great stuff, thanks for the hard work.
Looking forward to have some additional features to WooCommerce. Like product bundling, email templates, discount rules. Just to get rid of the hassle to get it work between different parties.
Cheers Christiaan
Hey Christiaan, I’m sorry to say that those WooCommerce changes aren’t in the scope of features we’re adding. We focus on visual styling and optimization of your website, and our WooCommerce integration supports 3rd party extensions. For those features, check the repository for free and premium WooCommerce extensions.
Thanks Brad! As usual another great article wrote by you. Btw, a lot of improvements
Thanks Michele.
OMG! Is this the best company in the space or what? I really love what you’re doing!
We do our best!
Wow! Awesome new features again! I can’t even choose a favorite from them! 🙂
A small feature, on the other hand, would be very useful for the progress bar. If the label text could be aligned to the center.
Thanks Krisztian, and for the progress bar feedback. That should be an easy adjustment, I’ll take this to our developers.
Thanks Bradley!
That’s just great Brad…Thanks!
You’re welcome, Uffe.
WOW WOW love the updates to the Apprentice – thank you
Yes! Glad to hear you like it, Chinmai
Yeah, i see. Thanks Thrive Theme
Hi there, I just have begun to explore Thrive Themes and it is just amazing what you can do. the new update seems to be great and makes a lot of fun
Awesomely Awesome! I am in the throws of putting together a course so including this will be amazing. I’d love to see a spreadsheet import feature – I add all lesson names and other details into a spreadsheet and then ctrl-c ctrl-v into Thrive Apprentice so an import would be great 🙂 For images and other course elements also as spreadsheets are so good for organising everything
Hey Paul, this is a puzzling request to me! I’d like to know more about it. You really build your courses in a spreadsheet? What’s do you have in each column? The lesson title + a link to a video file, or…? Do you have other text on your lesson page? And you want to import the spreadsheet and have lessons auto-generated, with the media files pre-loaded on the lessons?
It sounds to me like manually entering this data would only take a minute or two per lesson and give you much more control, unless of course your spreadsheet has lesson text too.
To be clear, this would get very messy very quickly and sounds more like a custom solution than a feature we’d add. It requires intelligently updating the Apprentice database. I won’t disregard your request, but I will need to understand it much better before we can properly consider it.
These are great updates. Would love to see a web hook trigger in Ultimatum for ConvertKit, pretty please. The generic web hook looks a little beyond my tech ability!
Noted! ConvertKit is quite a popular tool, so you aren’t the first person to ask for this. I’ll add your vote
Wow, congratulations and big thanks for the hard work Shane and the team!
My investment when purchasing the several Thrive modules about a year ago is more than just worth it. Thanks!!
One thing I cannot find (and I’m very much interested in) is how to update a progress bar dynamically, based on values in a external file (txt, CSV, or whatever).
Is there an existing way to do so but I overlooked it?
Thanks a lot!
Hello Jant, happy to hear your investment with us has been rewarding! The Progress Bar does have a dynamic input which you can read about here: Using dynamic values when setting up a progress bar. It won’t read from an external file, but if you can get that data into one of the 4 dynamic options we support (custom fields, URL query string, POST variable, Cookie data) then you may find a way to make it work for you.
Re. Apprentice: as an avid Apprentice- user, I’m also eagerly awaiting the possibility to duplicate lessons and courses. What’s the ETA on that? I know many more users have suggested this feature.
Yeah, that’s been suggested quite a lot. Duplicating courses is on our roadmap, and we’re working on where/ how to add duplication of specific lessons. It won’t be too far away
All new additions and updates are exceptional. I like how your team seems to “get it” when it comes to what is needed by marketers of all types.
In case I missed it, have you added any more integration with ActiveCampaign regarding the ability to add tags to modules, chapters, lessons so upon completion ActiveCampaign can have the tag(s) added to the user/contact to initiate defined “actions”? I believe this was on the list to be added and I didn’t want to miss it. If not added yet, is it still on the list of updates?
You guys create fantastic products that are very useful and allow us to keep eliminating 3rd party plugins. Keep it up.
Hey Allen, thanks for your comment! No we don’t have that feature for Apprentice yet, but it’s 100% on our list, and we’ve settled on a pretty powerful way to do it. That will come this year, for sure.
Re WP Rocket settings
Once installed, click the “Configure my site for Optimal Caching” and the recommended settings will be automatically deployed
Hi Brad, I am about to click on the configure button but am wondering what will be changed, and can it be restored easily if I strike problems?
Minification and Caching
Are you Sure you want to Overwrite your Existing Cache Settings?
Should I back up my rocket settings first? I guess I should anyway.
Does it just change settings on the cache page settings, or does it alter others?
I must admit, a fair bit of my time is spent on fine-tuning WP rocket to match in with TA and TTB updates, so it would be nice to know in advance what settings are being altered.
BTW thanks for the great work. Love TTB.
Cheers Don…
We enable caching and css/javascript optimization and add the required exclusion rules to make sure our products keep working.
I would say that the settings we enable are just standard practices in general; we aren’t doing anything over-aggressive or advanced, because this has to work on various websites. So if you already optimized WP Rocket for your own site, chances are that your settings actually have better results in your specific case 🙂
You can still try with our recommended settings, in this case I strongly recommend backing up your current ones, there’s an option for this under Tools in the WP Rocket dashboard.
Lorant can you share what those settings are so I can check that they are implemented without overriding my existing settings.
I use WP Rocket across many sites but it has been often heavily optimised.
So I would love to see the settings your Theme integration uses so I can manually implement them.
A bit tricky to share in a comment, I’ll make a note to our documentation team to maybe add a section to our article that goes through the exact settings.
It’s basically caching, minify and deferring enabled, but turned off for logged in users, and our javascript excluded https://share.getcloudapp.com/2NuEAnnk
These updates are great as always. Thank you so much. Any idea when the big Thrive Apprentice update will be?
Hey Angelica, it won’t be one big Apprentice update. It will be a series of new features that transform Apprentice over time. That said, there will be one or two bigger milestones where those smaller features can be used together for a significant change. The first of those bigger milestones needs a bit more work, so if all goes well- it’ll be in a few months.
Thank you for answering!
Great news with the Apprentice update. Question. Can you tell us what the vision is for Apprentice? Will it one day have membership functionalities like drip content, or will we always have to have either SendOwl or a membership plugin?
I can hint at a few things, but not the whole vision. That’s because software features and timelines are always subject to change, and even our best intentions declared too early can be frustrating. Yes- Drip is definitely coming. SendOwl and ThriveCart aren’t membership plugins, they are checkout tools. Access restrictions are managed by Thrive Apprentice but granted to a user when they buy. Our plan is to expand payment integrations so more checkout tools can grant access to Apprentice courses upon purchase. Hope that helps!
Yes, that sounds great. Support for Digistore24 is highly needed. At the moment, there is a Workaround with 3rd Party Webhook Tools, but a simple API solution would be super.
Hi Brad,
Every update is perfect. Please add more animations & decorations styles. I have 3+ years of experience in Thrive. I worked for an agency in the USA. I am also a freelancer on Upwork.
If you don’t mind May I ask you something?
Thanks,
Nazam
I’d like to see us expand our animations, yes. Decoration styles? You’ll need to be more specific.
Sure, reply right here. What’s your question?
I’m so glad you’re innovating the menu designs but you’re still providing menus that take up the entire screen on mobile (where most traffic comes from)!!
PLEASE prioritize making horizontally scrollable navigation menus available. These are absolutely critical for mobile navigation as they don’t take over the whole screen.
Hey Ryan, have you tried our mobile hamburger menus? You can set a menu, either horizontal or vertical, to display as a collapsed hamburger menu on any specific screen size (desktop, tablet, or mobile). This means you are not taking up valuable screen space on small devices until your visitor clicks the hamburger menu to open it. Although I agree horizontally scrollable menus would be a nice addition, I wouldn’t say it’s absolutely critical. We haven’t had any other feature requests for it yet, but I will log this request.
Great for Apprentice! But I have a question: do we need Thrive Achitect as well as Thrive Apprentice to be able to use Apprentice Lesson List on blog post or page?
Yes, that’s correct. The Lesson List is an element in Thrive Architect that will become available if you also have Thrive Apprentice installed and active.
Hello,
when will it be possible to output lessons also time-controlled (drop in)?
David
Course drip is a feature we’ll work on soon after some bigger Thrive Apprentice changes.