In a previous Thrive Themes blog post, we explained how you can use a pre-designed landing page template to get your new online coaching clients to book their own “free consult” appointments with you.
Now, I thought my tutorial was a pretty slick example of how you can integrate an automated scheduling tool with Thrive Architect.
But after publishing, one of our readers quickly showed us an even more efficient way to do it by adding Thrive Leads to the mix:
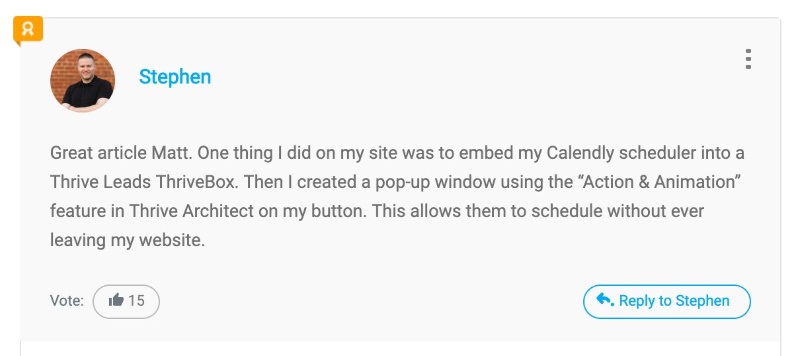
Fitness & Nutrition Coach Stephen Box left us an awesome comment about how he automates his new client scheduling using Thrive Leads.
So are you ready to follow Stephen’s lead and learn how to upgrade your New Coaching Client generation page with a Thrive Leads ThriveBox (a popup lightbox that’s triggered on text, image or button click)?
Awesome sauce! Read on...
More...
A Quick Shout Out To Stephen Box
One of my favorite things about working for Thrive Themes is seeing how active and switched on our customers and blog readers are.
Case in point, after receiving Stephen’s conversion focused comment on how to improve automated scheduling for online coaches with Thrive Leads, I quickly went to investigate his website to see how he get's it done... let’s just say that I was impressed!
Stephen’s New Client landing page is attractive and quickly streamlines visitors to click on one of his “Free 'Zero Pressure' Consult” buttons:

Stephen Box's New Client Landing Page. Notice how it streamlines visitors to click on his "Free 'Zero Pressure' Consult" scheduling buttons as well as his clever use of a "Pros & Cons" Content Block template.
I even noticed that Stephen deployed one of our “Pros & Cons” Content Block templates to help quickly communicate the value of his offer!
But what happens when you click on one of Stephen’s “Free Consult” buttons?
BAM! Something so simple, it’s magic:
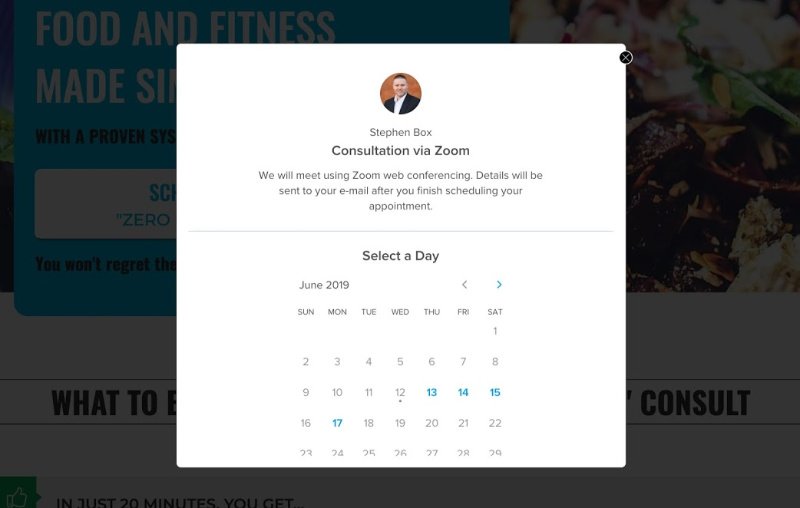
When a visitor clicks on Stephen's "Free 'Zero Pressure' Consult" button, it opens a lightbox embedded with his Calendly automated scheduling calendar where new clients can self-book their initial consult call.
Stephen just uses a blank Thrive Leads ThriveBox template embedded with his automated scheduling tool (in his case, Calendly).
Now that’s a super simple and slick way for online coaches to set up an automated system for their new clients to self-book without ever having to leave the website!
Want to see how to set this same system up on your own coaching homepage or New Client Generation page? I know you do so here we go...
Improve Your New Client Generation Page Using a ThriveBox
Assuming you already have a New Coaching Client generation page published on your WordPress site, you can deploy this auto-scheduling upgrade by creating a new ThriveBox within your Thrive Leads dashboard.
Choose the “Blank Template” opt-in form lightbox when prompted:
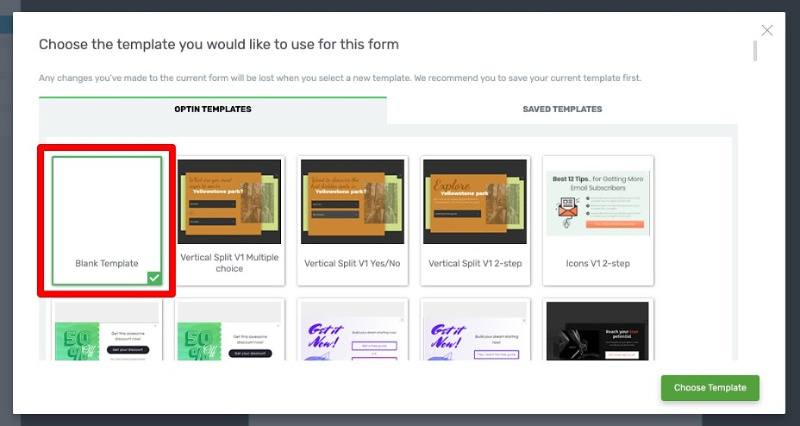
Select the "Blank Template" option when prompted.
When the “Blank Template” loads, you’ll see an empty lightbox positioned in the center of your Thrive Leads editor consisting of just a Thrive Leads Element with a Background Section inside.
The editing steps needed to achieve Stephen’s simple self-booking setup go like this...
First, insert a Custom HTML element into the Background Section of your blank lightbox:
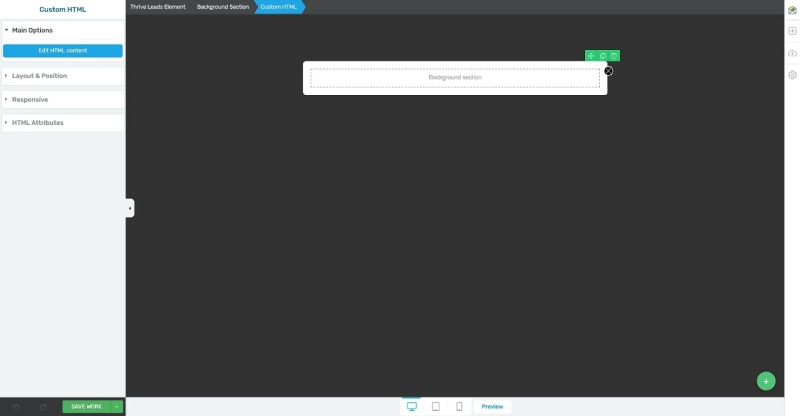
The "Blank Template" will load with a Background Section element inside a Thrive Leads Element. You'll need to add a Custom HTML element inside the Background Section and modify the Margin & Padding settings to be 0 pixels on all sides for each.
Next, do some quick Margins & Padding styling of your Custom HTML element, Background Section element, and Thrive Leads Element:
- For the Custom HTML element, change each of the Margin & Padding settings to 0 pixels.
- For the Background Section element, change each of the Margin & Padding settings to 0 pixels as well as the Section Minimum Height option to 910 px (if using Calendly).
- For the Thrive Leads Element, change each of the Margin & Padding settings to 0 pixels as well as the Minimum Height option to 910 px (if using Calendly).
Once that's done, login to your online scheduling tool account and locate the HTML code you’ll need to embed within your Custom HTML element.
For this post, I’ll showcase how to do this using Calendly (just like Stephen uses on his own coaching site):
How To Find Your Calendly Event HTML Embed Code:
Login to your Calendly account and click on the Event Types option in the main navigation bar.
Next, click on the cog icon shown in the upper right corner of your Event and select the “Add to Website” option from the dropdown menu:
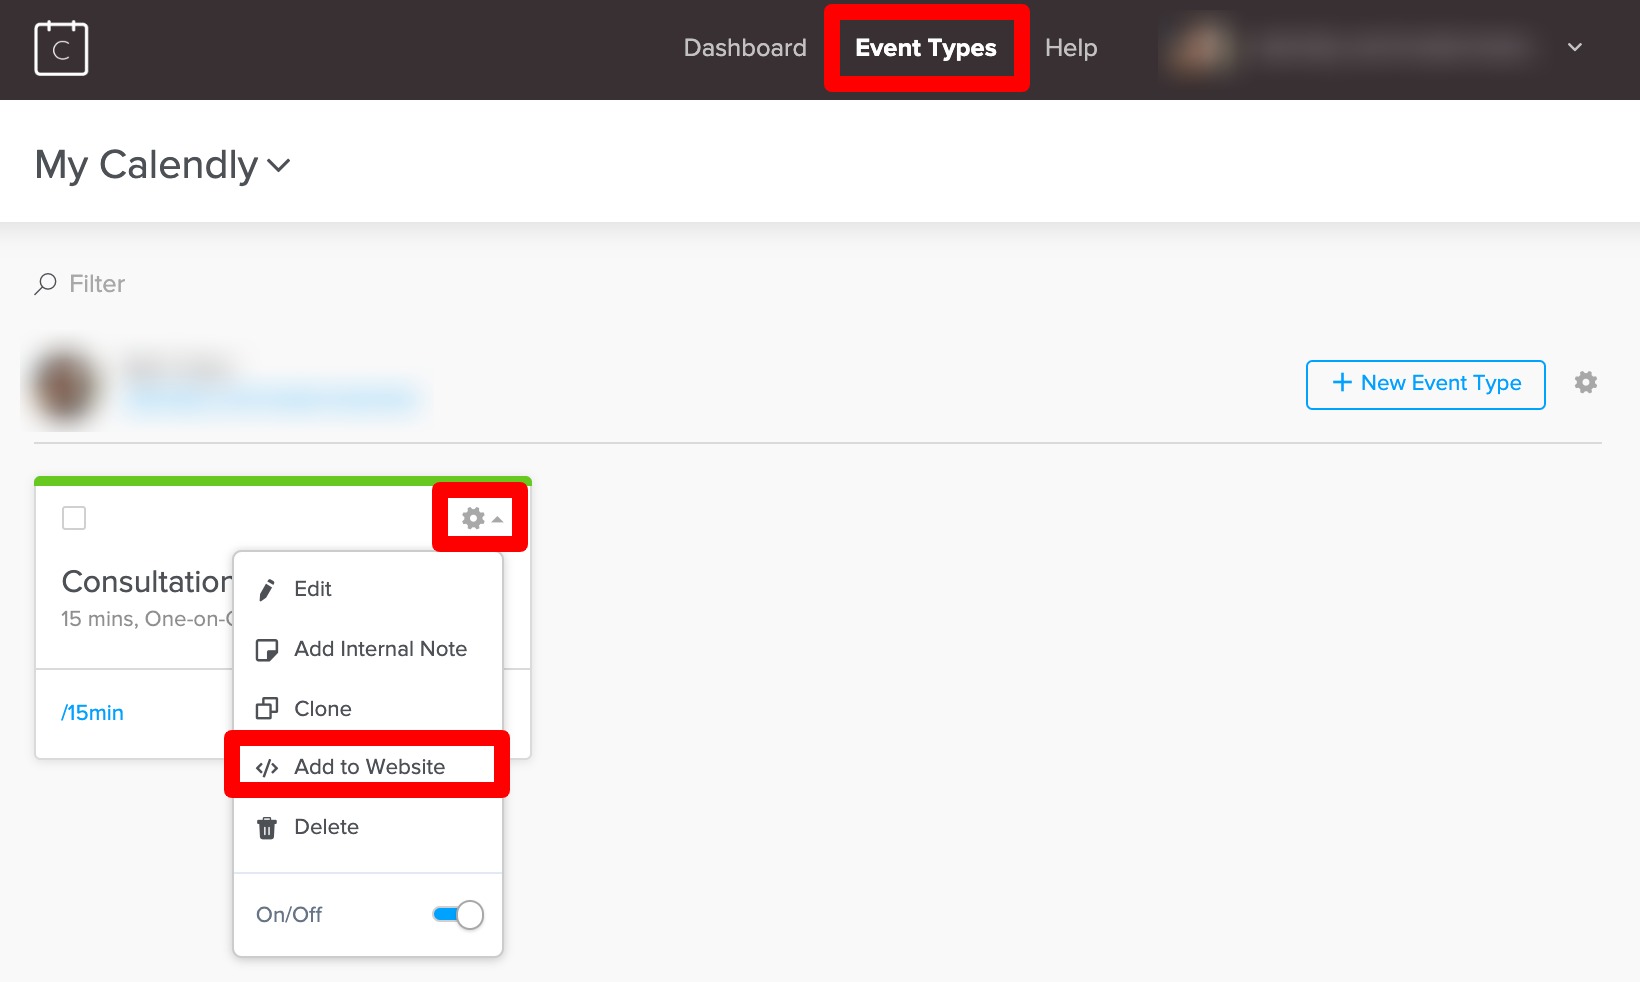
In your Calendly dashboard, click on the Event Types link in the top navigation bar. When the new page loads, click on the cog icon in your "Free Consult" Event box and select the "Add to Website" option from the dropdown.
After that, click the Inline Embed option in the “How do you want to add Calendly to your site?” popup window that appears:
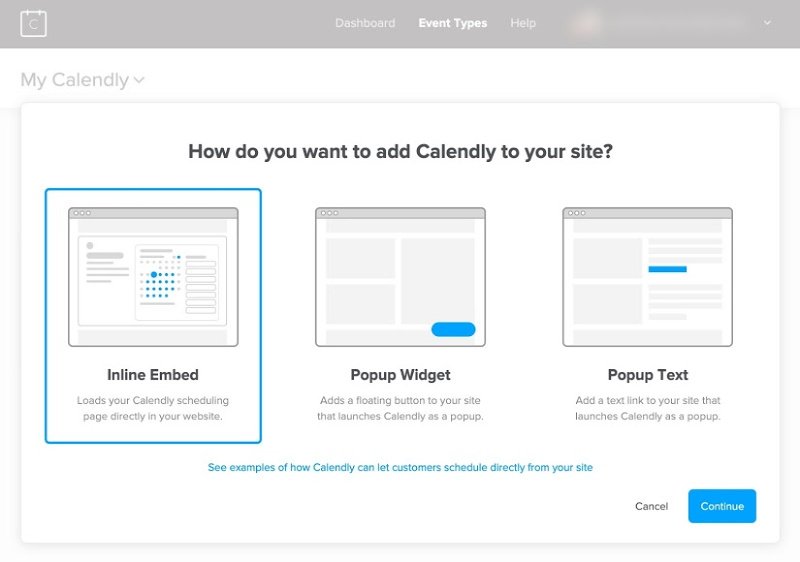
Select the Inline Embed option from the "How do you want to add Calendly to your site?" popup window that appears.
Finally, copy the HTML code Calendly provides you with (so you can paste it into your Thrive Leads ThriveBox Custom HTML element):
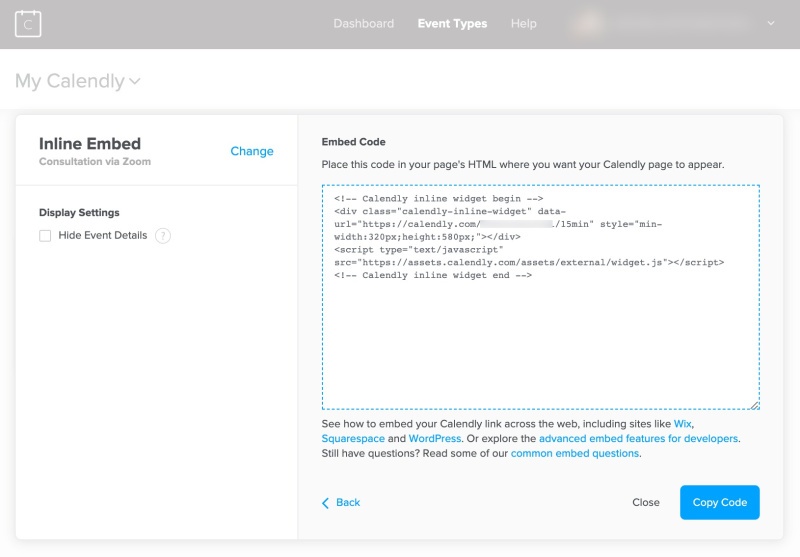
Copy the HTML code that appears by clicking the blue "Copy Code" button in the bottom right corner of the popup window.
Now paste your calendar tool event code into the Custom HTML element you dropped within your ThriveBox.
NOTE: You must also modify the height specifications (directly inside the HTML code) to match the Minimum Height pixel setting you set your Background Section and Thrive Leads Element to above (if using Calendly, I recommend changing the code to show height:910px):
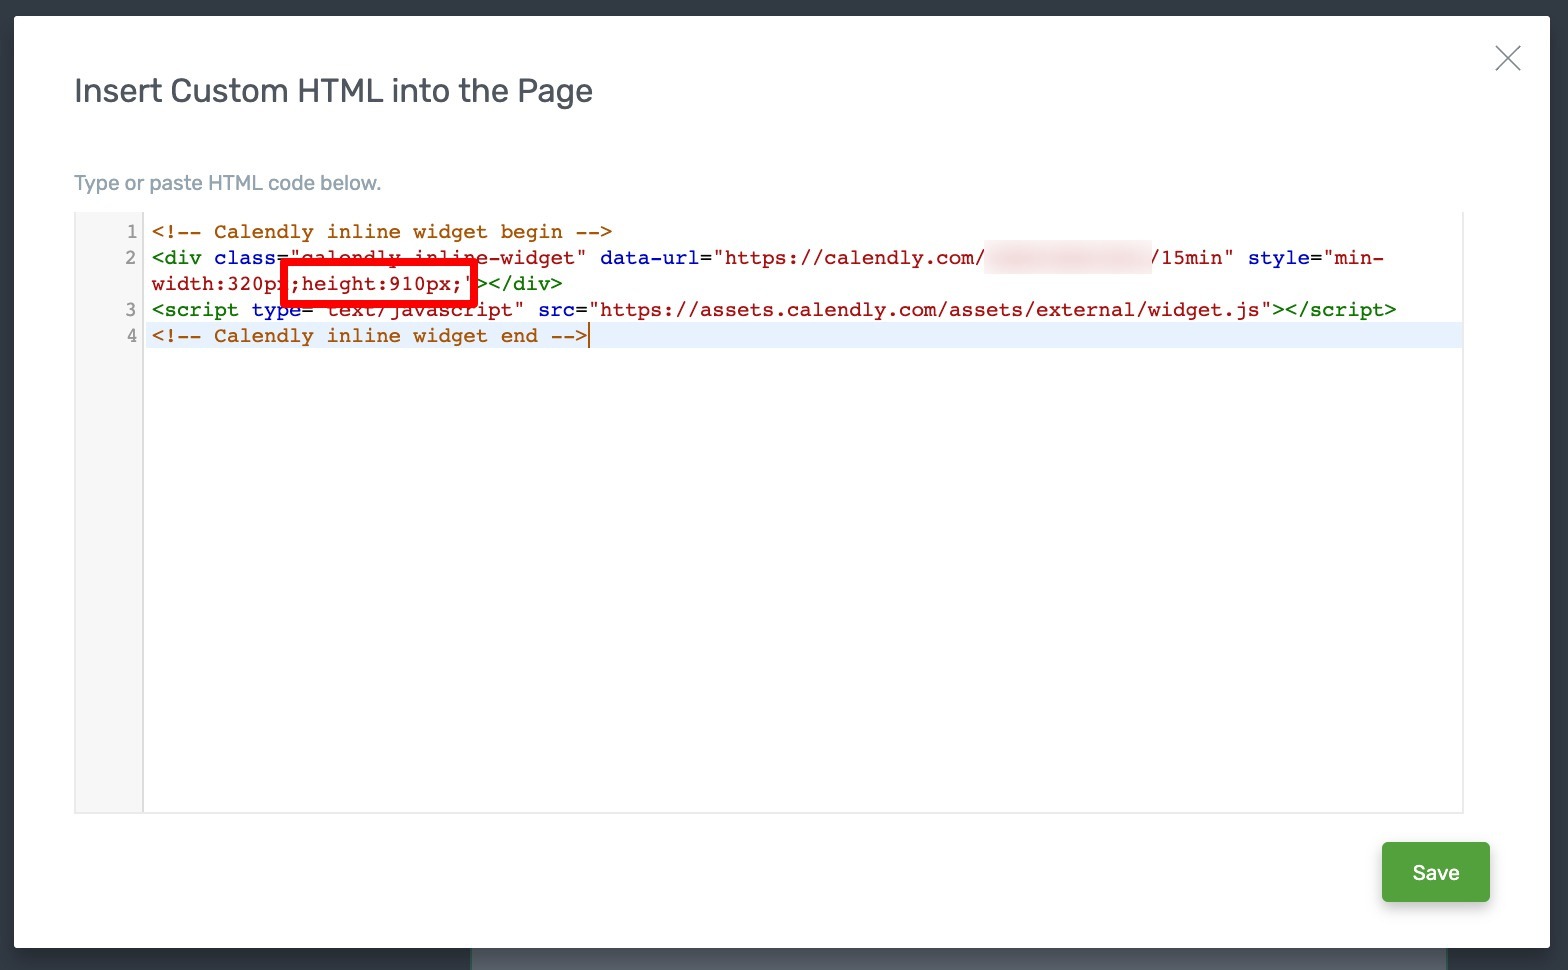
Paste your automated scheduling tool HTML code into your Custom HTML element and change the pixel height of the embedded calendar to match the Minimum Height settings you changed your Background Section element and Thrive Leads Element to.
(Don’t forget to press the save button in the bottom right corner of the Custom HTML element to continue).
Press the “Save Work” button in the bottom left corner of your Thrive Leads editor window to complete your ThriveBox setup.
Now, if you preview your new ThriveBox, it should look something like this:
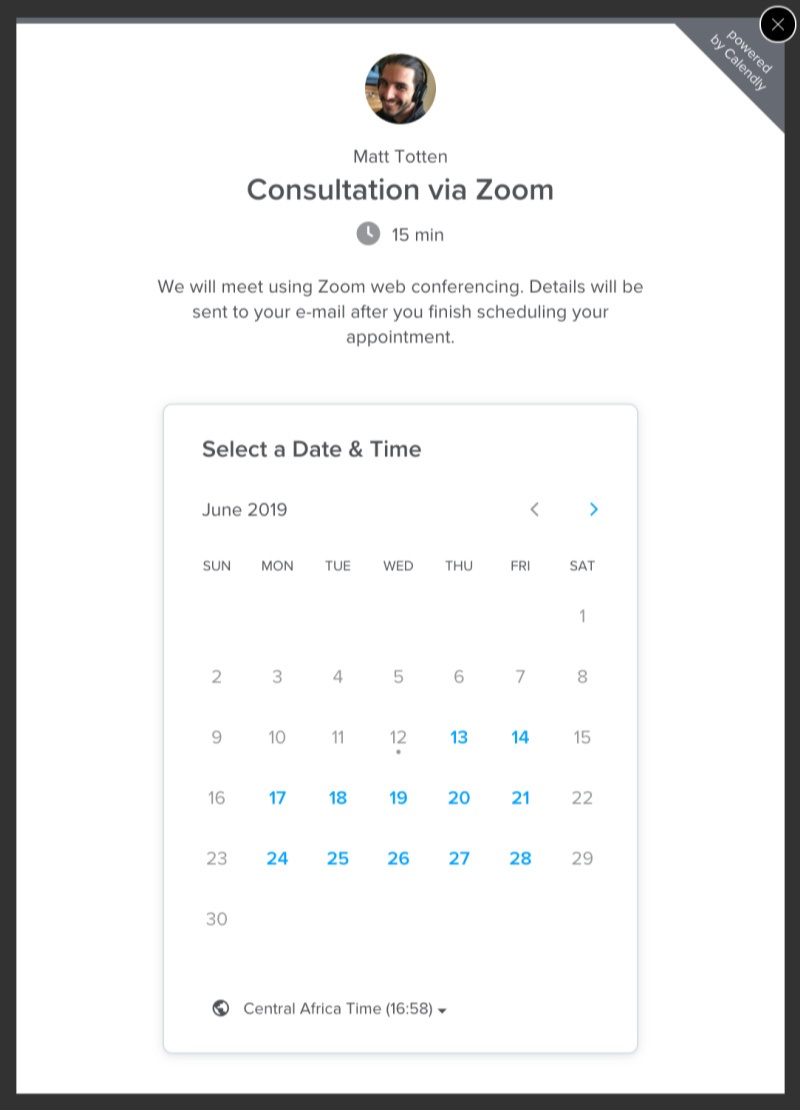
When you preview your ThriveBox, it should look something like this when it loads.
Update Your New Client Landing Page CTA Buttons
Finally, open up your New Coaching Client landing page with the Thrive Architect editor and scroll down to your first CTA button. For this post, I’ll use the example landing page I showcased in my previous automated scheduling post.
Highlight your “Free Consult” scheduling button and link it to your newly created ThriveBox in the left hand sidebar:
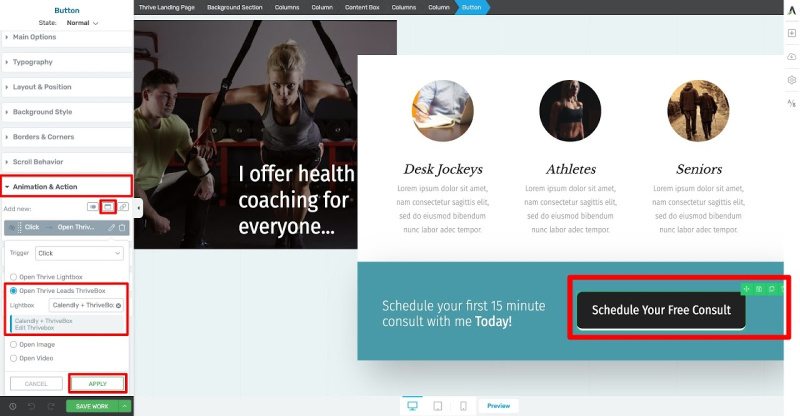
Load up your New Client Generation page in Thrive Architect and scroll down to your "Schedule Your Free Consult" button. Change the Action of the button to open your newly created ThriveBox on click.
You can do this by clicking on the Animation & Action tab, selecting the Popup icon, checking the “Open Thrive Leads ThriveBox” option, choosing your new ThriveBox’s name in the search bar, and clicking “Apply”.
Make sure to repeat this step for all the “Free Consult” CTA buttons on your landing page and then finalize the changes by clicking the green “Save Work” button in the bottom left corner of your Thrive Editor.
That’s It... Your ThriveBox Is Scheduling New Clients for You!
After completing the steps above, your New Coaching Client landing page should now show the following lightbox popup when visitors click on one of your “Free Consult” scheduling buttons:
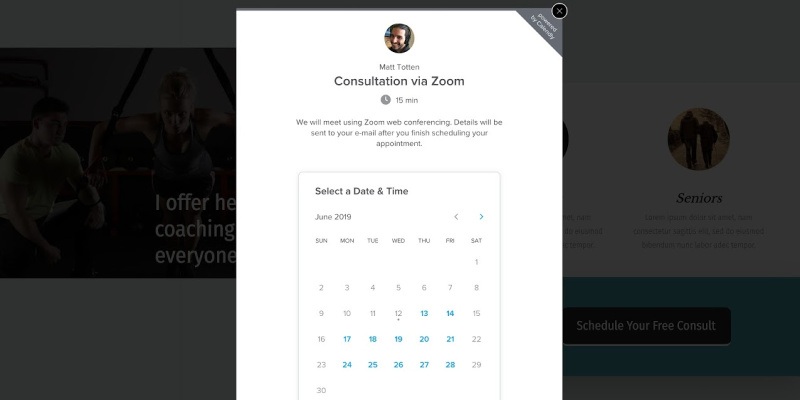
Your ThriveBox should look something like this when one of your new clients clicks your landing page scheduling button.
Without being directed away from your landing page, potential coaching clients can select one of your available coaching times and confirm their appointment:
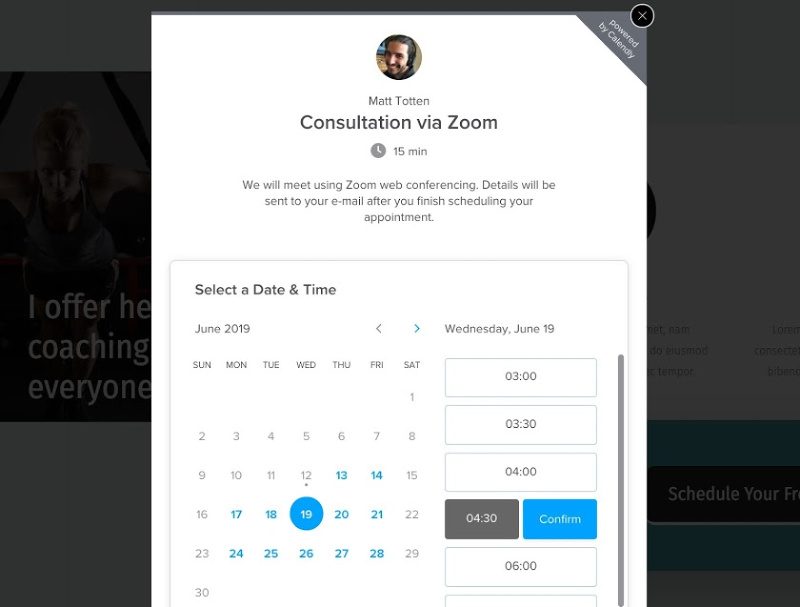
Your new client can then select one of your available dates and confirm a time that works for them without ever leaving your website!
Once your new client clicks the confirm button, the embedded scheduling display will change to collect their information and finalize the appointment:
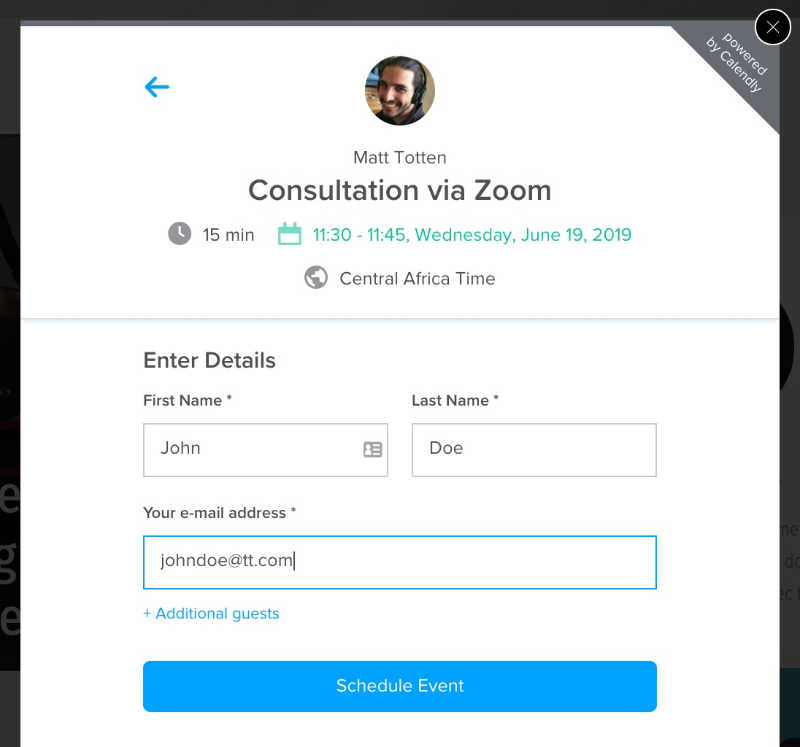
As a final step, clients will enter the information you require for your meeting like their name, email, Skype handle, etc. as well as any intake questions you may want them to answer (setup from your scheduling tool dashboard).
If you follow these steps, you’ll have your own conversion optimized, new client self-booking system up and running in just a few minutes, just like Stephen did for his online coaching business!
Now It’s Your Turn
So what do you think of this upgrade to the automated scheduling system we showed you back in this post?
If you’re an online coach, will you take what you learned here to further streamline your own new client booking process with Thrive Architect + Thrive Leads?
Let us know in the comments below!
P.S. If you’re using any of the Thrive Themes plugins in innovative ways, please share it with us in the comments so we can feature your site on the blog!


Where to get the name and email of the potential?
Hey Bjarne, your online scheduling tool (a.k.a. Calendly) will do that for you when the client clicks the “Confirm” button. The lightbox will change a final time to collect the info you require (this info collection setup is done within your scheduling tool’s dashboard).
Does thrive leads count the schedule appointment as a lead in the thrive leads tracking dashboard?
Hi Trent. No, Thrive Leads will only count email signups as conversions in the Thrive Leads dashboard.
This is very cool! Thanks for sharing. Can you add the specifications for ScheduleOnce (OnceHub) as well?
Thanks Rebecca! I think the process for the other Automated Scheduling tools should be very similar as long as there’s a place where they provide you the embed code to copy in their tool dashboard.
Can this be done using the free version of Calendly? Or is a paid version required?
Yup, this can be done with the free version of Calendly Randy!
Hey, Matt, I had set that up with booklikeaboss a while back and it killed my page speed. I was just wondering, whether you checked any effects on page speed with the Calendly solution and what the results were.
Thanks, Ann.
Hey Anna, thanks for your comment!
I just did my own little page load speed test: first with the Calendly embed ThriveBox turned on and second with it turned off.
The Calendly ThriveBox version did slow the page speed down a bit, but only by 0.2 seconds on the most important metrics (the Start Render Time & Document Complete Time). As far as I know, that shouldn’t effect your conversions too much for a personal brand online coaching site.
Let us know how it goes for you if you decide to start using Calendly instead of BookLikeABoss!
My page was slowed to a crawl using Google Page Speed and my home page has 1 picture in the header and the button linking to Calendly.
Really great piece . Thanks Matt
Cheers Michael!
Thank you for this case study and helpful tutorial. Any tips for setting up a similar system for clients who pay for the consultation/session? I don’t schedule free discovery calls but have e.g. quick 30 min paid sessions. As for payments, I use TT pricing forms and simple ‘buy now’ buttons: Stripe and WP Simple Pay plugin (mostly for its nice payment form).
Alla, I think with Calendly paid version of 8 USD/month you payment checkout is directly integrated within the form. If you connect to e.g. Zoom, then entire process is automated and client will be reminded to join his appointment as well. 😉
Thanks for jumping in Walter! Yes, payment integrations with Stripe and PayPal are included in the paid version of Calendly.
Very cool. Going to try idea with my Acuity Scheduling .
Good stuff Kat… let us know how it works for you!
Hello. Can I have the app go to a landing page after signing up? Or does the pop up just closes? I was thinking of sending the potential client to a page with a video and a download freebie
Hey Jorge, I’m pretty sure you can set up a post signup redirect link for your clients. Cheers for the question!
Nevermind my last question. Just tried it. Works great.
Awesome!
Does a redirect still work? If you want to redirect them to an application form page after they have scheduled a phone call using the popup? that would be important for me. Thanks.
I use calendly on my site and the answer to your question is… YES! You can redirect to a form after they’ve booked 😉
Thanks for the info Megan!
Hey Matt,
First and foremost, thank you for the shout out. Seeing pictures of my site on my favorite blog is definitely the highlight of my week.
Good call on the 910px too – just updated mine.
Now I’m working on a custom thank you page for my redirect to add that extra bit of value before their call.
Hey Stephen, thanks again for inspiring this post and congrats on such a slick looking website!
And great idea with the Thank You page redirect… that sounds like an awesome way to boost your overall client experience!
Stephen,
I implemented the Calendly lightbox.
Great idea and thank you for sharing!
Can you share how you are redirecting to the thank you page once they schedule?
I would like to add a pixel as well as give additional value.
Any guidance would be greatly appreciated.
Hey Melissa, sorry I overlooked your question. Hopefully, you figured it out but if not you can set your redirect inside Calendly on the event settings page
Hi Matt
As always you guys have done it again. Great post.
Have checked out Steve’s website and click on make an appointment, the calendar comes up but is static showing top section only. Can’t get at full calendar. Viewing on iPhone 8. Is please pass on so Steve can look at it.
Ian.
Yes seems like Calendly is not very mobile friendly 🙁
Matt, do you guys have a Coaching/Client landing page in the Templates section??? I dont want to have to build one from scratch!
Hi John, check out our “Consultation Smart Booking” landing page template. There’s actually an entire smart landing page template set for Consultations that you can preview from our Landing Page Template Gallery!
Hi all,
This is a really cool hack and I tried it out immediately. 🙂
Unfortunately, it carries quite a bit of overhead in terms of the calendly script: 170 KB 🙁
Google Pagespeed did not like that at all, so I went back to opening the calendly app in a new tab.
Have you any tips on minifying the script?
Cheers, Stefan
No sorry, maybe ask Calendly?
Hello Matt, great post!
I used to send my leads to Calendly directly which didn’t allow for tracking – or remarketing. Based on your tutorial I embedded the calendar in my website (on a page, not a pop-up).
It worked like a charm!
flow-seo.com/calendar/
Looking forward to the new behavior insights and remarketing campaigns!
Awesome work Viola! I think your calendar page looks super slick now compared to sending clients to Calendly’s website. That’s a pretty sweet Thrive Themes website you’ve got there as well!
Fantastic!!!!!!!
Thank you very, very much.
You make it so easy, that even an old dog like me, can build complicated websites and features like this ……easily.
Very pleased to learn about this feature and was nice to test it and see it in action. BUT…
Learned it doesn’t look like it’s possible to use it inside a Lead Group ribbon.
We have a CTA button that is inside a CTA ribbon that is activated on scroll. So even though the look of this button replicates two similar buttons above the fold it looks like the CTA ribbon will need to stay linked to a URL (as opposed to utilise the embed code).
Or is there another way it could be done?
This was amazing! I implemented it and it looks fantastic.
Is there a way that I can direct them to a thrive themes thank you page after they schedule within the lightbox?
Any assistance would be great!
Excellent articles! It simplifies he seemingly complicated process, it helped me a lot. However, I still wonder how I could integrate a payment system together with scheduling (with the free version of Calendy). Do you have an article/video about that Matt?
Calendly seem to have made some changes to their widget so that you will have scrollbars at 910px. You need a 1025px minimum height for all elements to get rid of these & you need to make the background transparent (0 opacity) or there will be padding around your calendar in the lightbox.
I do like this. However, In the thrive leads dashboard this counts as an impression but not as a conversion.. How to fix this?
Hey Matt,
very nice and useful post!
I wanted to get the same for one of my websites and I’ve figured out that, if you are a Microsoft 365 Business subscriber, you can achieve the same result with Microsoft Bookings + Microsoft Teams for the web meetings (the two works together seamlessly).
You need to tweak a little the html of the iFrame, but the result is really very good, and you don’t need to get any new tool.
Thanks for the great explanation.
I followed your tutorial and this looks really good on Desktop and Tablet, but on Mobile only the month and days of the month are shown, and everything below is cut off.
What am I doing wrong?
Thanks.
Hard for me to say off hand Aarif. I wonder if you need to change the pixel width inside the Calendly code…
Hi Matt,
Actually I got this resolved a while back via Thrive Support.
They adjusted the height in the HTML code from 910px to 1300px.
Awesome stuff… glad to hear you got it working properly Aarif!
Thank you, this is exactly what I was looking for!
Awesome… that’s great to hear Danielle!
Nice, but I want to ask my clients a few questions BEFORE they schedule an appointment. This helps me separate the window shoppers from the wolves. You guys should build a tool that will allow us to ask as many questions as we want, have an appointment calendar with various methods of contact.
Sounds like we’d have to build a completely new business then 😉 What you can do today is use Thrive Quiz Builder to qualify your visitors and then add the right calendar contact link on the specific results pages.
Hey Matt,
This is awesome. I just set up my scheduling at circlehtactical.com/contact with a “schedule appointment” button. However, following your steps exactly, some how I’m ending up with some margin or padding that causes me to have to scroll the calendar. I’ve verified all elements in Thrive Architect are zero’d out and have a max height of 910 as you mentioned, so I’m thinking Calendly adds some kind of margin automatically in the embed code?
Hi there,
Yes if you look in the Calendly code you might see something that says width and an amount of pixels. Changing that number will change the size of the calendar.