If Slack is your preferred way of communicating with your team, you'll be stoked to learn about the new Slack - Thrive Automator integration!
With this new integration, you can now receive Slack notification messages whenever something happens on your WordPress website.
Sounds interesting? Keep reading to learn more about this exciting integration.
More...
The Slack Action: Send Notification
Thrive Automator, our FREE automation plugin, works with Triggers and Actions. It's an "If this" (aka the Trigger) "then that" (aka the Action) engine.
For the Slack integration, we've added a new action: Send notification.
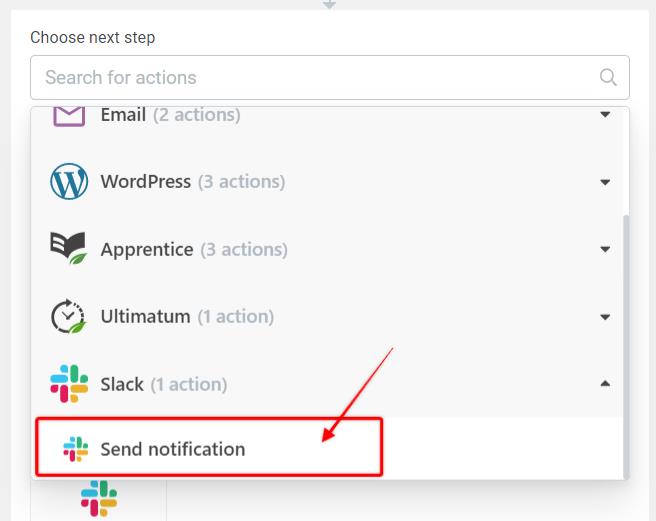
New Slack "Send notification" action available in Thrive Automator
This means that you can use just about any trigger available in Thrive Automator and send an automatic notification message to Slack based on that trigger.
The Notification Options
When you choose the "Send notification" action, you'll notice the different options available.
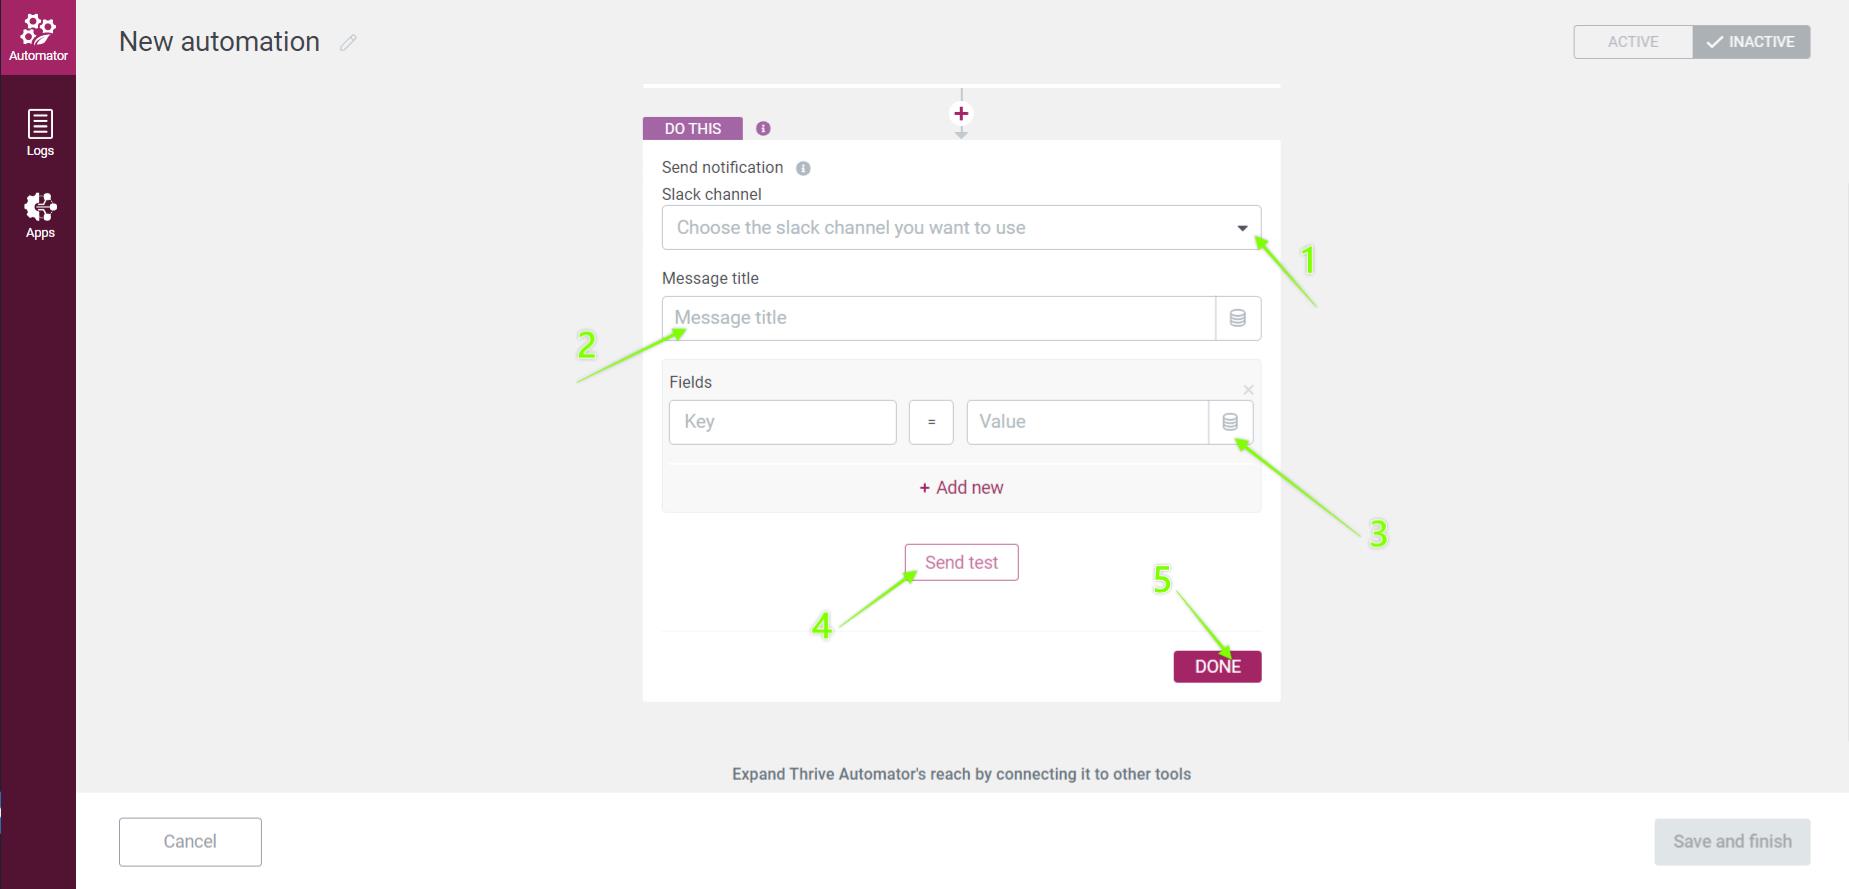
Slack Send notification options in Thrive Automator
You can:
- Choose in which channel you want to post the notification.
- Set a message title for the notification (you can make this title static by entering text or dynamic by clicking on the stack of coins button and choosing the dynamic data to send).
- Enter text in the "Key" field and choose a value for the field using the button that resembles a stack of coins. The data that's available will be dynamic and based on the chosen automation trigger. Let's say, for example, you choose "User leaves comment" as the trigger for this automation — which is available inside the WordPress triggers. Now, the data available is based on the data received when someone leaves a comment. Let's assume you want to know who commented, in that case you could type "Author" in the key field and choose the data "Comment author name" using the "stack of coins" button in the value field.
- Use the "Send test" button to send test data to Slack to see if your connection is working.
- Don't forget to click on the DONE button after filling out the notification details.
Your notification details could look something like this:
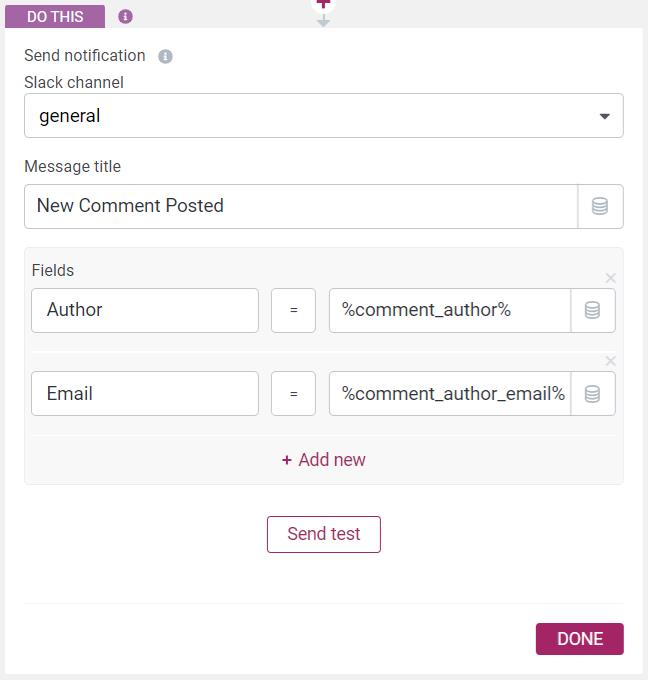
Example of the details for the "Send notification" Slack action.
The Triggers: Endless!
As you can see, setting up the "Send notification" action is pretty straightforward.
So now the fun part... What should you choose to trigger this action?
WordPress Triggers
As you might know, Thrive Automator has a bunch of WordPress related triggers to choose from. This means you can get a Slack notification for a ton of different website related triggers.
For example:
- When a user leaves a comment
- When a user creates a new account
- When a post is published (or updated)
- When a user role is added to a user
Example Automation: Receive a Slack Notification When Someone Comments on One of Your Course Lessons
Let's say you want to keep an eye on the comments that are posted in your online course (created with Thrive Apprentice).
EASY! Choose the "User leaves comment" trigger and set the post ID filter to only trigger when someone posts on a lesson or several lessons.
You can easily search on the title of the lesson or type in the ID
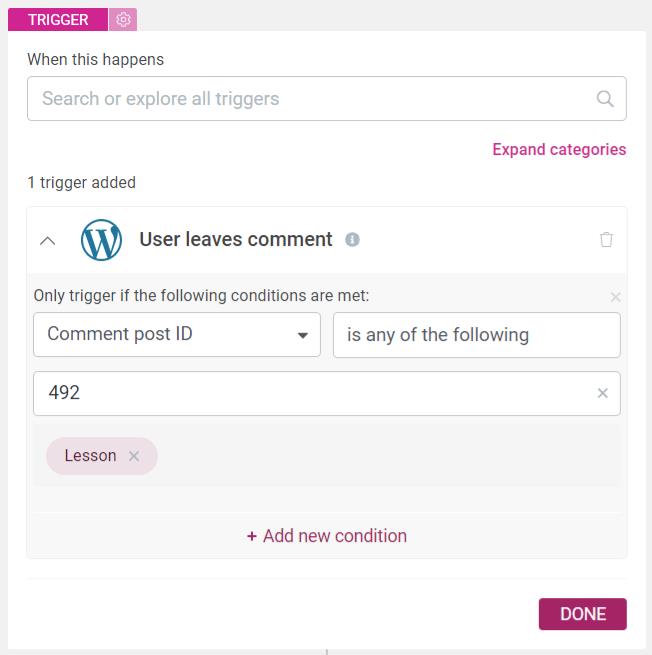
Trigger the automation when someone leaves a comment on the lesson "Lesson" with ID 492.
Now your notification could look something like this:

How to generate the URL in your message
As you can see in the message above, there's a direct URL posted in the notification message so that anyone can easily access the lesson where the comment was posted.
The way to do this is by combining static text with dynamic text.
The static part of the message is everything that would NOT change, in this case everything in red:
New Course Comment Posted on lesson https://yoursite.com/?post_type=tva_lesson&p=%comment_post_ID%
The green part of this message is the dynamic part (as indicated by the % signs).
You can easily add this by placing your cursor at the end of the static text, clicking the stack of coins, and choosing "Comment Post ID" from the available comments data.
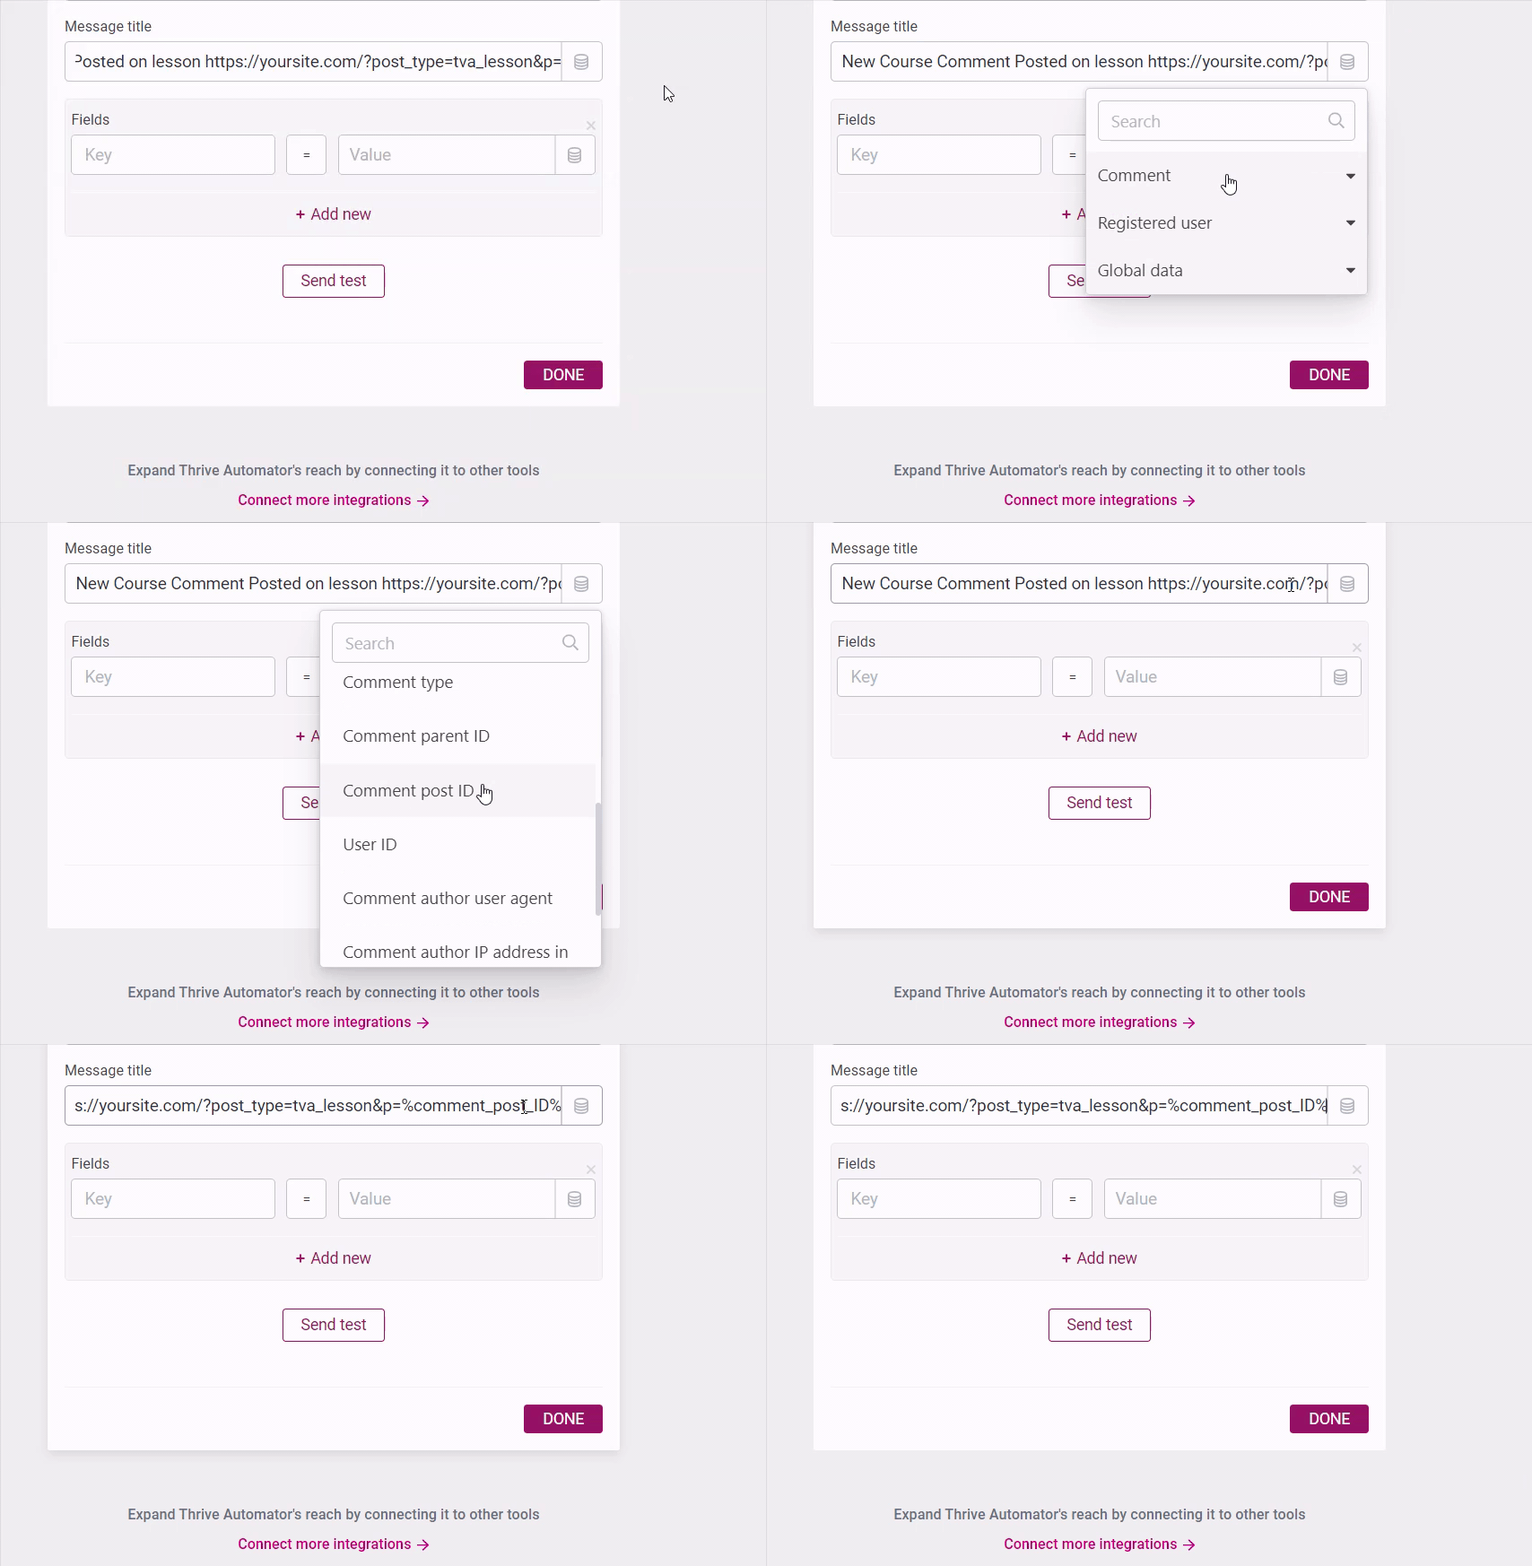
The red part in this example is specific for Thrive Apprentice lessons.
If you wanted to do the same for comments on a normal post, you'd use:
https://yoursite.com/?p=%comment_post_ID%
Thrive Suite Related Triggers
Thrive Automator has different triggers available for the different Thrive Suite plugins.
For example:
- Form submit to trigger an automation based on a Thrive Architect, Thrive Theme Builder, Thrive Quiz Builder or Thrive Leads form.
- User completes quiz for Thrive Quiz Builder
- User makes a Thrive Apprentice purchase and many, many more Thrive Apprentice specific triggers.
Example Automation: Receive a Custom Slack Notification When Someone Fills Out a Quote Request Form On Your Site
Now, let's imagine you have a specific form on your site where people can request a quote. You'd want to be notified immediately, in Slack, when someone fills out the form so that you can react as quickly as possible.
To set this up, search for the "Form submit" trigger (it currently has the Architect logo but will work with any form created with Thrive tools on your site).
Use the filter to only choose this specific form (and not all the other lead generation and contact forms on your site).
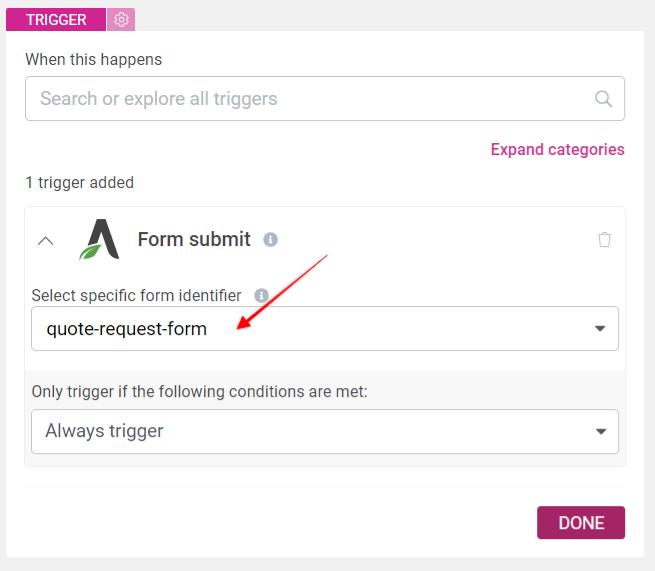
Form submit trigger with form filter
To find the identifier for the specific form you want to trigger, go to edit the form and look under the advanced options.
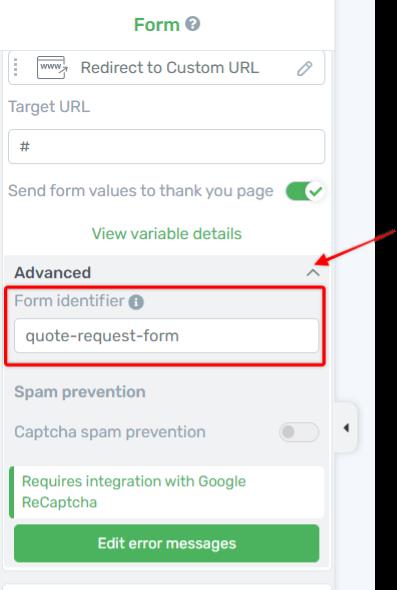
The form identifier can be found under the advanced options in the main options for the form.
Now, let's set up the Slack notification.
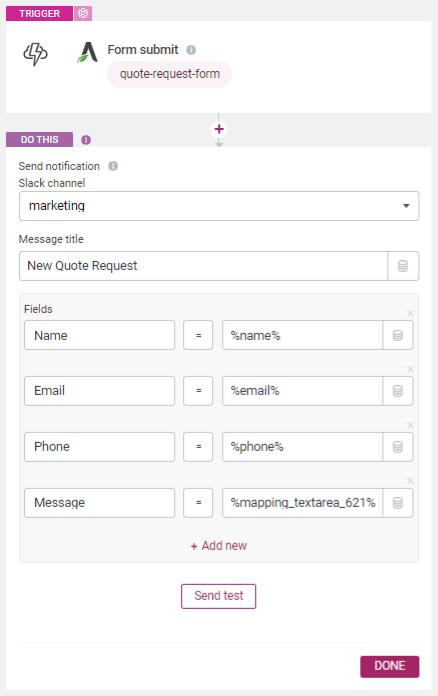
Slack notification action using the data from the form to create the message.
And this would be the Slack notification you'd receive:

Example of the Slack notification.
Now, you or someone in your team can easily follow up with hot leads!
WooCommerce Triggers
If you're running an e-commerce store using WooCommerce, you might want to get Slack notifications for certain actions on your site.
For example when someone completes or refunds an order.
You can do this using the WooCommerce triggers.
Example Automation: Get a Slack Notification When a Customer Completes an Order
Use the WooCommerce trigger "WooCommerce order complete". And use the dynamic data available to send a Slack notification including how much was spent on the order.
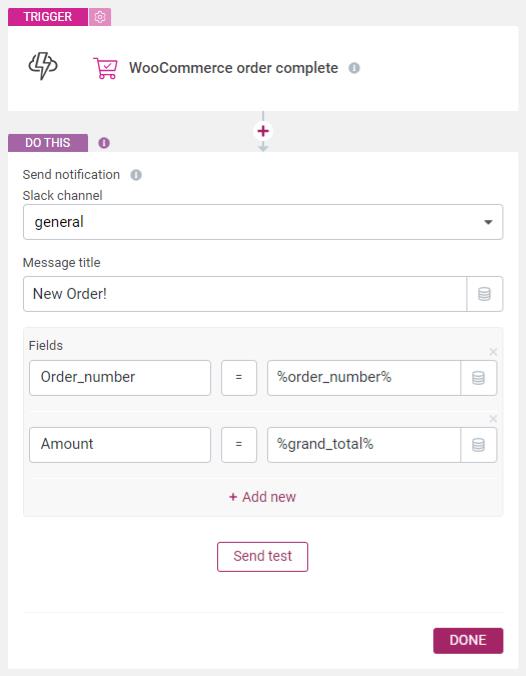
When a WooCommerce order is completed, send a Slack notification.
Or you could even set up a trigger with a filter so that only orders over a certain amount get posted in your Slack channel.
It's up to you!
Webhook Trigger
There are way too many possible triggers to cover here, but I'd like to show you one special one because of the incredible versatility it offers:
The webhook trigger.
If you're unsure what a webhook is, I'd suggest reading this article first: How to Connect Your WordPress Website to (Almost) Any Online Tool which explains webhooks in detail and why they are so powerful.
In short, most online tools have some sort of way to notify other tools. This is done through webhooks.
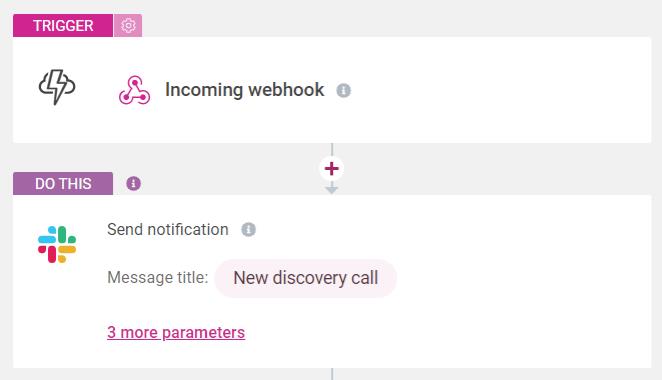
Any tool that can send a webhook can now be used to trigger a Slack notification!
If you'd like to receive a notification in Slack when someone schedules a free call, you can do this with webhooks.
From Acuity Scheduling, look for the "webhooks" integration and copy/paste the URL from the "incoming webhook" trigger in Thrive Automator.
Then set up the Slack notification.
Other 3rd Party App Triggers
Thrive Automator has a growing library of 3rd party apps that create triggers for the plugin such as:
- Wishlist Member
- Upsell Plugin
- Studio Cart
- WP Fusion
- Elementor
- ... and many more!
You can see a full overview of all the available apps and their triggers and actions in the Thrive Automator App Library.
Any of these triggers will also allow you to send a notification to Slack!
How to Activate the Slack Integration
In order to see the Slack app show up in Thrive Automator, you'll need to connect your Slack to your website via API.
This is straightforward and you'll only need to do it once.
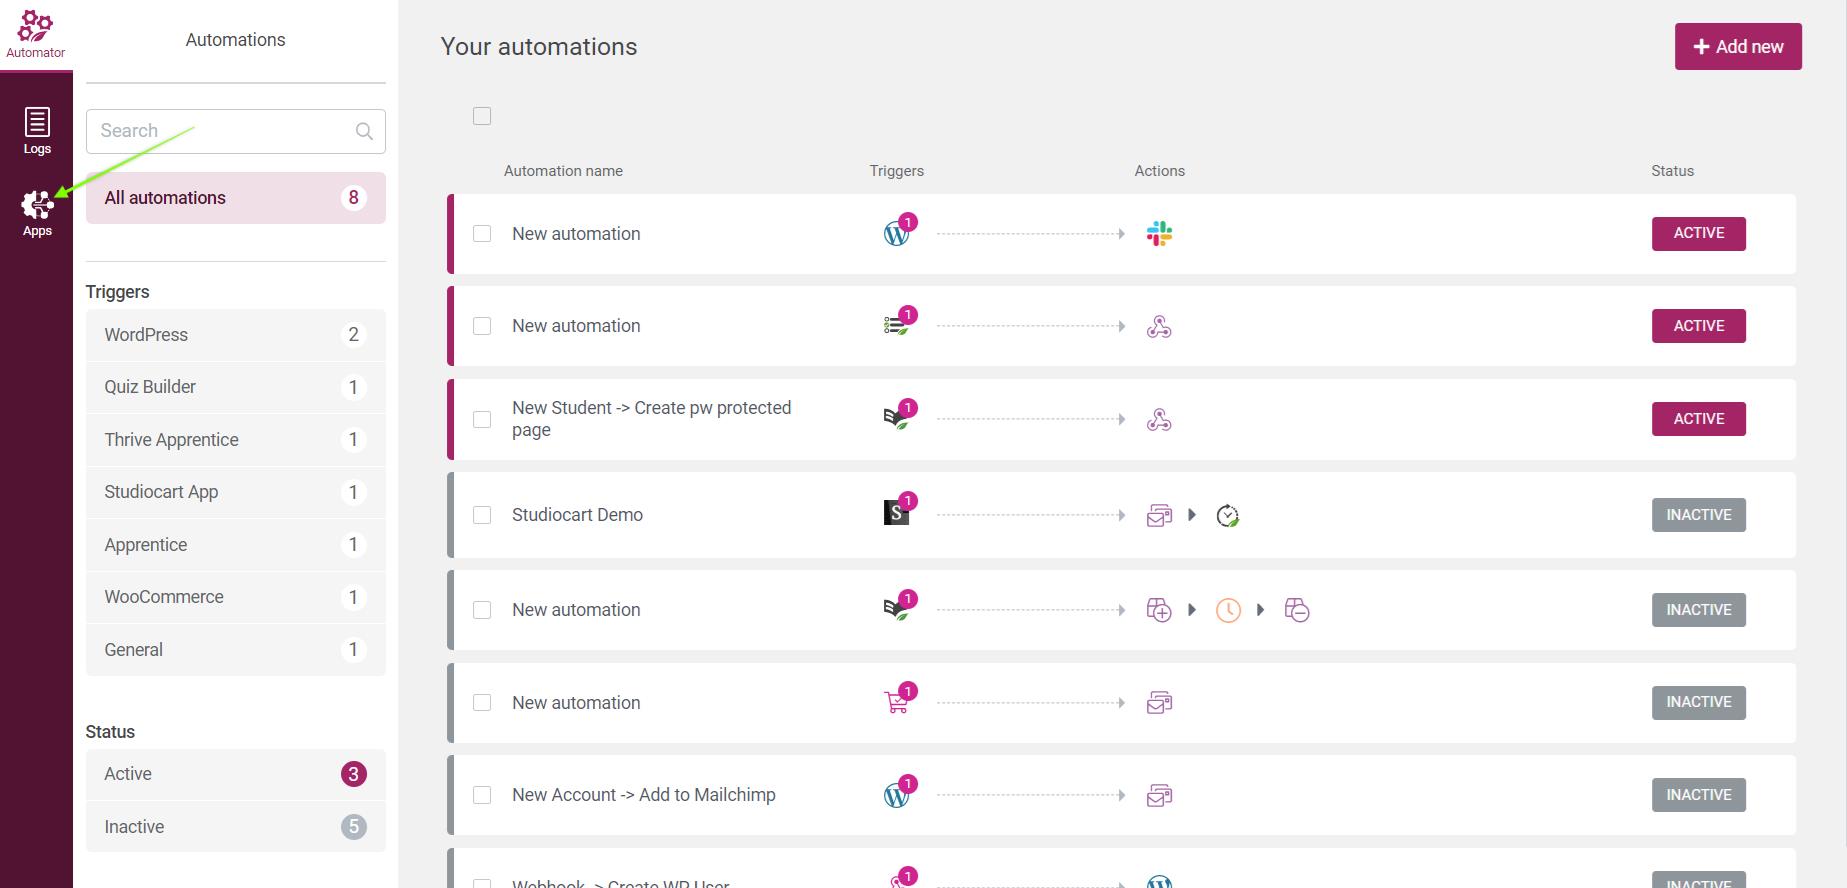
Click on the "Apps" tab in the Thrive Automator dashboard.
- Go to the Thrive Automator dashboard and click on "Apps" in the left sidebar
- Click on the "Add new connection" button.
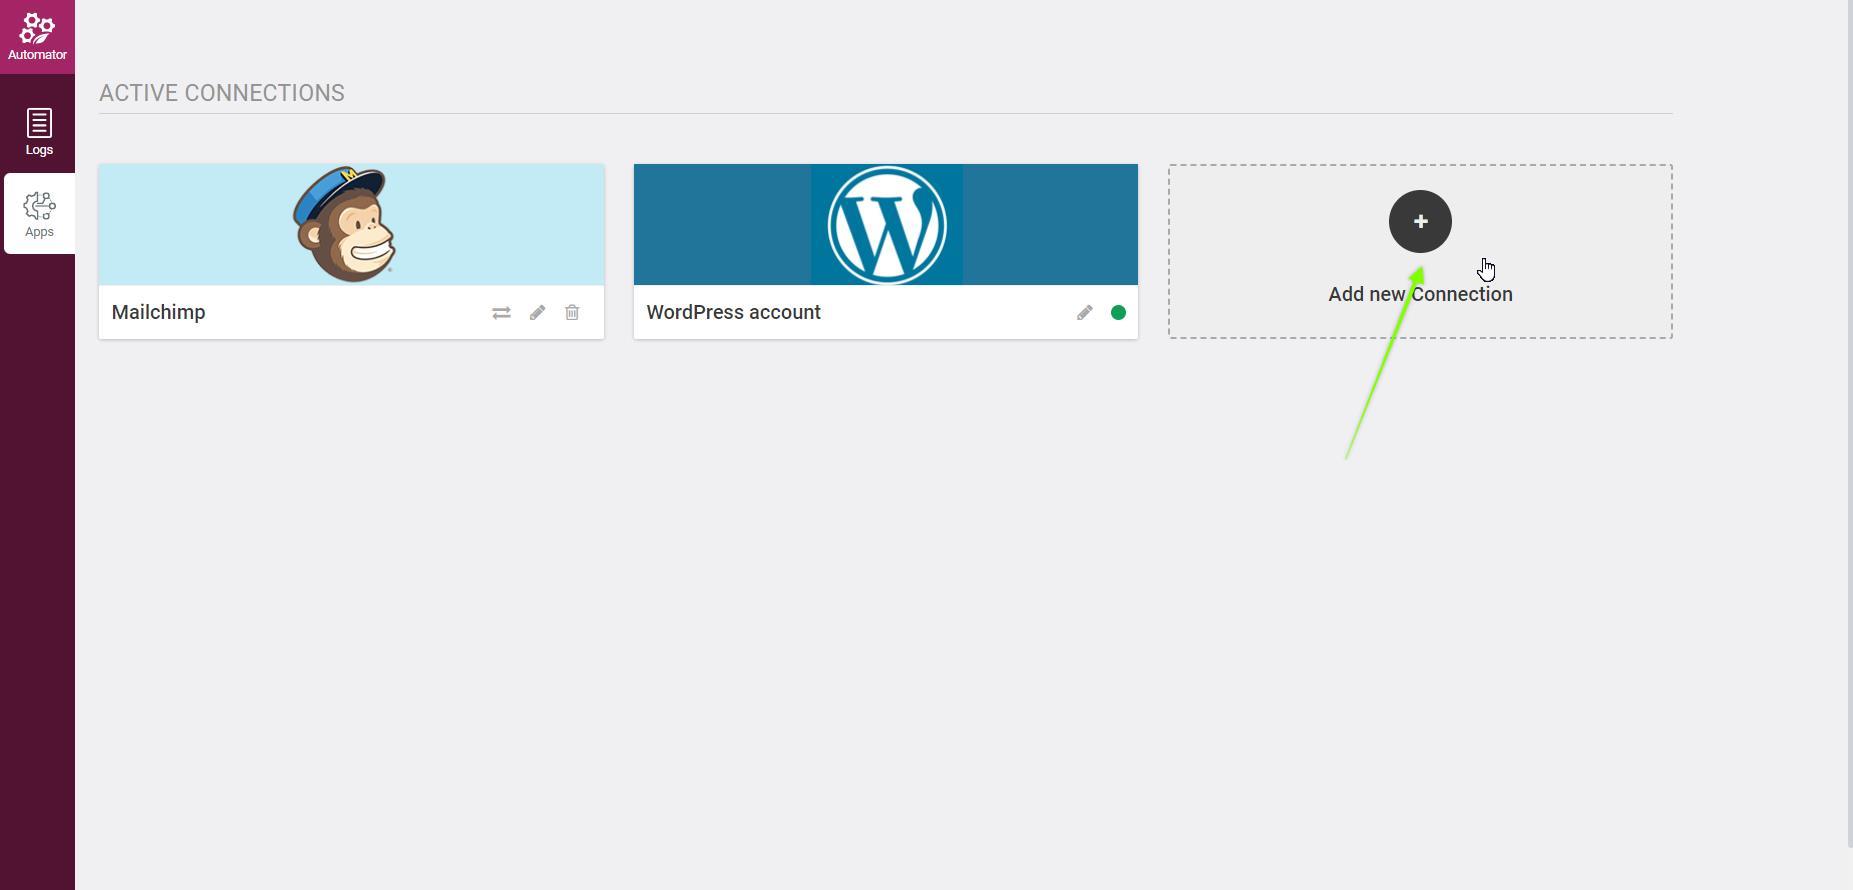
Click the "Add new connection" button
3. Search for Slack and click the green "connect" button
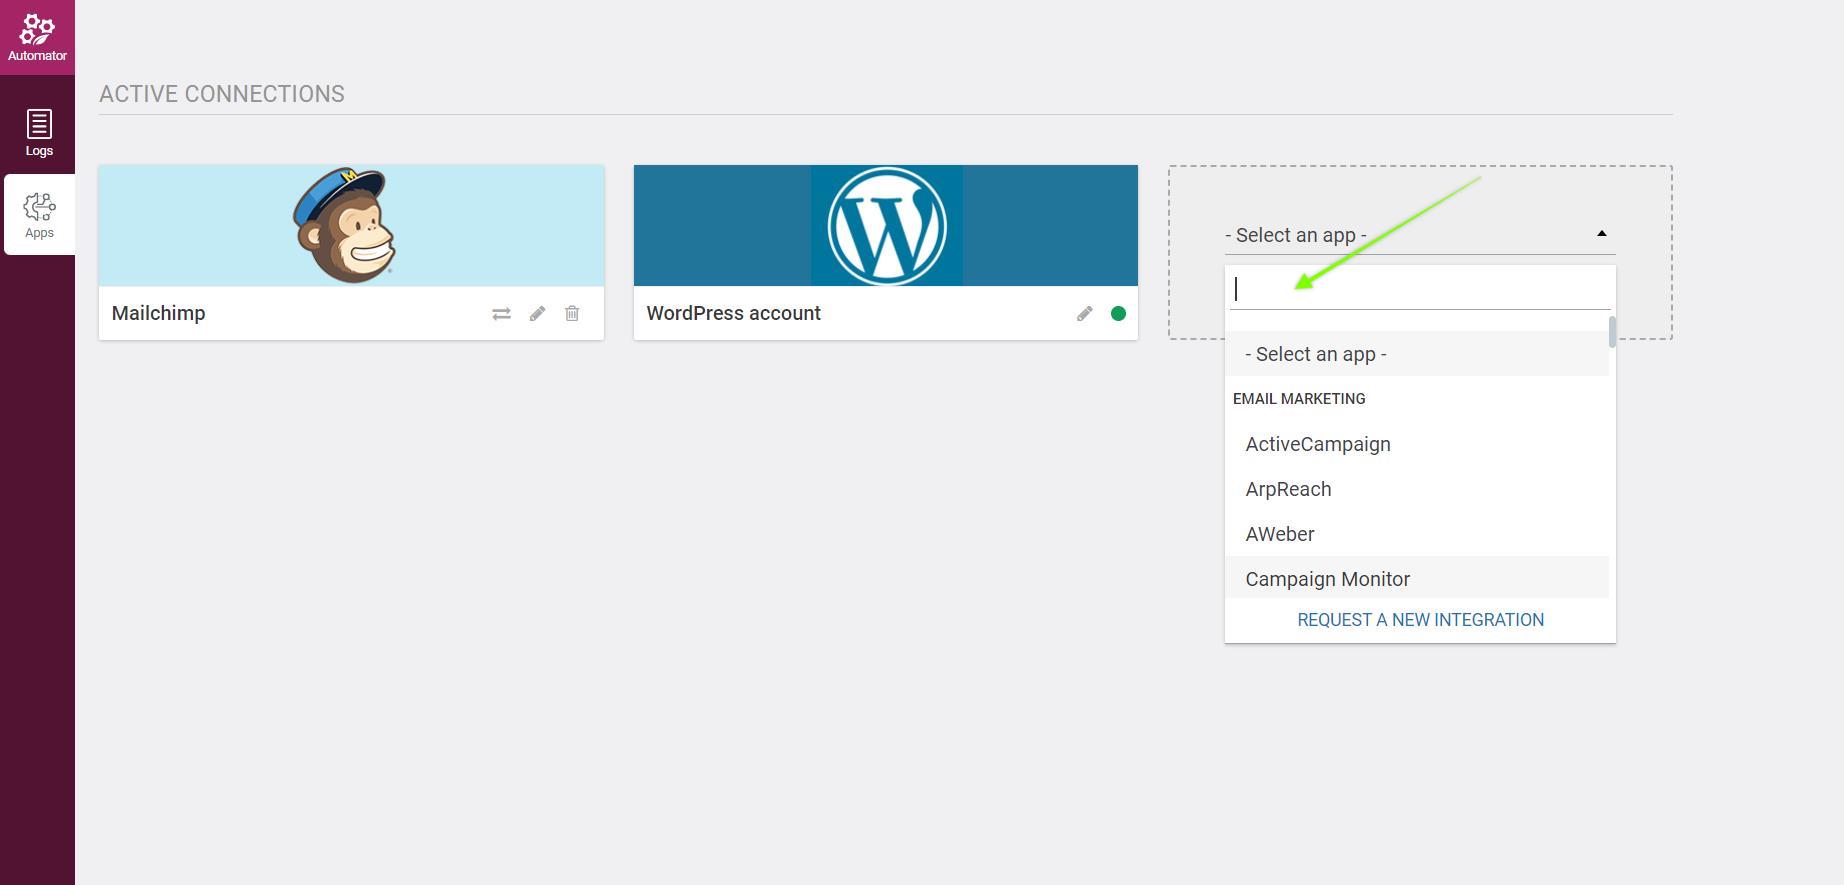
Search for Slack
4. Follow the instructions to connect your Slack workspace
5. When done, you'll see the success notification.
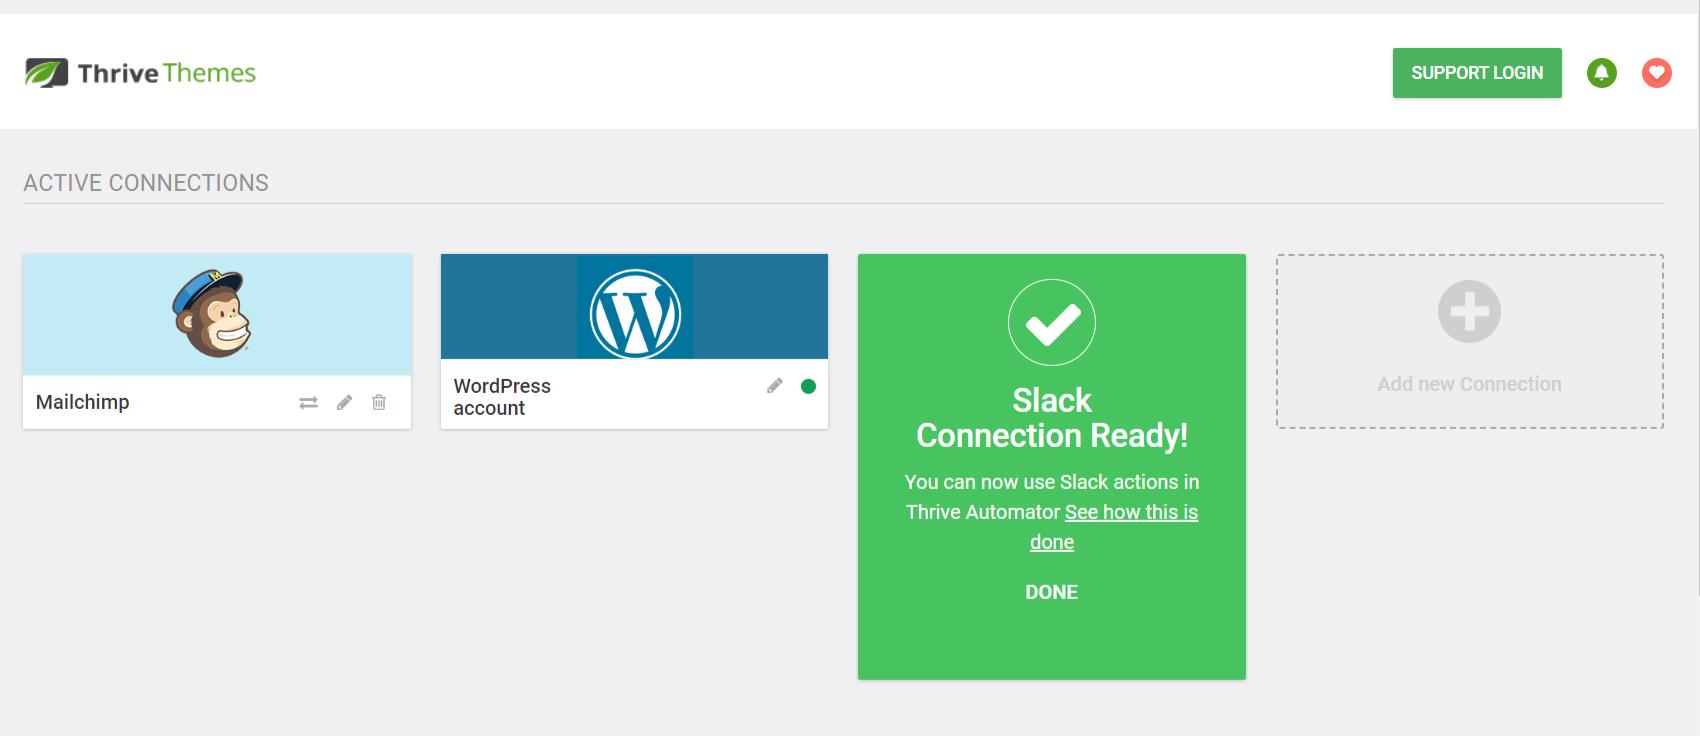
Success notification after connecting your Slack account.
That's it! The Slack connection is now established and you'll see the Slack action in Thrive Automator.
What Do You Think?
Do you like this new integration? How are you going to use it? Let us know in the comments below!


Awesome feature, thank you. Before I did this with Zapier, but it was a lot of money, now I can use it for free. 🙂
I already discovered it before this post was published, and I tried it. One question: Is it possible to pass the name of the purchased product in WooCommerce? It would be great to know what I sold.
Thank you so much for your work,
Tibor
Thanks Tibor!
If you use the WooCommerce trigger ‘Product purchase completed’, you can then use the product name in the slack message automation you set up.
As for Order Completed triggers, we’re currently working on an improvement to Thrive Automator so it will handle this better.
Thank you, Matt, I found it. A lot of opportunities.
Wow, that’s great hopefully there will be integration with Notion
Thanks Nguyen! I’ll pass the Notion integration request along to our devs, but feel free to reach out to Notion and ask them to integrate with Thrive Automator since we’ve made it incredibly easy for 3rd party tools to do so on their own.