Collecting the names and emails of potential leads, fans and customers is an important first step for any online business.
But if you’re serious about building your business through email marketing, at some point you’ll need to take your list building strategies to the next level.
And that’s exactly where our lead gen Custom Fields features can help you.
So in this video, we’re going to show you just how easy it is to start segmenting your new subscribers with Radio Buttons on any Thrive Architect or Thrive Leads opt-in form you create.
Ready to level up your current lead gen strategy? Then let’s get started...
More...
Using Custom Fields vs. Tags as Your Radio Button Data Types
This video post details exactly how you can use Radio Buttons on your lead generation forms to start collecting Custom Fields data about new subscribers to help take your email marketing to next level.
However, you now have the option to set your lead generation Radio Buttons up to collect that data as Tags instead.
Check out this recent Thrive Themes feature update post to learn how you can tag each of your Radio Button answers if that's more useful to you for triggering advanced email marketing automations.
How To Add Radio Buttons to Your Lead Generation Landing Pages in Thrive Architect
If you use Thrive Architect to build conversion focused landing pages on your WordPress website, then adding Radio Buttons to your lead generation landing page opt-in forms is one of the quickest ways to start segmenting your subscribers into more valuable sub-groups.
Here’s how quick and easy it is to get a simple landing page form like this...
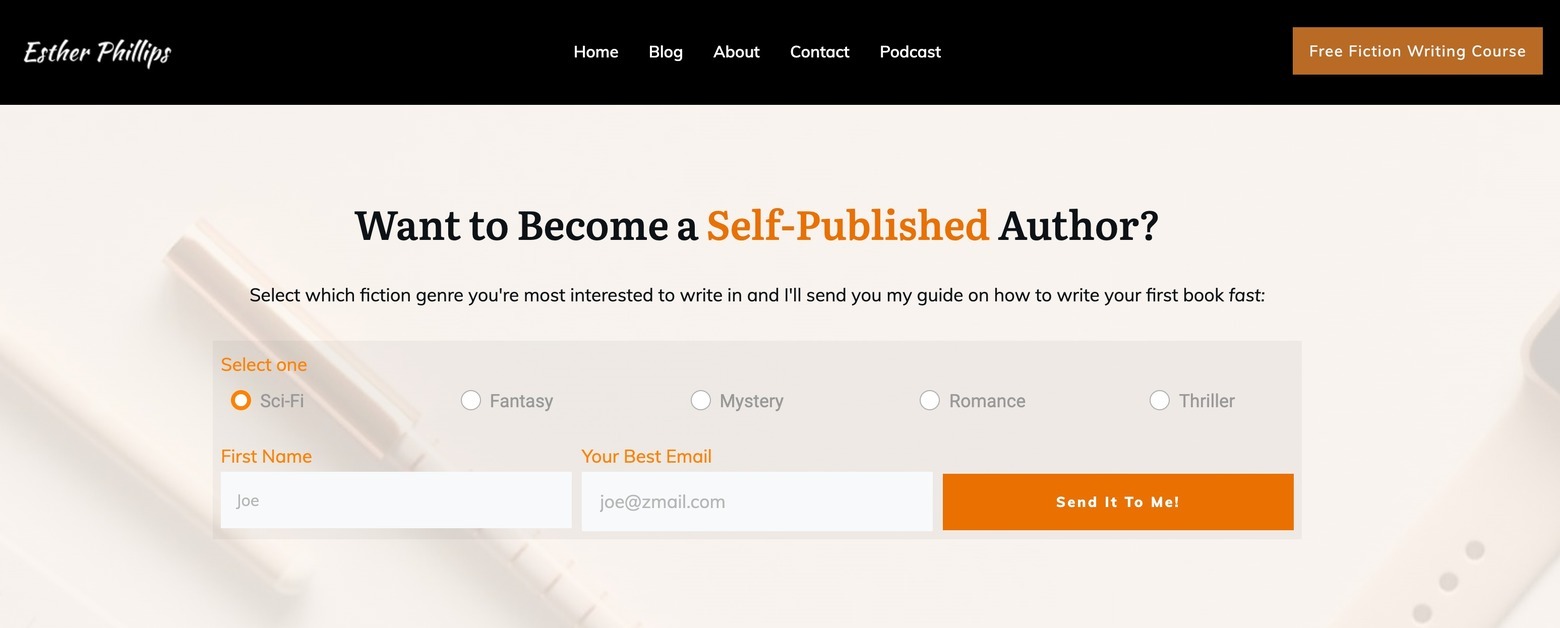
Here's a quick & easy lead generation landing page example you can build with Thrive Architect that segments your new subscribers using the Radio Button custom fields feature.
...set up with Radio Button selection options on your website.
Custom Field Type Selection Tip
Use the Radio Button custom field type on your lead generation forms any time you want your subscribers to select just one option from 2 or more possible choices.
How To Select and Modify a Lead Generation Landing Page Template or Lead Generation Page Block Template
To get started creating a lead generation landing page, first create a new Page in your WordPress backend followed by pressing the green “Launch Thrive Architect” button to enter the visual editor:
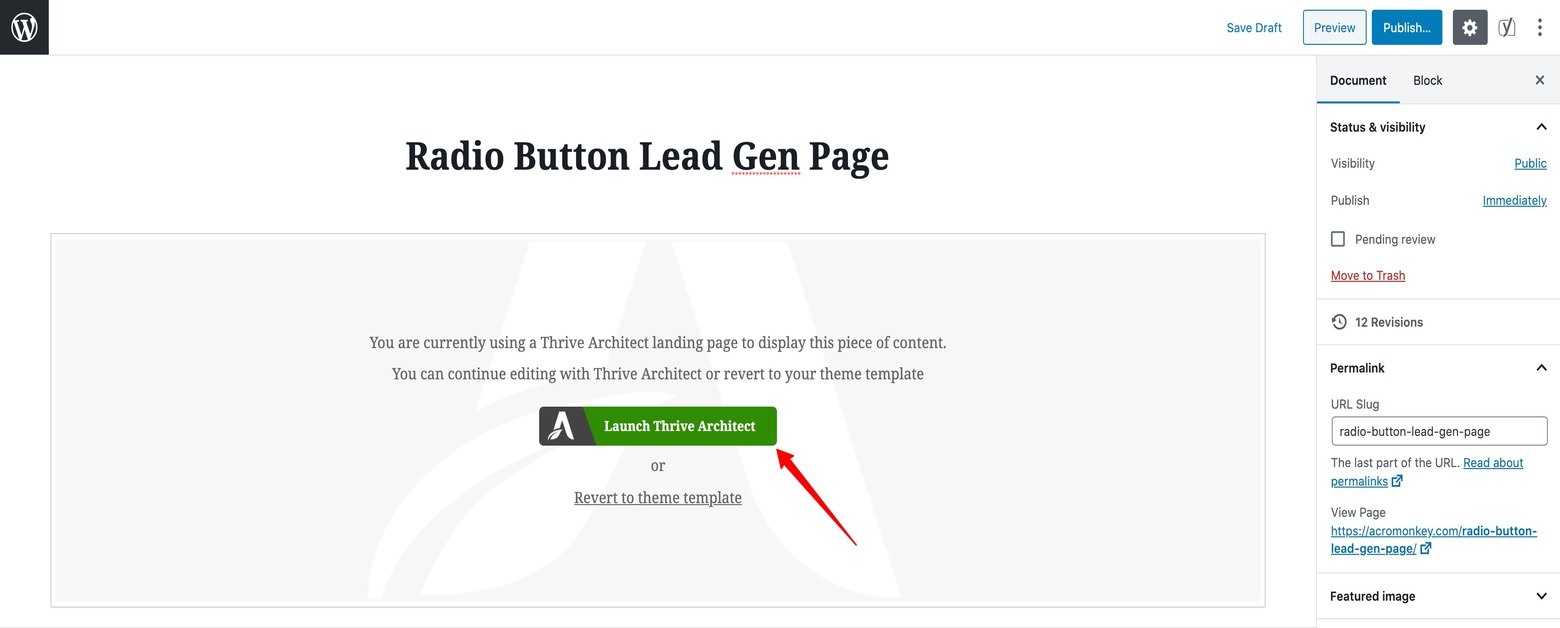
To create a new lead generation landing page, you'll first need to create a new Page in your WordPress dashboard and then smash that green "Launch Thrive Architect" button to get started building.
When the Thrive Editor window loads, navigate to the cloud icon in the narrow right sidebar to open the Thrive Architect landing page template library.
Select the lead generation landing page template that suits your needs best (or select a “Blank Page” template if you want to build your page from scratch. We use the ShapeShift Theme “Blank Page” template in the video):
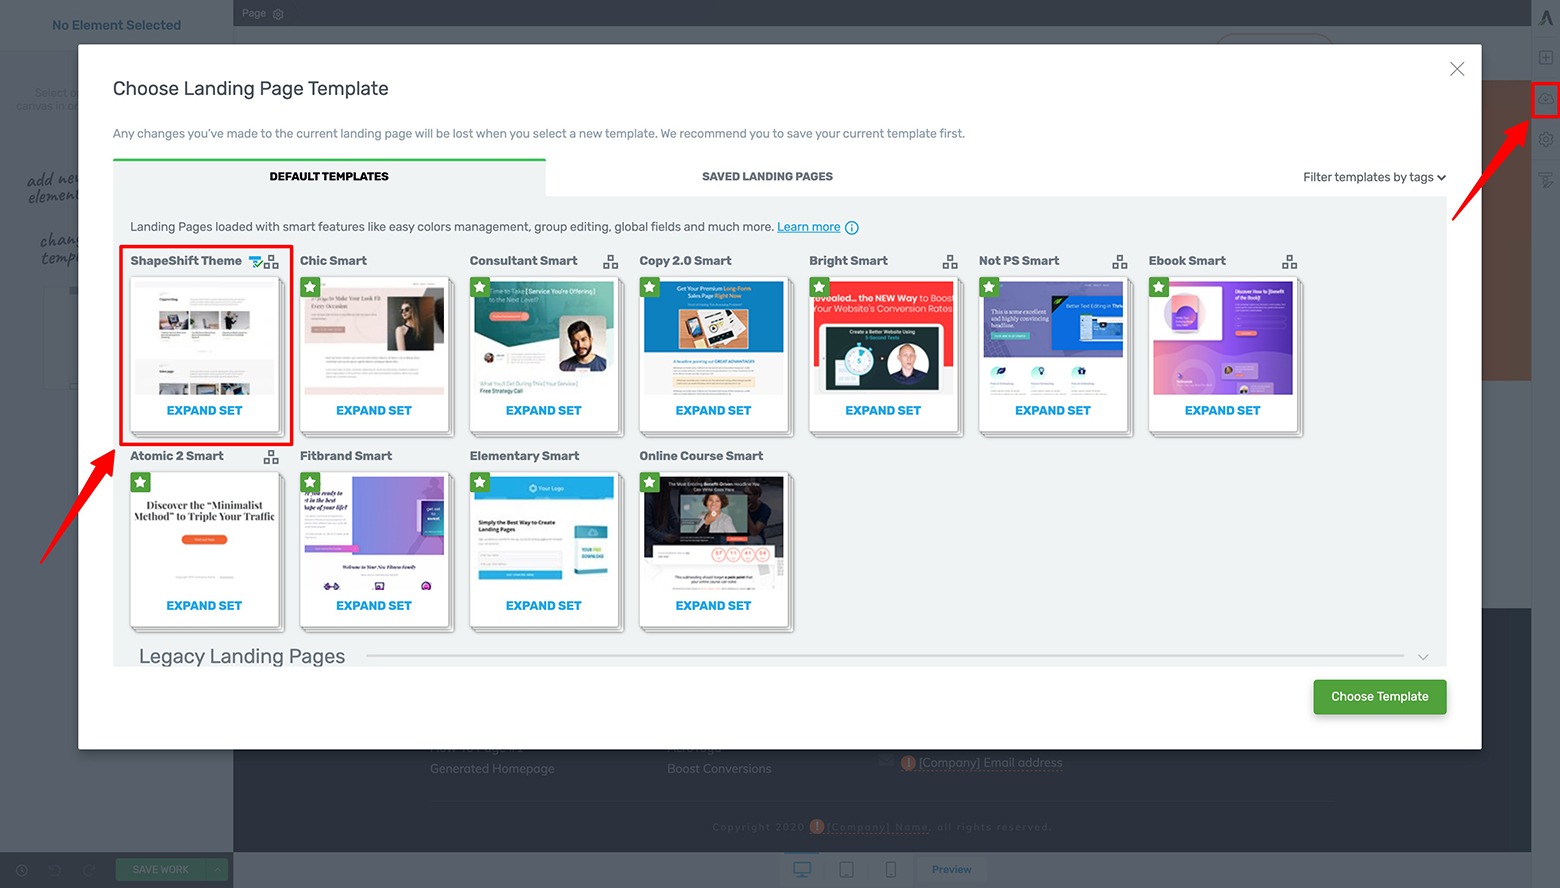
In the Thrive Editor window, navigate to the Landing Page Template Library by clicking on the cloud icon in the narrow right sidebar. From there, select from hundreds of landing page templates or choose a Blank Page template option to build your lead generation landing page from scratch.
If you choose a Page Block Ready landing page template (like all of the landing page templates available inside the ShapeShift Theme set), you can click on the blue “+ Page Block” button(s) that appear when you hover your cursor over the top or bottom of any Background Section element to open & access the Page Block template library:

If you choose to build your lead generation landing page from scratch, you can use Page Block templates (only available in Page Block Ready template sets like ShapeShift Theme) to build a custom landing page fast.
Click on the “Lead Generation” template filter in the left sidebar of the Page Block template library (that appears as a popup lightbox) to see the available lead generation Page Block templates:
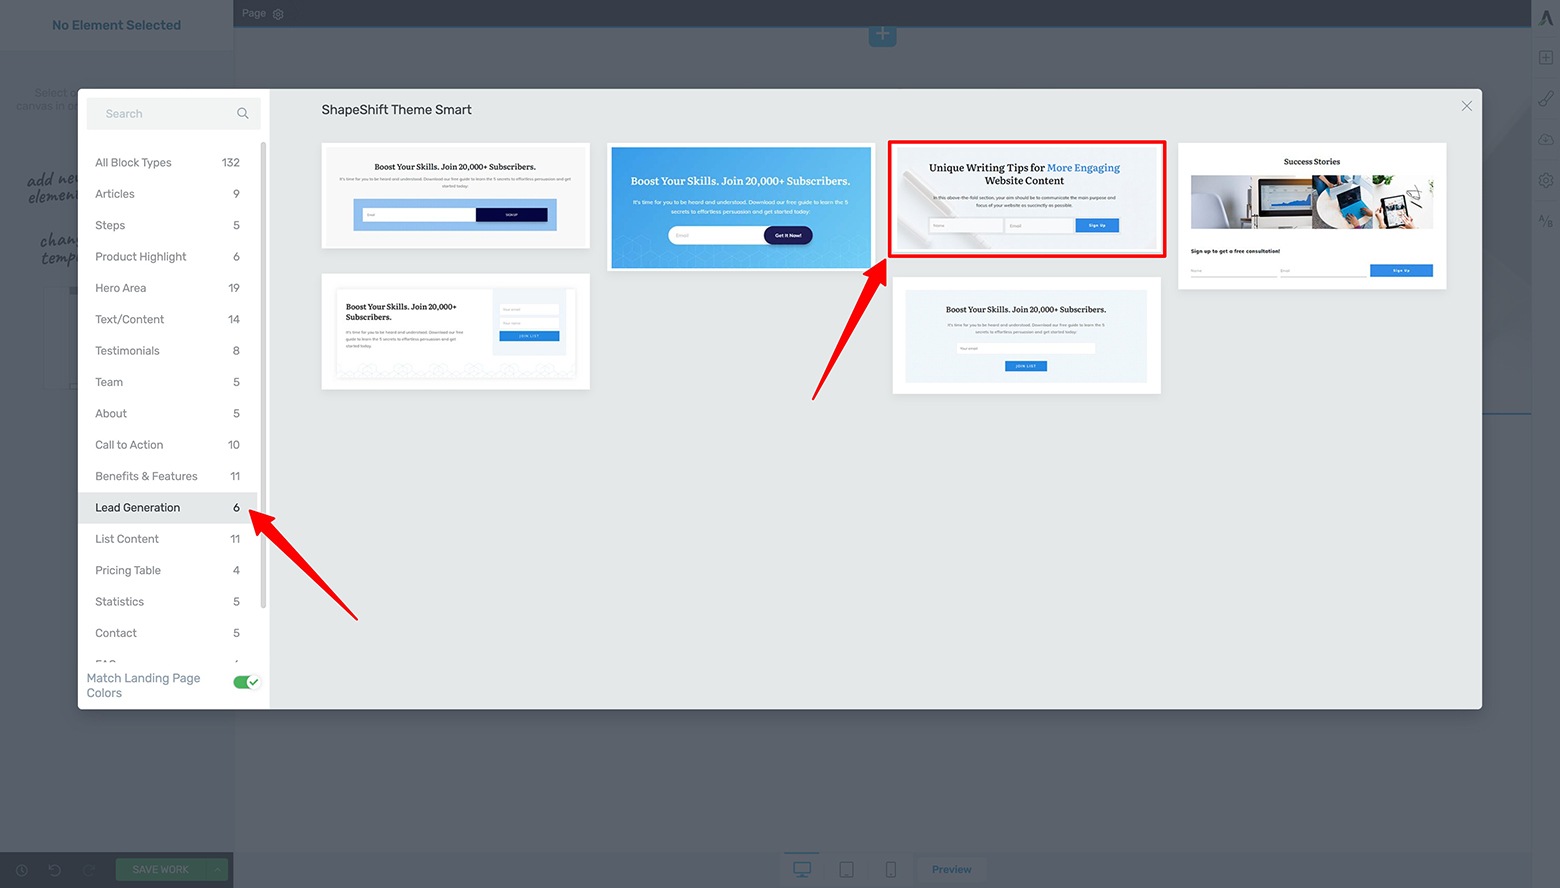
After clicking on the Add Page Block button, you can filter for Lead Generation templates by clicking on the "Lead Generation" filter in the left sidebar and then selecting the Page Block template that best suits your needs.
Choose one and notice how it adopts the Main Accent color setting of your landing page (your landing page Main Accent color can be found and changed by clicking on the Style Editor paintbrush icon on the narrow right sidebar).
Next, modify your lead generation template’s heading and text elements to help clearly convey what your opt-in offer is. Swap out any demo images for your own unique content where appropriate:

Once your Page Block template loads, you can simply inline edit the text to help clearly communicate your opt-in offer to potential subscribers.
Notice how this example showcases a website trying to help writers become self-published authors? It offers a free guide on how to write books of specific fiction genres in exchange for an email address.
This use case presents a great opportunity where Radio Buttons can be used inside the Lead Generation element to collect more advanced data to help create more targeted email marketing automations. Depending on each subscriber’s Radio Button selection, the custom field value collected could trigger a more individualized email automation aimed at serving genre-specific writer needs.
And serving more individualized subscriber needs is a surefire way to not only boost your conversions, but keep the different segments of your audience engaged with your content.
That’s the power of Radio Button lead segmentation!
So once the design of your landing page is complete, it's time to add your Radio Buttons and make sure it’s mapped correctly to your email marketing tool. Let’s learn how to do that next…
How To Create a Custom Field in Your Email Marketing Tool
Before you can add Radio Buttons to your lead generation form, you’ll need to create a Custom Field within your email marketing tool. In the video, you’ll learn how to do this using ActiveCampaign (but you can check out this Thrive Knowledge Base article to see how it’s done with your particular email marketing tool).
Does Your Email Marketing Tool Have an Advanced Integration with Thrive Themes Tools?
Your email marketing tool must be on this list to use any of the Lead Generation Custom Fields features including Radio Buttons.
In the case of using ActiveCampaign, you’ll need to navigate to the “Manage Fields” area within your ActiveCampaign dashboard by clicking on the “Forms” tab of the left sidebar, and then clicking on the Manage Fields option that appears in the expanded left sidebar.
After that, just click on the blue “Add Field” button:
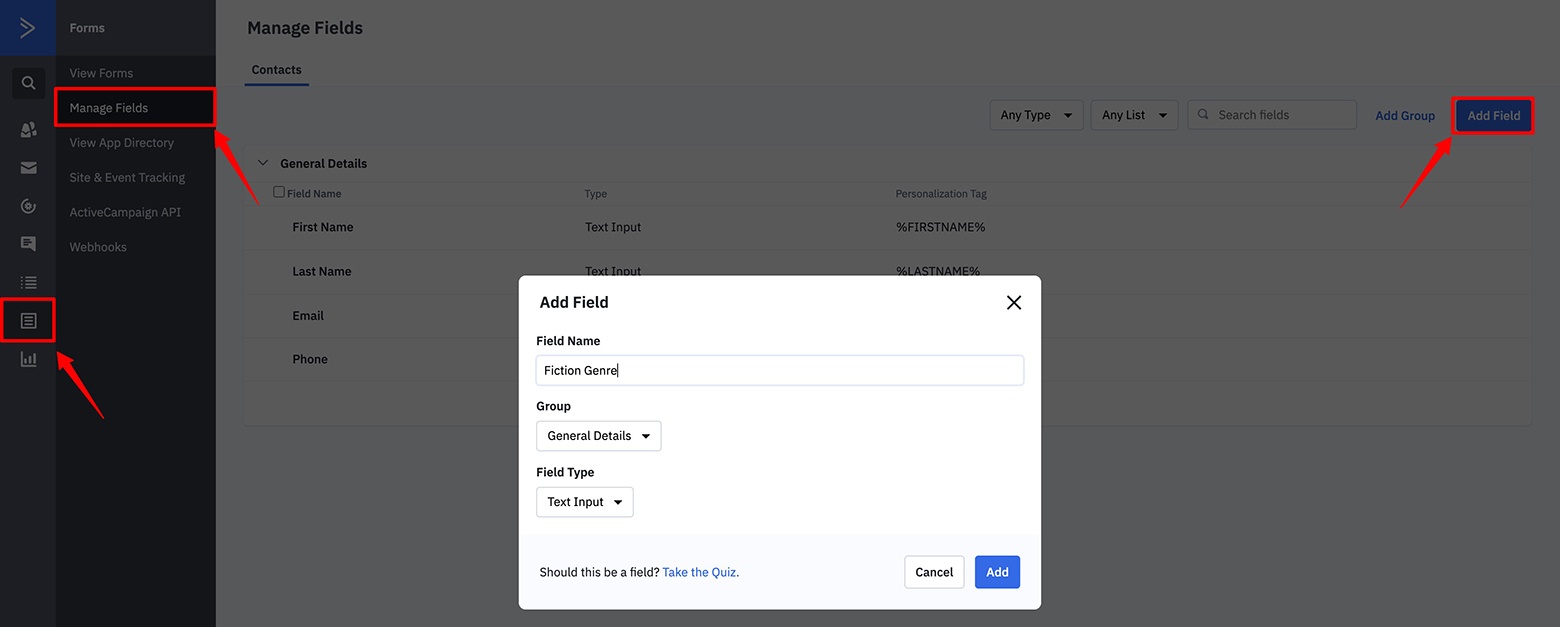
To create a new custom field in ActiveCampaign, click on the "Forms" tab in the left sidebar, followed by the "Manage Fields" option in the expanded sidebar, and then click on the blue "Add Field" button. From there, name your new field, select "Text Input" from the Field Type dropdown menu and click the blue "Add" button.
In the “Add Field” popup lightbox that appears:
- Give your new custom field a name (for this example, we named it “Fiction Genre”)
- Assign it to a Group (when applicable… otherwise, just use the default “General Details” group)
- Very important — assign the Field Type to “Text Input” (any other type of Custom Field created in your email marketing tool will not be detected by the Lead Generation element inside the Thrive Editor)
- Click the blue “Add” button to create your new field type.
Important Point for Custom Field Set Up inside ActiveCampaign
After creating your new custom field inside ActiveCampaign, click on its respective edit button (a pencil icon) and make sure the “Visible on forms” option is checked.
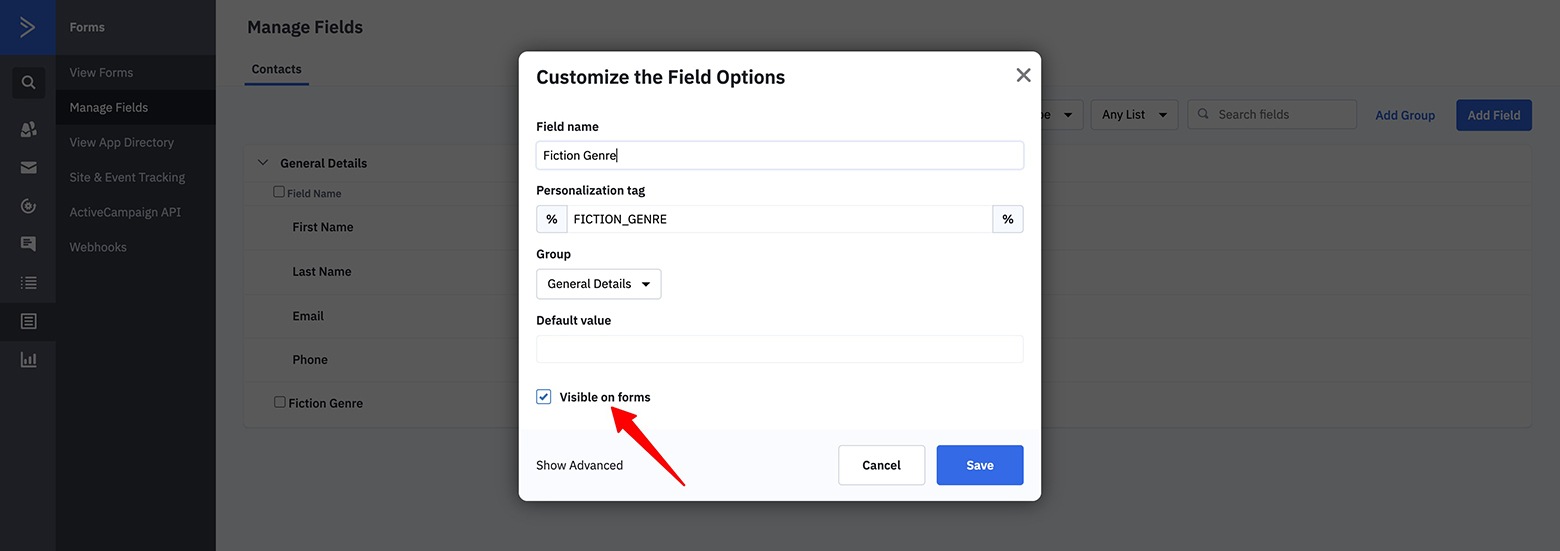
When creating custom fields inside ActiveCampaign, make sure the "Visible on forms" option is checked.
Now that your Custom Field is set up inside your email marketing tool, let’s now connect it with actual Radio Buttons on your Lead Generation element inside the Thrive Editor.
Add, Map and Design Your Radio Buttons
Once you’re back inside the Thrive Architect editor window, highlight the Lead Generation element and click on the blue “Add Connection” button in the left sidebar. Follow this by selecting your email marketing tool from the “Connection” dropdown menu:

To connect your Lead Generation element to your email marketing tool, first highlight the Lead Generation element in the Thrive Editor, click on the light blue "Add Connection" button in the Main Options tab of the left sidebar, and the choose your email marketing tool from the Connection dropdown menu.
A Note on Connecting Your Email Marketing Tool with Thrive Themes
Your Email Marketing tool must first be connected to the Thrive Themes API Dashboard to appear in the Connection dropdown menu.
Next, it’s important to click the refresh button before selecting the appropriate email list from the “Choose Your Mailing List” dropdown menu. If you forget this step, then your new Custom Field type (created within your email marketing tool) may not appear when it’s time to do the Field Mapping step coming up next.
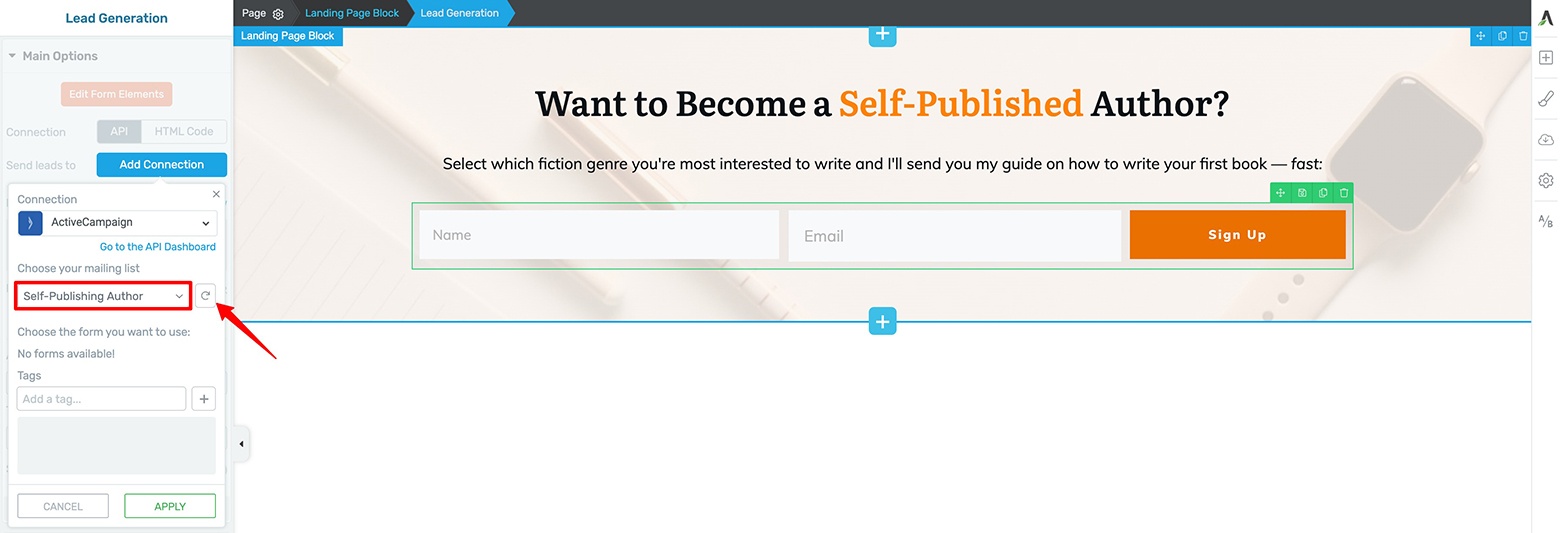
It's important to smash the refresh button before selecting your mailing list from the "Choose your mailing list" dropdown menu so the Custom Field you just created in your email marketing tool appears in the field mapping step coming up next.
From here, you can now add your Radio Buttons to your lead generation form.
Click on the blue “+Add new” text in the Form Fields area of the left sidebar followed by selecting “Radio” from the dropdown menu. It’s recommended to click the “Required” and “Show Labels” options as well. Finally, choose the Custom Field option you just created in your email marketing tool from the “Field Mapping” dropdown menu.
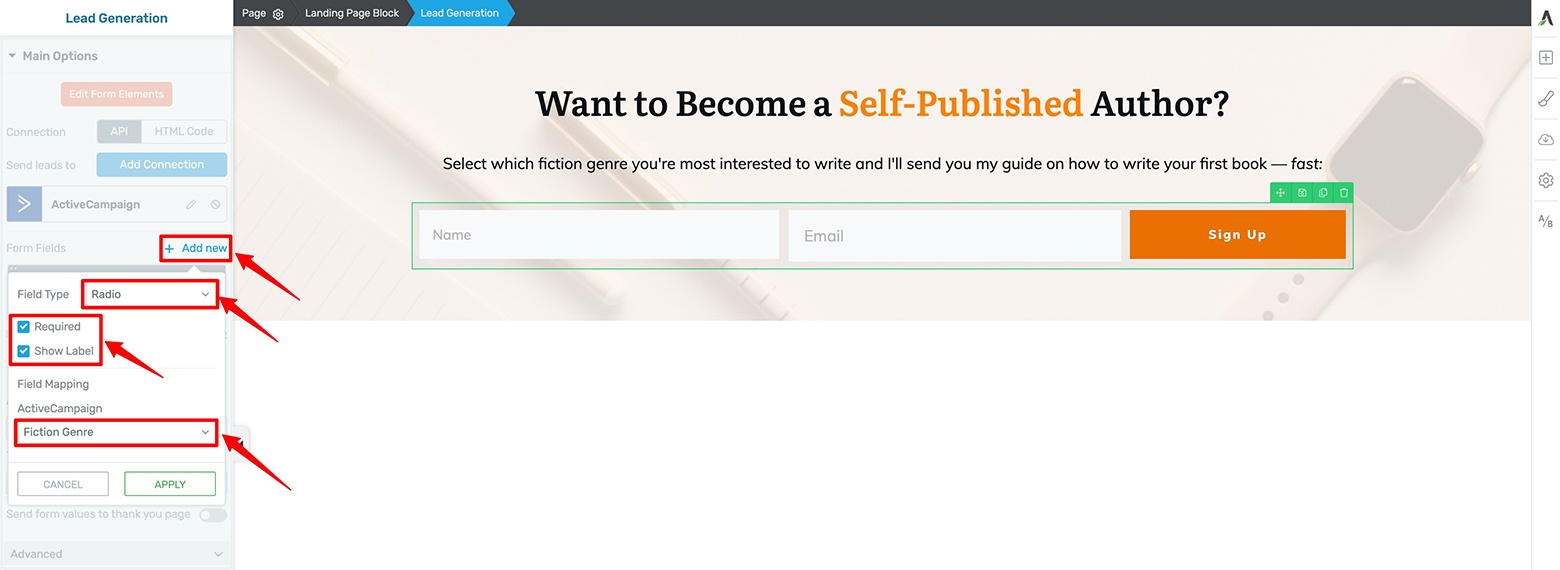
Now it's time to add your actual Radio Buttons! Do this by clicking on the "+ Add new" text in the Form Fields area of the left sidebar followed by selecting "Radio" from the Form Type dropdown menu and then choosing your new custom field from the Field Mapping dropdown menu. Making the Radio Button required and showing it's label is option, but recommended.
Click “Apply” and notice a default set of Radio Buttons get added to your Lead Generation element. Now comes the Radio Button design work…
Click on the peach “Edit Form Elements” button in the left sidebar to start customizing the look and feel of your Lead Generation element. Follow that up by highlighting the “Lead Generation Radio” breadcrumb so you can drag & drop your new Radio Buttons to the top of the form (above the Name, Email and Sign Up Columns element):
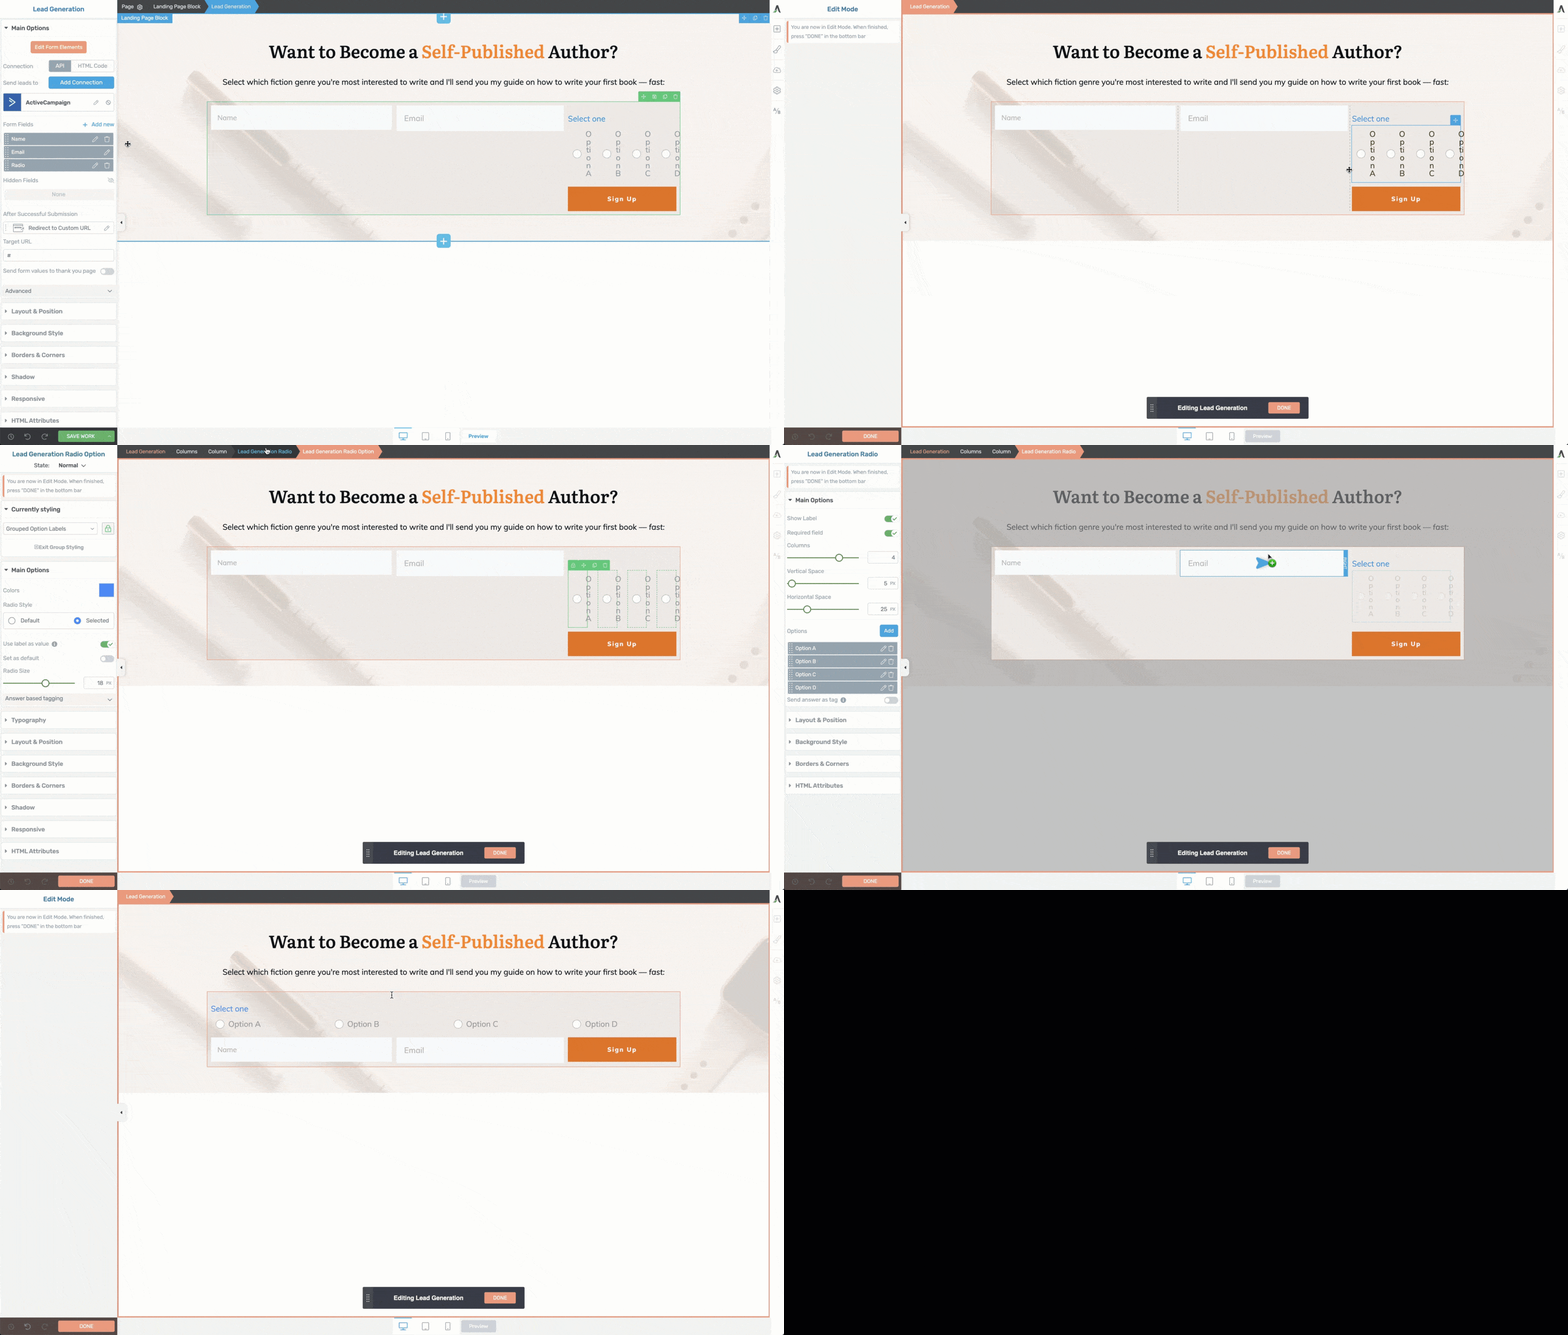
To begin editing your Radio Button design, click on the peach "Edit Form Elements" button in the left sidebar, highlight the "Lead Generation Radio" breadcrumb, and then drag & drop your Radio Buttons where you want them within the Lead Generation element.
Once your Radio Buttons are properly positioned on your Lead Generation element, you can start modifying the values and design of each Radio Button option. Group editing is active by default so a change to one Radio Button display setting will automatically apply to the others (group editing does not apply to inline text changes).
For our Self-Published Author example in the video, each of the Radio Button options should represent a different fiction writing genre including:
- Sci-Fi
- Fantasy
- Mystery
- Romance
- Thriller
We can start changing the default values by simply inline text editing the 4 different default Radio Button values (Option A, Option B, etc.). You can also change the Radio Button font style settings under the Typography tab within the left sidebar.
How Radio Button Text Gets Passed on to Your Email Marketing Tool
Make sure that the “Use label as value” toggle is on (inside the Main Options tab) for each Radio Button option so the displayed value gets passed along as-is to your email marketing tool.
If you want a different value recorded from what is displayed to subscribers on your lead generation from, uncheck this toggle option and specify the value you want to record in the “Value” box.
Don’t forget to change the overall Radio Button color option to match the look and feel of your landing page under the Main Options tab in the left sidebar. Notice that making this change will also change the color of the Radio Buttons themselves when selections are made by subscribers.
Under the “Radio Style” area, you can also choose from 1 of 8 different design styles for your buttons:
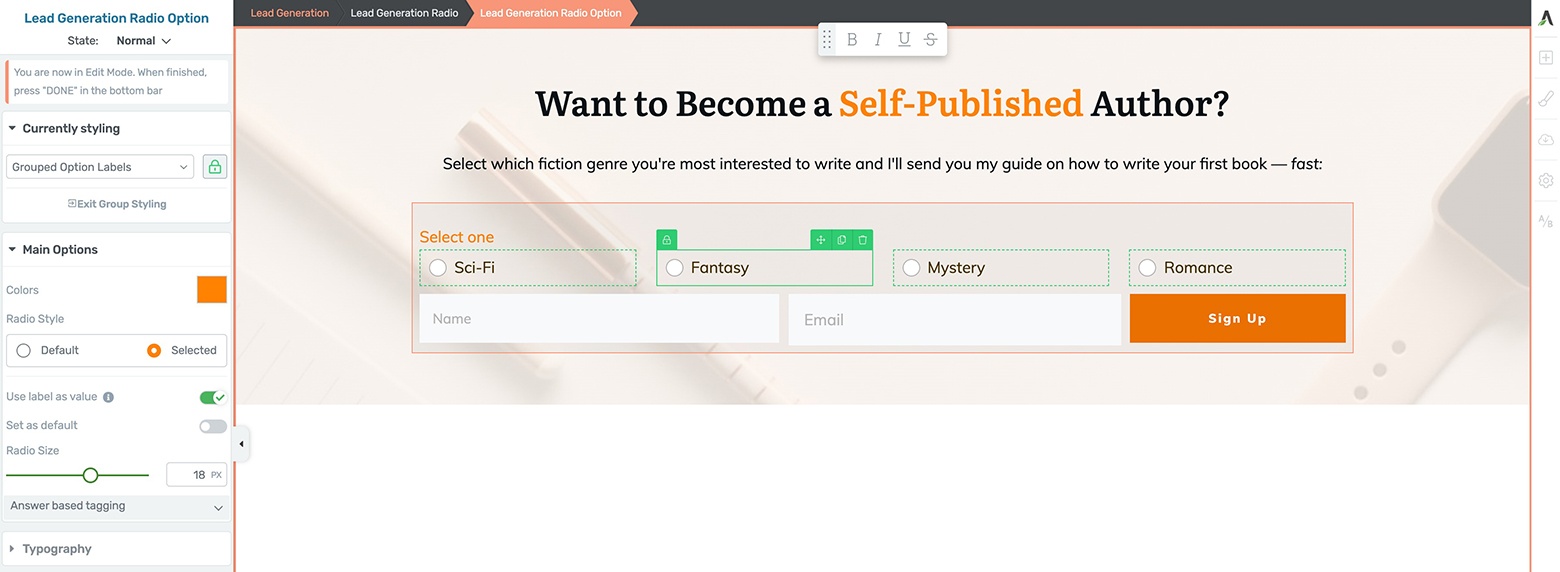
You can modify the overall color of your Radio Buttons to match the look and feel of your landing page design by highlighting one of the "Lead Generation Radio Option" breadcrumbs and then changing the color under the Main Options tab of the left sidebar. To modify the style of your Radio Buttons, choose one of the templates from the Radio Style dropdown menu.
Next, if you need to add or remove Radio Button options, do that by either clicking on the blue “+” button (to add) or respective trash can icon (to delete) on the actual lead generation form.
You can achieve the same thing by clicking on the blue “Add” button (to add) or the respective trash can icon (to delete) Radio Button options in the Main Options tab of the left sidebar (assuming the “Lead Generation Radio” breadcrumb is highlighted).
Just use the inline text editor to change the value of your additional Radio Button options:
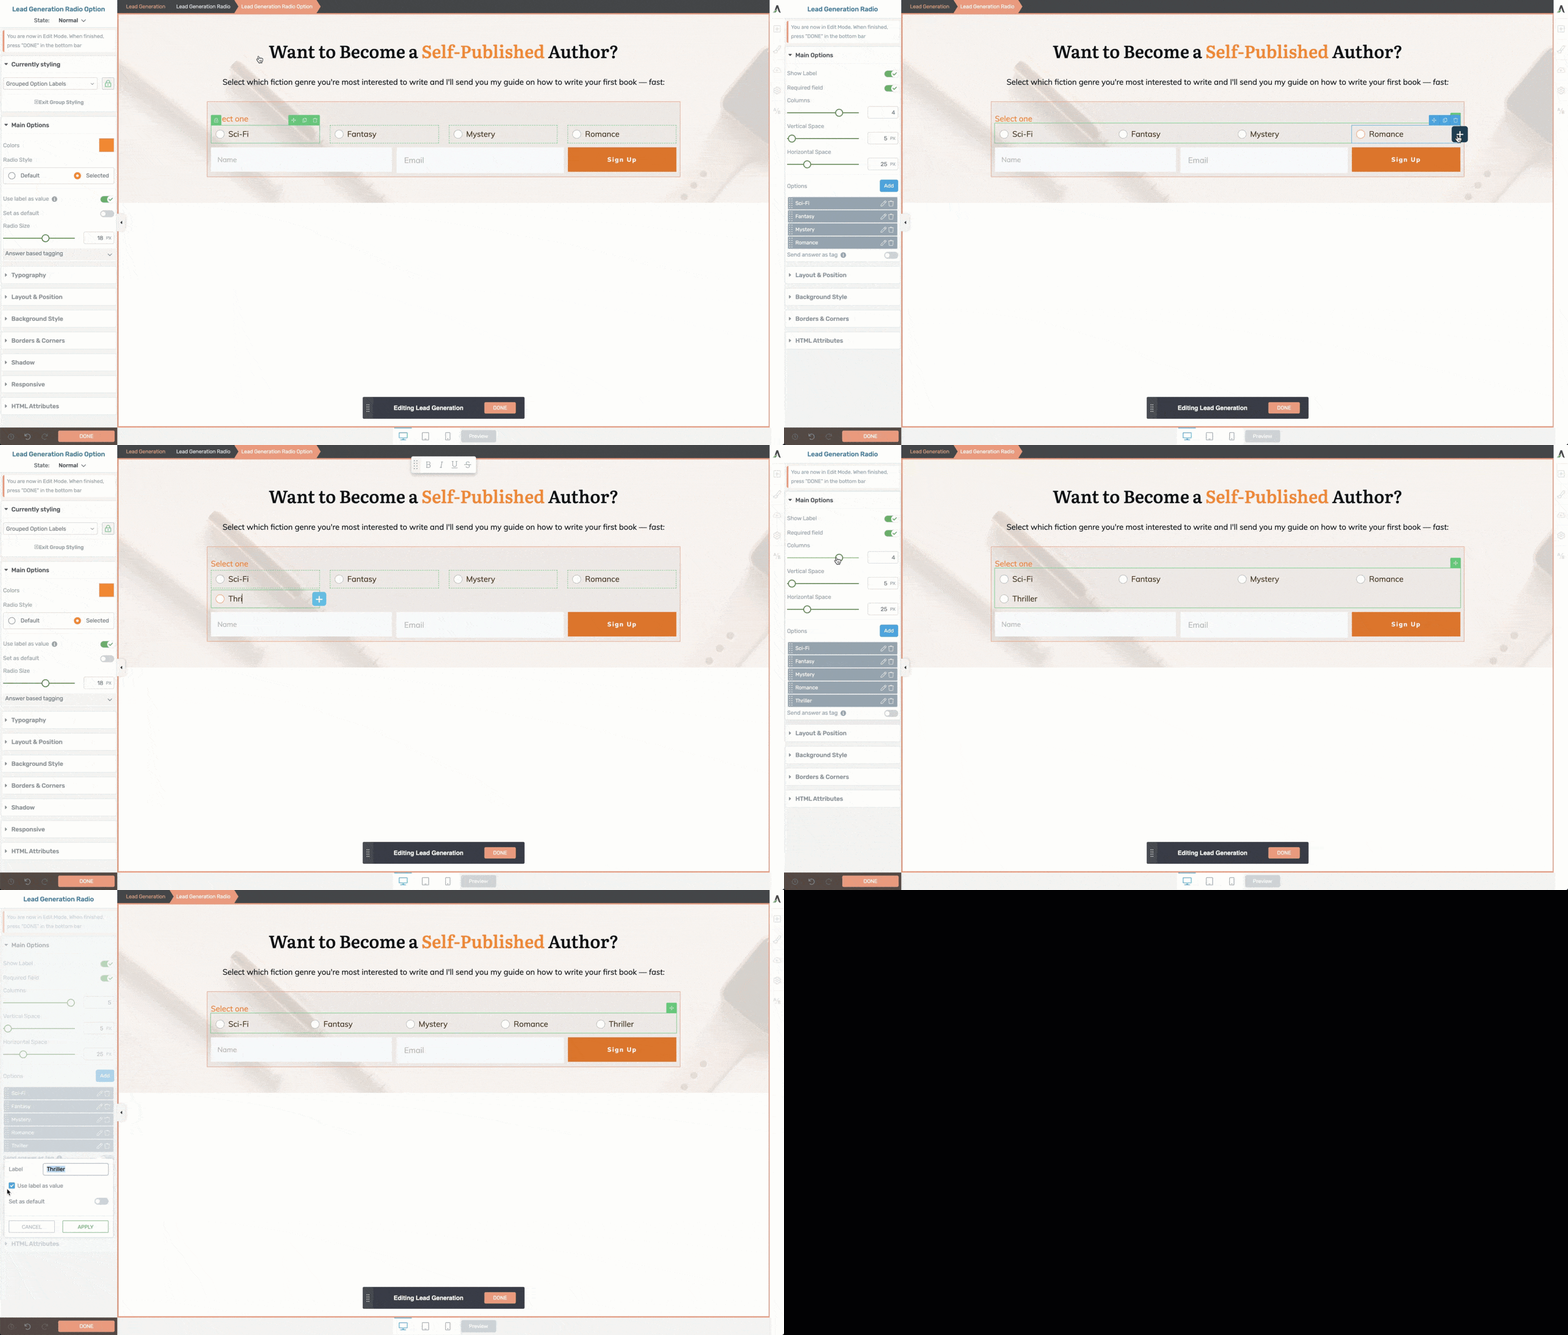
To add an additional Radio Button option, just hover your cursor over one of the options and click on the blue "+" button that appears. To delete a Radio Button option, just hover your cursor over it and click the green trashcan icon. You can inline edit each of your Radio Button values too. All of these modifications can be achieved in the Main Options tab of the left sidebar when the "Lead Generation Radio" breadcrumb is highlighted. Don't forget to match your Columns slider to match the number of your Radio Button options as well!
Finally, don’t forget to modify the number of Radio Buttons that can be displayed within a single row by changing the “Columns” slider value within the Main Options tab to match the number of Radio Button options available (5 in the case of this example).
Just click the peach “Done” button to exit the Form Elements editor and then immortalize what you’ve created by hitting the green “Save Work” button to complete your customization.
Publish your landing page and you’re in business!
Adding Radio Buttons to a Lead Generation Lightbox Form in Thrive Leads
Good News!
Adding Radio Buttons to your lead generation forms in Thrive Leads works exactly the same as it does inside Thrive Architect.
That means you can easily add Radio Buttons to your Popup Lightboxes, Screen Filler Overlays or even Sticky Ribbon forms if you so choose.
One of the benefits to using Thrive Leads opt-in forms instead of the Lead Generation elements inside Thrive Architect is that you can start A/B testing your Radio Button designs too. Is your Radio Button lead segmentation strategy working better to convert & segment new subscribers compared to another lead segmentation idea you have in mind?
Use the A/B Testing feature inside Thrive Leads to find out for sure!
Here’s an example of a Thrive Leads 1-step lightbox template that was modified to use Radio Buttons (it’s the second example showcased in the video):
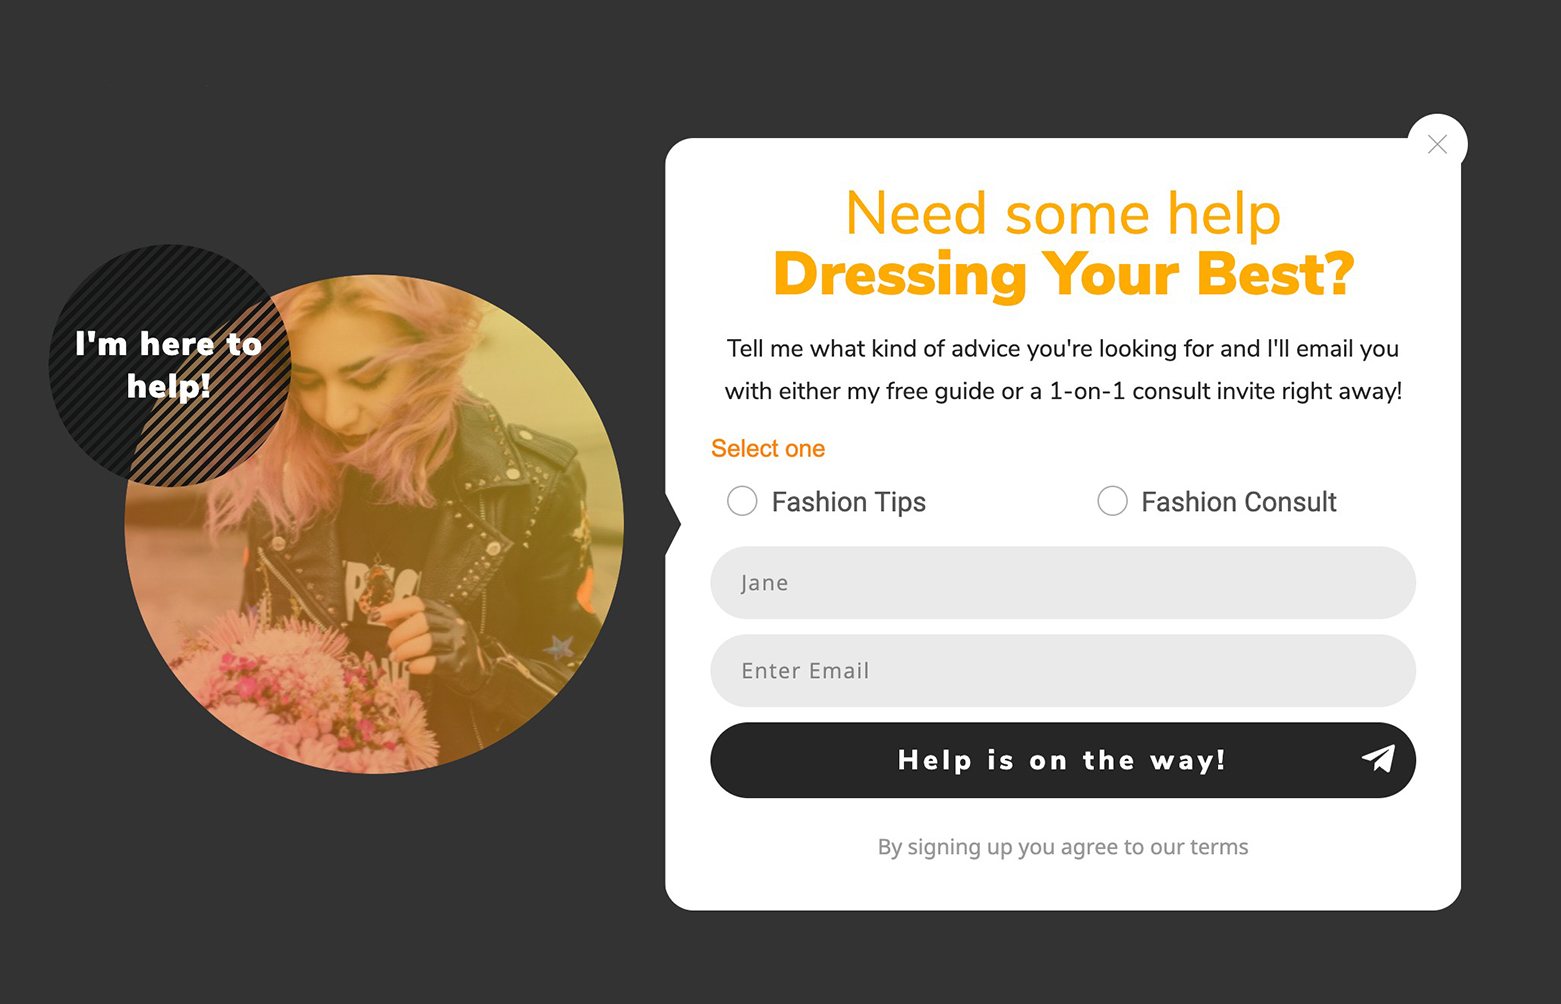
Here's a quick & easy lead generation popup lightbox you can build with Thrive Leads that segments your new subscribers using the Radio Button custom fields feature.
You can achieve a similar result by selecting the most suitable Thrive Leads opt-in form template for your unique needs (from the hundreds of templates now available) to give yourself a design starting point.
From there, you can follow the same process as above to add Radio Buttons to your Thrive Leads opt-in form design.
The Thrive Leads popup lightbox example shown in the video showcases how someone like a Fashion Expert can use Radio Buttons to segment their new subscribers into two valuable lead sub-groups:
- People looking for DIY Fashion Tips
- And people looking for a pro to do the work for them through 1-on-1 Consults
Using a Radio Button in this situation gives someone with a Personal Brand business the ability to collect a critical piece of information about each subscriber’s needs and send them individualized content to serve them best.
In the case of the Fashion Expert example, a “Fashion Tips” Radio Button result could trigger an autoresponder that sends a sequence of valuable DIY Fashion Tips emails followed by a sales pitch to buy a DIY Fashion online course.
If the “Fashion Consult” Radio Button was selected, that could trigger an autoresponder that prompts the subscriber to book a face-to-face coaching call.
Are you starting to see how insanely powerful Radio Buttons can be to add value to your online business?
Time to Level Up Your Own Lead Generation Forms with Radio Buttons
Ready to take what you learned about Radio Buttons in this video and apply it to your own lead generation forms?
Set up your radio button on either your Thrive Architect lead gen landing pages or Thrive Leads opt-in forms right and you’ll not only boost your conversions, but you’ll start collecting the information you need to serve your audience and customers in ways they’ll reward you better for!
We’d love to hear your own thoughts and ideas around how Radio Buttons can level up your lead generation and email marketing. Leave a comment below to share!


Very clear explanation with examples. Is it possible for subscribers to select more than just one state? So if you write a blog on several topics…and they want to follow more than one topic? Thanks.
That’s no problem at all Duric… you just need to use the Checkbox field type instead of the Radio Button field type within your Lead Generation element in the Thrive Editor.
The setup is exactly the same, just Checkboxes allow your new subscribers to select more than one option where Radio Buttons only allow subscribers to select a single option.
And just remember that you always need to set the Custom Field you create within your email marketing tool as a Text input (regardless of what field type you’re trying to add on your Lead Generation elements within the Thrive Editor).
Thanks Matt. This would work perfectly for what I have in mind and make it super easy for my visitors to make a simple choice and be lead exactly where they need to go.
That’s great to hear Jonah… happy list segmenting!
Hello, can a simple module subscribe my visitor to three different lists at once? I want my subscribers to see all my emails for a while. After one month I will send them to their account settings, so they can opt-out from some of the emails.
I need three real lists because I am using Mailpoet that does not have real segmentation functionality. Thanks in advance
Hi Leonardo, unfortunately you can’t have an opt-in form sign people up to multiple lists on the same email marketing tool at this time (however you set a single Lead Generation element up to add subscribers to lists on different email marketing tools).
I’ll share your comment with the team to see if this feature might be possible to add in the future for customers in your situation using a tool like MailPoet.
Hi Matt, thanks for your reply. I will probably stay with one single list for a while. Unless you have really different topics covered on your website, email segmentation may have some drawbacks too. Cheers
Matt,
Enjoyed the article! Just as a check for understanding on my part (as a somewhat novice)….
I can create these custom radio buttons as assign them with different tags (i.e. sports, business, education, etc)…
And then in my Convertkit account can have each tag trigger a specific email sequence?
Is this correct?
thanks!!!!!!
Thanks for your question Jeremy. Yes, you can now set your Radio Buttons (or any Custom Field type for that matter) to collect information as either tags (as explained here) or as a Custom Field (as explained in the video).
In Convertkit, you can then setup an email automation to be triggered by either the Custom Field(s) or Tag(s) your opt-in form collects. Pretty cool right?
Great post – very helpful. I assume it’s the same process if you’re using Infusionsoft vs Active Campaign?
Thanks! Each of the email marketing tools is a little different. Here’s how to set up Custom Fields inside Infusionsoft.
Hi Matt. I tried setting up an “text input” on a lead get while managing my form fields in active campaign like you said. I did this in order to see if the “check box” field type instead of the “radio button” can also work. However, after selecting multiple check boxes only one entry carried over to my active campaign per each contact that filled out the lead gen is the radio button the only segmentation that works right now with active campaign?