Want to learn how WordPress custom post types can turn you into a blogging pro? Keep reading!
Who doesn’t want to create better blog posts, faster?
Consistent content creation is a big challenge for solopreneurs and if you want to publish quality work at a pro pace, then building this skill should be one of your top priorities.
So in this post, we’re going to teach you a 4 step content creation process that uses 2 of our key Thrive Themes products (Thrive Theme Builder and Thrive Architect) to not only help you create professional looking blog posts more rapidly, but help grow your email list too!
The method you’re about to learn relies heavily on leveraging the rapid implementation power of templates across these 3 tools, and by the end of this post — you’re going to going to be a pro at all of them.
Ready to get started? Let's go!
More...
Here's Why WordPress Custom Post Types Matter (+ An Example)
So let’s assume you built a WordPress website for your coaching business using Thrive Theme Builder. Great choice! (Need a tutorial? Check this out)
For this post, we’ve chosen the public speaking coaching niche as our use case to help illustrate how our 4 step strategy might look for your online business.
And to help streamline the content creation process on such a coaching site, you first need to craft a few conversion focused Custom Post Template designs that you'll use for the different types of content you're planning to publish most often.
What is a Custom Post Template?
It's all in the name! In Thrive Theme Builder, you have the option to create a post template with custom features that you can use in addition to the blog post template you chose in the Thrive Theme Builder Setup Wizard.
Of course, your most frequent content type will use your default post template. But let’s say you also want to publish a different type of post — say, tool and gear reviews for your audience to help them decide what equipment they should invest in to best accelerate their public speaking skill building.
For that, you would need a completely different post design since the content pattern and calls to action for a review post are going to be different from that of your usual content case study.
This brings us to the first step in our 4-Step Better Content Faster Strategy and here’s how to complete it in just a few clicks with Thrive Theme Builder...
New Here? Meet Thrive Theme Builder
Thrive Theme Builder is several steps above a standard WordPress theme — and ten times more convenient!
It's my personal go-to for creating WordPress websites and helps me get all setup in 20 minutes or less.
You get a selection of professional themes, designed for a variety of niches (and can be easily customized for your specific industry); and a setup wizard that makes setting up your website's structure super easy.
Why settle for a WordPress theme thousands of other users have, when you can create your own custom theme that screams professionalism and uniqueness?
But don't just take my word for it.
Step 1: Create Custom Blog Post Templates With Thrive Theme Builder
Here’s how quick and easy it is to create a WordPress Custom Post Type Template for our tool review post example...
First, access the Templates Dashboard inside Thrive Theme Builder within your WordPress site’s backend dashboard:
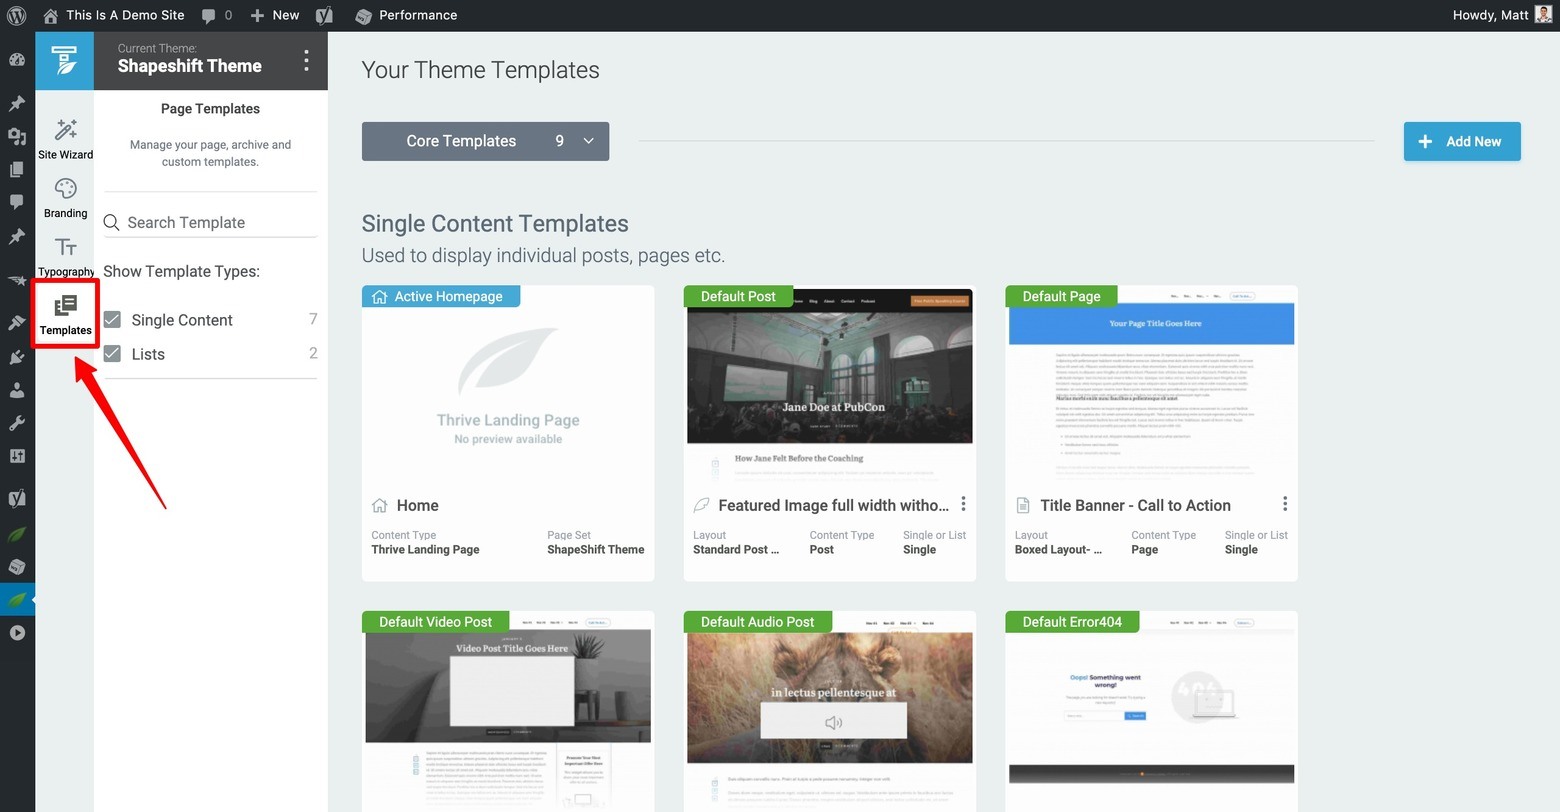
The Templates dashboard within the WordPress backend of Thrive Theme Builder.
Second, filter for your current “Post Templates” by clicking on the dark grey button at the top center of your template dashboard and then clicking “Post” under the “Custom Post Templates” area of the mega menu that appears.
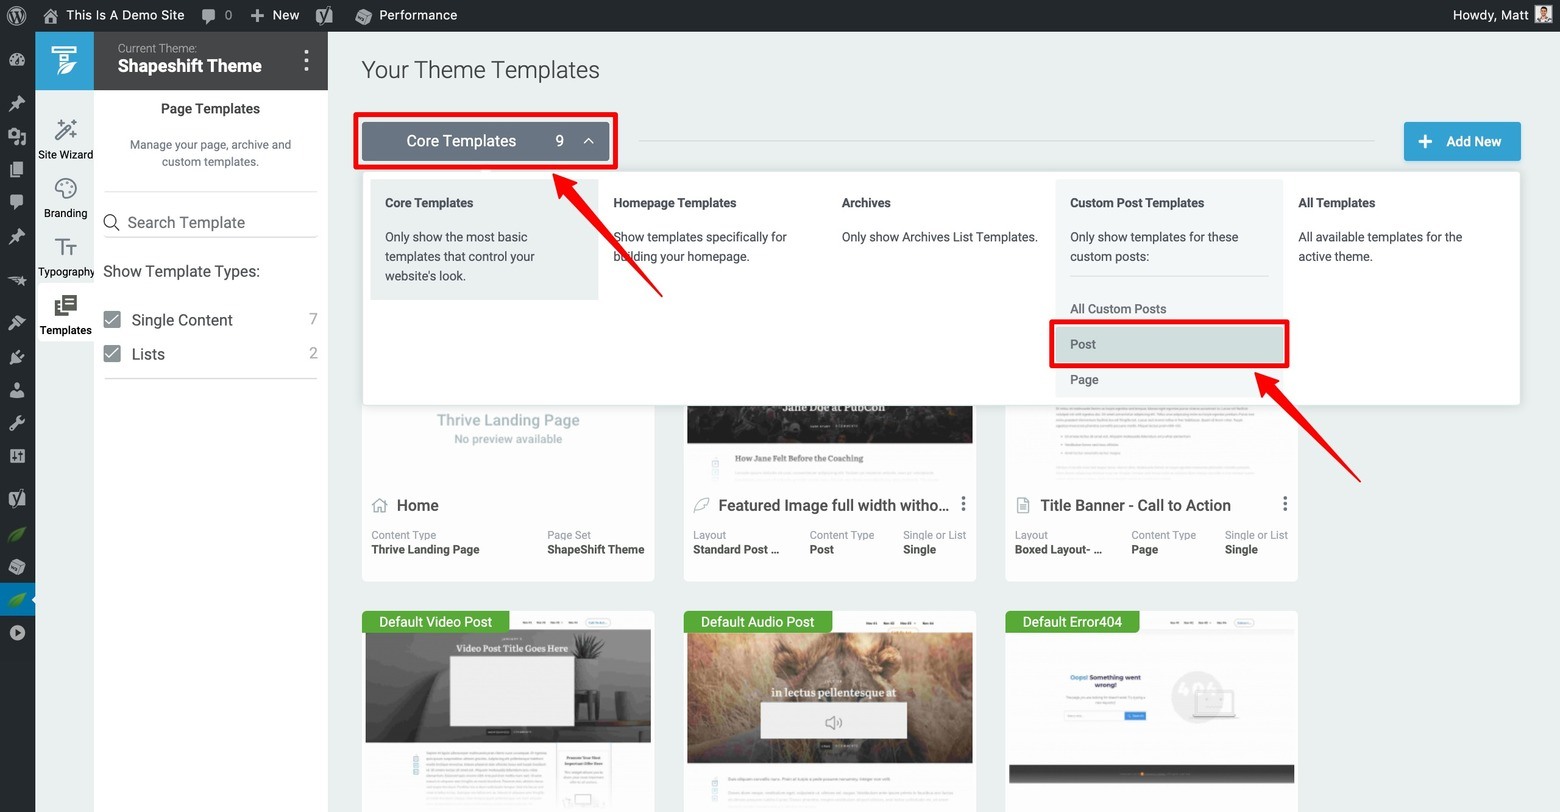
Click on the dark grey "Core Templates" button of the Thrive Theme Builder templates dashboard to access the Custom Post Templates "Post" option within the mega menu dropdown.
Now you can either duplicate and edit one of your existing post templates or create a brand new template by clicking the blue “+ Add New” button in the upper right area of your templates dashboard.
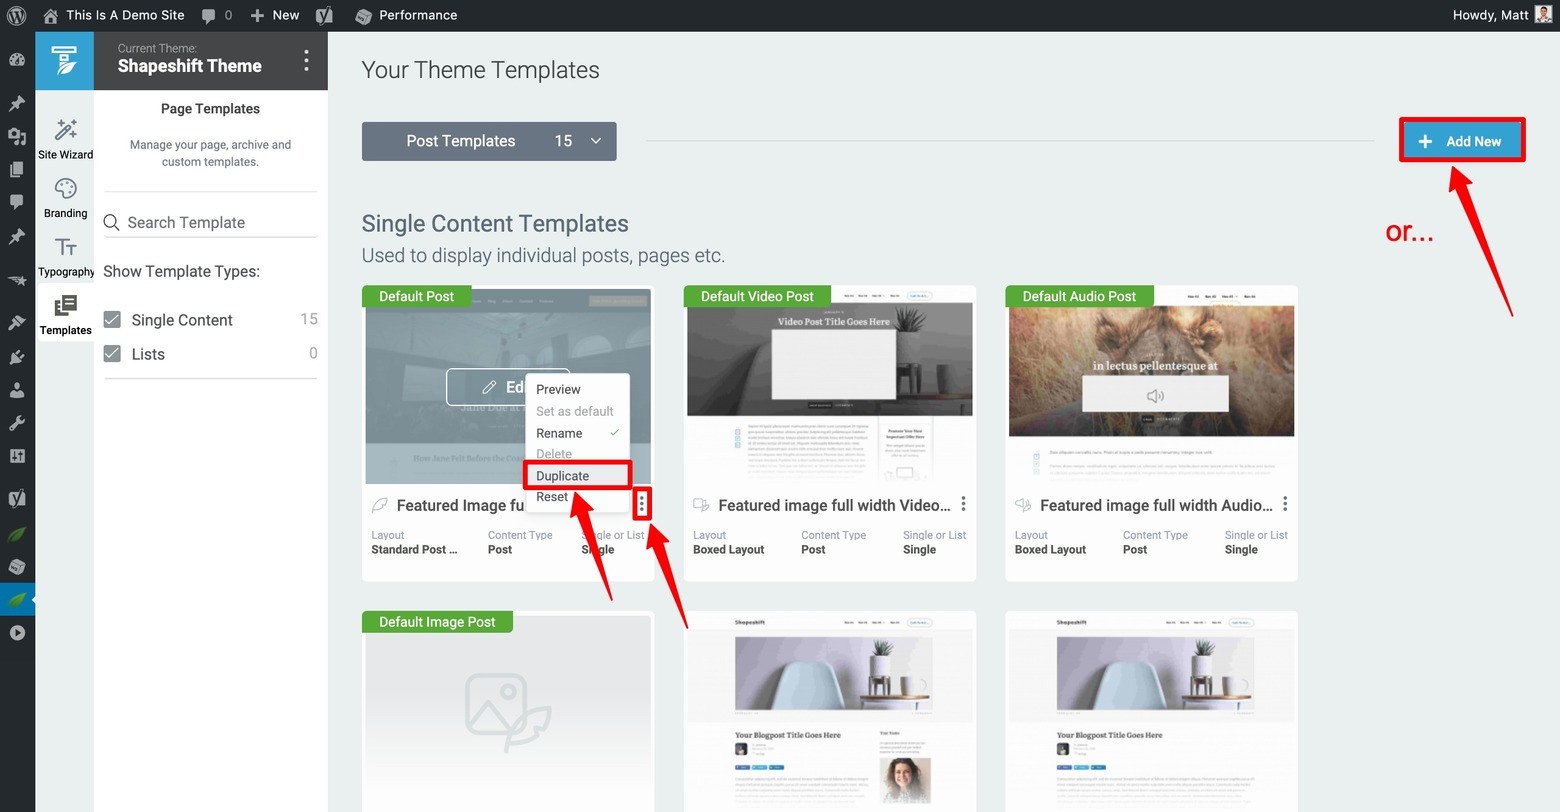
Duplicate an already existing post template by clicking on the vertical 3 dots and selecting the "Duplicate" option or click on the blue "+ Add New" button to create a new custom post template from scratch.
If you chose to duplicate an existing template, rename the template copy that appears and the click “Edit” button to begin the modification step.
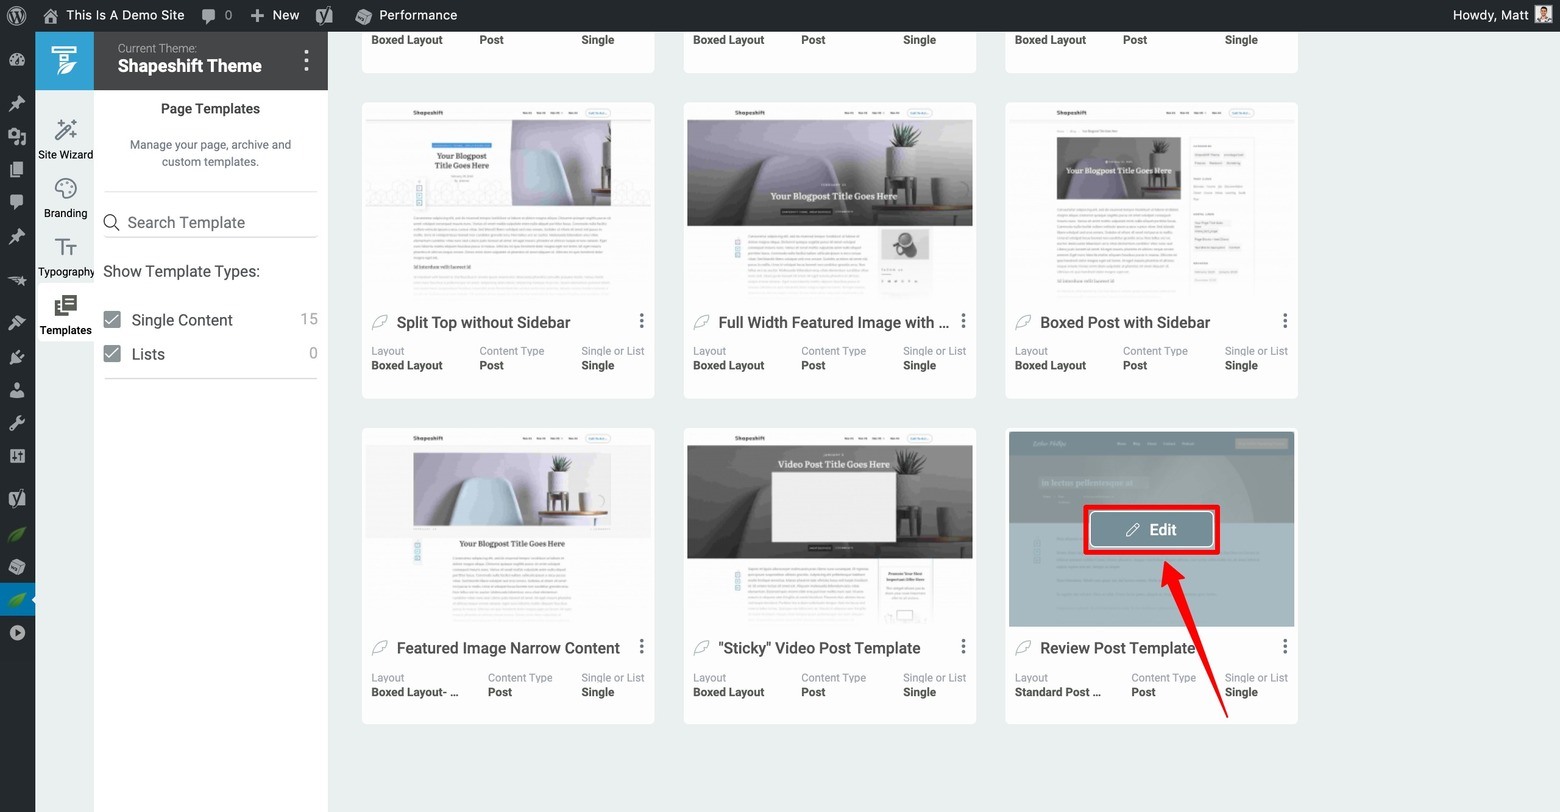
If you choose to duplicate an existing template, just rename the copy that appears in your dashboard and then click the grey "Edit" button that appears upon hovering over the thumbnail to enter the Thrive Theme Builder editor.
However, if you chose to create a brand new template, choose the following setup options in the new template lightbox that appears:
- Name your template.
- Choose “Single Content Post."
- Choose “Post” for your content type
- Choose either “Standard, Image, Video or Audio” for your post format depending on the type of content you plan to create for your review posts.
- FYI: Breakdown videos go great with tool review posts! - Choose an existing template type you want to use as a design starting point, or select “Start from scratch” to design your new template from a blank screen.
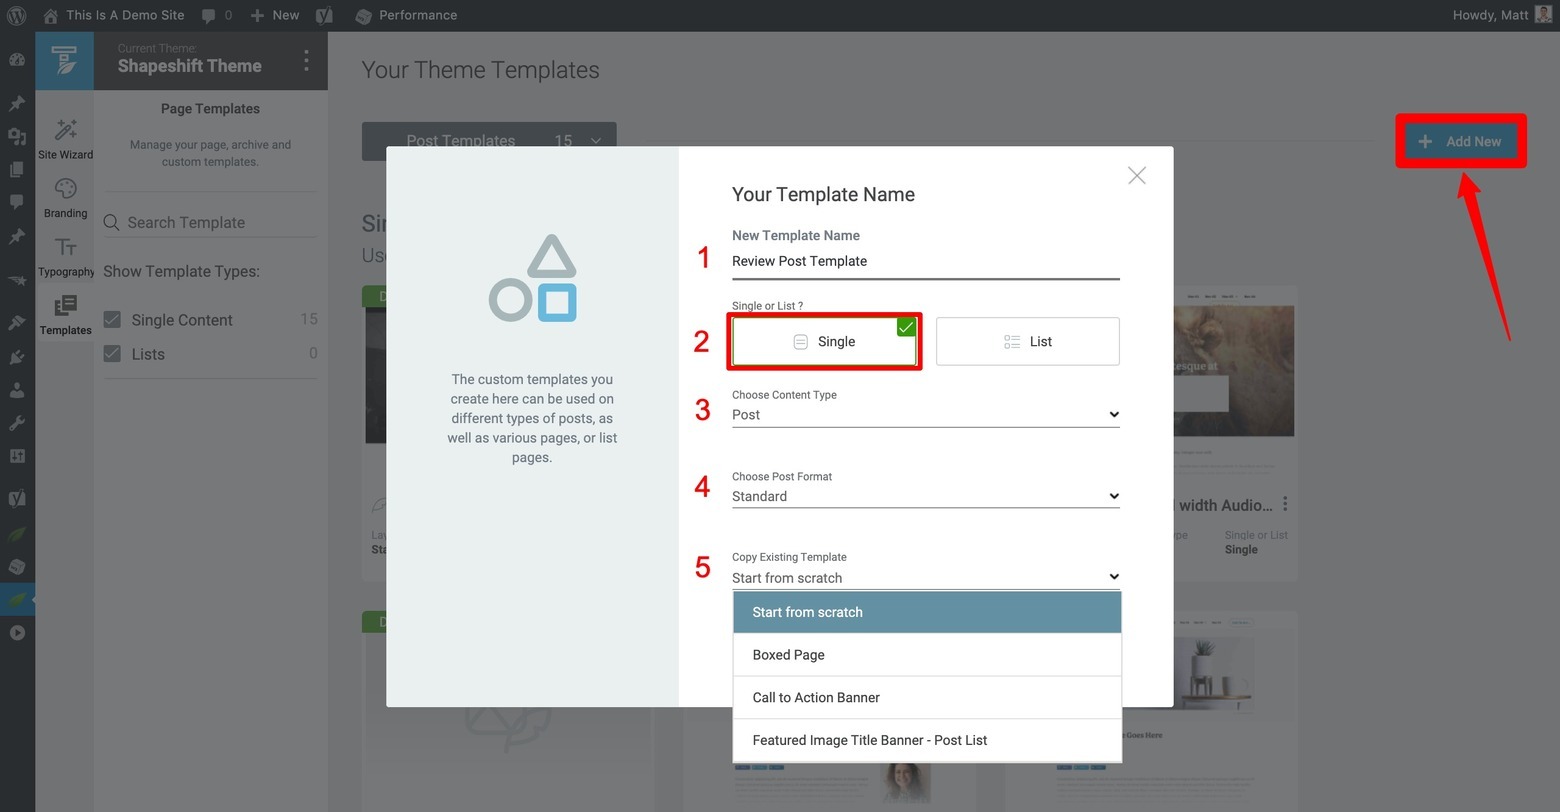
If you want to create a new custom post template from scratch, follow these initial setup steps.
Once your new Review Post template is created in the Thrive Theme Builder dashboard, it will appear with the other “Single Content Templates”. It’s now ready for you to start customizing by clicking the “Edit” button that appears when you hover your cursor over the template thumbnail.
After the template loads inside the Thrive Theme Builder editor, you can either begin modifying your duplicated template or building one from scratch. Check out Step 1 in the video below (at timestamp 03:20) to see just how quick and easy it can be to create a Review Post template inside Thrive Theme Builder.
Step 2: Create a Content Pattern with Content Block Templates
Once your Thrive Theme Builder Review Post Template has been created, it’s time to switch gears and start creating a content template for your review post using Thrive Architect, Thrive Themes' landing page builder.
Have You Met Thrive Architect?
If you're serious about building impressive pages that lead to conversions, Thrive Architect is worth your attention. It's more than just a page builder - it's a conversion-focused design tool that comes with professionally designed templates you can actually use without a designer's eye.
What I appreciate most about it is the practical conversion elements - from smart-looking buttons to lead capture forms. Each component is designed with a clear purpose: helping visitors take the next step with your business.
You can see your changes live as you make them, moving and adjusting elements until everything looks just right. The templates aren't just about looking good - they're structured to guide visitors toward taking action, whether that's signing up, buying, or reaching out to you.
You can get started with that by first creating a new Post in your WordPress dashboard, naming the post, creating and assigning it a specific post category type like “Review”, and then assigning the post the Theme Builder Template you just created.
Assigning your new post a Theme Builder Template can actually be done in one of two ways...
You can either find the “Theme Builder Templates” tab in the “Edit Post” dashboard and then select your new custom post template from the options dropdown:
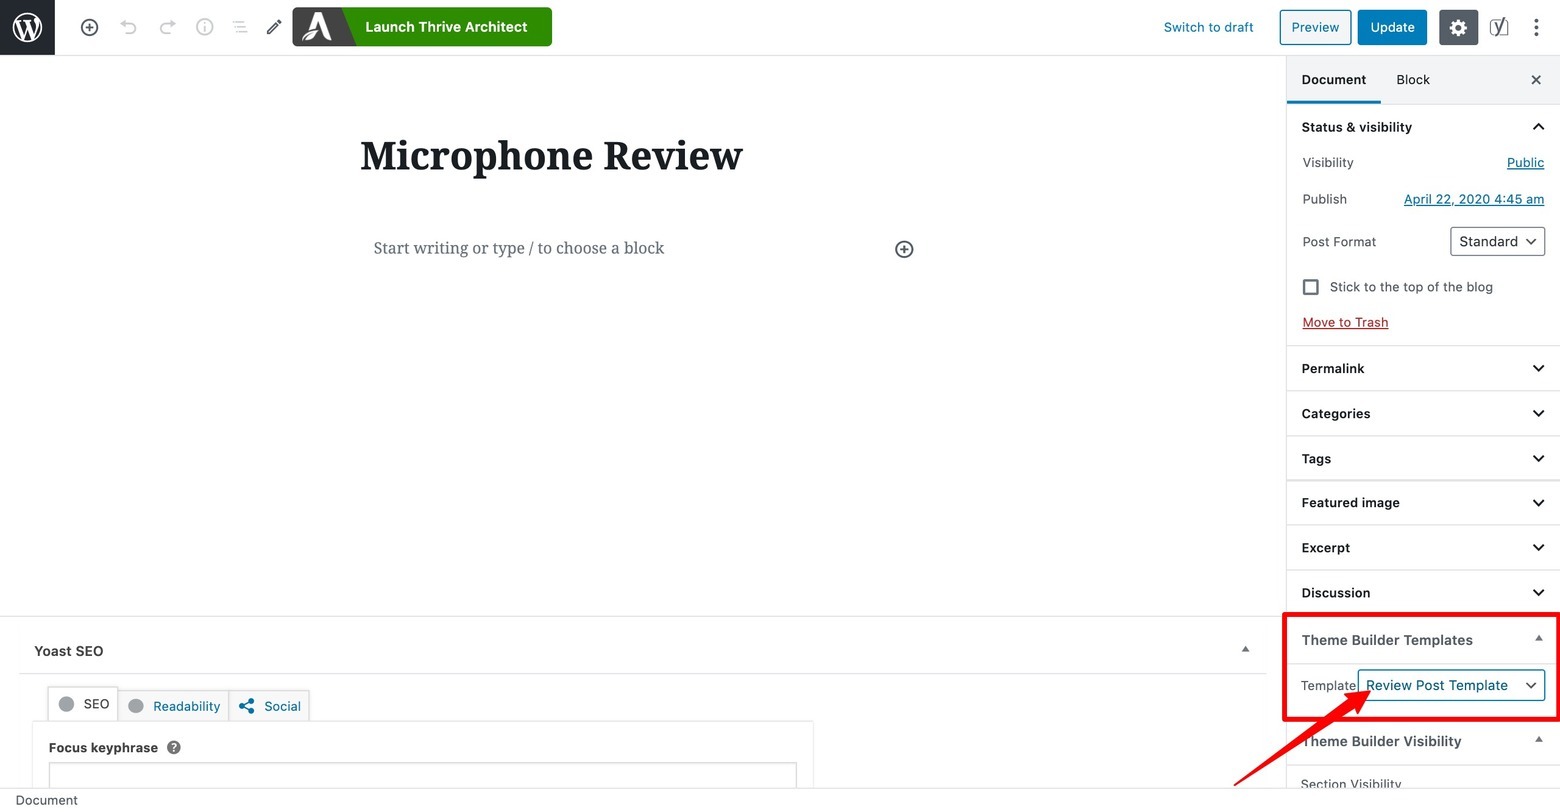
To apply your new Custom Post Template to a blog post, find the Theme Builder Templates tab whenever you create a new post and select your Custom Post Template name from the dropdown options.
Or alternatively, you can launch the post in Thrive Architect first and then apply the appropriate Theme Builder custom post template by clicking on the “Post” breadcrumb, clicking on the “Post Template Settings” tab that appears in the left sidebar, and then scrolling down to select the Custom Post Template option you created during Step 1:
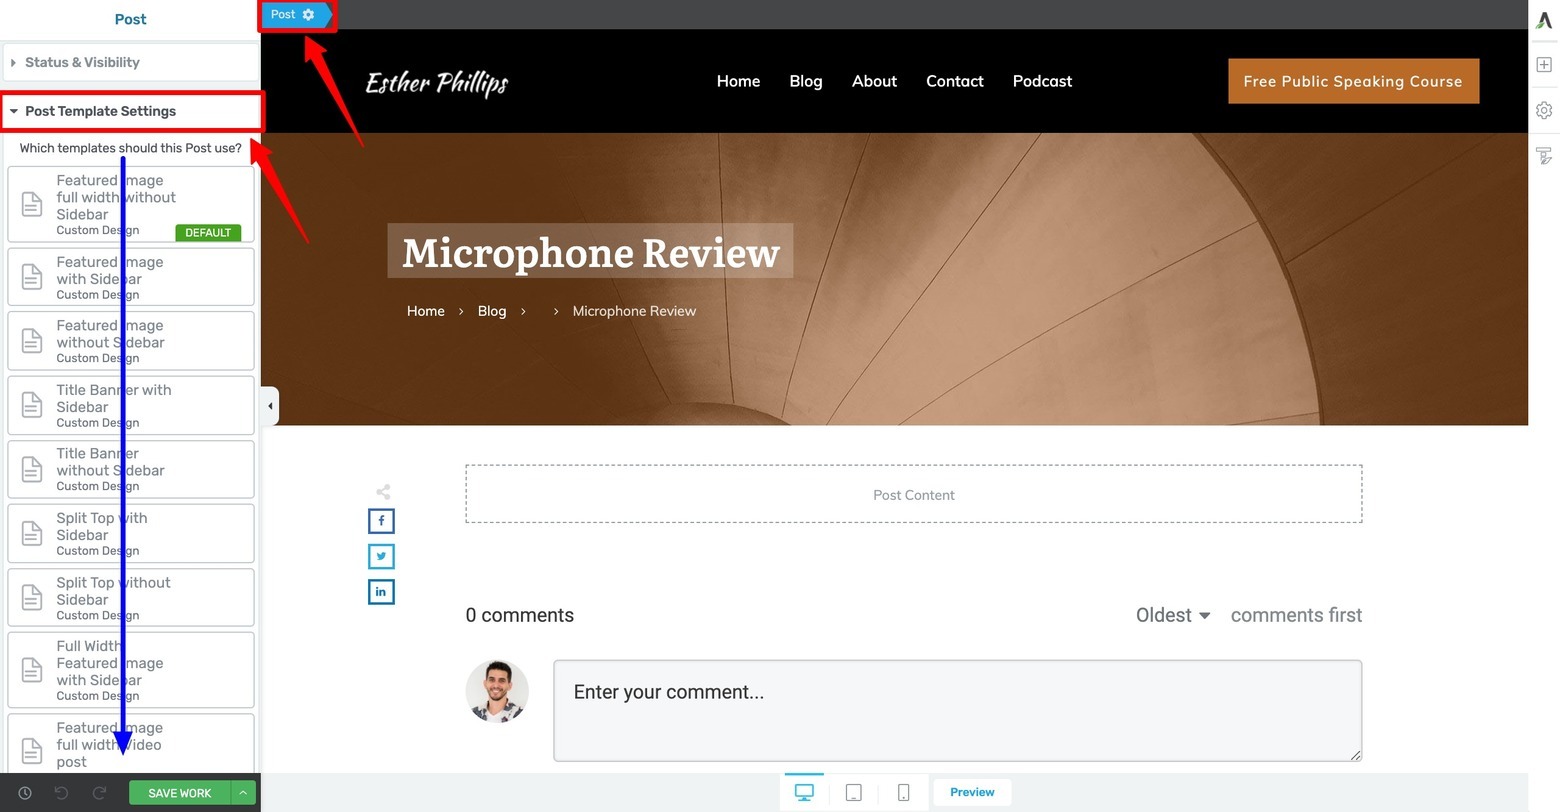
You can also assign your new Custom Post Template design within the Thrive Architect editor.
With the correct Custom Post Template loaded, let’s now create a quick content pattern for your review post.
The quickest and easiest way to do that is with the Content Block templates available inside Thrive Architect. To get started, drag & drop a Content Box element onto your Thrive Editor window first (this will be the parent element you end up saving as your content template in Step 3 shortly).
Then, drag & drop a Content Block element into your parent Content Box and then scroll through the templates that appear to find an appropriate one to begin your review post content pattern. You can even filter for “Product & Review” templates in the Content Blocks template library:
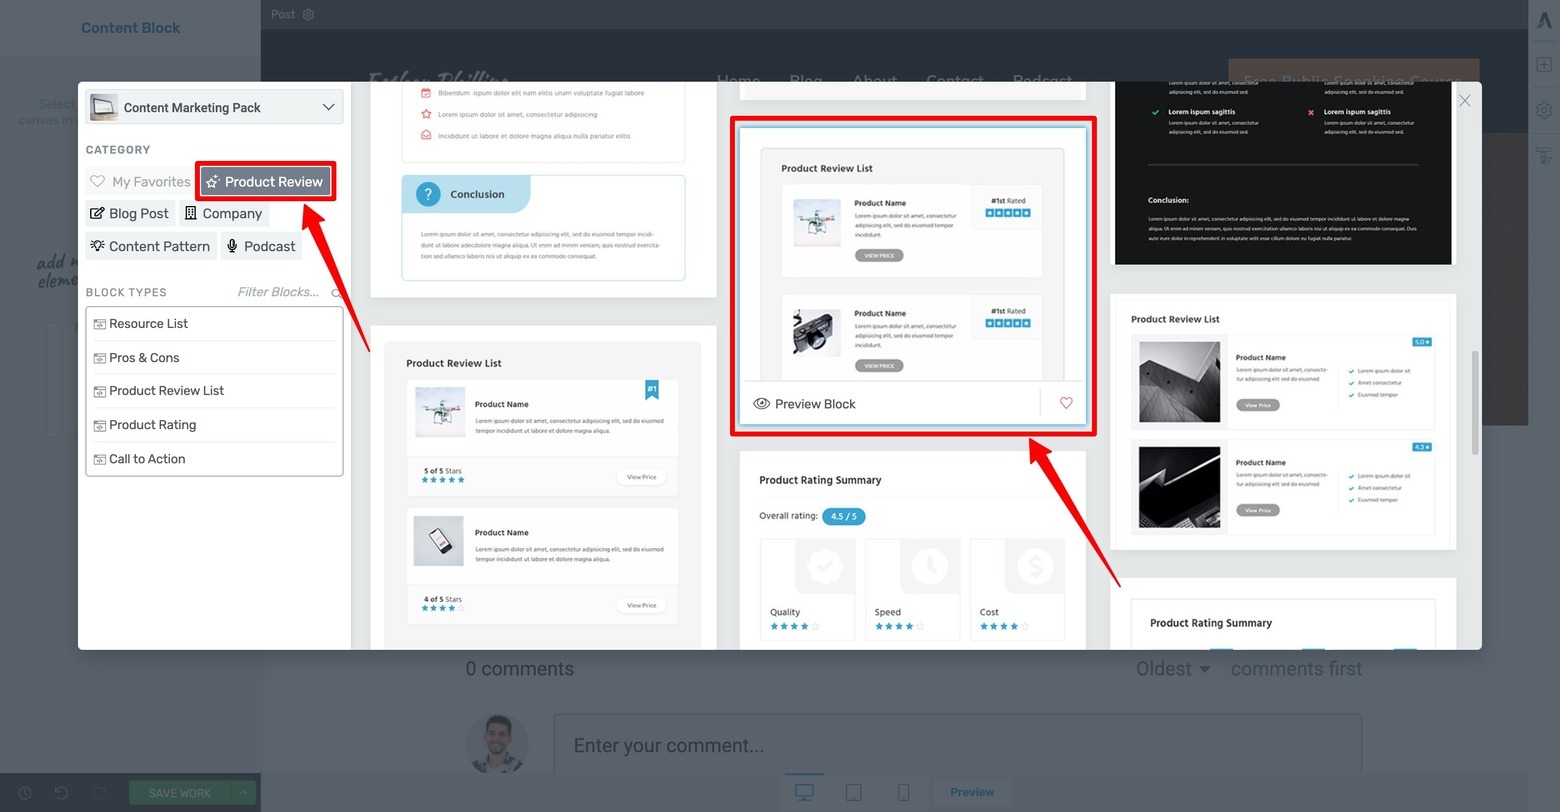
You can filter for specific types of Content Block element templates by clicking on either the Category or Block Types content filters in the left hand sidebar of the Content Blocks template library lightbox.
Not only does using Content Block templates in this way allow you to create pro-looking content patterns for specific types of content super quick, but modifying them for your unique needs is super efficient as well.
Just swap out the images, change the text and leverage the group editing technology available in the Content Block templates to make all the changes you need fast and hassle free. For example, when you change the Accent Color of your Content Block template, the color applies itself automatically to every design item in that template:
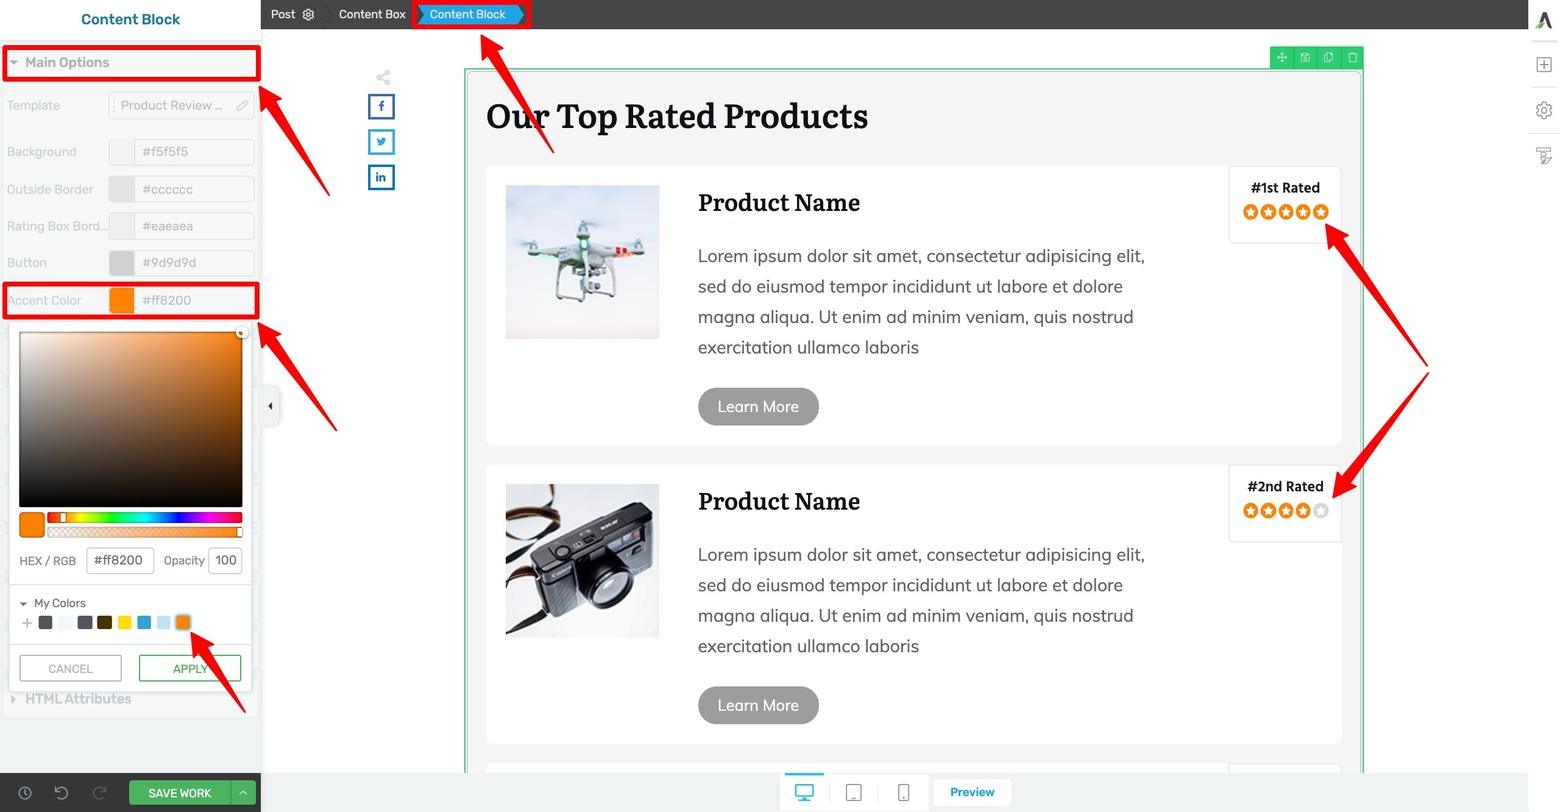
You can one-click update the accent color of your Content Block templates and see that change automatically update across all design elements within your template.
Continue this process by adding & modifying Content Block templates as necessary — as well as any other content you want your final content template to include — to finalize your review post content pattern.
We’re now ready for Step 3…
Step 3: Save your Content Pattern as a Content Template in Thrive Architect
There’s 2 ways for you to save your new review post content pattern as a content template in Thrive Architect.
This first way is — if you created your design inside a parent content box — to simply highlight the parent Content Box element in the Thrive Editor breadcrumbs and then click on the green disc icon that appears on screen:
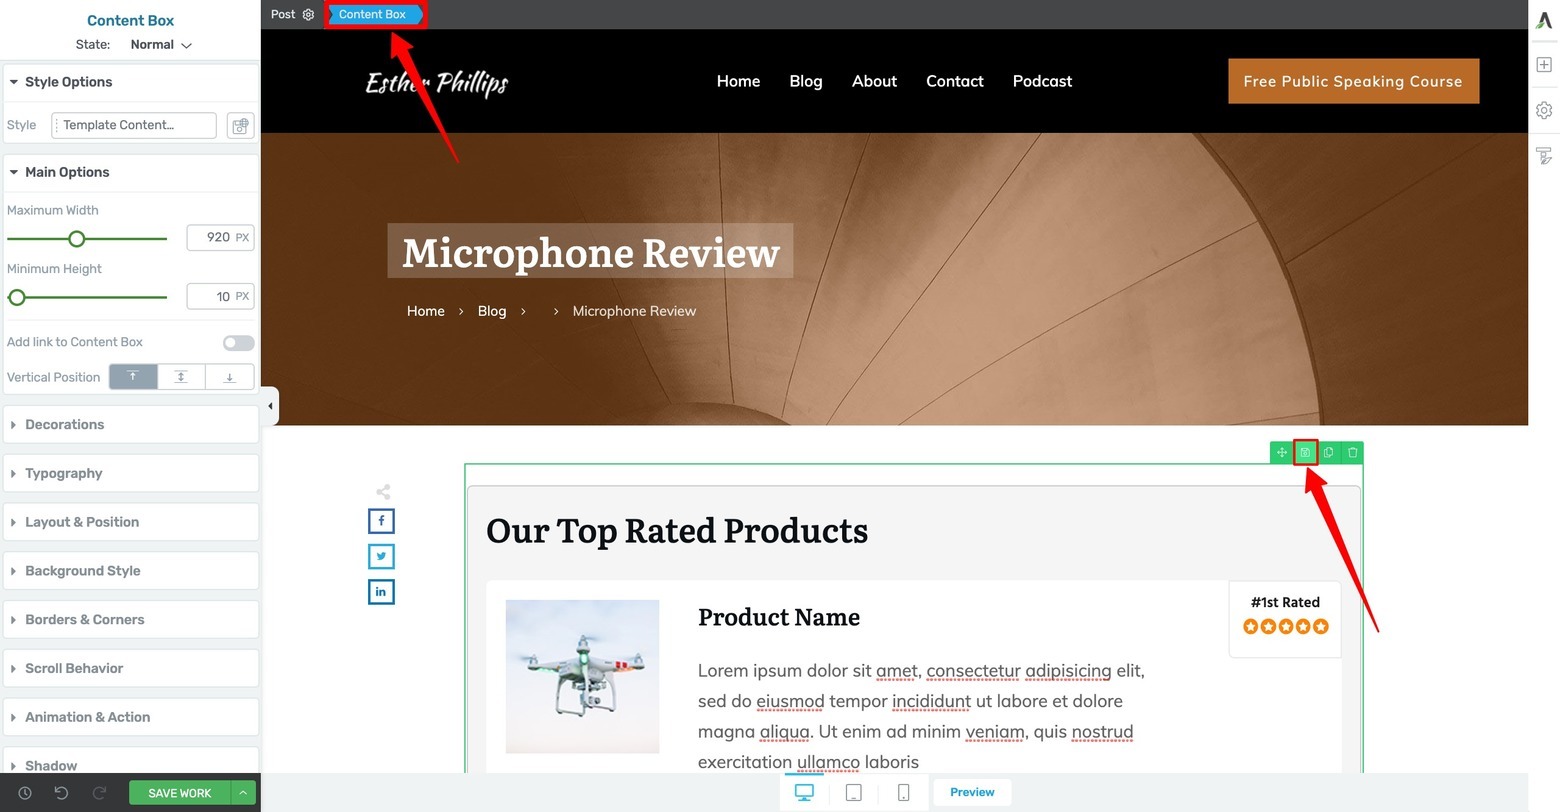
One way to save your new content pattern as a Content Template inside Thrive Architect is to make sure all your elements are included inside a parent Content Box element and then click on the disc icon that appears when that box is highlighted.
Alternatively — if you didn’t use the parent Content Box method — you can just click on the gear icon in the narrow right sidebar and then click on the “Save as Template” option that appears:
The other way to save your new content pattern as a Thrive Architect Content Template is to click on the right sidebar gear icon and then click the "Save as Template" option that appears.
In both cases, a lightbox will appear where you can name and save your Template for future use:
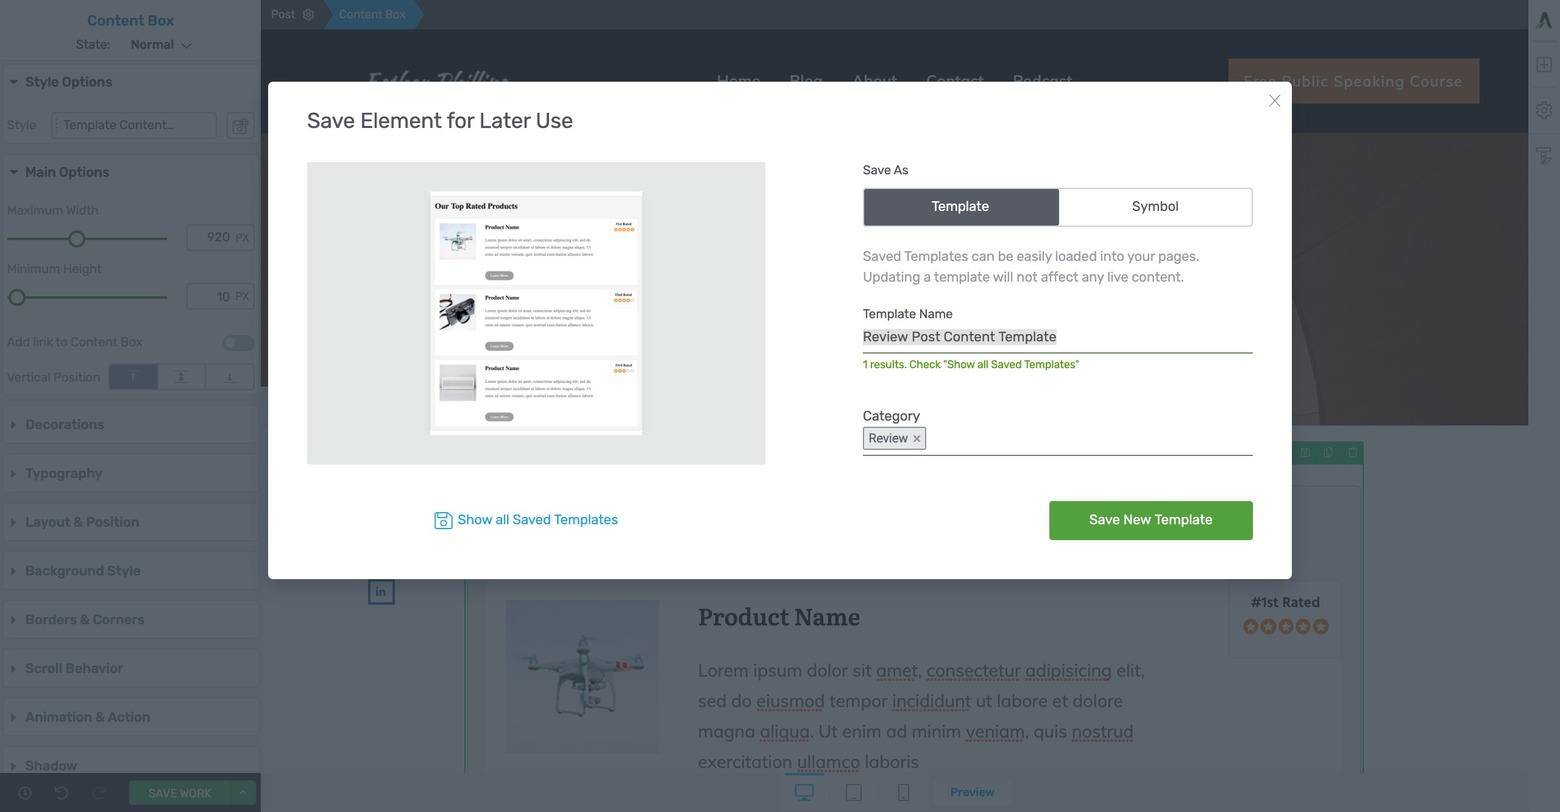
The "Save Element for Later Use" lightbox will appear when you click the disc icon so you can name your new Content Template and assign it a Content Template Category like "Review" (optional).
When you want to load this new content template, just drag & drop a Templates & Symbols element onto the Thrive Editor window from the right sidebar, click on the “Templates” type and then click on the saved content template you’re looking for:
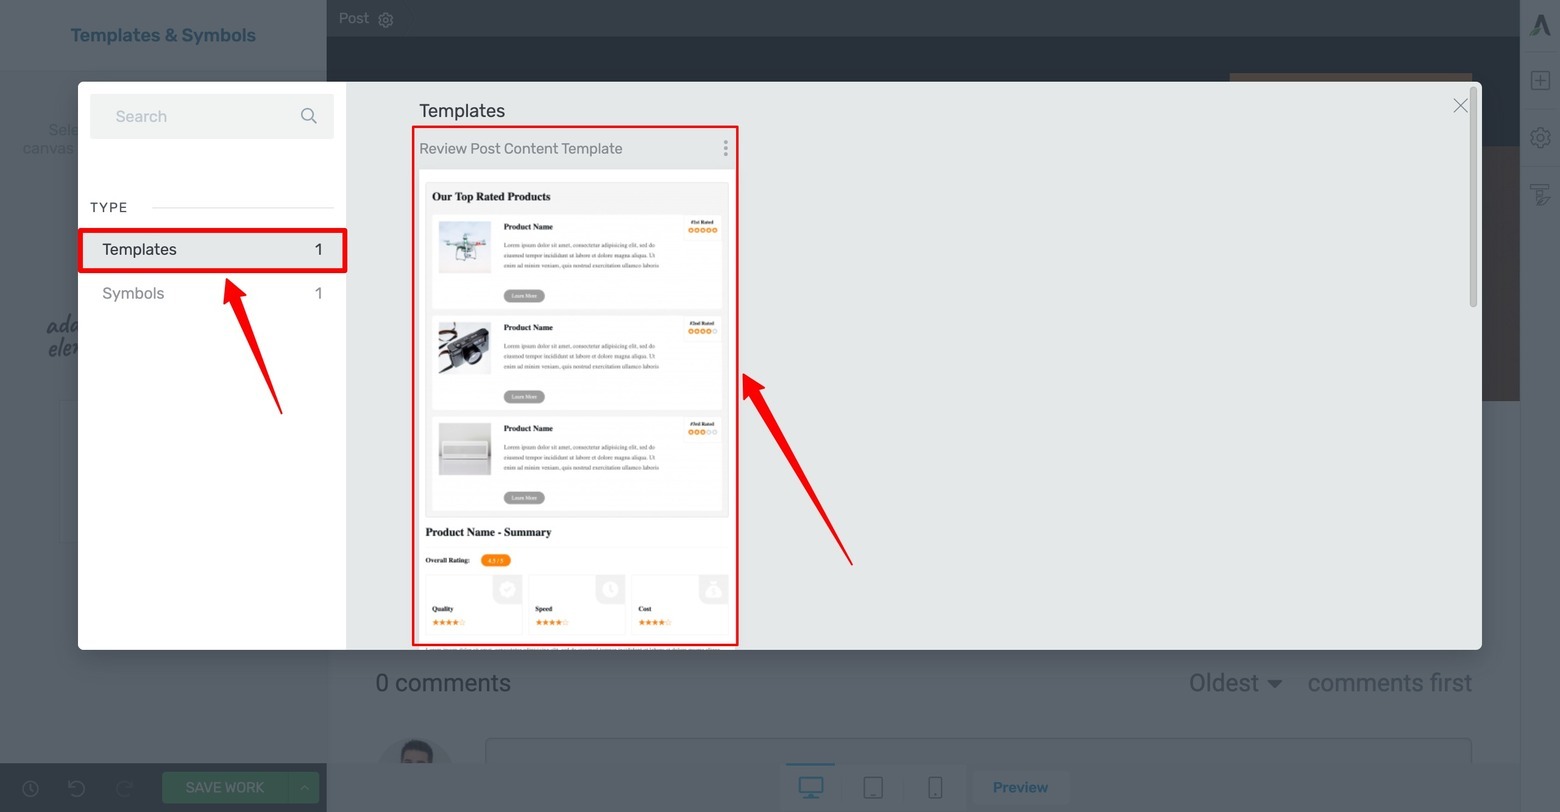
Whenever you want to use your new Content Template in Thrive Architect, just drag & drop the Templates & Symbols element onto your Thrive Editor window, select the "Templates" type in the left sidebar of the lightbox that appears and then scroll through your saved Content Template designs to find the one you're looking for.
From there, your saved content template will load within the content area of your post so you can quickly and efficiently modify the template to get your next review post ready to publish!
Step 4: Use Content Symbols to Keep Your Multi-Instance Content Synchronized
Similar to the content template step you just saw — but profoundly different in purpose — is our next step in the Better Content Faster process:
Using Content Symbols to keep your multi-instance content synchronized.
So what’s the big difference between Content Templates and Content Symbols in Thrive Architect? This…
Although you can deploy Content Templates on multiple places across your website, modifying any one Content Template only updates that specific instance of the template.
With Content Symbols however, modifying a single instance of a Symbol actually updates and synchronizes all instances of that Symbol — across your entire website.
So you see, the Content Symbol is an important tool within Thrive Architect that helps you keep multiple instances of a design element up-to-date without having to modify every single instance of a Symbol you deployed… a HUGE time savings!
For design elements you want to save a Symbol instead of a Template (a “Subscribe to my Podcast” call to action design for example), the process is very similar to previous Content Template step above.
Once your design element is ready to be saved, click on the parent breadcrumb in your Thrive Editor window:
To save a content design as a Symbol in Thrive Architect, highlight the parent element in the element breadcrumbs and click on the disc icon that appears.
In the lightbox that appears, click on the “Save as: Symbols” option, give it a name and assign it a Symbols category (optional):
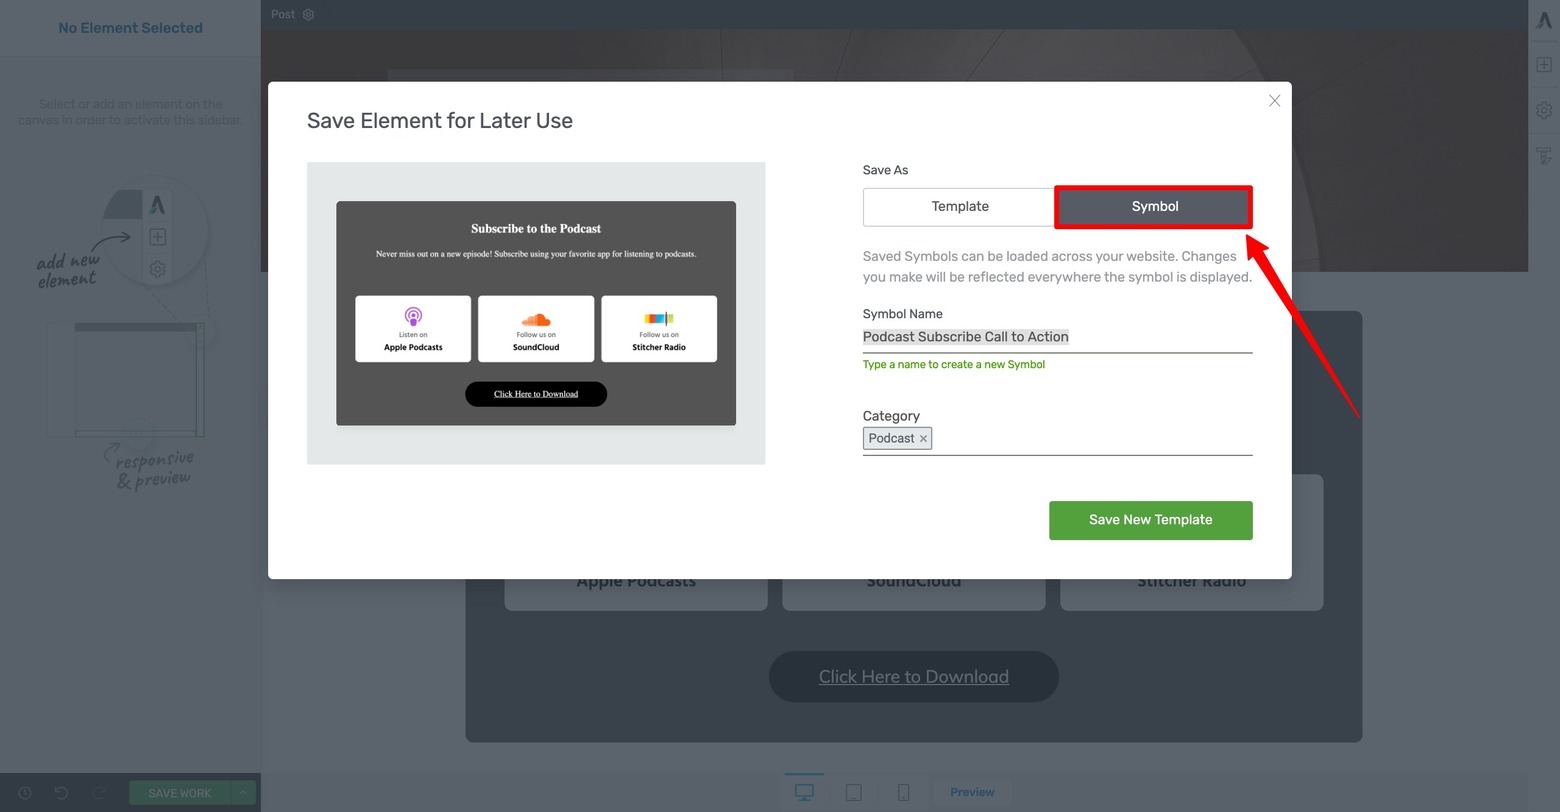
To save your content design as a Symbol in the "Save Element for Later Use" lightbox that appears, click on the "Symbols" button, give your new Symbol design a name and then assign it a Content Template category (optional).
Once that’s saved, you can load up your Content Symbol on any post or page of your website by simply dragging & dropping a Templates & Symbols element onto your Thrive Editor window, selecting the “Symbols” type in the lightbox that appears, and choosing the saved Symbol design you’re looking for:
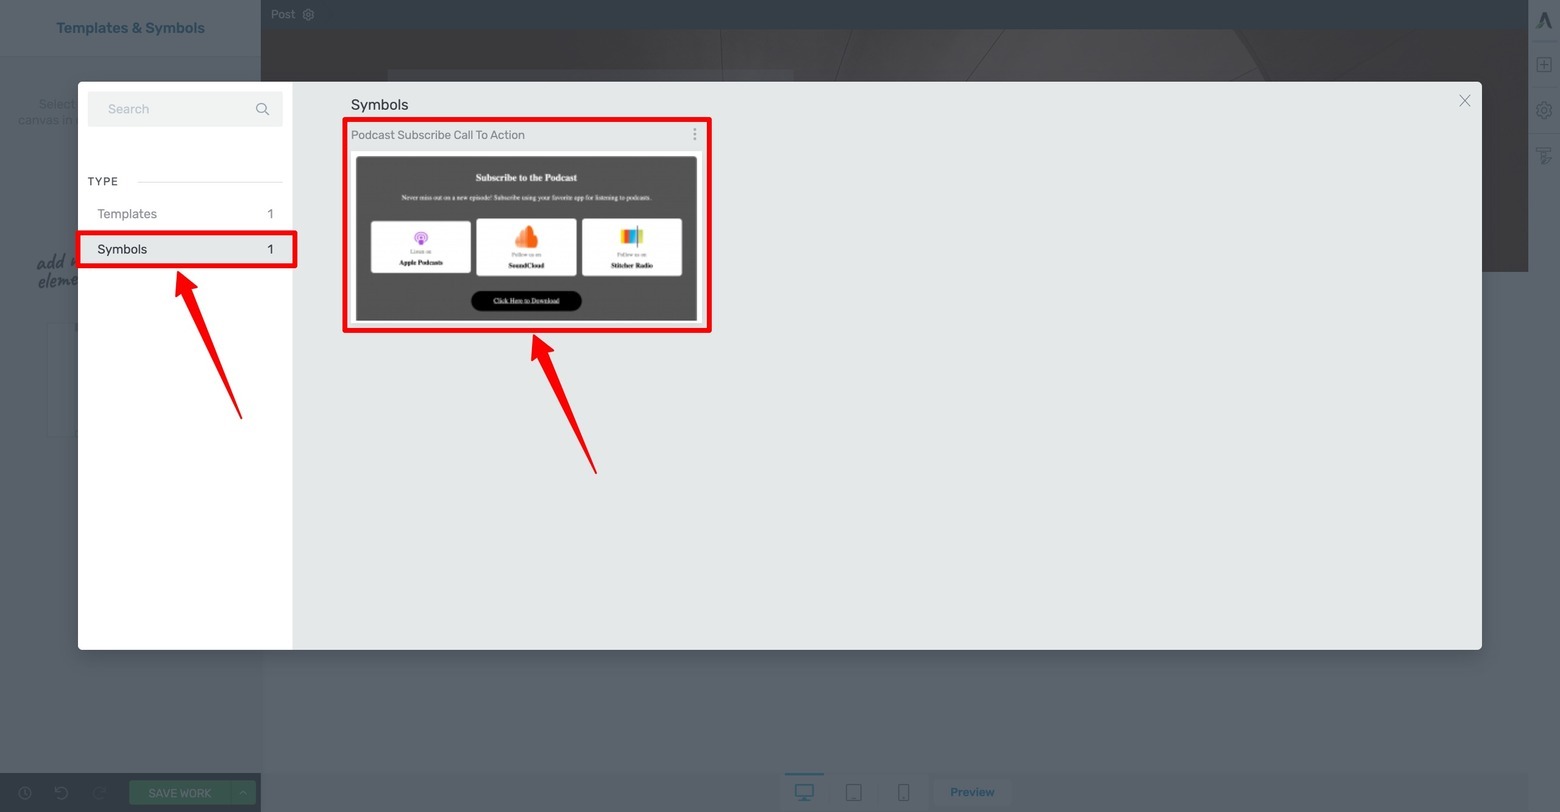
To load your Symbol design in Thrive Architect, drag & drop the Templates & Symbols element onto your Thrive Editor window, click on the "Symbols" type in the lightbox that appears, and then scroll through your saved Symbol designs to find the one you're looking for.
Just remember that any time you modify an instance of your Symbol, all instances of that Symbol on your website will instantly synchronize to match!
Now You Can Make Better Content —Faster
Ready to take what you learned in this post to improve your content, produce more of it — more often — and grow your email list at the same time?
Awesome... I guess it’s time for you to get to work then!
Just remember to follow the 4-step strategy we laid out for you using 2 of Thrive Themes’ most powerful tools and you’ll be publishing content like an online pro in no time.
And if you’ve got any questions about the content creation process or tools we showed here, make sure to leave us a comment below!


Good stuff! Any chance we’ll see an update to the content blocks to match the quality of the Page Blocks from landing pages? I feel like the breadth of options and designs are elevated significantly on the Page Blocks compared to content blocks, and the function of these two features is so similar in application.
Yeah we’re updating content blocks at the moment.
– Improving the usability of them
– Introducing smart colour technology so that the blocks will automatically match the brand of your Thrive Theme/landing page
– A number of new high-quality designs to really make your blog content engaging for visitors
Thanks for the comment Doug.
You made my week! Page blocks are such an integral part of my daily workflow for managing client sites and working on my own projects — I’ve saved HUNDREDS of hours already, particularly with TTB’s use of them. I can’t wait for a similar experience in my blogging workflow. Thanks, Paul!
Let’s dig a bit deeper if you wouldn’t mind..
– what kind of content blocks are you looking for?
– Are you going to be using them primarily for creating blog posts?
– What’s the main reason that you don’t use the existing content blocks – is it mainly because you don’t like design? Or is it due to function?
If you wouldn’t mind sharing your thoughts that would be greatly appreciated, Doug!
Absolutely.
TYPES OF BLOCKS
Since I use Page Blocks, lets me identify the ones I like and what I’d want from them. Most of these comments are based off of Shapeshift’s page blocks. There are plenty, but let me limit it to 5.
1. Text / Content Layouts – Pre-done content layouts that are aesthetically pleasing and match my TTB brand colors with a mix/match of dark/light and light/light designs.
2. List Content – Benefits / Features / Product highlights with icon or image that emphasize section.
3. Benefits & Features – Similar to the list content, but utilizing images placed in accentuated areas.
4. Illustrated List – Lends itself so nicely to a side to side back and forth content template.
PRIMARY USE – BLOGS
Yes, the primary use would absolutely be blogs. For myself, 90% of what I do on my own websites is blog article based. It’s how I drive the majority of my income. For my clients, I both encourage them to blog on their own, and if they are tech shy (most of them) I’ll implement their blogs for them. The common theme from clients is, “Give me a structure to follow” or “If I could just push a button and have the design done, then I could just cut and paste.”
SECONDARY USE – NORMAL PAGES
If I could use page Blocks within standard in-theme page templates rather than having to use a landing page, that would also be a tremendous help. Right now I’m using landing pages for actual in-theme pages just because of those Page Blocks.I’m having to add in the header and footer manually (which is way better with TTB, but it’s an extra step that feels disjointed and a bad UX). I’d rather only use Landing pages for my advertising campaigns and have these page blocks built right into Architect as I’m editing an in-theme page.
MAIN REASONS I DON’T USE CONTENT BLOCKS
The two main reasons are form and function. The interface for calling them up is fine, but they lack smart colors. The designs on the Page Blocks are simply 100x better, in my opinion. Layering of colors and elements, use of image placement, etc. There’s just a level of polish and “These are ready to use” that’s missing from Content Blocks. Content Blocks almost feel like wireframes that I have to adapt.
I hope that was helpful! I’m so passionate about the Page Blocks because of how this feature alone has helped my business grow (I’m not a designer) and save me time.
Thanks Matt. Very informative and helpful.
I have plenty to say and lots to write about in blog posts but my ‘brick wall’ is the actual post content pattern and my lacking in being ‘design savvy’. This tutorial goes someway in helping me through that. I’d like to see more of the same.
There are plenty of tutorials online about creating ‘Page Templates’ and ‘Archive Templates’ etc but very few on ‘Reusable Content Pattern Templates’.
Going forward, I’d therefore like to see more and more of these ‘user case’ tutorials on ‘reusable blog post content patterns’ and how we can best utilise the existing (and any new) content blocks to make the ‘content area’ of a blog post more pleasing and different to the generic looking ‘wall of text broken up with an image’ type of posts that we have all become accustomed to.
Blog posts are the meat and potatoes of most websites yet the use of a content pattern and how to create one is under taught.
There are lots of elements/blocks (if that is the correct terminology) that we can drop into a content pattern so perhaps more tutorials that demonstrate the use of those elements, such as accordion and tabs and faq blocks etc., to help us present the information in a different/better way.
Tutorials on how to create our own elements/blocks or how to adapt those that exist would be good too.
How do we/can we incorporate/combine multiple elements within the blog content pattern? i.e. An accordion that uses star ratings or a tab with an image or video dropped inside it. These are the things that I’d like to see more tutorials about.
Hope that makes sense.
Thanks for your comment Jonah as well as your “Content Pattern from Scratch” tutorial suggestions. Like you said, content pattern tutorials for different online business use cases is under-taught and something we could definitely champion here at Thrive Themes with the many features and templates we’ve built into Thrive Theme Builder and Thrive Architect. Keep watching this space because we’ll definitely have more content like you suggest to come!
Thanks Matt. Looking forward to learning more. I’d also add that there is great benefit gained by producing such tutorials.
Firstly, more in depth video tutorials allow Thrive Themes to showcase theses specific functions and features in a much better way and in doing so also helps us to grasp what we can actually do and achieve, particularly for those of us who are not necessarily designers or who may be lacking in the creativity and tech department. Hand holding is good for business and visitor/reader retention.
Secondly, many of your tutorials (and those from the team) often provide that initial ‘AWARENESS’ of a particular feature or function. With so many ‘hidden’ features and functions it can be difficult to grasp what is actually available and possible unless it is made more obvious and understandable.
Finally, don’t assume that just because a particular feature/function has been provided that everyone coming here knows what it is or how to utilise/adapt it. Hold my hand and I’ll keep coming back for more.
Great but I wonder when thrive theme will be available for the public cause I have thrive architect plugin I don’t have enough money the membership. I really love to get thrive theme to combine it with thrive architect. Can I get it?
Watch this space for an announcement on that soon Genel!
Thanks Matt for sharing such a great informative post.
Right now, I switch my theme to Thrive Theme Builder and it is a great theme. I think I dont need to hire a developer again to do some changes on my site. So, thank you very much that you have build a great theme.
My only concern right now is I have to edit all of my post because I have two – three templates. For example, one with sidebar and one without sidebar. I will love more the TTB if you can lock the template with the category of post. So, each category have each template. So it will save my time very much.
Sorry for my bad English.
Thanks for the suggestion Randika!
Thanks Matt for sharing such a great informative post.
This is just what I needed to better utilize the Thrive Theme Builder for various posts. Thank you for continuing to provide awesome, actionable content.
You’re welcome Maria!
Hey Matt, Thanks for sharing this informative blog with us.