FREE VIDEO SERIES
How to Launch an Online Business From Scratch >>
How to Launch an Online Business From Scratch >>
The Beginners Guide to Starting an Online Business
Chapter 6:
How to Launch an Online Course: Unique Tactics That Work

Online Business Launch Strategy Series

Get access to the free 3-part video series to start your own online business.
In this chapter, we're going to talk about marketing your online course launch.
In case it wasn’t 100% clear so far, simply making a product and expecting it to sell on its own is doomed to fail. Instead, you’ll need to grow an audience and eventually launch an online course product.
This is an event that requires synchronized marketing, timed emails and specific messaging all to get your first influx of customers queuing up to pay for your course when it first becomes available.
"Can I launch with a small mailing list?"
At this point, you might be thinking “What if my audience is really small?”
Your audience is the mailing list you’ve grown, and any social media networks you’ve built. It’s the people who know you and that you can reach with ease.
Yes, the size of your audience will have a direct impact on the amount of sales you make when you launch your online course. However, we know that it’s unlikely you have a sizable audience yet. So we’ve got a few tricks up our sleeves to help you reach a much wider audience despite your low profile.
When you get Thrive Suite for Course Creators, you have access to Thrive University, our very own online school for course creation, marketing and more. Here, you’ll learn all about the ‘Zero Audience Launch Method’ that is essential if you’re starting from scratch.
The good news is that your launch won’t be anything like Tim Cook taking the stage for an Apple product launch. You’ll be able to do everything you need from the comfort of your laptop.
But it won’t be easy, per se.
To figure out how to launch an online course, you’re going to need a culmination of strategy, marketing, and hard work. And if you are willing to do all of it with commitment to your plan, your launch strategy will pay dividends.
You can walk away with an influx of new customers in a short amount of time that will jumpstart your online course business with:
Oh, and one more big thing...
It’s not unheard of for online course creators to make tens of thousands of dollars in mere days during a course launch. Online courses can even make $100K+, though usually these are people who have a pre-existing audience they can leverage or a mailing list they've been growing for years before creating their course.
However, for every successful course launch, there's another one that falls flat on its back. But that doesn’t mean success is a game of chance.
Most online course launches that fail are failing for the same reason: the marketing was inadequate.
You’ll need to grow an audience rapidly in preparation for selling your first product, nurture your leads, and then execute a well-thought-out launch plan.
The way you handle your online course launch will shape both your brand and your business’ future, so it's undoubtedly one of those ‘make or break’ moments. Haphazardly throwing together “buy my new course” messaging won’t cut it.
So let’s get you started preparing for your first online course launch.
In this chapter, we’ll address 4 main areas of a successful course launch:
- 1Creating a High-Converting Sales Funnel
- 2Motivating Customers to Enroll Now
- 3Coordinating Email Marketing That Drives People to Buy
- 4Leveraging Other Audiences to Reach More People
1. Sales Funnel Basics to Launch an Online Course:
No matter the size of your audience, what marketing strategies you use, or what your online course is about, all of your potential customers must go through one bottle neck:
This single page on your website is responsible for your income. It’s the page that persuades your visitors that your course is the right product, and encourages them to take that leap with their credit cards.
But what happens next? When your customers decide to buy, how does all of your technology connect together to ensure a seamless transaction experience?
That would be the responsibility of your sales funnel.
A sales funnel is the name given to the combined steps a visitor moves through while purchasing your product. It can be as simple as a few connected web pages that a customer will move through, or as complicated as having conditional logic with upsells, downsells and crossells based on purchase behavior.
Since you are starting an online business, your first sales funnel should be very simple:
1. Sales Page
Where visitors learn about your product and the price.
2. Registration + Checkout
Where visitors create a student account and enter payment information.
3. Thank You Page
Where students are welcomed and thanked for their purchase.
This is a perfectly adequate sales funnel for your first online course. Now let’s go through the basic requirements for your sales funnel:
The Buy Now Button
On your page, you’ll have a ‘buy now’ button, most likely with text that says something like ‘click here to enroll’. This button links to your checkout.
Some online course creators will offer different pricing tiers on their sales page. This means that visitors can pay different prices for different packages: the more they pay, the more they get.
For example, you may have a basic pricing tier for $197 that only has the core course, and a premium tier for $297 that includes all of your bonuses.
Depending on your setup, you may also want to offer payment plans where the upfront cost is reduced, but the customer will be re-billed a number of times until their full payment is complete.
Although offering different pricing options on your sales page is as easy as dragging & dropping a button element with Thrive Architect, there’s a better option:
Pricing Tables
The Pricing Table element in Thrive Architect comes preloaded with 22 unique templates that you can load with a click. And of course, everything you see is fully front-end editable:
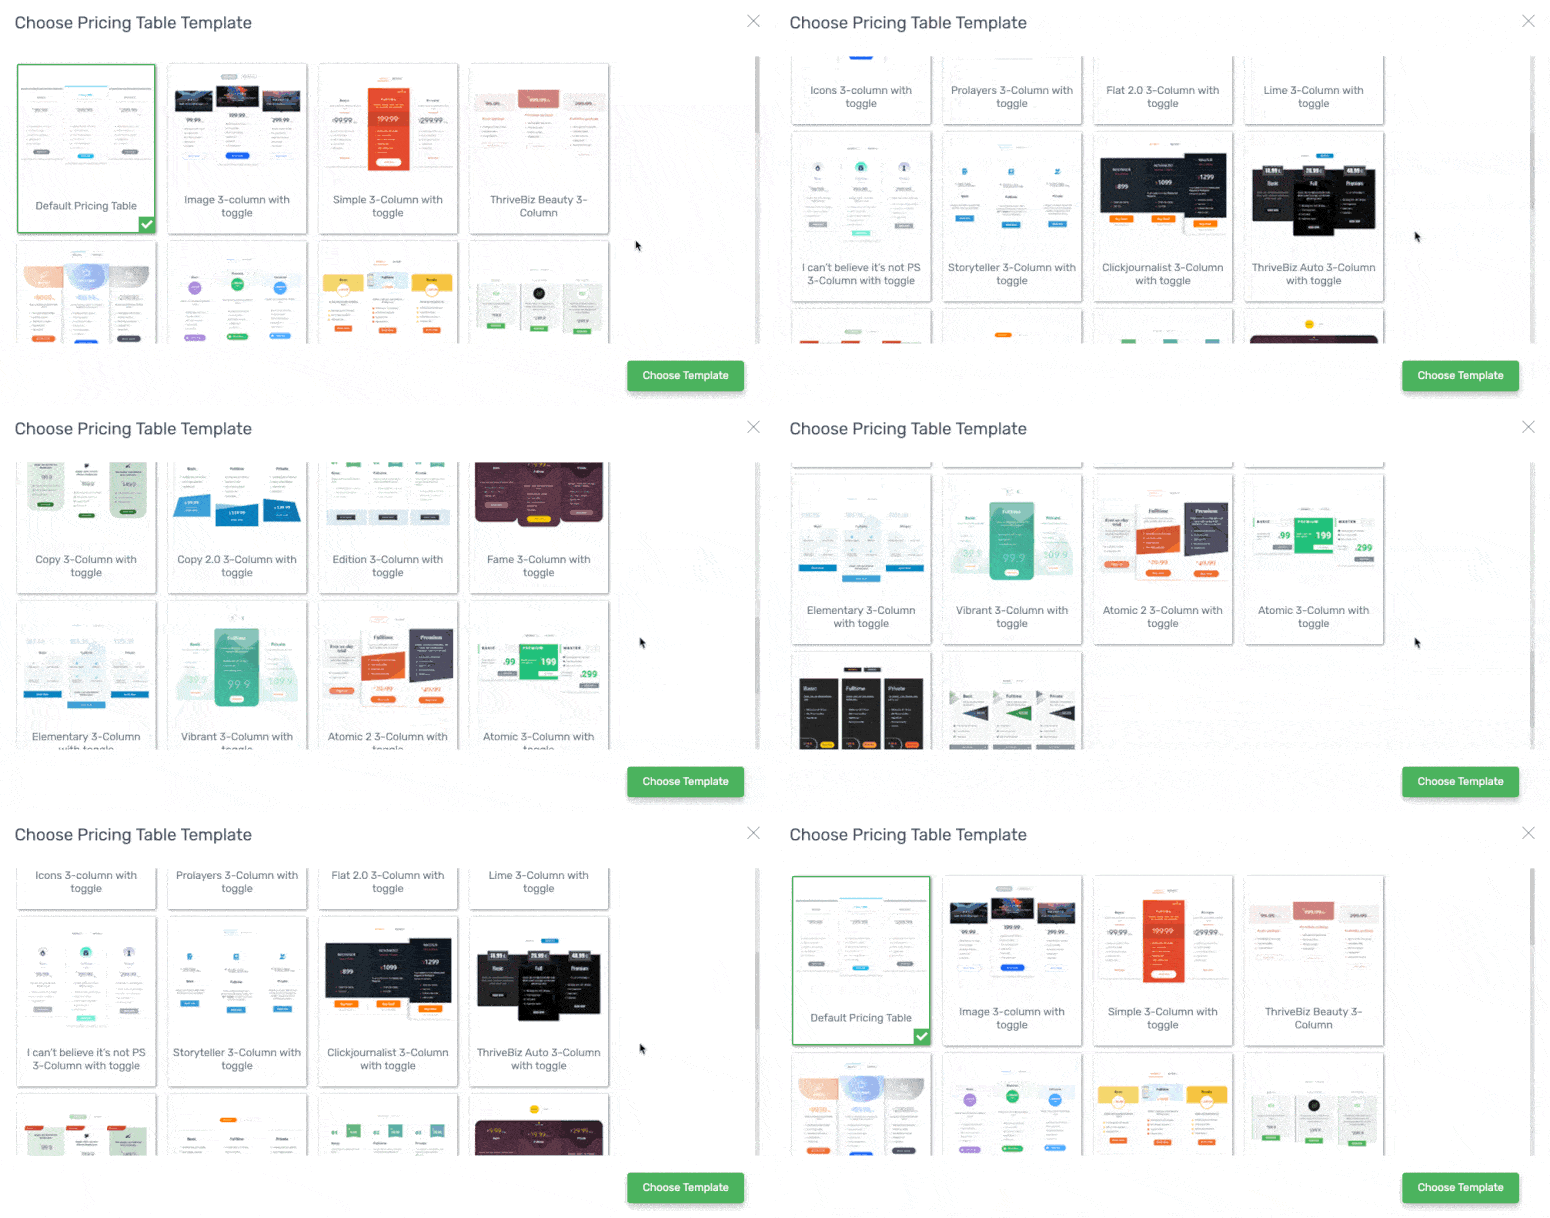
Look at all those beautiful Pricing Tables to choose from!
Want to see what they look like when they're loaded on the page?
The following is an example Pricing Table template that we’ve dragged & dropped onto the page. We've only entered some placeholder text, but make sure you click the instance switch (the one that says 'one-time fee' and 'monthly') to see how it works:
Example Pricing Table
Core online course
$
99
Popular
Advanced Example
Course + coaching + bonuses
$149.99
Second Set of Prices
Simple, fast and effective flexible move
$
25
x 4 monthly
payments
Popular
Second Set of Prices
Creative working space, not noisy, fully equipped and convenient
$25
x 6 monthly
payments
On a pricing table, the ‘buy now’ button will link to a different product inside your payment tool (such as ThriveCart, WooCommerce or SendOwl) and drive the visitor straight to the checkout for that product.
There is no need to include an ‘add to cart’ step here. People don’t shop for online courses like they do for food in a grocery store. Including an ‘add to cart’ is known to be a conversion killer, since it adds a confusing extra step before the customer can hand over their money.
It’s preferable to take a visitor straight to a streamlined checkout page the moment they click ‘buy now’. Any delay or confusion could lead to distraction and lose the sale.
The Checkout
There are 3 ways your checkout button can operate:
- 1Link to another page on your website: this is the page a visitor will enter their payment information on.
- 2Link to a page on a different external website: you might use a payment processor that exists outside of your WordPress website and need to direct customers there. In this case, you’ll have a checkout page URL for the correct product on your account with that external tool.
- 3Modal Popup: this is when a small box pops up over the top of your sales page when the customer clicks ‘buy now’, and displays the credit card information fields for customers to pay without leaving that page.
In any of these cases, your ‘buy now’ button will have a URL link that includes information about the matching product. It might look something like this:
https://yourdomain.com/checkout/product-1-discounted/
When using Thrive Architect, you can select any button on your sales page and easily link the correct URL within the button link field:
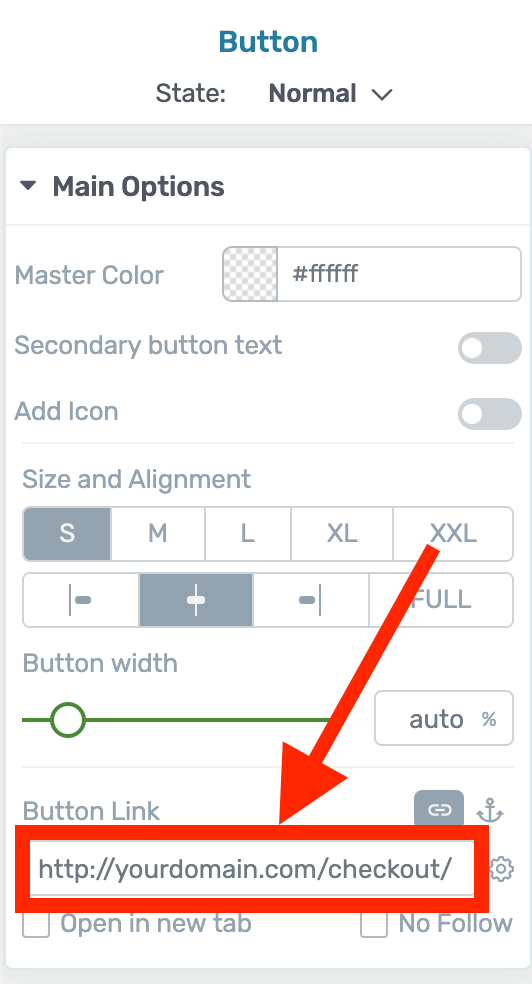
Drop your product link here
Different products often require using a different URL, which you'll need to link to via your buy buttons. This requirement also applies to different pricing tiers for the same product, so make sure you've got the right link on the right button before publishing.
Then, simply by clicking that link, customers will be directed to a checkout with the correct product and price already in their cart. All they need to do is fill out their information and voila!
Purchase complete.
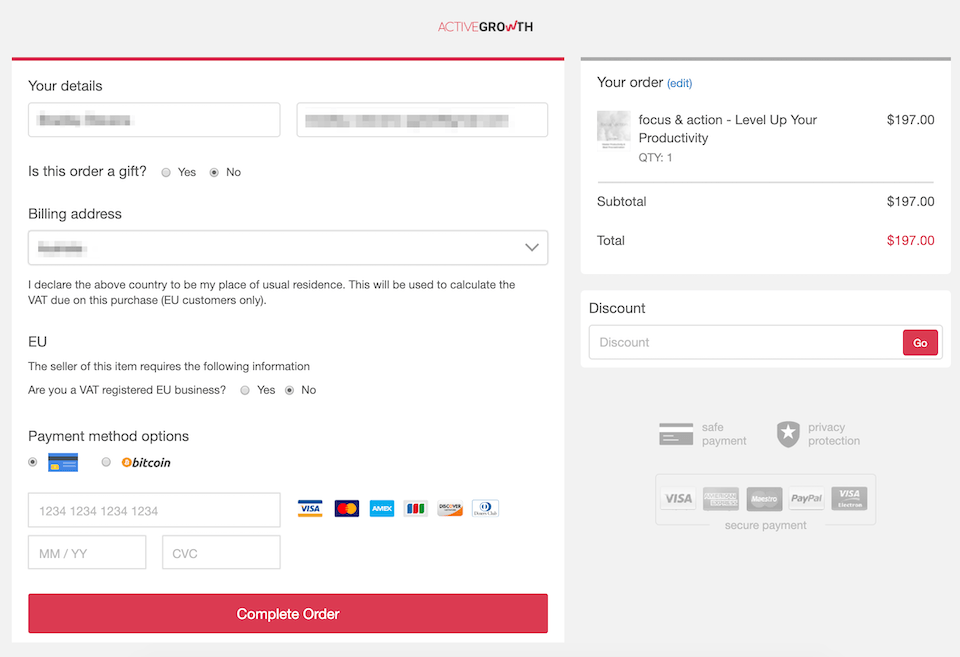
Here is an example Checkout Page created with Send Owl and Thrive Apprentice.
The Thank You Page
After a visitor enters their payment information and completes their purchase, your checkout tool will redirect the visitor to a page of your choosing. Of course, you want this to be your thank you page.
Your thank you page needs to feel welcoming and comforting. After all, your customer just transferred a sum of cash into your account so it's important to make sure they feel taken care of.
You can set up this page in Thrive Automator which will link your online course, payment pages and emails together seamlessly for your lead generation campaign.
A thank you page should describe the next steps they to take, such as:
But there’s another vital marketing purpose to your thank you page: your tracking scripts.
This is more of an advanced marketing tool, but essentially, a tracking script identifies a visitor to your thank you page as someone who has just completed a purchase. When that page loads, the script ‘fires’, which can be set up to do all sorts of things.
The most common use for a tracking script is to register a conversion. So if 50 people arrive at your sales page and 10 of those people proceed through to your thank you page (thus triggering your tracking script), your website software automatically knows that those 10 visitors purchased, and calculates a conversion rate of 20% for you.
But you don’t need to worry about tracking scripts right now. You can have a successful launch without understanding this and introduce it later as your business grows.
Now that we’ve covered the function of your page, let’s make sure you’re driving people to click that all-important ‘buy now’ button!
2. Motivating Your Customers to Enroll Now
As a solopreneur and course creator, you are your own marketing department. That means it's your job to communicate the value of your course to anyone who might be interested.
Don’t make the mistake of dismissing a potential customer with:
“Oh, they’re just not ready to buy yet”.
Do you know what makes a customer feel ready to buy?
You.
Think about it. If you received a one-off email from a complete stranger that says “Buy this thing!”What are you going to do? You’ll rush to mark it as spam and then quickly forget about it.
When navigating how to launch an online course, you have to strike a careful balance between demanding attention whilst also connecting authentically with your customers.
Now imagine you receive an email from someone you're familiar with, someone whose emails are so valuable that you eagerly open each one, someone who you know, who you like, and someone who you trust…
...you’ll get very different reactions to your product launches when that's the case.
Your marketing is what takes someone from vaguely interested to purchase-ready.
Ready means providing huge value up-front. Ready means having great emails that prime your audience before they even know about your product. Ready means answering all of their questions on your sales page.
Or more simply:
Ready means that if your product is right for them, they have no reason not to buy.
You have to take responsibility for your own marketing.
The #1 Driver Of Conversions: Scarcity
In your marketing efforts, your goal is to motivate potential customers to buy your online course. But you’re up against a world of digital distractions, online noise and laziness.
Even if your course is the perfect solution to a customer’s problem, you’ll need to answer the most common customer question: “Why don’t I just buy this later?”
To that question we respond with scarcity.
Scarcity marketing is anything you do that limits the opportunity to join your course… meaning potential customers really can miss out on something.
There are 3 main types of scarcity, and they look something like this:
“Sign up now or else…”
- You’ll miss out on a huge discount
- You won’t get the special bonuses
- You can’t join the course after it closes
Scarcity is invaluable for a product launch since no-one else has taken your course yet and potential customers can’t scour for reviews or testimonials.
Let’s look at your 3 options:
3 Scenarios That Create Real Scarcity
1.
Scarcity Option 1: Launch Discount
This is the easiest scarcity strategy and the one we recommend when you launch your course for the first time. Simply slash the price of your product by 50% during a limited launch window. Your launch window should be anything from 5 to 14 days. If people buy during this time, they get your online course at half the price of what you will later sell it for (after the launch window ends). This is your way of rewarding customers for jumping in early.
2.
Scarcity Option 2: Special Bonuses
Is there any bonus material you can offer only to people who sign up now? It could be special access to a webinar, supplementary lessons, an eBook or digital download, etc.
The goal is to make it clear that this bonus will no longer be available for customers after the special launch window has closed. Offering special bonuses allows you to keep your price consistent whilst incentivizing customers early.
3.
Scarcity Option 3: Closing the Course
This strategy is popular among higher priced courses, and for good reason. Even when you offer a discount, visitors know they can still enroll in the course later. But by completely closing the course, you lock a visitor out from buying it all together. That’s a strong motivator to take action during the launch window.
High-price courses often use the open/closed setup since their course creators usually provide direct support or additional coaching to students. Because this “hands on” additional value can be so time consuming, the course creator needs to prepare a schedule that allows them to put in extra work soon after the course opens.
The scarcity here is crystal clear: “Buy now… or you miss out entirely!”
How to Set Up Your Scarcity Launch Window
It’s important that your potential customers know exactly how long they have until your special offer ends. For this, you’ll use a countdown timer that will look something like this:

An example Thrive Architect countdown timer in action
The animation of the ticking timer is sure to get your visitors’ attention and help them realize that this is a special limited offer. It’s impossible to look at a timer and not wonder what happens when it gets to zero.
The Manual Way:
You can set up your countdown timer manually on your sales or landing page. If you’re using Thrive Architect, you can drag-and-drop the countdown timer element into the visual editor window and then set it to your desired finish date and time. When it gets to zero, you’ll have to either manually change the price of your product or unpublish the page.
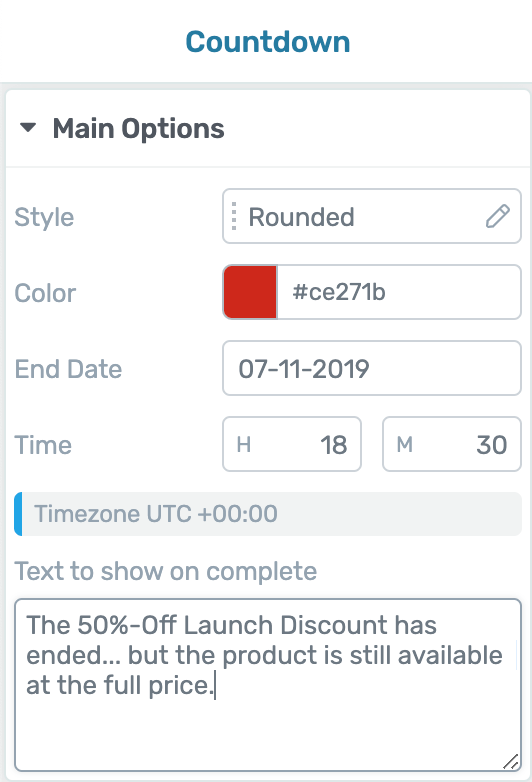
Thrive Architect timer settings
The Super-Powered, Automated Way:
Since scarcity is such a powerful marketing tool, we have a Scarcity plugin called Thrive Ultimatum and it’s perfect for launching an online course.
In Thrive Ultimatum, you can create a timeline for your launch window (such as 10 days) and set events that will trigger at given moments during or at the end of your course launch. This means you can add a new banner or ribbon to your website after Day 4, or have your countdown timer change from blue to a dramatic red two days before it hits zero.
Here’s a quick rundown of how to use Thrive Ultimatum for your online course launch:
Step 1:
Create a page inside your WordPress website that should show outside of your launch window.
If you’re going to close your course after the launch, you simply need a “course closed page”. We recommend setting up an opt-in form on your course closed page so interested visitors can join your mailing list outside of your course launch window.
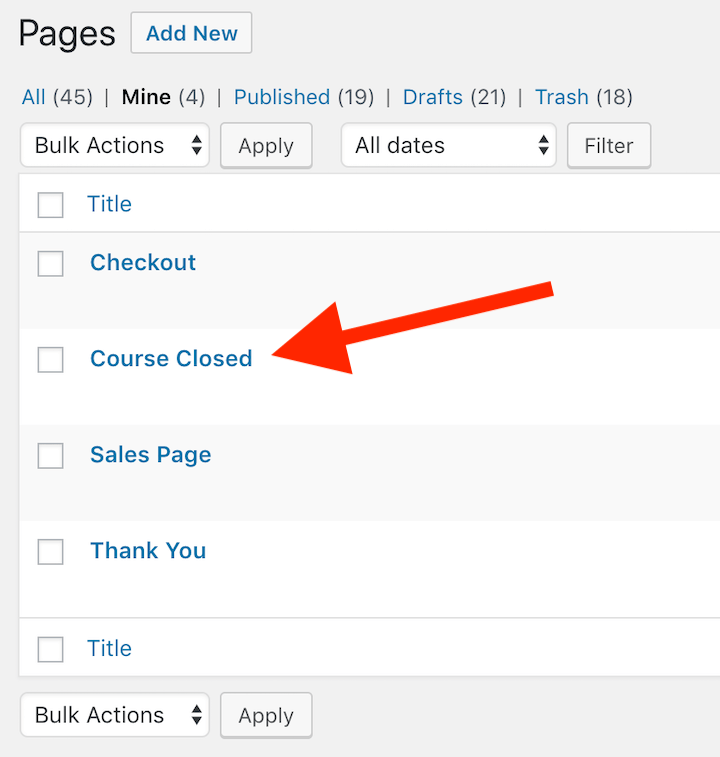
This is the page that will show outside of your campaign
If you’re offering a 50% discount instead, then you can simply duplicate your sales page and set the text and pricing buttons to the full price that people will pay after your launch window. That means you’ll end up with two sales pages: one at a discount, and one at full price.
Step 2:
Set your campaign dates. To launch your course, you’ll want to use the ‘fixed dates’ campaign option in Thrive Ultimatum and enter the date your launch window opens and closes.
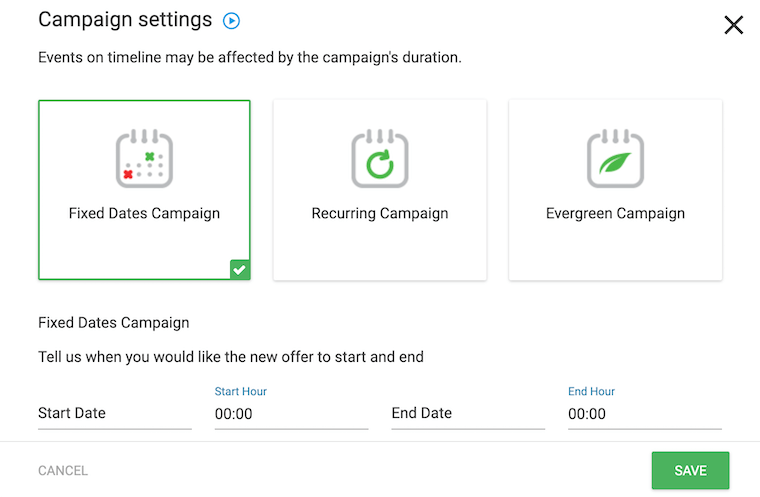
The 3 different types of scarcity campaigns in Thrive Ultimatum
Now you can set the campaign to ‘lockdown’. That means any visitors arriving on your page outside of the launch window will automatically be redirected to your secondary page, preventing them from accessing your discount.
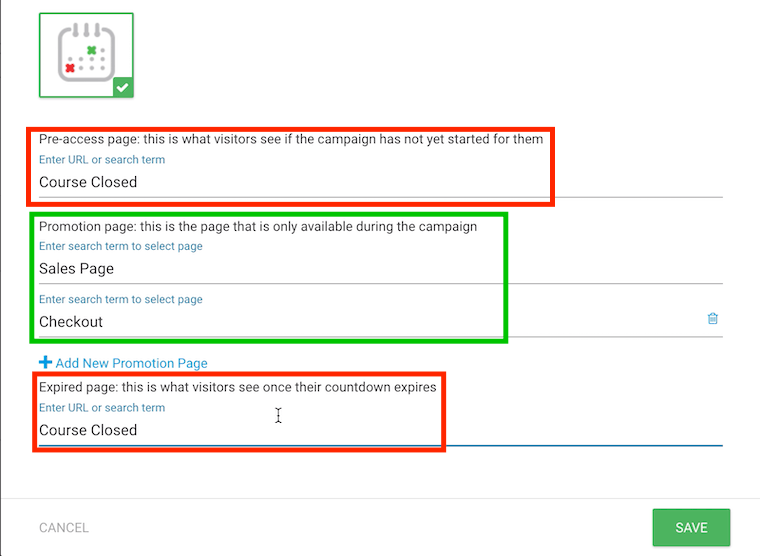
In green: the pages only available before the countdown ends.
In this example screenshot, we’ve set the ‘course closed’ page as it will be seen if someone tries to visit your website before or after your launch. We’ve also set its corresponding ‘checkout’ page to only be available during the campaign window too.
It’s easier if we show rather than tell you how this works, so check out this video to learn how you can set it up for yourself:
Step 3:
Now you can design your countdown timers. There are a bunch of different templates to choose from in Thrive Ultimatum, and you can easily configure their size, color or any surrounding text as you need:
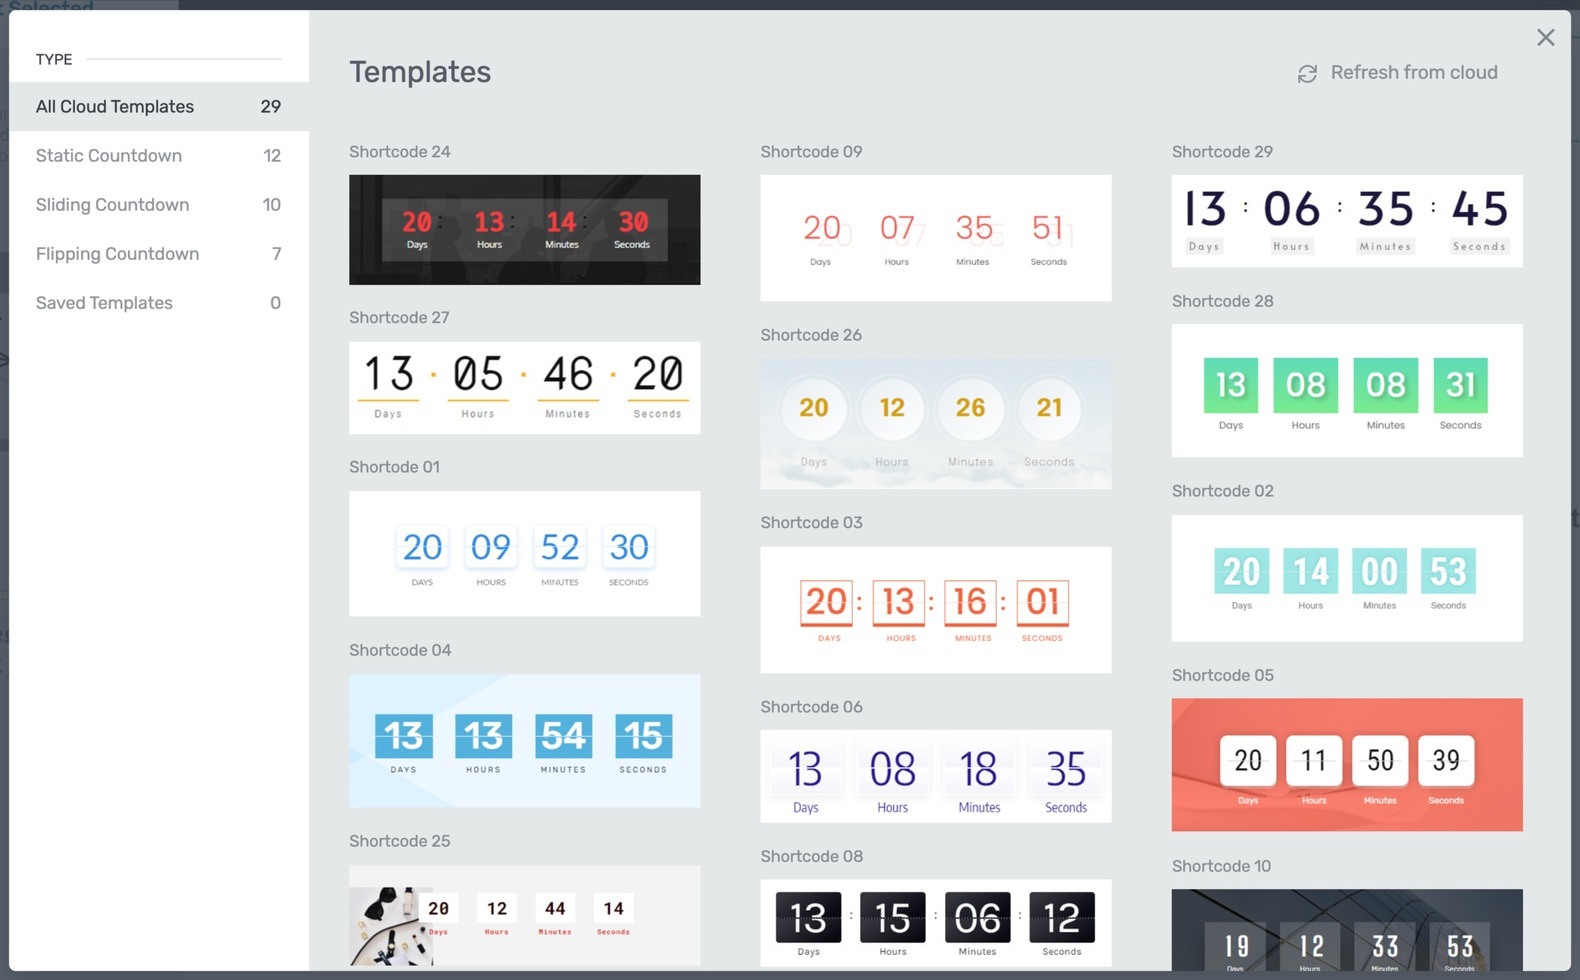
Just some of Thrive Ultimatum's 'Shortcode' Countdown Timer Templates
Just select the 'shortcode timer' design you like best for your landing page design and then customize it as needed.
What’s a shortcode? A shortcode is a very simple line of code between square brackets. It looks something like this: [shortcode]
It's called a 'shortcode timer' because you can place this anywhere on your site, even on non-Thrive pages, just by entering the correct shortcode.
Of course, the colors, fonts and texts can all be changed, but the template library makes it easy for you to start with a professional looking countdown timer design instead of building one from scratch.
Step 4:
Thrive Ultimatum gives you the option to change which countdown timers will show at certain points during your launch window. For the average user, you don’t need to be too concerned with these settings. Simply assign your shortcode timer from Step 3 to show during your entire campaign.
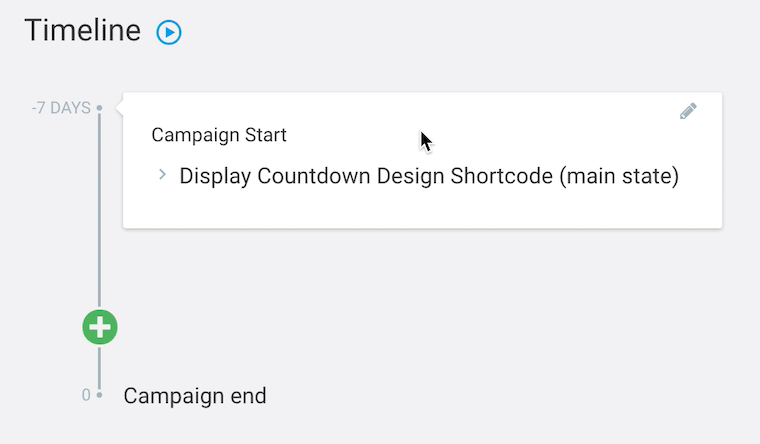
With this setting, the one timer will display for the entire 7-day campaign.
However, if you want to see what a multi-step scarcity countdown timer can look like to supercharge your online course launch, make sure to watch the product video for Thrive Ultimatum by clicking here.
Step 5:
Place the timer on your sales page. If you're already using Thrive Architect, it’s as easy as drag-and-dropping the Thrive Ultimatum element, just like this:
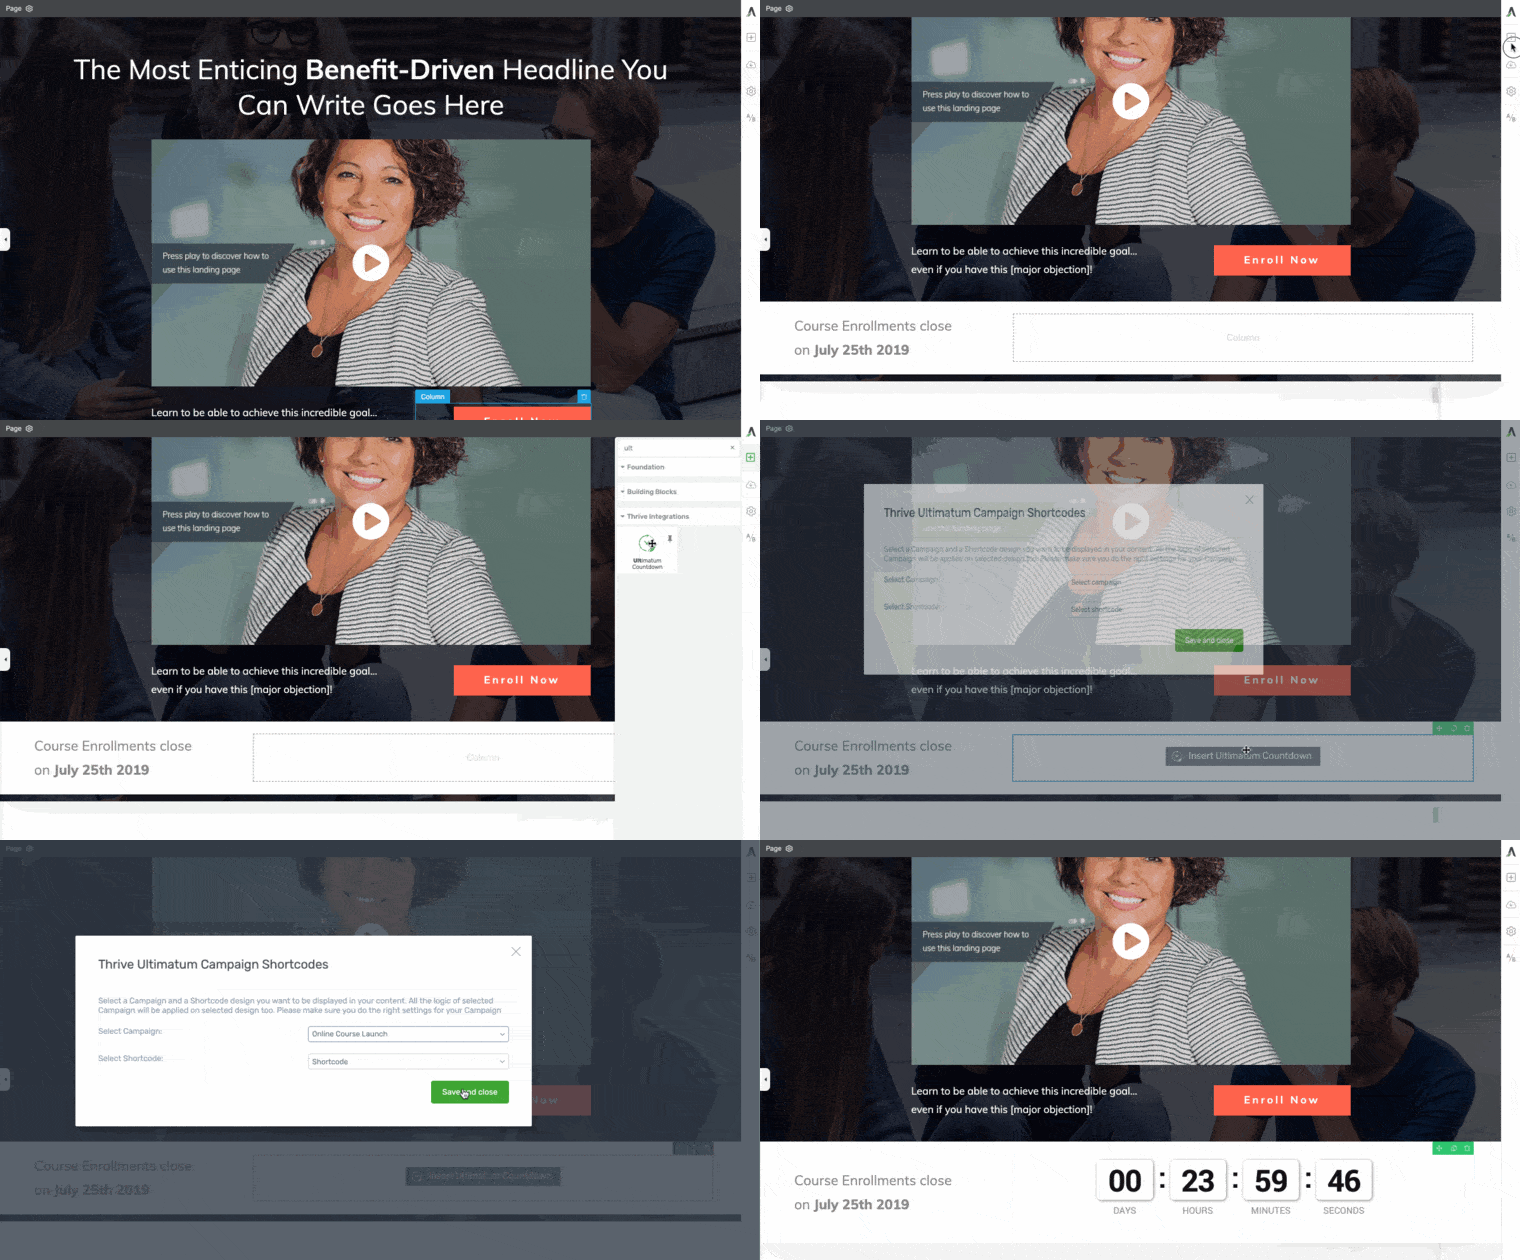
Drag and drop your new Thrive Ultimatum timer onto your sales page... and you're done!
But if you aren’t using Thrive Architect, then you can embed your countdown timer with a shortcode anywhere on your website, like on a landing page.
The Result?
Your visitors will see a ‘buy now’ button that links to your special limited discount. They’ll also see a timer counting down to the end of the campaign, making it very clear how long they have left to take you up on your special offer.
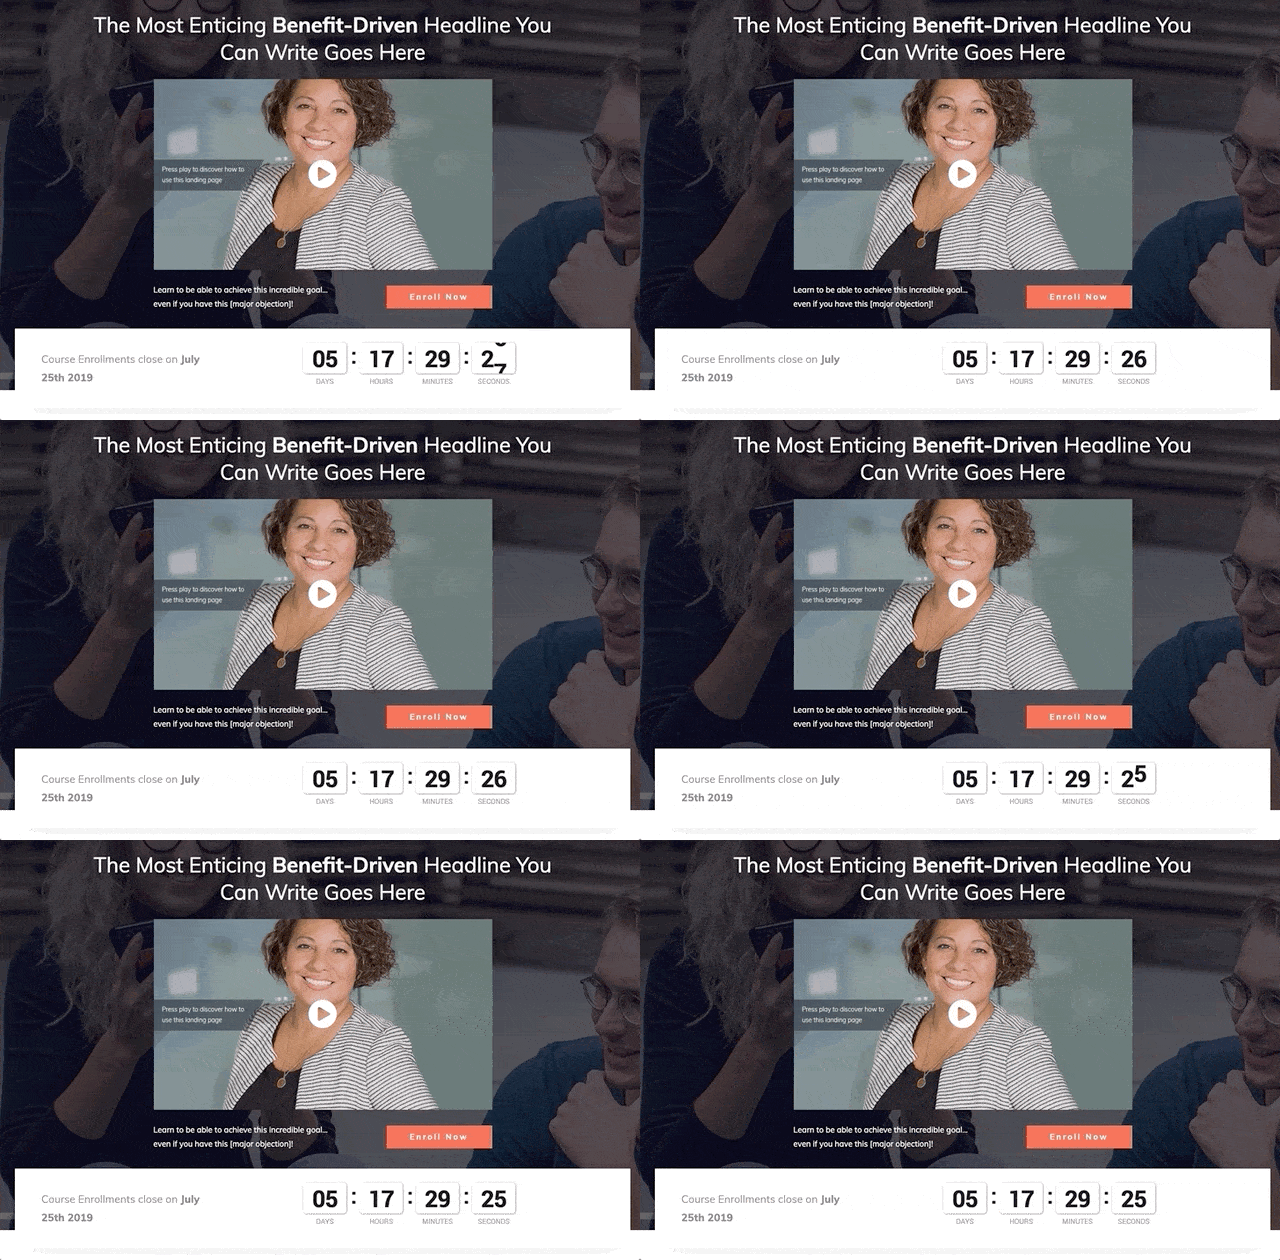
Your sales page with a customized timer.
If they wait too long, whenever they visit your website, they’ll either see the ‘this course is closed’ page instead… or they’ll see a different sales page that doesn’t have the discount available.
3. Coordinating Your Email Marketing Campaign
With your sales funnel pages prepared and your scarcity marketing campaign set up, you’ll be fast approaching the first day that your online course becomes available for purchase.
It’s an exciting time! But there is still work to be done.
Making your course available won’t get you a single sale… unless you tell people about it.
This is where your efforts in building an email list before you launch will pay off. And if you’re worried that your mailing list isn’t big enough to make a launch worthwhile, don’t panic – in Part 4 of this chapter, we’ll show you how to leverage other people’s audiences.
Why Focus On Email to Launch an Online Course?
Email is the backbone of your audience communication. It’s not that social media isn’t worthwhile, but rather that email puts you in direct contact with your audience at the right time.
The very minute your online course becomes available, you can drop an email right into your subscribers' inboxes to tell them about it.
Your mailing list subscribers have already given you permission to contact them directly, and they’re welcome to unsubscribe if they decide your emails aren’t their cup of tea anymore.
However, firing a single email off when you launch your online course won’t cut it.
You’ll need to send a series of emails:
The email marketing campaign for your online course launch should be just as structured as your sales page. In fact, you’ll find that certain emails reinforce your sales content.
So let’s go over the essentials of email marketing that you’ll need for your launch strategy.
Separate the Buyers from the Non-Buyers
Have you ever bought something online and then continued to receive advertising for the product you just bought?
Infuriating, isn’t it?
We’ve got to make sure you avoid that. The moment someone purchases your online course, it's important they don't receive another email prompting them to buy.
As you grow your mailing list, you need an easy way to separate course customers from subscribers who have yet to buy said product.
For this we recommend tags.
If you’ve had any experience in email marketing, you may wonder: “Why not lists?”
We'll explain the difference now.
Lists Vs Tags: What’s the Difference?
1) Lists:
Inside your email marketing tool, you’ll be growing your mailing list. As the name suggests, it’s basically a super long list of email addresses of people who’ve subscribed and given you permission to begin mailing them.
Most email marketing tools allow you to create multiple lists. A single email subscriber could be on one list, or many.
A little later, you’ll learn about affiliates, people who you have a business partnership with. You’ll want these people on a different list to your regular subscribers.
At a high level, lists are an easy way to separate different groups of people that have nothing in common. It’s not always the case that your affiliate partners want to receive your general subscriber emails, but because you still need a way to contact them about promoting your product launches — you'll want to keep them on a separate list from your subscribers.
2) Tags
Most email marketing tools also have an option to add tags. A tag is just a one or two word note that gets associated with a specific email subscriber.
The subscribers don’t know what tags you’ve given them. They’re purely for your own sorting purposes.
You can then choose to send emails to subscribers that do or do not have specific tags. This will be how you identify a customer and ensure they don’t receive the incorrect marketing emails.
Tags can be added in one of 3 ways:
The third option, automatically, is where the power of tags really shines.
How To Use Tags In Your Email Marketing
In Thrive Leads, you can tag a subscriber as they join your mailing list. That means at the very same time they subscribe, you attach a tag that identifies something unique about them.
For example, tags can be used to segment subscribers based on interest. If you teach pet training, you might want to segment cat owners from dog owners. Those who have a cat won’t be interested in your online course about training a dog, so you can make sure your cat subscribers are filtered out from receiving dog marketing.
In the early stages of growing your audience however, it’s not so important to segment your audience based on interest.
But, it is important to tag your customers.
Tagging Your Customers
Virtually all checkout tools will have a way to automatically pass a tag to a subscriber on purchase. If they don’t, you can use Thrive Automator to create an automation to pass tags on to your email marketing tool after specific actions occur by individual visitors.
An automation is just a logic rule. It says “if this happens, then do this”. So it’s not difficult to prepare an automation that says “When the customer makes a purchase, apply this tag”.
But if a visitor does complete a purchase, what tag should you assign them? We recommend a simple one that says:
“Customer: [product name]”.
As you create more online products, continue to use this format to identify different buyers of each individual product. Thus, if a customer has bought multiple products from you with the same email address, then they'll have multiple product tags assigned to their subscription within your email marketing tool.
Filtering Out Your Customers
Now, whenever you send an email, you need to take a moment to think about who should get it. If it’s an email where all you're doing is providing value to your audience, then it’s ok for both customers and non-customers to receive it.
List-wide email examples might include notifying your subscribers of a new blog article you’ve written, a new YouTube video you published, or simply a helpful email that is relevant to your niche.
But when you are sending a promotional email that is telling your subscribers about your online course or encouraging them to buy, you need to filter out existing customers from receiving those.
In ActiveCampaign (the advanced email marketing tool we recommended back in Chapter 5), whenever you begin to write a new email, you’re given the option to choose which list you want to send it to. That’s your high-level separation (e.g. affiliate partners or email subscribers).
But then, right underneath your list selection is the option to select a pre-existing segment, or to create a new segment.
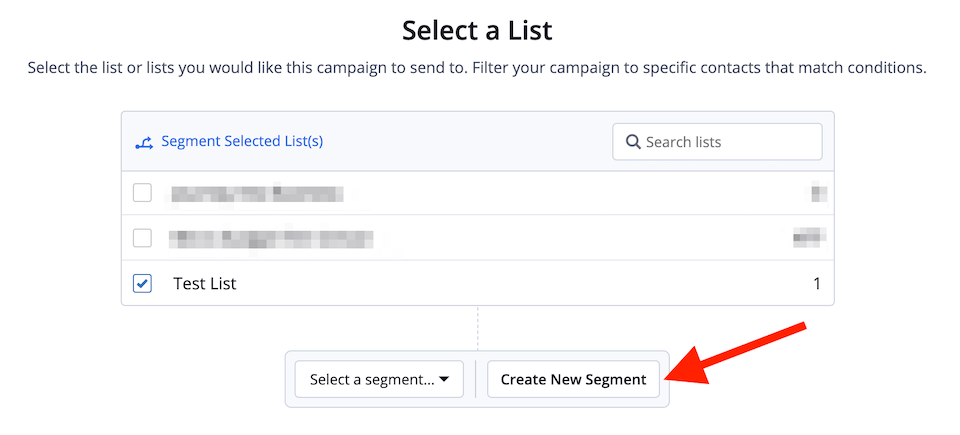
If you haven’t created a segment to filter out your customers, you’ll want to click this.
You'll want to prepare a segment for those on your list who haven't bought your online course yet, so click ‘create new segment’.
On the next screen, you can choose the conditions that will define this segment. Here, it’s as easy as naming it ‘Non-Customers’ and then selecting: Tag > Does Not Exist > Customer: Online Course
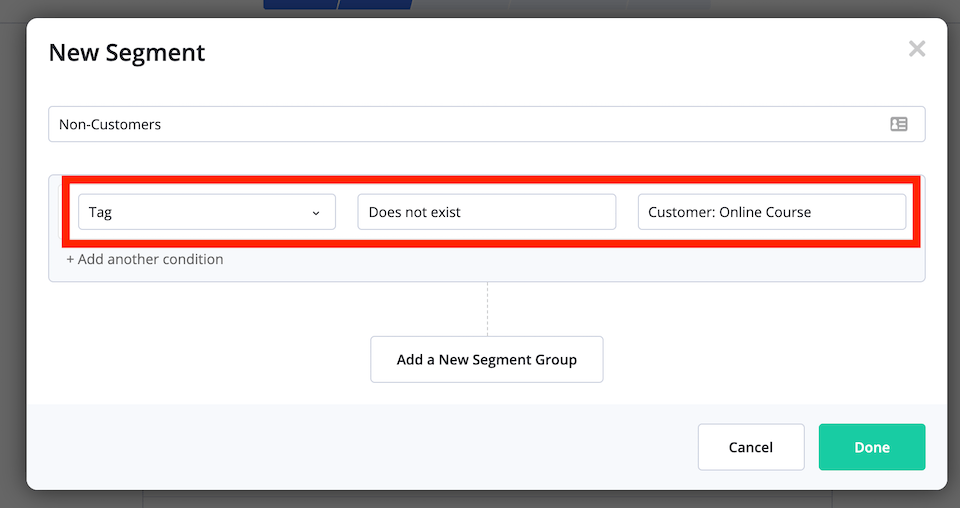
You can set multiple conditions if required (up to 20!)
The segment you choose/create will then dynamically update. That means that if someone buys your online course and gets the matching tag, they will automatically be filtered out of this segment without you needing to update it manually.
Make sure all of your course marketing emails are sent out through this segmentation process.
Welcoming Your Customers
When a customer finally does purchase your product, you should send a warm greeting email to their inbox immediately.
This email will get a very high open rate. After-all, the email will provide them with their next steps as well as confirm their purchase was successful.
The customer has just handed over cash, so they won’t want to miss this one.
But… how do you send that email automatically?
The answer is, once again: automations.
If you’ve set up your customer tag in the previous steps, then you’re in a prime position to automatically send that welcome email. All you have to do is trigger the email to send “when tag is applied”.
Here’s how this automation might look for you in ActiveCampaign once again:
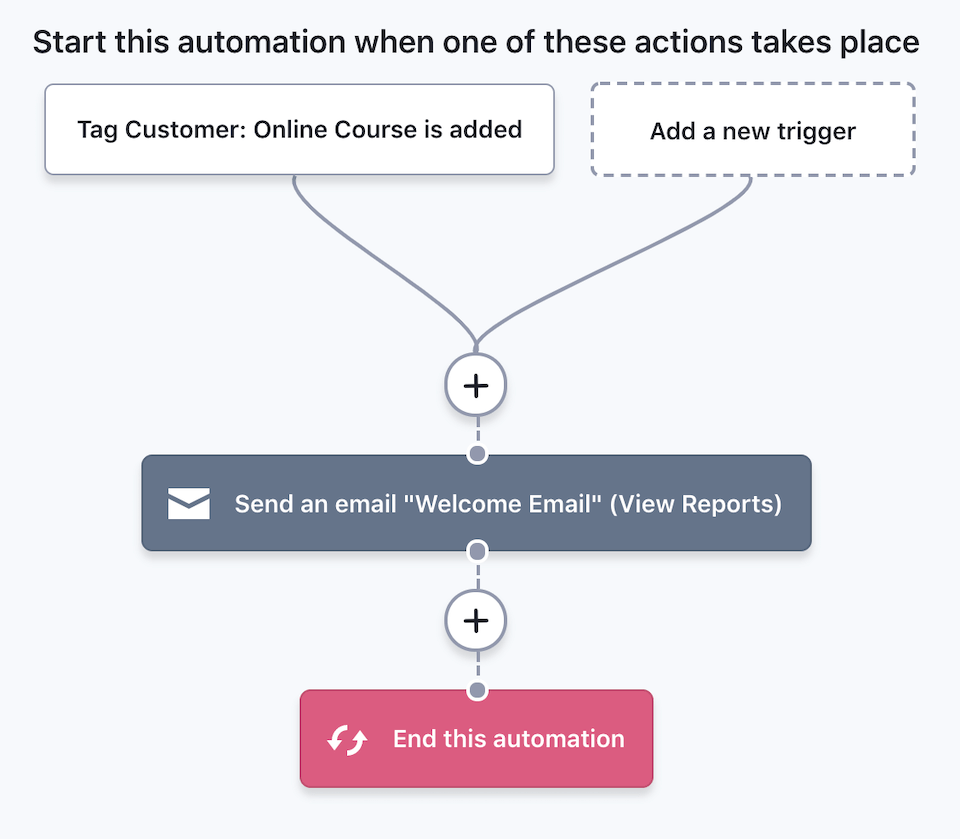
Active Campaign automations can be triggered when tag is added
And that’s it!
The trigger condition can be set to “when tag customer: online course is added”. So, the customer will never enter this email automation until they get assigned that particular purchase tag.
As soon as your checkout tool confirms the purchase and assigns the tag to a customer's email subscription, the welcome email will be sent immediately to their inbox.
Magic!
Updating Your Customers Post-Purchase
With time, you might want to contact your course customers for important reasons like:
These events don’t need to be automated, but you must make sure they go to the right customers.
To do this, you’ll want to use the same steps you followed in creating the segment above, except that this time, you’ll create a ‘Customers’ segment and set it to:
Tag -> Exists -> Customer: Online Course.
Whenever you send an email to this segment, only your loyal course customers will get the update.
Your Online Course Launch Marketing Strategy
With your segments set up, you’re ready to start emailing your audience. There are many different strategies you can take here, and we go into comprehensive detail about our recommended launch strategy in Video #1 of our 3-part series.
You'll get the online course launch blueprint, detailed explanations of how and why each step works, as well as all the email template swipes for you to use when you’re launching an online course.
If you want to see the RAPID version of that launch strategy, Shane walks you through an online course launch map as part of our free video series on starting an online business. It literally maps out every single email you’ll need to write, what each of them should say, and when they need to be sent when you launch your course.
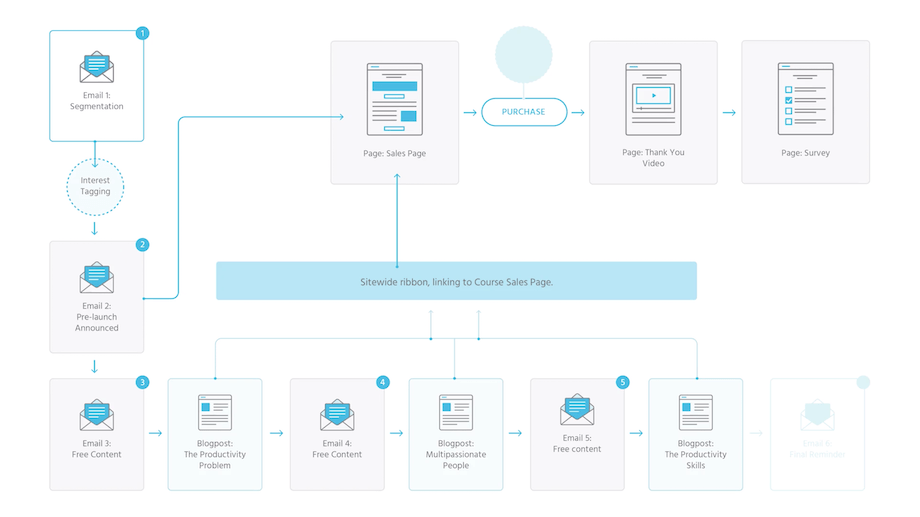
And while that's coming through to your inbox, let’s now focus on the 3 basic segments of your online course email marketing campaign...
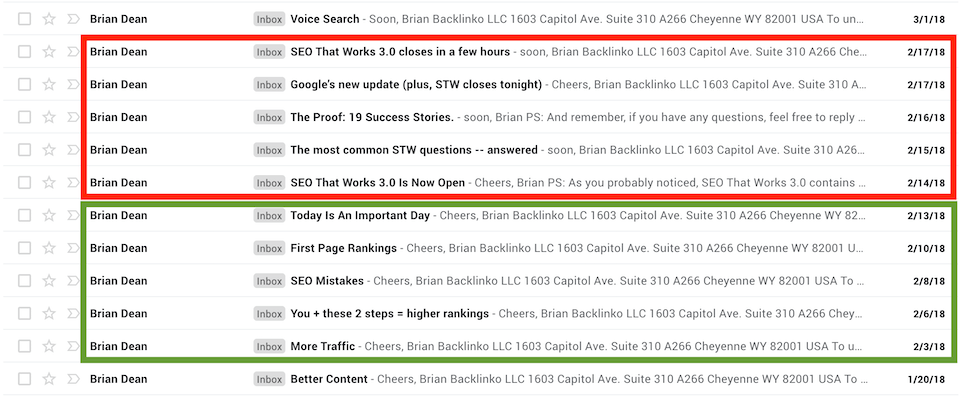
Brian Dean’s launch emails from back in 2018 (in reverse order, most recent at the top).
In Green: 5 x Pre-Launch Emails over 10 days.
In Red: 5 x Launch Emails over 4 days.
Part 1: Pre-Launch Emails
It’s not a wise idea to appear out of the blue and ask for a direct sale in your first online course launch email. In marketing, you should always offer value first before ever asking for something in return.
It's been said that it takes an average of 7 touch-points before a customer will be ready to buy from you. A touch-point is simply contact with your brand: an email, seeing one of your social media posts, visiting your website, watching a video, reading a review of your product… anything.
Visitors who've never heard of you are called Cold Traffic, and are notoriously hard to convert. Warm Traffic (or even Hot Leads) however, are potential customers who have at least experienced a first-impression of your business.
So before you promote your online course, you’ll want to warm up your mailing list.
That involves sending at least 3 emails (usually 2 days apart) before your launch with the sole focus of providing high value content… without asking for anything in return.
This is known as your ‘pre-launch campaign’.
During this warm up period, don’t tell subscribers about your course yet. Don’t even worry about mentioning that you are going to launch an online course. Just provide value. That's it.
Your goal in these 3 emails is to convince subscribers that:
These emails could just consist of text. Or they could link to videos you’ve published on your YouTube account... or blog posts on your website. It’s up to you.
Your pre-launch emails just need to be worth their time to consume and provide much appreciated value. That’s all.
Part 2: Launch Emails
As we covered in the section on Scarcity, we recommend you have a reason for your audience to buy now. Be it a discount, a limited time bonus, or that you are closing your course, this reason needs to be crystal clear during your marketing campaign.
That means for a specific period of time, you are motivating your buyers to take action.
You’re going to send a higher volume of emails during your actual launch period and you must make sure that every single email includes a hyperlink to your sales or landing page.
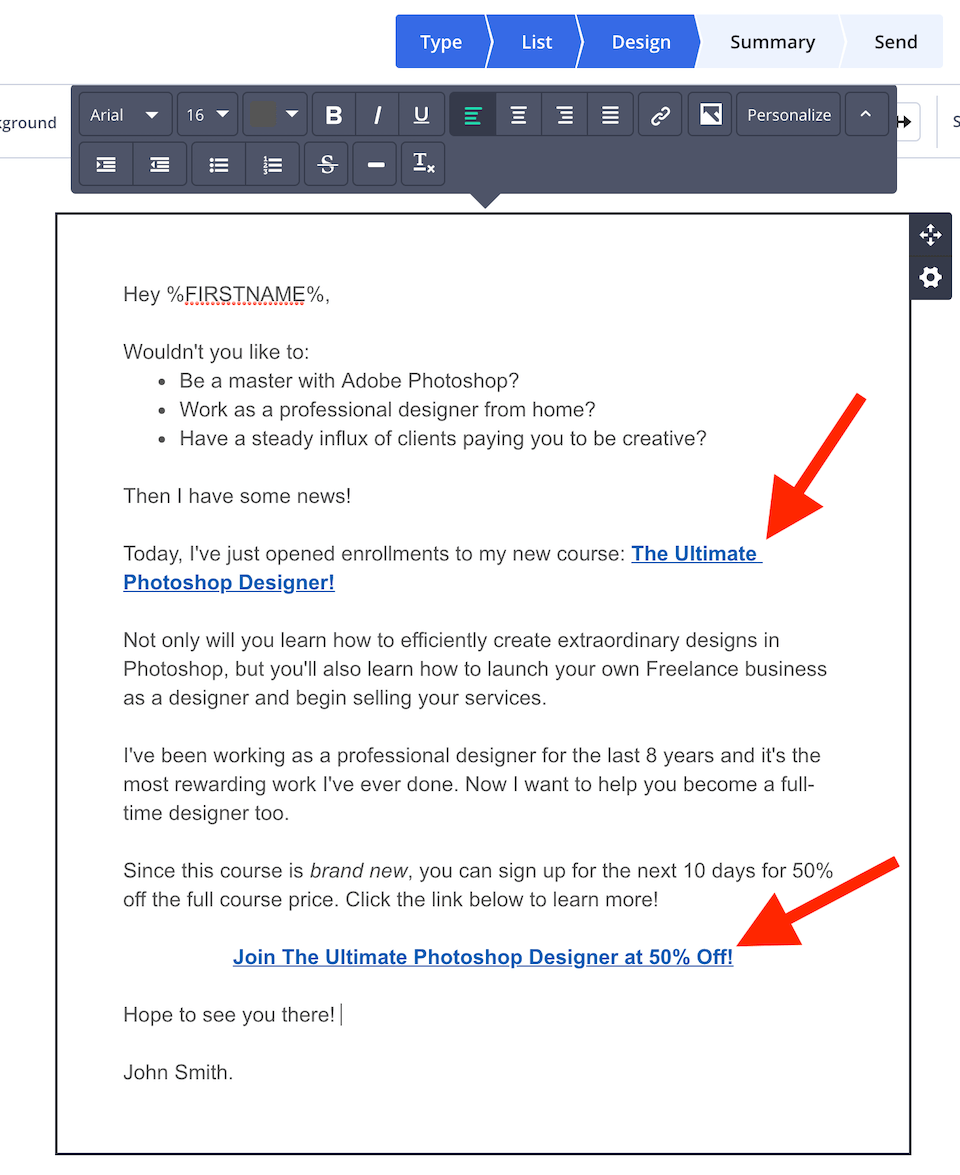
Every email you send during your launch should have a link straight to your sales page.
Beginning-of-Launch Email:
The minute your launch window opens, you should announce it with an email right into your subscribers’ inboxes.
Essentially, this first email has to do the same as the “above the fold” area of your sales page and the PAS storytelling combined, which means it needs to:
- 1Promote the benefit of signing up to your course,
- 2Make it clear when the launch window ends, and
- 3Highlight the problem that the course is going to fix.
Of course, you’ll also need to provide a link to your website right there in the email.
Mid-Launch Emails:
Over the subsequent 5 - 14 days that your launch window is open, you’ll want to trickle out emails providing more information about your course.
Remember, not all your emails will get opened. In fact, average email open rates are going to be about 20-30% — depending on how engaged your audience is. That means the other 70-80% will see the email come in… and simply ignore it.
Don’t be disheartened about that though… because they are still seeing your subject line.

Even unopened emails will still have their subject line seen in an inbox
That’s one reason why copywriters spend a lot of time testing email subject lines. You want those subject lines to pique a subscriber’s curiosity, leading them to open the email and see what’s inside.
Even if all the emails you send never get opened, you still want to make sure those subject lines tell the story: something has become available… and it’s closing soon.
Early in your launch, it’s acceptable to email once-per-day. That might seem like a lot, but in the context of the average email inbox, it isn’t. Your subscribers are getting loads of emails every single day. The only way to cut through that noise is to be consistent.
The majority of your customers will either buy quite early or quite late.
Plan for a quieter sales period during the middle of your launch window. That quiet middle is the right time to send out some additional high-value emails that are closely related to your product, but don’t necessarily demand the sale.
If you ever find yourself stuck when coming up with content for your launch, go back to your sales or landing page and borrow from their structure. You might send an email that just shares the outline for the modules, or focuses simply on the bonuses your customers will get.
Your readers may not want to click through but if they’re reading your emails, you’ve still got to make sure they’re well-informed about the value of your course. If they’ve read the emails and like what they see, they’ll click through on one of your last ones as the countdown timer nears 00:00:00.
Closing Emails
Towards the end of your launch window, you’ve got to put the pressure on. Make it clear how much time is left. 48 hours? 24 hours? Count them down.
In these final emails, you’ll want to do 3 things:
- 1Resolve any objections. Make your 30-day guarantee crystal clear as a promise that customers can get their money back if the course doesn’t work out for them. Include testimonials. Whatever it is, you must resolve as many objections as possible so that the right customers don’t have any more excuses not to buy.
- 2Show readers how their life will be different if they take your course versus what it will be like if they don’t. The best way to do this is to focus on the euphoric feeling they’ll experience once their primary pain points are resolved… and then contrast that to the continued pain they’ll feel if they don’t pull the trigger on your course.
- 3Highlight what they’ll miss out on once the countdown timer hits zero. If you’re offering a discount, make it clear how much money they save by acting now. If it’s a bonus, show them what they get. Don’t assume subscribers read any of your previous emails, so hammer those important points home again here.
Despite the fact that you're selling hard in these final emails, be a decent human being about it. Your end goal is to help people, so always make sure you’re doing that throughout your email campaign.
Part 3: Cool Down Emails
If someone doesn’t buy your online course, that's okay. They aren’t dead weight on your mailing list. Maybe they haven’t got the money to enroll, or perhaps the pain point you solve isn’t that prevalent in their lives right now.
Rather than ghosting all the non-buyers on your mailing list, it’s important to take them through a cool-down sequence. That’s a series of high value emails that aren’t asking for anything. All you’re trying to do is show them that you are still grateful for their attention and that you value them — even when they don’t buy from you.
Some customers take months or even years before they’re ready to buy.
At the conclusion of your cool down emails, you can return to good old-fashioned newsletters and occasionally drop a reference to your course when it's relevant to do so.
The 4 : 1 Marketing Ratio
If your online course is going to remain open, it's worth considering the 4:1 marketing ratio.
It's the simple idea that for every promotional email you send that asks for a sale, you should be sending 4 others that only provide value without asking for money in return.
By striking that balance, your customers will appreciate your emails, get in the habit of opening them, and will perceive your calls-to-action much more favorably.
Email Marketing Takeaways For
How to Launch an Online Course
- 1Apply tags automatically to identify your customers
- 2Filter existing customers out of your launch emails once they own the product
- 3Warm up your mailing list with pre-launch emails
- 4Send frequent emails during your launch linking to your sales page
- 5Send less-frequent, value-based 'cool down' emails after your launch ends
Now that we’ve looked at how to use email marketing to launch your online course, you might be thinking: “This is useless because I don’t have a big mailing list yet”.
Good news: there's more than one way to skin this launch cat.
4. Leveraging Other People's Audiences
It’s likely that your mailing list is quite small right now.
Less than 1,000 subscribers… maybe even less than 100.
You’ll be pleased to know that although growing an audience is an invaluable part of scaling your business, there is an easy way to leverage other people’s audiences to get your product in front of thousands and thousands of people.
All for zero up-front cost.
Back in chapter 2, we said that online courses are a great product to begin your entrepreneurial journey with because they make high profit margins that permit you to invest in marketing. Now you get to see why that is the case.
If you’ve created a worthwhile online course that can be purchased at a decent price, then you’re in a prime position to share some of those profits with people who already have audiences.
How?
Imagine having a team of respected sales people out there who:
- 1Have access to their own large audiences and mailing lists
- 2Will fight to promote your product to their audiences
- 3Have marketing experience persuading people to buy products and services
You get all of this and more… with Affiliate Marketing.
“Wait... aren't affiliates a scam?!”
If you’re new to business, the word ‘affiliate’ might carry some negative baggage. You might think it’s related to shady scams, or that it’s complicated and distrustful. Like most things online, there’s always a few bad eggs that take a genuinely positive strategy and push it until its reputation is hurt for the rest of us.
So let’s put an end to that right now:
Affiliate marketing (done right) is easy, powerful and it helps everyone.
Your customers get to discover the perfect product, your partners are incentivized to promote your course, and you get to put your marketing on autopilot even when you have a small audience.
The Power of Partnerships
Next time you visit a grocery store, pay attention to what’s on the shelves. If a manufacturer of a new product wants to start selling a new product, they can either:
- 1Try and open their own store to sell directly to new customers, or
- 2Get their stock on the shelves at an established store
For a new business, the second option makes a lot more sense. Potential customers are already walking the aisles and so placing a new product on these shelves would get it right in front of buyers.
Of course, the grocery store will have a special partnership with the new brand that allows them to sell the products and share in the profits. For each product sold, the grocery store takes a cut.
And it works well for everyone involved! The grocery store has new stock to fill their shelves and the manufacturer sells in a much greater volume than they ever could’ve if they tried to build their own store.
That is exactly why partnerships are the perfect solution to launching your product when you don’t have a sizable audience yet.
In order to attract partners however, you’ll need to take 2 important steps:
- 1Set Up an Affiliate Program: a way to reward your partners for promoting your product.
- 2Attract the Right Partners: a way to reach out to the people who would support you.
Let’s start by setting up your affiliate technology.
What Is Affiliate Marketing?
An affiliate is someone who assists you in marketing for a commission on each sale that they get for you.
Although anyone can be an affiliate marketer, it’s generally only worth the effort to become an affiliate if you already have a sizable audience you can easily reach. So affiliate marketers tend to be people who have grown a large mailing list or have a large social media presence on a platform, such as YouTube.
Since it can take a long time to grow such an audience, these marketers often don’t have space in their schedule to create their own products.
Instead? They’ll promote someone else’s... and you’re hoping that they’ll promote yours.
A good affiliate has carefully nurtured their audience. If they are an email marketer, then they have taken the time to earn their audience’s trust by frequently providing high-value content.
Every once in a while, they’ll promote a product to their audience and whenever someone buys— Cha-ching! The affiliate gets a commission from the sale.
What’s great about affiliate marketing is that the payouts are automated.
That means that you don’t have to manually count pennies. A well made checkout tool like ThriveCart or SendOwl can automatically calculate and pay commissions into the correct affiliate’s bank account without you even having to put down your martini.
We’ll show you how to set this up in a moment.
How Do Commissions Work?
There is often some push-back from course creators to the idea of giving away a slice of the pie. After all, you’ve made an awesome online course, so why should someone else get paid for merely telling their audience about it?
Sure, it can seem unfair, but at the end of the day it’s a digital product.
The cost of enrolling 10 students instead of 1 is virtually the same. So each additional sale is profit in your pocket.
The high profit margins for an online course make it a great product for automating your marketing. You want to motivate an affiliate to get you the sale, so it’s worth being generous with your affiliate percentage.
For a digital product like an online course, affiliates can expect a 35% to 50% commission. But remember: if the customer doesn’t buy, the affiliate doesn’t get a single cent… and you don’t either.
Offering a generous commission like this motivates affiliates to heavily promote your product to their audience and to put in the effort to sell it.
But I know what you’re thinking:
“Up to 50%?! That’s ridiculous!”
But here’s another statistic to put your mind at ease:
“
Selling to past customers is up to 10x cheaper than attracting new customers.
Thrive Themes
What matters most is growing a loyal customer base who would buy your next online course… and the one after that. That’s where you begin to see super-high conversion rates and soaring profits.
Your short-term goal is to turn a profit immediately on your first course launch, but your long-term goal should be to grow a large list of loyal customers that will buy any new product you launch.
But for now, you need your affiliates to be motivated to find loyal customers for you. Recruiting an army of motivated affiliates is the key to automating your online course launch marketing.
How Affiliate Links Work
When someone becomes an affiliate for your product, they’ll be given an affiliate link. This is a unique URL that takes a customer to your website while identifying the affiliate as the person who referred them.
Each affiliate will have a different link, one per affiliate. But the destination for the visitor is the same.
Just to clear up the confusion, ThriveCart ISN’T a part of the Thrive Themes product range but does work well as part of our tech stack (particularly with Thrive Architect).
You can only purchase ThriveCart through affiliate links. You can see what their affiliate sale page looks like by clicking through to ThriveCart here… in the interest of keeping things meta.
As you’ll see from the link URL,
“https://thrivecart.com/private-pilotprogram/?affiliate=activegrowth”
You’re taken to a specific page that is the unique destination for this affiliate link, which in this case is ActiveGrowth. It’s a seamless experience and you don’t even realize what’s happened!
If that customer then purchases your product, ThriveCart will automatically pay out the commission to the affiliate’s bank account.
Voila!
Of course, when you email your own mailing list, you won’t need to use an affiliate link. For your own marketing, just send them straight to your website. Any traffic that arrives at your sales page without being attributed to an affiliate allows you to collect 100% of the profit.
Setting Up Your Affiliate Partner Program
If you’re using ThriveCart to help sell your online course, creating an affiliate program is easy. The first thing you’ll need to do is configure the general settings of your affiliate program. The dashboard looks like this:
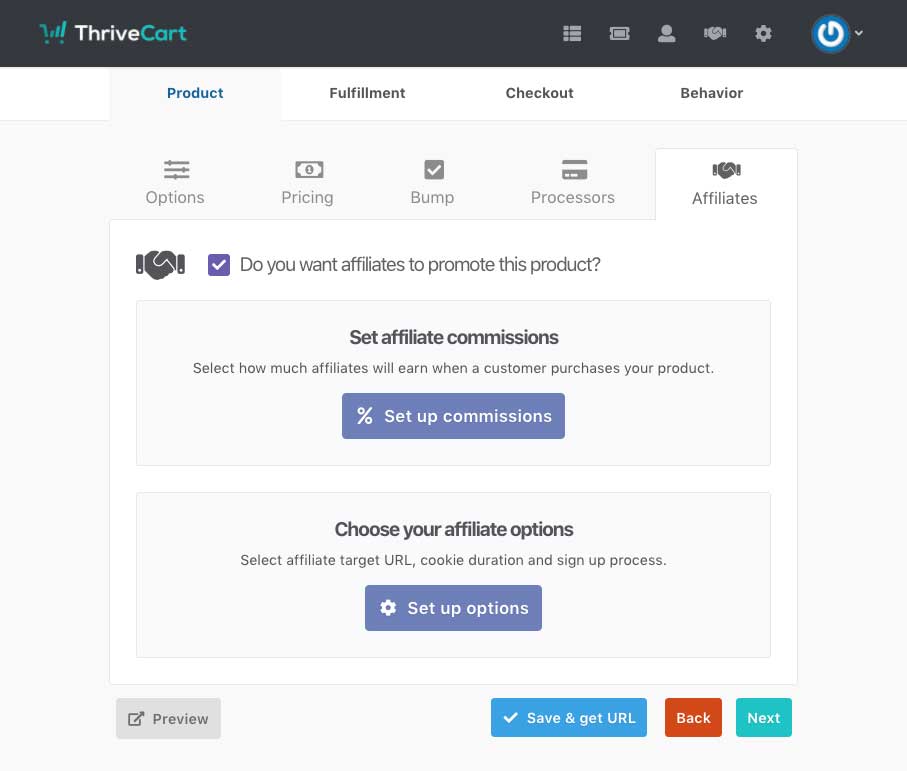
Enabling affiliate sales by product.
What's a Cookie?
A cookie is what a website uses to identify a visitor. Don’t believe the paranoia... cookies are responsible for your pleasant viewing experience on any website. Ever noticed how you don’t have to login to Facebook every time you visit? That’s because of cookies. A cookie can also identify who a referring affiliate was, so here’s the 3 main affiliate cookie settings you need to pay attention to:
The 3 Main Cookie Settings
Cookie Precedence
How long after the affiliate refers that customer should their commissions expire? If you set this to 3 months, then an affiliate will only get their commission if the visitor purchases your product within 3 months of clicking their affiliate link.
Cookie Lifetime
How long after the affiliate refers that customer should their commissions expire? If you set this to 3 months, then an affiliate will only get their commission if the visitor purchases your product within 3 months of clicking their affiliate link.
Cookie Expiry
If a customer buys one of your courses and then soon after buys another, should the affiliate receive commissions on both sales or just the first? Here is where you set the rules.
Don’t let yourself get too overwhelmed by these options. Most checkout tools have preset defaults that’ll be adequate for you to get started. However, as you work with affiliates and get more comfortable, you might want to make some changes to these defaults.
Beyond these general cookie settings, here's a few other options worth noting too:
Affiliate Pay Delay
You might not want to pay out your affiliates instantly, but instead add a short delay, such as one week. By creating a delay, you can offset any refunds. If a customer requests a refund soon after buying, then the affiliate’s commission is cancelled and you won’t need to recall any funds from their account to pay back the customer.
Mailing List ID
When an affiliate joins your program, you’ll want to connect them straight to your affiliates only mailing list. Then, whenever you want to notify your affiliates of any launch-related information, you can send an email to that specific list and contact them all at once.
Enabling Affiliate Commissions Per Product
Once you have the general affiliate program configured inside your ThriveCart account, you can choose to enable or disable it for each individual product you sell.
This also means you can set custom commission percentages per product.
Simply select your online course product, check the ‘Do You Want Affiliates to Promote This Product?’ box, and then ‘edit % commission settings’ to assign a percentage you're comfortable offering.
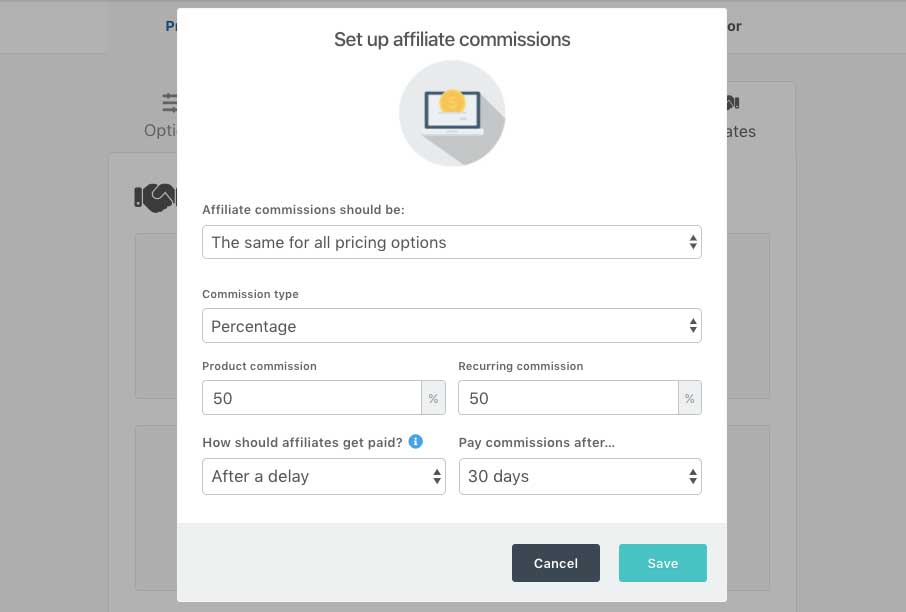
In the setup pop-up you can adjust commissions per product and the delay period for payments.
If your product has more than one pricing option, you can make further customization for each price tier by changing to the appropriate selection in the “affiliate commissions should be” box.
The last thing you have to do is select when your affiliates will get paid. This can be instant, after a delay, or X now and Y later.
The commission will then go into their PayPal account.
That’s all you have to do to start partnering up with affiliates!
How to Add Partners to Your Affiliate Program:
There are 2 ways to accept new people into your partnership program.
1.
Open - Apply to join your affiliate program:
For an open affiliate program, any visitor that stumbles across your website can sign up and apply to get their affiliate link.
You decide whether or not they can promote you. They’ll still need to confirm their payment information for your software to auto-payout their commissions, but after that, they're ready to promote.
2.
Private - you must be invited:
A private affiliate program is closed to the general public. No one will know it exists or know any information about it. In this situation, you’d need to reach out directly to affiliates and invite them to join. It gives that added feeling of exclusivity and lets you carefully manage your first affiliates before you ramp up and start partnering with anyone.
If you want to have an Open or Approval Only affiliate process, you’ll want to create an information page on your website. This can simply be a webpage that explains how your affiliate program works. Make sure to include this vital information:
- What is the commission percentage?
- When will payouts occur?
- What is the Cookie Lifetime?
- Are commissions granted to the first or last referrers?
- How can potential affiliate partners apply?
If you are inviting affiliates personally, then include this information in your contact email or a document you send to them. It doesn’t make sense to have that information available publicly if people cannot apply to join without your invite first.
What Happens When an Affiliate Joins?
If you’re using ThriveCart, when an affiliate applies, you provide them with a dedicated affiliate link to sign up to your program. You can get this unique link by clicking “Get URL” on the product page and you can copy it from there:
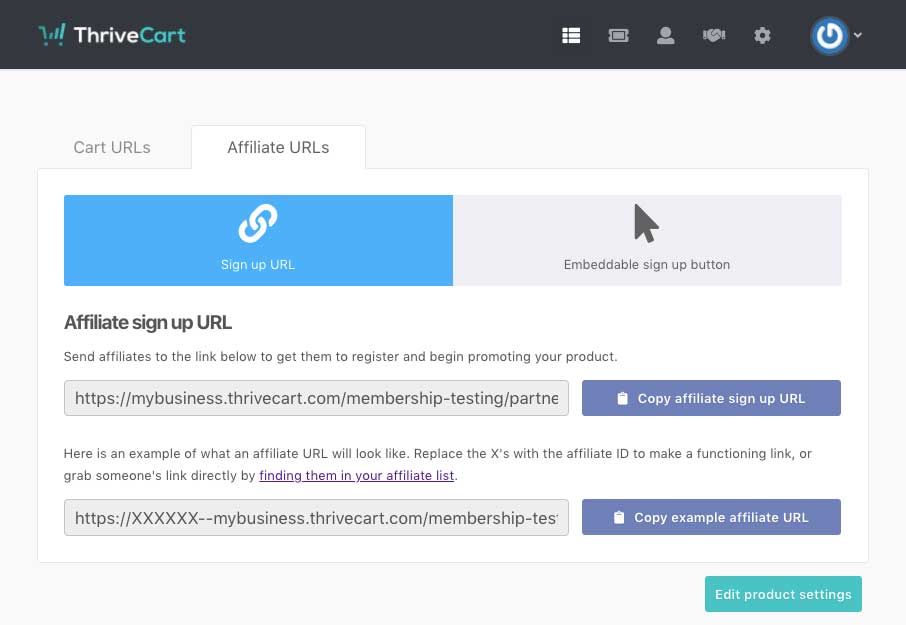
The first step to getting an affiliate onboard is sending a sign up URL.
Alternatively, you can do this process manually by clicking on the tabs Affiliates>My affiliates, and then you can create your link.
When they sign up, a free ThriveCart account is created for them and is linked to your products. This is where they will manage all affiliate business with you, including their affiliate link. They can access all that they need in the Products tab.
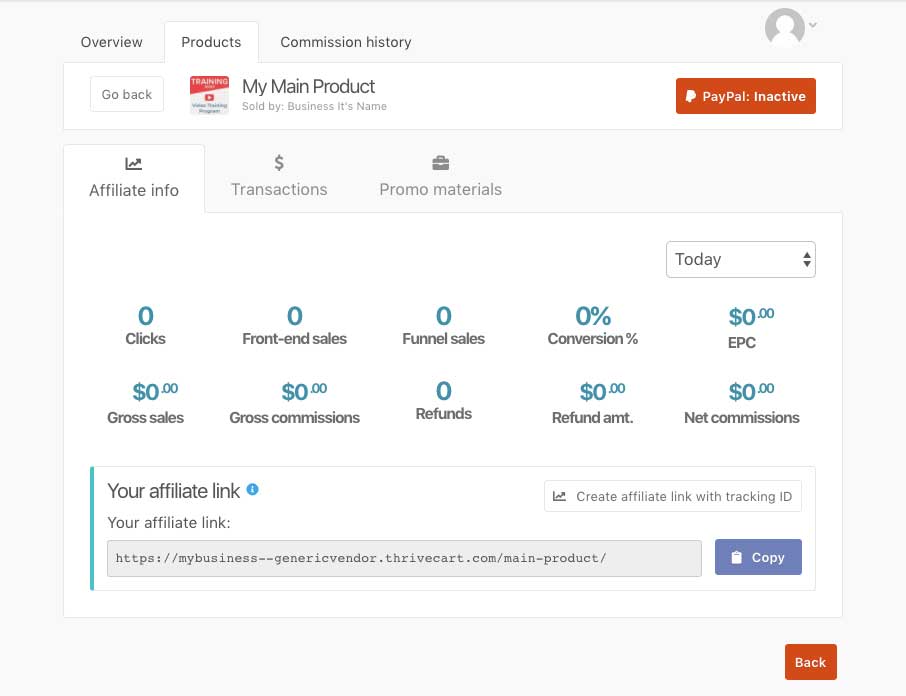
From the Products tab, affiliates can see all of their progress.
In the Products tab, affiliates will get their affiliate link. Then all they have to do is share that link to their own audience. They can do this by:
- Sending the link in emails
- Adding the link to pages on their own website
- Sharing the link on their social media platforms
NOTE: Affiliate Disclosure Rules
There are some rules around affiliate disclosure on certain platforms. That means if someone is going to share your affiliate link, they may need to declare to their audience that they get a commission on resulting sales. Fortunately, it’s the affiliate’s job to abide by these rules, and not your concern.
After the affiliate begins to share their unique link, they’ll be able to see some reporting right inside of the ThriveCart dashboard. The most important statistics will be:
Finding Potential Partners
Now that you've set up your account to accept affiliates, you need to find the right people to partner with. Of course, we’re hoping they’ll find you, but it’s unlikely that they will.
So you’re going to contact potential partners directly.
Established affiliates will know a good deal when they see it, but brand new partners who are new to affiliate marketing may need a bit more information.
You’ll want to start looking for partnership hot spots in the same places you did for your original customer research.
Primary Hot Spots:
- What are the popular websites or blogs your ideal customers visit?
- What podcasts do they listen to?
- What YouTube channels do they subscribe to?
- Who do they follow on social media?
In your research for new affiliate partners, you’re trying to find where your target audience already congregates.
Secondary Hot Spots:
You should also look at where your ideal customers hang out when they aren’t thinking about the problem that you solve.
Let’s say your online course is about training designers in Photoshop mastery so they can launch their own freelance business. The obvious primary hot spots would be blogs or YouTube channels that offer Photoshop tutorials.
But think beyond that… where else might that customer hang out that isn’t directly related to your product?
Designers might also follow photography blogs or read up on computer technology, since both of these relate indirectly to their interest in design.
How to Contact Potential Partners
Once you've found some established audiences, you’ll want to get in touch with the owners of those audiences.
Never ever share your website directly without their approval. If you try to share a sales page straight to a private Facebook group, get ready for a swift boot out of it.
Always seek an approved partnership first.
The good news is that most audience owners make it reasonably easy to contact them, since they already know partnerships are great opportunities to make some additional money.
Bloggers + Podcasters:
Popular bloggers and podcasters will have a website with a dedicated contact page. Here’s the footer of Pat Flynn’s website for his outrageously popular blog ‘Smart Passive Income’:

The footer from Smart Passive Income's homepage
Once you open the contact page, you’ll either be given an email address, or be presented with a contact form to fill out and submit. In Pat’s case, this is what awaits you:
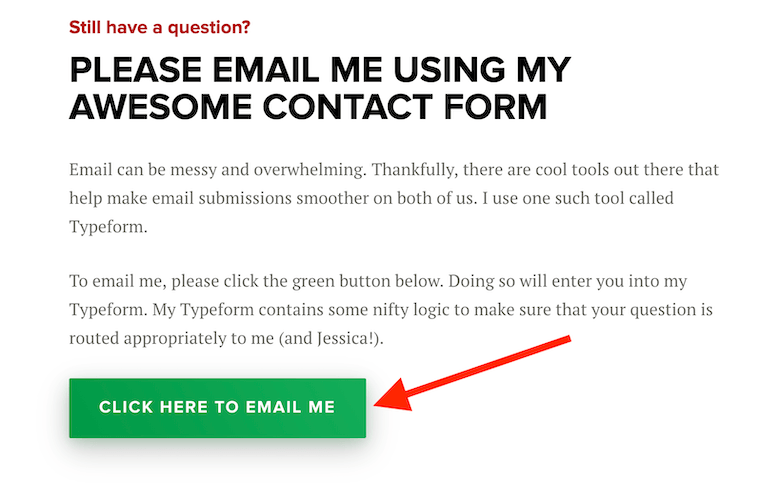
Rather than giving out a personal email address, Pat has a contact form that auto-emails him.
YouTube Channels:
Found a great YouTube channel that already reaches people in your target audience? Don’t try and contact them by dropping a comment on their latest video. Instead, head to the ‘About’ section in their channel.
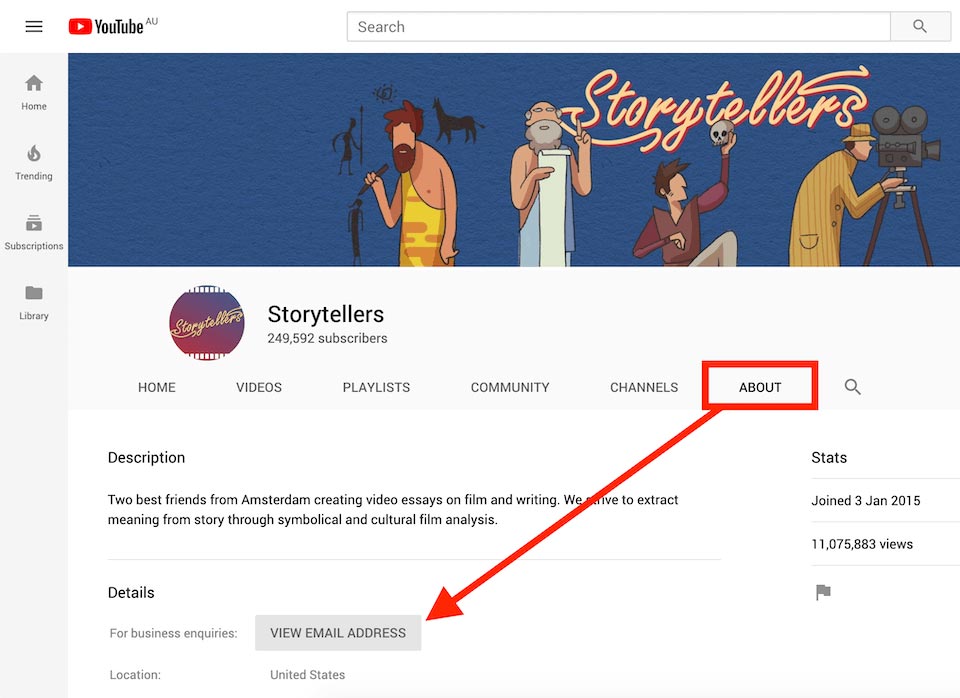
YouTube channels open for partnerships will likely showcase a contact email address
YouTube does have some rules for sharing affiliate links directly on their platform, so it’s worth mentioning this in your outreach. As long as the channel abides by the rules, there won’t be any negative repercussions to partnering with you.
But truth be told, a YouTube channel that is open to affiliate partnerships should already understand the rules to protect their standing with the platform.
Facebook Groups
Did you find a facebook group with 10s of 1000s of members? Make sure you read the group rules first. Some Facebook groups simply do not allow any promotion at all and are very strict about it.
Other groups will allow some promotion so long as you contact the admins first. Here’s where to find the right people:
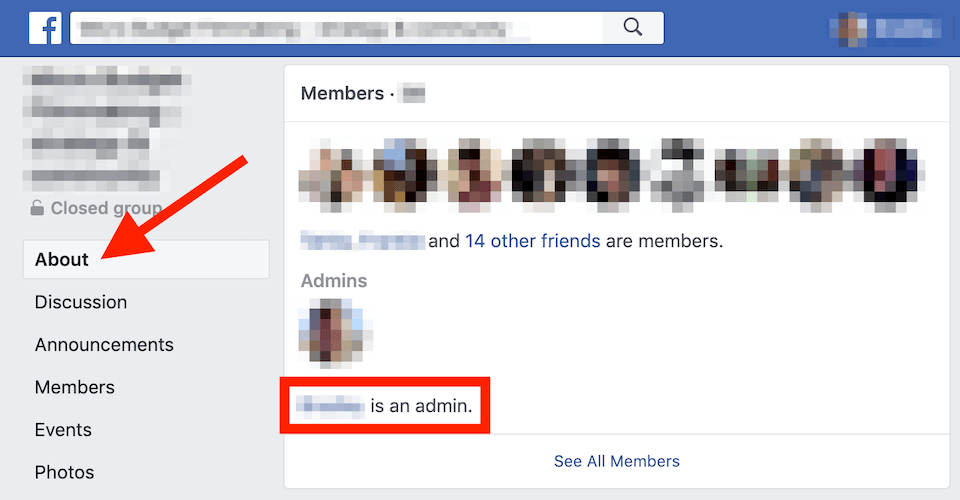
Hit the ‘About’ tab, and you’ll see a list of admins that you can contact directly.
Approaching a Partner:
Each successful partnership you create could represent a significant boost in your sales. So don’t be lazy in your outreach.
What’s important is that you aren’t harvesting cash from their audience, but rather providing value. You want to show potential partners that your product is a valuable option that will help their audience achieve something they’re struggling with.
Partners will be pleased to have an opportunity to earn money, but not if it means spamming their own audience and losing the attention and respect they’ve taken years to build.
Whether you reach out via email, through a contact form, or through a direct message, you should say something along the lines of:
Email Outreach Template
Hello [their name],
I am [your name] from the website [your domain]. I’ve had my eye on your [brand/ channel/ website] for a while and I can see you create great content for your audience.
In a few weeks time, I’m launching an online course on [topic] which looks like it could be a great fit for your followers. The course will help people achieve [outcome].
Would you be interested in joining our affiliate program? We offer a generous 50% commission on referred sales. That means that for anyone in your audience that chooses to buy the course, you’ll receive a payout of [50% of course price], simply for sharing a link.
We are planning to launch on [launch date].
If you’d like to register as an affiliate, it will only take you 5 minutes to sign up. All you have to do is visit this link [affiliate registration page]. Once you’re set up, we’ll update you with launch information closer to the date.
If you have any questions, I’d be happy to answer them.
Looking forward to hearing from you and I hope we can partner up,
Kind regards,
[Your name]
Corresponding With All of Your Partners
At various points in your launch plan, you’ll want to update your affiliates. Perhaps you push your launch date back by a week or two, or you create some extra promotional content your affiliates could use.
Whatever it is, you need an easy way to get in touch with them.
The best way to do this is to create an affiliates-only mailing list inside your Email Service Provider. The only people on this list should be confirmed affiliates who have already signed up to your program and received their link.
Then, notifying your affiliates is as easy as sending an email to that specific mailing list.
Yes, that means you’ll have a subscribers list and a separate affiliates list.
Once again, if you’re using ThriveCart, this is pretty easy to set up. After you connect your email marketing service (such as ActiveCampaign) to your ThriveCart account, you can attribute a Mailing List ID to your affiliates. This means that once they have signed up as an affiliate, ThriveCart will automatically add them to the correct mailing list so they can get your affiliate partner updates.
A Note on Affiliates:
Be professional. When you reach out to a potential affiliate, you’re offering a business relationship. If you’re unprofessional or communicate poorly, you’ll be throwing up red flags.
The last thing an affiliate wants is to send their audience to a poor offer by a mismanaged business — and have their own audience angry at them for it.
Building a great network of affiliates requires a sleek course creator website to sell the great work that you’ve been doing.
For that, we’ve put together a neat little package that covers everything from your opt-in pages to your affiliate's sales pages, plus all the tools that you’ll need to build your online course. What’s more, you’ll have access to Thrive University to help you start your online course business.
There’s no other way to say it, you need Thrive Suite for Course Creators.
Your Online Course Launch Checklist
In this chapter, you learned the fundamentals of coordinating a successful online course launch, by focusing on 4 key areas. Make sure these are at the top of your course launch checklist:
- 1Preparing a sales funnel that seamlessly moves customers through the checkout process
- 2Adding scarcity to compliment your course launch and incentivize your customers
- 3Utilizing email marketing to warm up your mailing list, inform them about your product and drive them to your online course sales page
- 4Leveraging other people's audiences through partnerships and offering an attractive affiliate program
And once you've conquered the all-important product launch to finally see some real cash flowing into your business, it's time to scale it all up.
Share this Ultimate Guide on your Social Media Accounts with the buttons above
Next: How to Scale Your Business
Yup, the next chapter is all about tightening the bolts, optimizing your website and making sure your business SCALES UP.
In Chapter 7, we’re going to show you:
It's been a wild ride, but hopefully you're starting to see how all the puzzle pieces come together to create your first online business. Time to wrap things up!
Disclaimer: Nothing on this page, our website, or any of our content or courses is a promise or guarantee of results. All the material within ThriveThemes.com is provided for information purposes only and we are not implying you'll duplicate any results. Your results will vary and depend on many factors. All business entails risk and no action should be taken solely based on the information in ThriveThemes.com. The publisher is not entering into any kind of practitioner/client relationship with its readers. The publisher is not responsible for errors or omissions.
This site is not a part of the Facebook website or Facebook Inc. Additionally, This site is NOT endorsed by Facebook in any way. FACEBOOK is a trademark of FACEBOOK, Inc.
Copyright 2019 by whitesquare GmbH, Thrive Themes | Contact | Privacy | Disclaimer
