If you have Thrive Apprentice installed and activated, you will be able to very quickly and easily add a “Log In” or “Log Out” option inside your site’s menu, so that users that are not logged in can do that, or the other way around.
Here is what such a menu can look like, for a user that is currently logged in:

This way, they can easily log out, with the click of a button. If they do not have an account, you can also add a “Register” option, so that they can sign up.
If you want to achieve this, here is what you can do:
Access the menu you want to add the options to
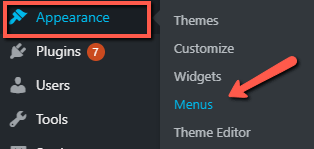
In your WordPress admin dashboard, in the left sidebar, hover over “Appearance”, and click on “Menus”:

Then, select the menu on which you want to add the button, using this dropdown:

Add the “Thrive Apprentice account” menu item to your menu
Next, go to the “Add menu items” section, and click on the “Thrive Apprentice account” section:

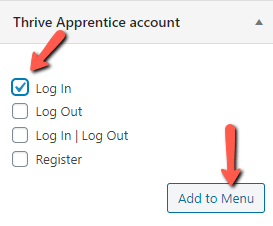
Then, you will have to select which options should be added to the menu. Depending on what you’re trying to achieve, here are the options that you can add to the menu:
-
Log In: if a visitor is not logged in, they will be able to use this button; the button will appear only for the users that are not logged in.
-
Log Out: if a user is logged in, they can log out using this button; the button will appear only for the users that are logged in.
-
Log In/Log Out: this button will appear either as “Log In” (if the user is not logged in) or as “Log Out” if the user is logged in.
-
Register: if a user is not logged in and does not have an account, they can register using this button; the button can be seen only by users that are not logged in.
To add any of these options (you can add one or more), tick the checkbox in front of each item that you want to add, and click on “Add to Menu”:

|
Warning! If, for example, you add both the “Log In” and “Log in | Log Out” options, then, if someone is not logged in, they will see two “Log In” options in the menu, like so:  To avoid this, make sure you only choose one of the two options. |
As an example, I will add the “Log in | Log Out” option, so that users will permanently have the option to log in or log out, from the menu.
Edit the Option
Once added to the menu, you can also use some options for this button. To use these, go to the “Log In | Log Out” menu item (or whichever you chose), and expand it, using the down arrow:

Navigation Label
You can change the label, if you want, by entering the label in this field:

Show When
Next, you can change when the item should be shown. For that, click on the “Show when” field, and choose the suitable option:

Link to
Then, you can choose the page where the “Log In” button should go to. By default, this will be set to the “Apprentice Login Page”, but you can also choose a custom one:

If you do that, another field will appear, where you can insert the custom URL:

Move
If you want to move the placing of the item in the menu, you can do that, using this section:

Remove
Also, you can remove the item if you decide that you do not want it to appear in your menu anymore:

Save Menu
Finally, once you are done with all the modifications, click on “Save Menu”:

If you need more details on how to edit a menu using WordPress, or how to use the Menu Settings from the bottom side of the page, make sure to check out this article.
This is how you can easily add the “Log In”, “Log Out”, or even “Register” buttons into your menu, when using Thrive Apprentice.
I really hope this article was useful to you. Don’t forget to check out all of the articles and tutorials from our Knowledge Base, for more information about Thrive Themes and all of the features.
If this article was useful, please make sure to rate it with a smile below 😃