If you are using the Gutenberg editor to add and modify the content of your posts, and you also have various Thrive Themes products installed and activated, you will be able to use the Thrive blocks.
This means that you are able to use the WordPress editor, while still making use of the blocks designed in Thrive Architect/ Thrive Leads/ Thrive Ultimatum/ Thrive Ovation/ Thrive Quiz Builder.
|
Important! Please note that, for this feature to properly function, you will need to update your website to WordPress 5.5. |
Access the Blocks
First of all, in your admin dashboard, go to “Posts” -> “All Posts”, and open one of your posts in the WordPress editor. You can do that by hovering over the post, and clicking on “Edit”:

Then, you will be able to add Thrive blocks in two ways:

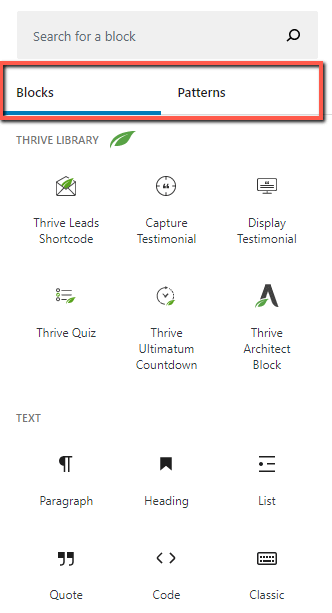
1 – If you click on the plus sign from the top left corner, this left sidebar will open. This sidebar has two different tabs: “Blocks” and “Patterns”. The “Blocks” tab will be open by default:

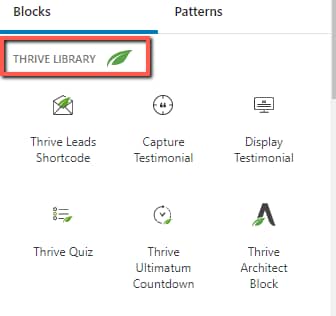
As you can see, one of the sections here is the “Thrive Library” section:

To add a block, click on it, and it will be inserted in the editor.
2. – If you click on the plus sign found at the end of the WordPress content, a pop-up will open:

Again, a list of some of the Thrive blocks will appear there. To add a block, click on it:

Then, the block will be added to the editor.
As mentioned earlier, depending on the Thrive plugins that you have installed and activated on your site, you will be able to add various blocks. Here are all the different ones that you can find in the “Thrive Library” list:

Thrive Architect Blocks
Firstly, you can add the “Thrive Architect Block”, which will allow you to add an existing Thrive Architect symbol, or create a new one. To add this block, simply click on it:

The block will be added after the content:

After adding a Thrive Architect block, you will have to decide whether you want to choose and insert an existing block, or create a new one:

Use a Previously Saved Block
Note: The blocks added here are the symbols found in the Thrive “Symbols & Blocks” library. You can access the library from your Thrive Dashboard -> Global Elements -> Symbols & Blocks, or by clicking on “Symbols Dashboard”, as seen in the image above.
If you want to select an existing block, you can use the search bar to filter the list, or click on the “Select a block” field and choose the one that you want to use:

From the dropdown that opens, with all of the available blocks and symbols, choose the one you want to add:

After clicking on it, the block will automatically be added:

Create a New Block
The other option that you have, besides selecting an existing block, is to create a new one. If you want to do that, click on the “Create a new block” tab:

Then, enter its title, and click on “Create Block”:

This will open the Thrive Architect editor, where you will be able to edit and create a block using all of the available elements:

Then, once you save the changes, the element will automatically be updated in the WordPress editor, as well.
After inserting the block, you are able to use some of its options to further customize it. You can find a way to use these options later in the article.
Thrive Leads Shortcode Blocks
If you want to add a “Thrive Leads Shortcode” block in the editor, you can do that, just as shown in the case of a Thrive Architect block, but this time, choose “Thrive Leads Shortcode”:

Then, to choose a Thrive Leads shortcode, click on this field:

This will open a list of all of the available Thrive Leads shortcodes. These will be the ones that you’ve created in the Thrive Leads dashboard, as explained in this article.
Click on the shortcode that you want to insert:

Then, you can edit the block as you wish, using the options described a bit later in this article.
Thrive Ultimatum Countdown Blocks
Next, you have the possibility to add a “Thrive Ultimatum Countdown” block, if you have previously created a campaign using a “Shortcode” design in Thrive Ultimatum.
If you’re not familiar with the Thrive Ultimatum Shortcode campaigns, please check out this article.
If you want to add this block to your WordPress editor, go ahead and click on the plus sign and choose this block from the list:

Now, you will have to choose the campaign that you want to insert. Click on this field:

This will open the list with the available running campaigns, and you can click on the one you want to insert:

Then, select the shortcode that you want to insert (one campaign can include multiple shortcode designs):

The Ultimatum Countdown will be added. You can then edit it, and even change the campaign and shortcode, from the right sidebar, as advised later, in this article.
Thrive Quiz Builder Blocks
The next type of block that can be added in the WordPress editor is the “Thrive Quiz” one, meaning that you can add quizzes to the Gutenberg editor.
In order to add a quiz, choose the “Thrive Quiz” block from this list:

Click on the “Select a quiz” field and choose the quiz that you want to insert:

Once you do this, the quiz will be inserted. You can change it, if you want, and also edit it. You can find instructions a bit later in the article.
Thrive Ovation Blocks
You can also capture or display testimonials in the WordPress editor, with the use of the Thrive Ovation blocks.
There are two different blocks for testimonials: “Capture Testimonial” and “Display Testimonial”. To add either of them, click on the plus sign and select the one you want:

-
Display Testimonial
If you want to display a testimonial, add this block, and click on “Setup”:

This will open the Thrive Architect editor, where you can select a testimonial template, and then customize it to your liking:

Once you create and customize the testimonial, click on “Save Work” to save everything.
-
Capture Testimonial
Similar to the “Display Testimonial” block, the “Capture Testimonial” one will also have the “Setup” option:

If you click on it, you will be taken to the “Thrive Architect” editor. When you’re done customizing the “Capture Testimonial” element in Thrive Architect, click on “Save Work” to save it.
The Thrive Ovation blocks will then be added into the Gutenberg editor, and you can edit them and customize them as you wish:

Edit the Thrive Blocks
Once you have added or created a Thrive block and inserted it in the WordPress editor, you will be able to edit it, as well.
Note: I will use a Thrive Architect block to showcase the options, but please keep in mind that they will be identical for whichever Thrive block you are editing.
Move, Drag, and Other Options
Firstly, when you select the block, some options will appear on the top left corner of the block:

-
Change block style or type
The first option here will let you change the style/type of the block. In this case, if you click on the “Thrive Architect” icon, you will be able to transform the block into a group:

You can read more about Group blocks here.
-
Drag the block
The next icon will allow you to grab the block and drag and drop it where you want, on the editor:

-
Move up/down
You can also move the block up or down one level, using the up/down arrows:

-
More options
Lastly, the three-dotted icon will provide even more options for the block:

If you click on this icon, you will notice a dropdown with all of these options, that you can use to fully customize this element:

Right Sidebar Block Options
Besides the options that appear when you select the block, you also have some options on the right side of the editor, in the “Block” tab:

-
Block Settings
The first section is the “Block Settings” one, and this is where you can go back to where you’ve created the block, and customize it.
The option that you see here will depend on the chosen block:
Thrive Architect Block:
For this one, you will be able to open the Thrive Architect editor and customize the block from there:

Thrive Ultimatum Shortcode Block:
For this block, you have the option to edit the Ultimatum timer, and also change the campaign and shortcode:

Thrive Quiz Shortcode Block:
The available options for the Quiz are to edit it, from the Thrive Quiz Builder dashboard, or to choose another quiz:

Display Testimonial Block:
The only option available for this block is to open it in the Thrive Architect editor and customize it there:

Capture Testimonial Block:
Similarly, the only option available for this block is to open it in the Thrive Architect editor and customize it there:

Thrive Leads Shortcode Block:
For this block, you can use the “Block Settings” section to edit the Thrive Leads shortcode, from the Thrive Leads Dashboard, and also to change the Thrive Leads shortcode and choose another one:

-
Advanced
The second section here is the “Advanced” section. Click on it, to expand it:

Then, a field will appear, and you will be able to insert additional CSS classes if you want:

These are the ways in which you can use the Thrive blocks when editing your content with the Gutenberg editor.
Don’t forget to check out our knowledge base, for more information about various Thrive Themes products and features.
I really hope this article was helpful. If so, make sure to leave a smile below 🙂