Install the Plugin
MailPoet is a self-hosted plugin, so the process of setting it up is a bit different from most of the other services.
First of all, you will have to install the plugin. For that, in your WordPress admin dashboard, go to “Plugins” -> “Add New”:

Then, search for the “MailPoet” plugin:

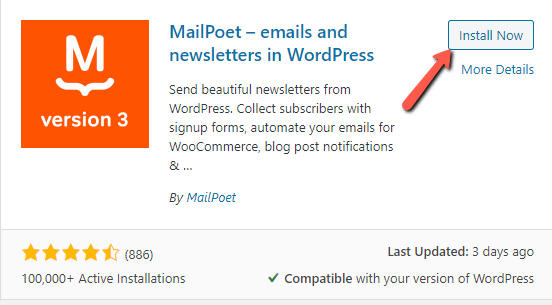
When you find MailPoet version 3, click on “Install”:

After the plugin is installed, activate it, as well, by clicking on “Activate”:

Once the plugin has been successfully added and activated, you can access the Thrive Dashboard, to create the connection.
Access Thrive Dashboard
From the left sidebar, click on “Thrive Dashboard”:

Scroll down and look for the “API Connections” card and, when you find it, click on “Manage Connections”:

This is where you will be able to see a list with all of your active connections, all the services that you have set up. To add a new one, click on “Add New Connection”:

Click on the “Select an app” field and scroll down to get to “MailPoet”. Click on it:

All you have to do now is click on the green “Connect” button:

The connection is ready, and you can start connecting your forms to this service:

The plugin will appear in the left sidebar, and you can start setting up your emails, lists, etc:

Connecting MailPoet to a “Lead Generation” element
If you want to connect your forms to MailPoet, you can add a “Lead Generation” element (or use an existing one) to one of your posts/pages, and set up the connection.
Here is how to achieve that:
-
Add Connection
After adding a “Lead Generation” element to your editor, click on it, to see all of its options.
In the left sidebar, make sure that “API” is selected here:

Then, click on “Add Connection”:

A pop-up will open, where you will have to set up the new connection:
Connection
Firstly, click on the “Choose Connection” field, to open the list with all the available connections, and choose “MailPoet”:

Mailing List
Then, you will have to choose your mailing list:

When you’re done, click on “Apply”:

The connection will be added. You can then move on and set up the form fields, choose what happens after someone successfully submits the form, and so on.
2. Set up the form fields
The connection has been made. The next step would be to set up the form fields.
For each type of field, we have created a separate article, that explains how to add and customize it, and you can check them out here:
You can find out more information about how to do that, in the dedicated section of the “Lead Generation” article, that you can find here.
After setting up the fields, the next step would be for you to choose what happens after someone successfully submits the form to your site.
If you need guidance with this part, you can also check out the article about the “Lead Generation” element, where we’ve explained what your options are, in the After Successful Submission section.
You’re all done, and you can start using the connection. Just make sure to save all the changes, so that the API connection to be saved as well. To do that, click on the green “Save Work” button from the bottom left side of the screen.
Connecting MailPoet to Thrive Leads
Besides linking your account to a “Lead Generation” element, you can also connect the service to one of the forms created in Thrive Leads. If you want to do that, access the Thrive Leads dashboard, by hovering over “Thrive Dashboard” (in the WordPress admin dashboard):
Then, look for the Lead Group, that contains the type of form that you want to add the connection to, and click on it, to open the list with all of the form types:
After you find the form type (in this case, “Widget”), click on “Edit”, from its right side:
A list with all the “Widget” types of forms will open. Look for the one that you want to add the connection to, and click on “Edit Design”:
Now, the Thrive Architect editor will open. The form will have a “Lead Generation” element inside it, and you can select it, by clicking on it, in the editor:
The “Lead Generation” options will appear in the left sidebar. The way to set up the MailPoet connection is exactly as described above when explaining how to link this connection to a “Lead Generation” element.
You can then set the display settings of the form, and choose on what posts/pages it should appear, and you’re all set.
You are now all set to use this connection. Each time someone will sign up using a form from your site, they will also be added to the chosen mailing list, as a subscriber.
If you need more information about various Thrive Themes features or products, make sure to check out our articles and tutorials, here.
I hope this article was useful to you. If that’s the case, don’t forget to leave a smile below 😃