This article will explain how to easily integrate a form created via Gravity Forms to a “Lead Generation” Element.
Get the HTML code from Gravity Forms
Naturally, you already have the Gravity Forms plugin downloaded & installed.
Next, go to your Gravity Forms Dashboard.
If you haven’t already, create a new form and customize it as you wish.
If you’ve already created one and designed it to your liking, open the “Forms” section to locate it. If you want more in-depth details about creating a form using the Gravity Forms plugin, check out their article.
Change the placeholders
Keep in mind that when creating your form with Gravity Forms, you have to make sure you also change the “Placeholders” for its fields.
This is important because these placeholders are the ones that will appear inside the fields of your form after you add it to your page. Thus, in the “Placeholder” field you should write something specific to the field, such as “Name”.
This is how to set the “Placeholders”. Click on a field. Then go to “Appearance”. You will see the “Placeholder” field:

Write a relevant name in the field and click on the “Update” button from the right side of the screen:

Copy the HTML code
After you’re done customizing your form, click on the “Preview” option:

Go to either one of the form fields and right-click on it. Choose the “Inspect” option and the Developer Console window that contains the HTML code will appear, on the right side of the screen:

Look for the part of the code that starts with “<form..” and right-click on it:

Hover over the “Copy” option and click on “Copy Element”:

Insert the HTML code to your Lead Generation element
Now, you can go to the post or page that you want to add the form to and edit it with Thrive Architect.
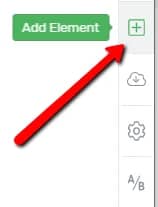
In your editor, on the right sidebar, click on the “plus” sign. This is where you can add a new element from:

Look for the “Lead Generation” element or search for it in the Search Bar:

Drag and drop it on your editor where you want the form to be placed. You can customize it now (for example: resize it, align it, etc.) or leave that for later:

This “Lead Generation” article goes more into detail about how you can use the element.
Once the “Lead Generation” element is placed, the options will appear on the left sidebar:

If you take a look under the “Main Options” section, you can see the “Connection” field, where you can either choose an “API” connection or an “HTML Code” connection:

Click on the “HTML Code” button. You will find a field that says: “Insert your code here”. This is where you have to paste the HTML Code of the Gravity Form that you’ve previously copied:

After you’ve inserted the code, click on the “Generate Form” button:

You will notice that the form has been created and you will be able to see and edit the form fields from the left sidebar. This is where you can quickly edit or delete the form field labels:

If you need to further edit the “Lead Generation” element, you can do that by clicking on the “Edit Form Elements” button found at the top part of the left sidebar. If you need to find out more about how to do that, we’ve got that covered in one of our articles.

After you finish setting up the Lead Generation element, don’t forget to save your changes by clicking on the green “Save Work” button, found on the bottom left corner of the editor.
This is how you can easily integrate Gravity Forms on a “Lead Generation” element. If you want to find out more about various elements using Thrive Architect, you can browse our knowledge base.
If you found this article useful, don’t forget to rate us with a smile below 🙂