This article will explain how to connect a “Lead Generation” element to your Google Drive account, in order to allow users to upload files when filling in the “Lead Generation” form.
If you want to achieve this, you will need first create an API connection from the Thrive Dashboard, and then connect your “Lead Generation” element to Google Drive. Here is how to do all that:
Create the API Connection
First of all, you will need to create the credentials needed in order to connect your Google Drive account to your Thrive Dashboard.
For that, access the Google APIs console. Then, you will need to sign in to your account, if you’re not already signed in.
Once you do that, you will be taken to the API & Services Dashboard. In order to go further, you will need to create a project or select an already existing one.
To create a new project, click on the “Create Project” option:

Then, configure the new project, and click on “Create” when you’re done:

Enable the Google Drive API
After creating the new project, you will need to enable the APIs and services. For that in the project “Dashboard” section, look for the “APIs” card and click on “Go to APIs overview”:

Then, from the top side of this page, click on the “Enable APIs and services” option:

This will open the API Library, with various products. What you have to do here is look for the “Google Drive API”, or search for it in the search bar from the top side of this page:

When you find the card, click on it:

Then, click on the “Enable” option, in order to enable the Google Drive API:

Once you have enabled this API, you can move on to the next step.
Configure the OAuth Consent Screen
After the project has been created, and the APIs and services have been enabled, you need to authorize your domains. Firstly, access the “Credentials” section of the left sidebar of the project, after enabling APIs services:
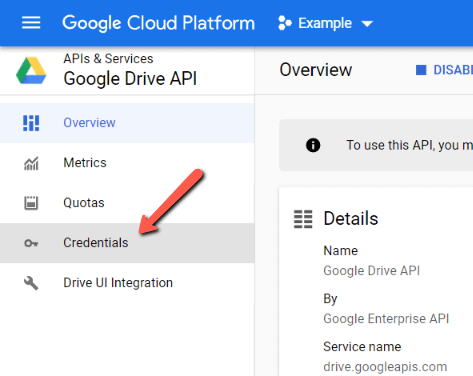
Click on the “Configure consent screen” button found here:

This is where you will have to enter the authorized domains, (one or more). You will have to create and register an app. Therefore, choose the “External” user type here, and click on “Create”:

Then, you will need to enter the app details, such as name, logo, etc, as well as the authorized domains. Enter the desired application name in this field:

Then, enter your site’s domain in the “Authorized Domains” field:

If you want, you can also add links to your homepage, or to the Privacy Policy/Terms of Service pages, and then click on “Save and Continue”:

|
Note: In some cases, the Privacy Policy and Terms of Service Pages are mandatory, so you will be required to add them to the respective fields. |
You can then go through all of these steps to further set up the application:

Click on “Back to Dashboard” when you’re finished:

And, when you’re back in the dashboard, make sure you also publish the app, using this option:

Then, a pop-up will open, and you will have to confirm:

Generate OAuth Credentials
Next, you need to generate some keys, which we will use in the Thrive Dashboard. Go to the “Credentials” section of the left sidebar:

From the top side, click on “Create Credentials”:

Then, a dropdown will appear. Here, choose the “OAuth client ID” option:

A field will appear, where you have to choose the application type. Click on this field to open the list of available types:

From this list, choose “Web Application”:

You can change the default name for the application if you want. What’s important here, is to set the “Authorised redirect URLs”. Click on “+Add URL”:

Then, in the field that opens, add this URL: https://[YOUR-SITE]/wp-admin/admin.php?page=tve_dash_api_connect
Keep in mind that you will have to replace “[YOUR-SITE]” with your website:

After entering this URL, click on “Create”:

The credentials will then be generated. A pop-up will open, with your Client ID and Client Secret keys:

These are the keys that you need in order to create the connection from the Thrive Dashboard.
|
Note: You may also go through the domain verification process if you wish. You can verify the domain by accessing this section of the left sidebar:  |
Access Thrive Dashboard and create the connection
Once you have these two keys, you can access your “API Connections” section and set up the Google Drive connection.
For that, in your WordPress admin dashboard, in the left sidebar, click on “Thrive Dashboard”:

A list of all of your Thrive Products will open. Scroll down, and you will also see some features. Look for the “API Connections” card, and click on “Manage Connections”:

Here you will be able to see all of your active connections. Click on “Add New Connection”:

Then, click on the “Select an app” field, to open the list with the available integrations:

Scroll down until you see the “File Storage” section, and click on “Google Drive”:

You will be asked to enter the Client ID and Client Secret keys, that you have previously generated, here. Enter the keys in these two fields:

After you do this, click on “Connect”:

You will have to grant Google Drive permission to access files and folders:
|

|
 |
And then you will see this success notification:

You can then start connecting any opt-in form to Google Drive.
Connect the “Lead Generation” element to Google Drive
Everything is set up in order to connect a “Lead Generation” element to your Google Drive account.
For that, either add a “Lead Generation” element to a page or post in Thrive Architect, or edit one of your Thrive Leads opt-in forms. Feel free to check out this article to find out how to properly set up this element.
Set up the “File Upload” field
Then, you will be able to add a “File Upload” field to your element and connect it to your Google Drive account. In the left sidebar, you will see a list of all the form fields. Click on “Add New”, to set up a new form field:

A pop-up will open. Click on the first field here, which is the “Field Type” one, to open a list with the available types of fields:
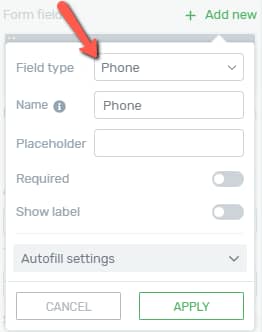
From this list, choose “File Upload”:

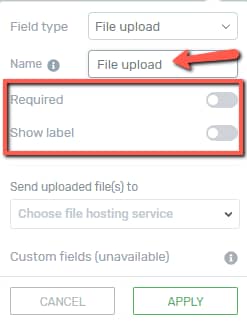
Then, you can provide a name for this field, but this is optional, and will not affect the looks of the “Lead Generation” element in any way. Also, feel free to choose if the field should be required or not, and if you want to show or hide its label:
The next step is to set the hosting service, where the uploaded files should be sent to. This is where we will choose the files to be sent to Google Drive.
For that, click on this field:
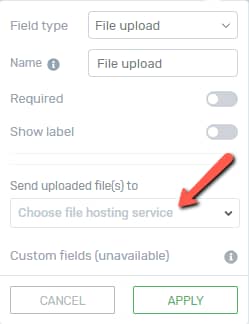
You will see “Google Drive” in this list. Click on it:

Then, choose the Google Drive folder where the files should be stored, and insert it in this field:
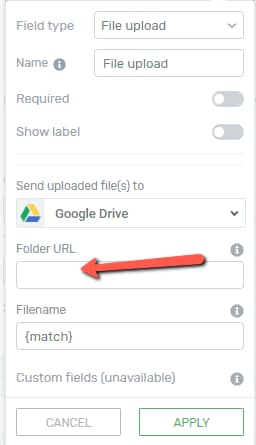
If you need help finding the URL of a folder, check out this article.
Lastly, you have to choose the file name for the file that users will upload to your site:

This can be either static or dynamic. This means that you can either insert a static name in this field (for example “Image”), or you can use the following shortcodes:
-
{email} – using this shortcode, the name of the file will be the email of the person who submits it;
-
{date} – the name of the file will be the date of the submission;
-
{time} – the name of the file will be the time of the submission;
-
{match} – the name of the file will match the name of the uploaded file.
For example, if you enter “Image_{email}_{date}” in this field, the name of the received files would look similar to this: “Image_example-mail+gmail.com_12-05-2020“.
After you finish setting up the field, click on “Apply”:

You’re all done! Now, whenever someone uploads a file using your form, their files will be stored in the Google Drive folder that you have set up, as described above.
Edit the design of the field
After setting up the field, you can set up the allowed file types that the users can upload, and the maximum number/size of files. If you want to do that, you will first have to enter the “Edit Mode” of the “Lead Generation” element.
For that, while the “Lead Generation” element is selected, click on the “Edit Form Elements” option:

Then, in the editor, click on the “File Upload” field, to open some options for this field:

Some options will appear in the left sidebar:

Here is how you can use these options:
Edit File Upload
If you click on this button, you will be able to enter the “Edit Mode” of the “File Upload” field type, and this will allow you to edit each of the items of the field (for example, you can customize “Select Files” button, etc ):

Required field
When you first set up the form field, you had to choose whether it should be required or not. However, you can also set this up from here, using the switch next to this option:

Show Label
The same goes for the next option – you can also show or hide the label from here:

Allowed file types
Important!
If you want to see which file types your users can use when uploading a file to your site, please see this article.
This is where you can decide which type of files people will be able to upload to your site. Simply select the file types that you want to be uploaded:

Note: By default, only “Documents” are set here, so make sure to add more allowed file types, if you want the users to be able to upload other types of files, as well.
Max files and max file size
Lastly, you can set the maximum number of files to be uploaded, as well as the maximum size of each file (in MB). To change the default numbers, either enter a numerical value in each of the fields or use the up/down arrows:

Moreover, feel free to use the rest of the general options to customize both the “File Upload’ field, as well as the entire “Lead Generation” element.
These were the ways to set up a “File Upload” type of field and connect a “Lead Generation” element to your Google Drive account. If you want to find out more about various Thrive Themes features and products, feel free to take a look at our knowledge base.
I really hope this article was useful. If so, don’t forget to leave a smile below. 😄