Before connecting a “Lead Generation” element with Zapier, you need to have two things:
-
an API connection between your Thrive Themes account and your Zapier account;
-
a Zap that is set up to work specifically with the “Lead Generation” elements that you create on your website with Thrive Leads or Thrive Architect.
If you need details on how to create these two things, please check out this step-by-step tutorial.
Connecting a form to Zapier is also shown in this video tutorial, starting from minute 5:49:
Once you have set up the connection and the Zap, Zapier will be available for the “Lead Generation” elements (either used in Thrive Leads or Thrive Architect) that you have on your website.
Nevertheless, to use the Zapier connection, you will have to connect the “Lead Generation” elements to Zapier.
Here is how you can do that:
Connect a Lead Generation element to Zapier
You can do this for any opt-in form you have on your website, regardless if it is in a lightbox used by Thrive Leads or inside your content build with Thrive Architect. The important thing is for the opt-in form to use the “Lead Generation” element.
The first thing to do is to edit the design of the Thrive Leads Lightbox or edit the page you have the “Lead Generation” element on with Thrive Architect.
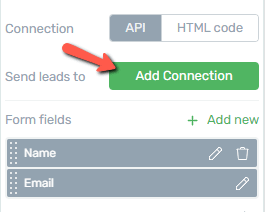
Once there, click on the “Lead Generation” element to see its options in the left sidebar. Then, from the “Main Options” in the left sidebar, click on the “Add Connection” option:

Connection
A pop-up window will open where you can connect the “Lead Generation” element to Zapier:

Click on the field, to open the list with all of the available connections.
Look for the Zapier connection and when you have found it, click on it:

Set connection details
Then you will have to continue by setting the connection details. There are two details you can set here:
-
You can choose to “Send IP Address” by checking the checkbox next to this option. This means that together with the rest of the details that the subscribers will complete in the opt-in form, you will also receive their IP address:

-
You can also add different tags in the designated field. The tags you enter here will be displayed in the app you have integrated into your Zap, along with the other information about the visitor who will sign up through this form:

After you have completed these options, click on the “Apply” button from the bottom right corner of the pop-up window to go on.

Set Form Fields
Next, you will have to set what fields to appear in the opt-in form and which ones should be required/mandatory for the subscription. The “Email” and the “Name” fields appear by default here and the “Email” field is mandatory since without an email address it would not make sense to subscribe.

You can set the “Name” field to be required as well, or you can add a new field, the “Phone” field, if you wish, by using the “Add New” button:

Each field can be customized. You can change their name into a description. For e.g. instead of “Email”, you could write “Please write down your email address”.
Moreover, the “Name” and the “Phone” fields can be deleted, by clicking on the little trash icon next to them.
After you have set the fields, click on the “Next” button to go on.
After successful submission
Last but not least, you will have to select a post-opt-in action, which means that you will have to decide what happens after a visitor signs up through the opt-in form:

You can choose between these actions:
-
Redirect to Custom URL: if you choose this action, a field will appear where you can enter a custom URL/a link to a page, where you want to redirect the users after they subscribe.
-
Show success notification: this will allow you to enter a customized message that will be displayed after someone subscribes.
After you have chosen the post-in action as well, simply click on the “Save” button from the bottom right corner of the pop-up window, and your “Lead Generation” element will be connected to Zapier.
Test the connection on the front-end
After you have connected the “Lead Generation” element to Zapier, you can save your work and test how the connection works on the front-end, for the visitors of your website.
First, save the page or the lightbox design that you were working on, by clicking on the “Save Work” button, from the bottom-left part of the page:

Then, preview it to see how the “Lead Generation” element works with Zapier on the front end. Use the “Preview” button from the bottom center part of the page:

Note: You will have to preview the page, use the “Preview” option in an incognito window, or in a browser where you are not logged in, to be able to see, and use the “Lead Generation” element just like the visitors of your website would.
Once you are on the page with the “Lead Generation” element, complete the form to sign up as a visitor would:

Then, wait for the Zap to send you the information about the sign up through the app of your choice.
The notification message, as well as the details/data in it, will be in accordance with the way you have customized the message when you have created the Zap for this connection. This means that it will include the information that you selected (inserted the fields for) when you customized the message.
Hopefully, this article was useful to you. If so, please reward it with a smile below 🙂