If you want to connect your Dropbox account to your Thrive Dashboard, thus allowing the users of your site to upload files, which will be stored in your Dropbox account, you can easily do that. Keep reading this article and follow the instructions.
Firstly, you will need to create an API connection from the Thrive Dashboard, and then connect your “Lead Generation” element to your Dropbox account.
Create the API Connection
In order to create the connection via API, you will need to access the Dropbox App Console. Sign in to your account, if you haven’t already. Then, you will need to create an app.
Create an app and copy the API keys
After you sign in, you will be taken to the App Dashboard. In order to create an app, click on the “Create app” button, from the top right side of the dashboard:

Then, you have to configure the new app. First, choose the “Scoped access” option:

The second step is to choose the type of access that you need:

You can check out this article to learn about the Dropbox app permissions.
The third and final step is to name your app and check the Terms and Conditions agreement checkbox:

When you’re done, click on “Create app”.
A page will open, with some settings for the new app.
Important!
|
You will have to make sure some options are checked here, in order for the connection to be successful. After creating the app, on the page that opens, go to the “Permissions” tab:  In the “Files and Folders” section, make sure that these two options are checked:
 Then, click on “Submit”:  |
You can go back to the “Settings” tab, and continue the setup as described below.
What you have to do here is to complete the “Redirect URLs” field:

This is the URL that you have to add in this field:
Keep in mind that you will have to replace “[YOUR-SITE]” with your website, and click on “Add”:

This is how your URL should look like, and you can add more links here if you need to:

Once the Redirect URL has been added, you will need to add the domain of your site in the “Chooser / Saver / Embedder domains ” section, as well.
Tip: You can add more than one site here, like so:

After this, you’re all set to create the connection in your Thrive Dashboard.
What you will need there, are the two app keys that you can find on the same page where you have added the Redirect URLs.
Just above that section, you will see the “App key” and “App Secret” fields:

Once you find them, you can access the Thrive Dashboard and insert these keys, to create the connection.
Access Thrive Dashboard and create the connection
To do that, in your WordPress admin dashboard, in the left sidebar, click on “Thrive Dashboard”:

This will open a list of all of your Thrive Products. Scroll down, and you will also see some features. Look for the “API Connections” card, and click on “Manage Connections”:

This is where you can see all of your active connections. To add a new one, click on “Add New Connection”:

After this, click on the “Select an app” field, in order to open the list with all of the available integrations:

Scroll down to get to the “File Storage” section, and choose the “Dropbox” option:

Next, you will be asked to enter the App Key and App Secret keys, the ones mentioned here. Enter the keys in these two fields:

After you enter the credentials, click on the green “Connect” button :

You will have to grant Dropbox access to your files and folders:

Once you do this, you’ll see a success notification:

You can then access any “Lead Generation” element from your site, and connect it to your Dropbox account.
Connect the “Lead Generation” element to Dropbox
First of all, you will need to either add a “Lead Generation” element to a page or post in Thrive Architect, or edit one of your Thrive Leads opt-in forms. Feel free to check out this article to find out how to properly set up the “Lead Generation” element.
Set up the “File Upload” field
Once you have opened a “Lead Generation” element, you will be able to add a “File Upload” field to it and connect it to your Dropbox account.
After you select the element in the editor, in the left sidebar, you will see a list of all the form fields. Click on “Add New”, to set up a new form field:

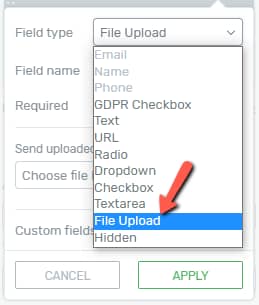
A pop-up will open. Click on the first field here, which is the “Field Type” one, to open a list with the available types of fields:

From the list that opens, click on “File Upload’:

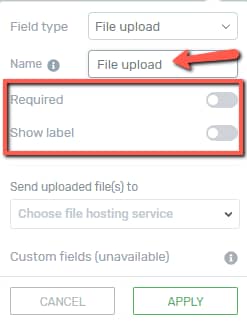
After that, feel free to choose a suitable name, and set if the field should be required or not, as well as if the label should be shown or hidden:

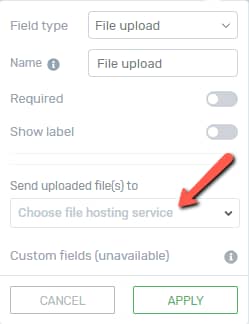
The next step is to set the hosting service, where the uploaded files will be stored. This is where we will choose the files to be sent to your Dropbox folder. Click on the “Choose file hosting service” field:

A list will open, with all the available connections. Click on “Dropbox”:

Next, you will have to use the folder picker, to choose the Dropbox folder where the uploaded files will be stored. Click on this field:

Then, a pop-up will open. Select the desired folder, and click on the “Choose” button:

Lastly, you have to choose the file name for the file that users will upload to your site:

The file name can be either static or dynamic. This means that you can either insert a static name in this field (for example “Image”), or you can use the following shortcodes:
-
{email} – using this shortcode, the name of the file will be the email of the person who submits it;
-
{date} – the name of the file will be the date of the submission;
-
{time} – the name of the file will be the time of the submission;
-
{match} – the name of the file will match the name of the uploaded file.
For example, if you enter “Image_{email}_{date}” in this field, the name of the received files would look similar to this: “Image_example-mail+gmail.com_12-05-2020“.
After you finish setting up the field, click on “Apply”:

This is it! The field has been set up, and people will be able to upload files to your site, which will then be stored in your Dropbox folder.
Moving forward, you can also decide what file types people can upload, for example, and what maximum size they should have. For that, you can edit the form elements of the “File Upload” field, by entering the “Edit Mode” of the “Lead Generation” element. Here is how to do that:
Edit the design of the field
While the “Lead Generation” element is selected, click on the “Edit Form Elements” option:

In the editor, click on the “File Upload” field, in order to open its options:

You will be able to use the options that appear in the left sidebar, to customize this field:

Here is how you can use the options under the “Main Options” section of the left sidebar:
Edit File Upload
This option allows you to enter the “Edit Mode” of the “File Upload” field type, and this is how you will be able to edit each of the items of the field (for example, you can customize the “Select Files” button, etc ):

Required field
You can also choose if the field should be required or not from here, as well. For that, simply use the switch next to this option:

Show Label
The same goes for the next option – you can also show or hide the label from here:

Allowed file types
|
Important! If you want to see which file types your users can use when uploading a file to your site, please see this article. |
You can decide what file types can be uploaded to your site. Simply select the file types that you want to be uploaded:

|
Note: By default, only “Documents” are set here, so make sure to add more allowed file types, if you want the users to be able to upload other types of files, as well. |
Max files and max file size
Besides the allowed file types, you can also set the maximum number of files to be uploaded, as well as the maximum size of each file (in MB). To change the default numbers, either enter a numerical value in each of the fields or use the up/down arrows:

This is how you can customize a “File Upload” field using the “Main Options” section of the left sidebar. Of course, feel free to use the rest of the general options, as well, to customize the field even further.
These were the ways to set up a “File Upload” type of field and connect a “Lead Generation” element to your Dropbox account. If you want to find out more about various Thrive Themes features and products, feel free to take a look at our knowledge base.
I really hope this article was useful. If so, don’t forget to leave a smile below. 😄