Put simply, Google Analytics can be used to track the traffic of your website and get reports about various aspects of it (e.g. traffic sources, conversions, etc.).
In order to use this popular web analytics platform to get data on your website’s traffic, you will need to add a Google Analytics tracking code to your website.
You can easily do this, with just a few steps, if you have a Thrive Theme Builder Theme installed on your WordPress based website.
1. Get the tracking code
First, you need to get the tracking code you want to add/insert. Sign in to your Google Analytics account, go to the “Admin” page, select an “Account”, then the “Property” you want to get the code for, and then click on “Tracking Info” → “Tracking Code”.
Your tracking code, which is a script, will be displayed at the top of the page. Make sure to copy it. If you need more details on how to get this code, please access the Google Analytics knowledge base here.
2. Insert the tracking code to the Thrive Theme Builder Theme
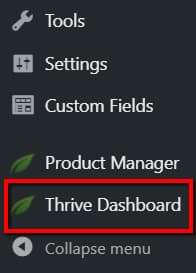
Now that you have the tracking code, you will need to insert it as a script to your theme. Go to your WordPress admin dashboard and click on the “Thrive Dashboard” item, from the left-side menu:

This will open your Thrive Dashboard with the currently installed Thrive Products you have on your website, as well as the Thrive Features you can use.
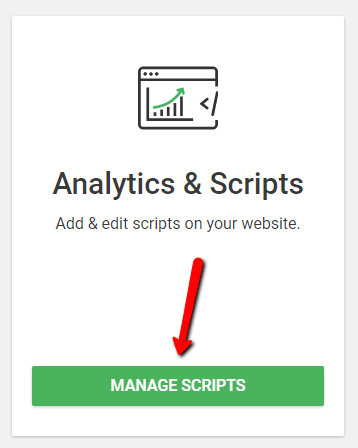
Scroll down on this page until you see the “Analytics & Scripts” card. Once you have found it, click on the “Manage Scripts” button from it:

You can add various types of scripts, therefore your tracking code as well, to your website, using the options from the “Analytics & Scripts” page that opens.
Click on the “Add New” button from the page:

Next, complete the necessary details in the pop-up that opens:

Script
Add the tracking code, you have previously copied from your Google Analytics account, into the designated field from the “Script” section of the pop-up:

Script Label
Next, add a label, a name for your code/script in the field from the “Script Label” section. This label should represent the script you are adding (in this case, for instance: “Google Analytics Tracking Code”), so that you can distinguish it from other scripts that you might add here in the future:

Placement
Then, you will have to select the location where the tracking code should be added. Click on the “Choose placement” indication from the “Placement” section:

This will open a drop-down with three possible choices: “Before </head>”, “After <body>” and “Before </body>”. In this case, since you are adding a Google Analytics tracking code, choose the “Before</head>” option from the drop-down:

It is recommended that you choose the “Before</head>” option here, because Google advises adding the code in a way in which it appears before the </head> tag is closed. This way, the code will run before the page is loaded, and all the Google Analytics features will work properly for it.
Inserted in
Last, but not least, you have to choose where you want to insert the tracking code. You can choose between Thrive Themes and Landing Pages.
Since you want to add the code to the whole Thrive Theme Builder Theme, click on the checkbox before “Thrive Themes” in order to select this one:

When you have finished completing the fields/details in the pop-up, click on the “Continue” button, from the bottom-right corner:

After you do that, you will see the Google Analytics tracking code added to your theme:

This means that it will be globally applied to the whole theme of your website, tracking its traffic.
Edit or remove code/script
You can edit or remove the code anytime with the options it has on this “Analytics & Scripts” page. To edit the tracking code, simply click on the “Edit” option (pencil icon) that appears next to the label you have given to the code:

This will open the same pop-up window that you have used to add the code/script in the first place. Apply the modifications that you want, and then click on the “Continue” button again, to save them:

If you do not want to use the code/script anymore, click on the “Delete” option (trash icon) next to it:

Then, confirm in the little pop-up that opens, that this is indeed what you want to do, by clicking on the “Yes, delete” option:

Once you do that, the tracking code will be deleted and it will no longer be used on your theme.
This is how easily you can add (as well as edit or remove) a Google Analytics tracking code to your Thrive Theme Builder Theme. If you want to get more information about Thrive Theme Builder options and features, check out our knowledge base here.
Hopefully, this article was useful for you. If so, please give it a smile below 🙂