Besides adding the standard “Text Questions”, as well as the “Video Questions”, Thrive Quiz Builder also allows you to add “Audio Questions” to your quiz.
This way, the people who take your quiz can hear the question, and not just read it, making your quiz more interesting and interactive.
You can add an “Audio Question” to a quiz by following these steps:
Add Questions
Naturally, before being able to add the question, you will first need to either create a quiz (if you have not done that already) or edit an already existing quiz, that you want to add the “Audio Question” to, in your Quiz Builder Dashboard.
If you require detailed information on how to create a quiz, please check out this article.
Next, while you are on the Quiz Builder Dashboard, look for the “Manage” button from the questions card and click on it:

After you have accessed the questions editor, click on the “Add Question” button from the upper left part of the page:

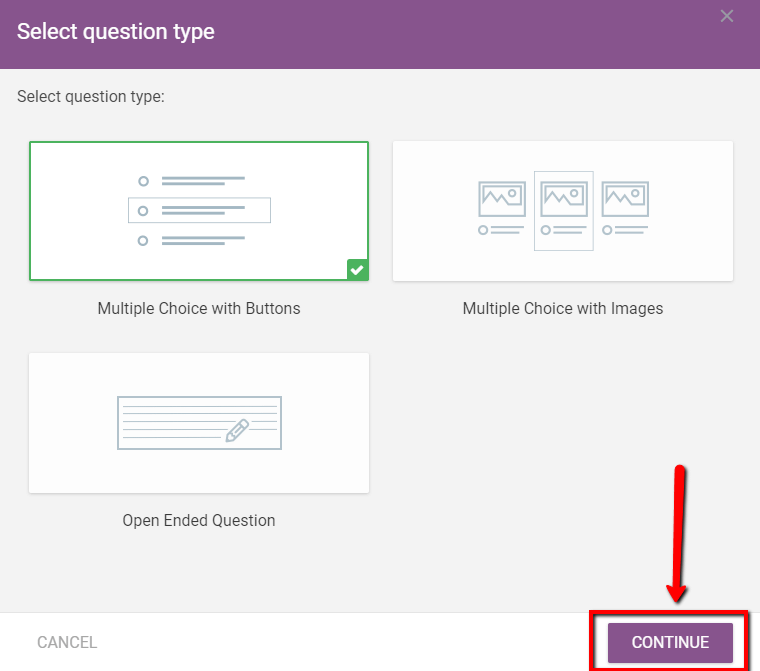
A pop-up will open with the available question types you can choose from:
- Multiple Choice with Buttons
- Multiple Choice with Images
- Open Ended Questions
You can choose whichever type you want from here. These three question types refer to the way users will be able to answer the “Audio” question, which we will add in the next step.
So, for instance, choosing the “Multiple Choice with Buttons”, will mean that users will be able to answer the “Audio Question”, by clicking on one of the multiple possible answers (in the form of buttons) you will provide them with.
Once you have selected the question type, click on the “Continue” button to go on:
Turn the Question Into an Audio Question
After you click on the “Continue” button, the pop-up will change into the “Add Question” pop-up. In the upper center part of the pop-up, you will see the type of question. By default, this is set to be a “Text Question”.
Click on the down arrow next to this default “Text Question” option:

This will open a drop-down where you can select which type of question you want to add. Click on the “Audio Question” to select it:

Then you will be able to add the actual “Audio Question”, using the new options that appeared in the first section of the pop-up:

The first option is the “Source” option. In order to upload the “Audio Question”, you will have to select the “Source” of the question from here. This will also determine the rest of the options that you will have for adding and customizing the question.
By default, the “Custom” source is selected. Click on the down arrow from the “Source” section to see all three “Source” options that are available:
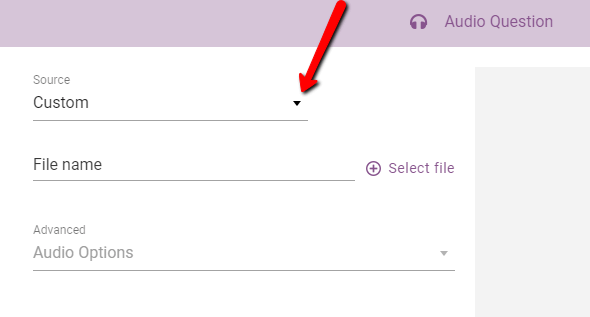
A drop-down will open with the available options:
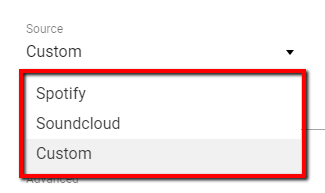
You can either upload a “Custom” file from your PC as your “Audio Question”, or you can add the audio file that you have uploaded on Spotify, or SoundCloud, as the “Audio Question” for the quiz.
To select one of these “Source” options, all you have to do is to click on them. Then, depending on which of these sources you have chosen, you will have different options for adding and customizing the “Audio Questions”, as follows:
Spotify
Add URL
In order to add an audio file from Spotify to your quiz, after selecting “Spotify” as the source of the question, you will have to enter the URL of the audio, in the “URL” field:

Tip: In order to get the necessary URL, access the “More” options (three dots icon) when viewing/listening to the Spotify audio and then, click on the “Copy link” option from the drop-down that appears.
After you have completed the “URL” field, with the link of the audio uploaded to Spotify, simply click anywhere outside the field, or press “Enter”. Then, the Spotify audio will be added as your “Audio Question”. You will see a preview of it on the right side of the pop-up.
Note: Please keep in mind that if the quiz taker, who listens to your “Audio question” with a Spotify source, is logged in to Spotify in the same browser, then, he/she will be able to listen to the whole “Audio question”.
However, if the quiz taker is not logged in to Spotify when listening to the “Audio Question”, then, only a preview (usually around 20 seconds) of the “Audio question” will be available for him/her. In this case, he/she will have to log in to Spotify, to be able to listen to the whole question.
SoundCloud
URL field
If you want to add an audio file that you have uploaded to SoundCloud, as your “Audio Question”, then first select “SoundCloud” as the source of your question. Then, complete the “URL” field with the link of the SoundCloud audio that you want to add:

Note: You can get the link to the SoundCloud audio if you click on its “Share” option when viewing/listening to it. A pop-up will open and it will contain the link that you need. Copy it and then insert it to the “URL” field.
After you have completed the field with the link, click anywhere outside the field or press “Enter”. This way, the SoundCloud audio will be added as your “Audio Question” and a preview of it will appear on the right part of the pop-up.
Advanced – Audio Options
Once you have added the SoundCloud “Audio Question”, there are a few “Audio Options” that you can use to customize it. To see these options, click on the down arrow next to the “Audio Options” from the “Advanced” section:

A drop-down will open with the available options and you can select which one you would like to use from them. All you have to do is to check the checkbox next to the option(s) you want to use:

- Autoplay – if you use this option, the “Audio Question” will start to play automatically when a quiz taker reaches it.
- Do not show artwork – using this option will mean that the artwork (the image associated with the audio file) will not be displayed in the “Audio Question”.
- Do not show the user – if this option is selected, the user (the name of the author of the audio file) will not be shown as part of the “Audio Question”.
Custom
The third source that you can use for your “Audio Question” is the “Custom” one. This is useful if you want to upload an audio file from your own computer as the Audio Question”.
After you have selected the “Custom” source, click on the “Select file” button from the pop-up:

This will open your Media Library and the audio files that you have in it. Look for the audio file that you want to use. When you find it, click on it to select it and then click on the “Select” button from the bottom right corner, to add it as the “Audio Question”:
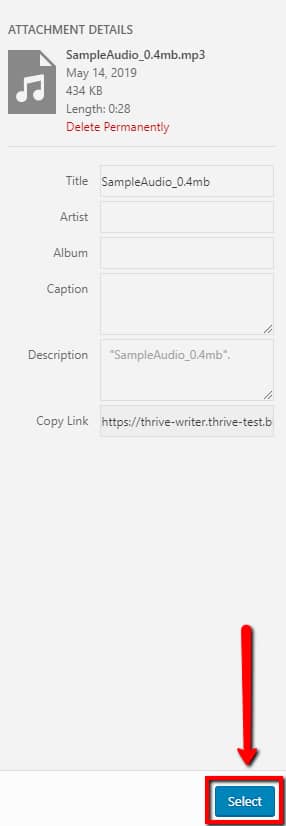
Note: If you did not upload the audio file to your library yet, then, use the “Upload Files” option from the Media Library to upload the file first:

Advanced – Audio Options
After you add the custom audio file as the “Audio Question”, you have two customization options for it. In order to see these, first click on the down arrow, next to the “Audio Options” in the “Advanced” section:

A drop-down will open containing the two options. To use either of these, all you have to do is to check the checkbox next to them:
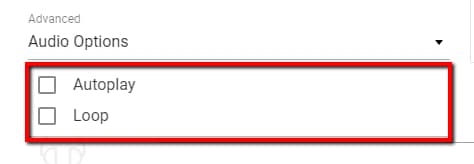
- Autoplay – if you use this option, the audio will start playing instantly, when someone will reach the “Audio Question”.
- Loop – if you check this option, the video will play over and over again (in a loop), until it is stopped.
Add the question text and description
After adding the “Audio Question”, (regardless of which source you have used for the audio file), you will also have to add a question text and a description for it, in the middle section of the pop-up, below the “Advanced” options and the preview.
Simply complete the “Question text” field with the text of this “Audio Question”, and the “Add Description” field with the description you want to be displayed for this “Audio Question”:

Set up the answer(s)
Once you have also added the question text and description, the next step is to set up one or more answers for the “Audio Question”.
First, add an answer by writing it in the “Answer” field:

Then, associate the answer with a category, points, or correctness depending on your quiz type, and use the additional “Weight“, “Tags“, or “Feedback” options as well for your answer.
Since the way in which you can do this, is exactly the same as in the case of “Video Questions”, if you need in-depth information about setting these up, please consult this article.
After you have finished setting up the “Audio Question”, as well as setting up every answer that you wanted for it, click on the “Save” button, from the bottom right corner of the pop-up:

This way, the “Audio Question” will be added to the quiz. If you wish to add more “Audio Questions” to the quiz, simply repeat the steps described in this article.
After you add more questions (regardless of their type), you can drag and connect them to each other in the questions editor, to create the desired flow of your quiz.
Once you have added every question that you wanted to your quiz, click on the “Save & Exit” button, from the bottom right part of the questions editor:

If you would like to find out more about Thrive Quiz Builder, check out our knowledge base section here.